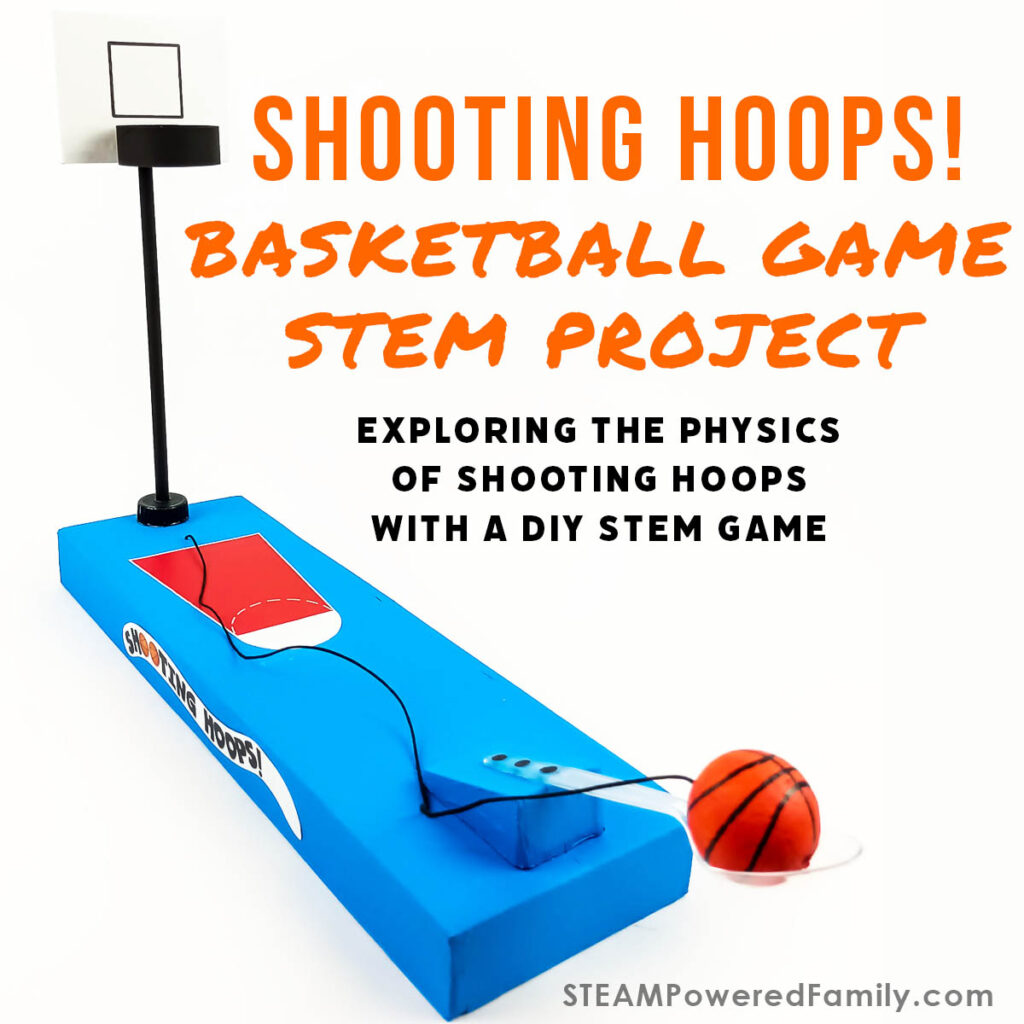
Shooting Hoops – Basketball STEM Project
So, you are in the middle of exams and don’t have the time to go to the basketball courts and have fun? We have the solution! In this amazing STEM lesson, we will make a basketball game to play on your desk at home or in the classroom on a rainy day. It is also a great project for the science fair, as it explores many scientific and STEM concepts including physics, math, and engineering.
DIY BASKETBALL GAME STEM PROJECT
Table of Contents
Disclaimer: This article may contain commission, paid partnerships, or affiliate links. We independently review everything we recommend. When you buy through our links, we may earn a commission from qualifying purchases.
The Physics of Basketball
Before we jump into our basketball STEM project (and you are going to love this DIY Basketball game!), let’s take a look at some key concepts related to the game of basketball. We need to understand the science of basketball, so we can relate it back to our project!
Gravity
Gravity is the invisible force that pulls the basketball down toward the ground. It’s what makes shooting and dribbling in basketball a little more challenging but exciting!
That’s why you must aim a little higher when you shoot, so the ball has a chance to arc (that is the curve the ball makes when you throw it) and sink it into the hoop. Without gravity, the ball would go in a straight line, and scoring would be much easier!
Force and Motion
Force is the key to movement in basketball. Pushing the ball harder when dribbling makes it move faster, allowing better court control. Passing involves pushing the ball with force to reach teammates quickly and accurately.
Motion is about how players move during the game, like running or shooting. Shooting relies on force and motion, as players push the ball towards the hoop precisely to score points.
So, force and motion work together to make basketball exciting, but we should always remember to use force wisely!
Want to dive more into the science force and motion? Try this Build a Pin Ball Game Project that explores Newton’s Laws of Motion.
Friction
Friction is a force that happens when things rub against each other. In basketball, friction plays a significant role in basketball ball movement.
When the ball touches the floor, friction helps it stop or change direction, similar to how shoes grip the ground when running to slow down.
Dribbling is also affected by friction, as it helps control and keep the ball close.
However, friction can slow the ball when shooting, causing it to fall toward the ground.
Overcoming this friction requires shooting with enough force.
The type of shoes worn in basketball matters too; those with good grip and patterns on the soles increase friction, aiding quick movements and direction changes on the court.
Traction
Traction helps players stay balanced and in control while moving on the basketball court. It helps you move quickly and change direction without slipping or sliding.
When you run, stop, and change directions on the court, your basketball shoes grip the floor and give you the traction you need to stay stable.
Traction also helps you with dribbling and shooting. When you dribble the ball, you must move your feet while controlling the ball.
Good traction from your shoes helps you stop and start quickly, making it easier to dribble effectively. That is why basketball shoes have special patterns on the soles.
Angles and Trajectory
One of the biggest challenges in basketball is getting that ball into the hoop. Why is it so hard? Well, it’s because of something called angles and trajectory.
In basketball, the angle at which you shoot the ball is important, this is often referred to as the “launch angle”. When you shoot, you want to aim for the hoop at just the right angle to increase your chances of scoring.
The trajectory is the path the basketball takes in the air. When you shoot the ball, it goes up into the air, follows a specific path, and, thanks to gravity, comes down. Hopefully into the hoop if you have done everything right! The trajectory is affected by how you release the ball, the force you use, and the angle you shoot.
When everything comes together, you get the perfect launch angle and shot, and the basketball goes through the hoop!
This is perfect launch angle can vary for different players, because each player is a different height, and shoots with a different velocity. Not to mention the changes required due to game play when shooting from different parts of the court.
Angles and trajectory also affect passing. When you pass the ball to a teammate, you must choose the right angle and trajectory to ensure the ball reaches them accurately.
Understanding angles and trajectory helps you make better shots and passes in basketball.
Energy and Transfer
Your body is a source of energy, powering movements like running, jumping, and shooting.
When running, your stored energy is converted into motion, allowing you to move swiftly on the court. Energy also plays a big roll in getting that perfect vertical jump!
Energy transfer is essential too, like when passing the ball to a teammate. You are transferring energy from your body to the ball to propel it to their hands.
Shooting also involves energy transfer. When shooting the ball, your body imparts force and power to the ball, determining its speed and strength toward the hoop. The energy doesn’t vanish; when the ball hits the hoop or floor, it’s transferred and transformed, producing sounds like bouncing or swishing.
Energy plays an important role in various aspects of the game, driving actions and reactions throughout.
Aerodynamics
Aerodynamics is all about how objects move through the air.
When passing the ball, the ball’s shape and position affect the air resistance it faces. A well-thrown pass makes the ball faster and more accurate when reaching your teammates.
Players can use aerodynamics to their advantage. They can intentionally use air resistance to make tricky shots, increasing scoring chances.
Learn more about aerodynamics in our Paper Airplane STEM Challenge.
Balance and Stability
Balance is about staying upright and in control while moving and making different basketball moves. When you’re balanced, you’re less likely to stumble or fall.
Stability is all about staying steady and not wobbling or losing your balance. It’s like a tree with deep roots that don’t get easily pushed around. When you’re stable, you can move quickly and change directions without losing control.
Balance and stability play a big role in the game of basketball.
Both are very important for defense. These superpowers make it harder for opponents to get past you and score.
Want to know more about the physics of Basketball? Check out this book on the physics of basketball or this article.
Now that you understand the science of basketball, let’s make a basketball game that incorporates all of this science into one fantastic STEM build and science backed basketball game. We call it, “Shooting Hoops!”
Basketball STEM Game Tutorial Video
Check out our video tutorial showing step-by-step this STEM project build. We find the easiest way to understand the directions of these STEM projects is to watch us build them. If you can’t see this video, or require closed captioning, please visit the STEAM Powered Family YouTube Channel.
BUILD A BASKETBALL DIY GAME
Materials & Tools
Cardboard sheets (double wall) or an old cardboard box
Small piece of black craft paper
Some sand (any dry sand or pebbles will work)
Brown paper tape (optional)
Piece of thin string or thread – 50cm
Small polystyrene ball (4cm)
Bottle cap
8mm wooden dowel stick – 30cm length
Wooden skewer or an awl
Toilet roll or cardboard tube
Brown paper tape
Paper punch
Large sewing needle
Glue stick
Glue gun
Hobby knife with cutting board
Scissors
Pencil
Ruler
Soldering iron or a drill
Some acrylic paint and a paintbrush
Plastic spoon
Printable Templates
The printable template for this project for cutting out the cardboard pieces, plus the graphics, are available to the STEAM Powered Family mailing list members. Simply enter your email to unlock.
Material Alternatives
We love to make use of what we have available in our projects, so before you run out and buy a bunch of supplies, here are some alternative material options.
Brown paper tape – Masking tape works as well. This just helps with the final look of the game, so it has finished edges.
Polystyrene ball – ping-pong ball or a mini squish basketball like this one
Cardboard tube – paper or plastic cup (it should be big enough for the ball to fit through easily). Using a cup may be more like the basketball net which might appeal to some kids.
8mm wooden dowel – the dowel can be slightly thinner or thicker, you can also use a stick or branch from your garden, but it must be 30cm long.
Plastic spoon – Use jumbo craft sticks.
SAFETY NOTE
When using a hobby knife or a glue gun in this project, an adult should do these steps or provide supervision to older, competent students. Always use caution and common sense and put safety first.
Directions
Gather your supplies. Download the printable template, print and cut out all the template pieces.
Next, cut out the cardboard to the dimensions and shapes indicated on the printable template.
IMPORTANT – It is very important to note that for the top and bottom, and two long sides, you need to double the length of the printable templates. You can do this by printing off two of the templates, cutting them out, then taping them together.
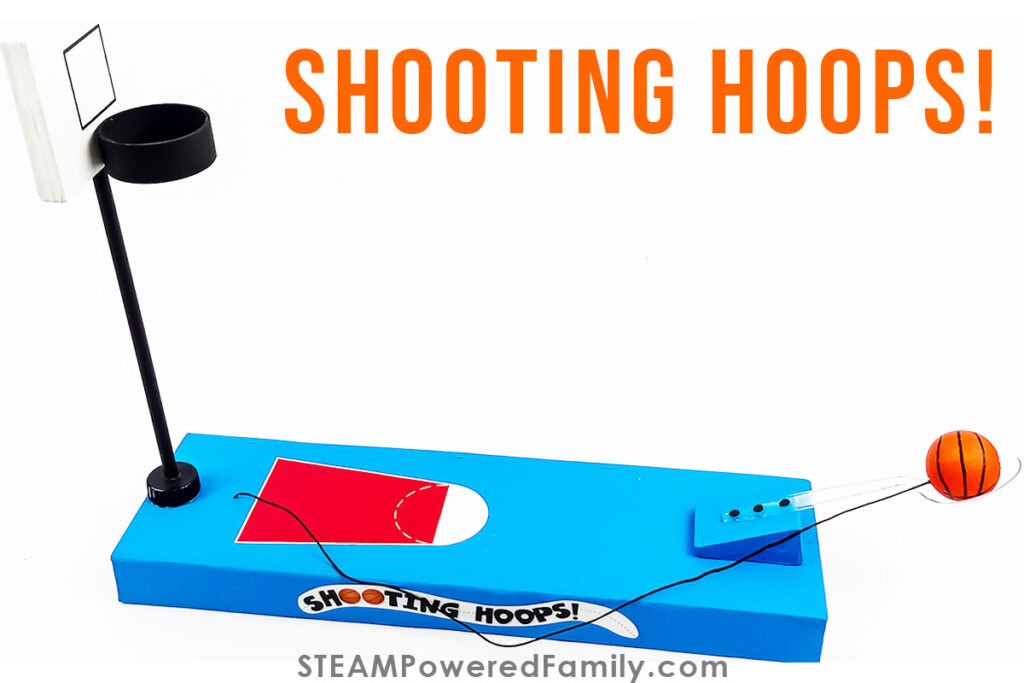
Build the Base
The first thing we are going to do is build the base. Start by gluing the two long side pieces onto the base (the bottom piece). Next, glue the two short side pieces onto the front and back sides of the base.
Now, before we glue on the top piece, we need to make a few holes.
Place the template onto the top piece and make a small hole with a wooden skewer or an awl where we will thread the string. Let’s call this Hole #1. This hole is 5cm from the edge, in the middle of the backside.
Make a mark with a pencil 2cm from the edge on the same side for the placement of the basketball hoop post. Let’s call this Hole #2. Use the skewer to make a hole here too.
Add the thread to Hole #1
Cut the string or thread to a length of 50cm and make a double knot on one end. Check that the string fits through the hole you made. If not, use the skewer or awl to make it the correct size.
Thread the string through the hole from the bottom of the piece of cardboard and pull it out so that the knot reaches the hole. The knot should not be able to pull through the hole. If it does, make a bigger knot.
Put some hot glue over the knot to hold it in place.
Using an 8mm drill bit or a chop stick, make Hole #2 a little bigger. You can check the sizing by using your dowel. It should fit snuggly in the hold.
Put a 1cm layer of sand into the bottom of the box. This helps to provide some weight to the game so it doesn’t move during play.
Finally, glue the top piece onto the base.
Building the Basketball Hoop and Launcher
Starting with the board behind the net, glue all four pieces together, ensuring the two pieces you cut with a channel are sandwiched between the top and bottom.
Now build the wedge which will form part of your catapult launcher. We found the easiest way to build the wedge was to assemble it in this order:
- Glue the wedge back onto the bottom piece.
- Next, glue the top piece onto the wedge back.
- Glue the open edge down together.
- Glue the two sides onto the wedge to complete it.
Finishing Touches
Cover all the edges of the game pieces with brown paper tape. This step is optional but gives a more finished look to your game.
You can now paint all the pieces using any colors you want. Don’t forget to paint the hoop, if you are using a cardboard tube, and the ball and post too.
PRO TIP! Remember that the base is filled with sand, so be careful when you paint the base, and don’t spill any sand out. It’s going to be difficult to get the sand back in! Keep shaking the box to get the sand down to the opposite end.
Finishing the Basketball Hoop
Start by making a hole in the bottle cap for the dowel stick. There are a few different ways you can do this, but all should be done by an adult or older kids should be under adult supervision. You can use a drill, and drill a hole, or we found using a soldering iron was the easiest way. But be careful and do it in stages as the soldering iron is very hot, and the hole could become too big for the dowel.
Cut your toilet roll about 3cm thick to create a ring. This will be the hoop for the basketball net.
Glue the hoop onto the bottom edge of the backboard.
Squeeze a lot of glue into the channel of the backboard and push the dowel all the way up into the hole. Make sure that the dowel is straight!
Push the bottle cap onto the dowel.
Squeeze a lot of glue into the hole where the dowel must go into the base and push the dowel into the hole. Make sure that the basketball hoop stands up straight while the glue dries.
Once it is dry, push the bottle top down to touch the game board and make a pencil line around it.
Raise the bottle top, put glue around the inside of the pencil line you just made, and push the top down into the glue.
Your hoop is done!
If your kids want to get really creative, they can make a net to go on the hoop out of some string.
Building the Launcher
Mark the middle of the board lightly on the opposite side of the hoop, 1cm from the edge, and mark the middle of the back of the wedge too.
Glue the wedge down onto the base.
Make a mark 4cm up from the end of the plastic spoon and glue it onto the top edge of the wedge.
Punch three black circles from a black piece of paper and stick them onto the spoon to look like “screws.” This is optional, but makes it look nice.
Making the Basketball
Using the needle make a hole through the middle of the polystyrene ball.
Now paint the ball orange and add black strips so it looks like a basketball.
Once it is dry we are going to attach it to a string. Using the sewing needle, thread the string through the eye of the needle.
Push the needle through the hole you already made in the ball. Push it all the way out the other side.
Remove the needle and gently pull the string back up into the ball.
Put a little hot glue into both holes to hold the string in place.
PRO TIP! Please do not put too much hot glue into a polystyrene ball, as it will melt! For kids, it may be easier to use school glue for this step.
Finishing Touches
Using the logos from the templates, stick the logos on either side of the board and the court markings in front of the basketball hoop post.
Or get creative and come up with your own designs for your game!
Put the ball onto the spoon, take aim, and shoot!
Troubleshooting
Having trouble sinking those shots? Remember, this is a game, you shouldn’t be sinking every shot, but if it seems harder than it should be, there are a few tweaks you can make. So let’s go back to the science of the perfect basketball shot to get your game on point! Some things to consider:
- Do you need to change the length of your string?
- Is something crooked or off center?
- Do you need to adjust the amount of force on catapult?
For more Sports STEM try our Mini Golf STEM Project.
Basketball Game Night Printable Pack
Want more Basketball fun? Who doesn’t? Members of the STEAM Powered Family mailing list get access to this Basketball Game Night Printable Pack that is slammed full of fun for your next hoops game night or party. It’s 17 pages of B-Ball Fun!
Catapult Science
In this game, we used a catapult to launch the ball. Why a catapult, you ask? Let’s look at how a catapult works.
A catapult is a special device that uses energy to launch objects. A catapult typically has a long arm or lever (the handle of the plastic spoon) and a cup (the bowl at the end of the spoon) to hold the object (the ball) you want to launch. The other end of the arm is attached to a base or frame (the wedge on the board). When you want to launch something, like a ball or a small toy, place it in the catapult cup, take aim, and fire!
Catapults have been used throughout history for various purposes, like launching projectiles in battles or for fun experiments. Some catapults use different mechanisms or additional parts, but the basic idea is the same: storing and releasing energy to launch objects.
Catapults are a fun way to explore the concepts of potential energy, elasticity, tension, and kinetic energy.
More Fun Catapult Projects
Want to learn more about catapults? We have so many fun catapult projects including:
- The Classic Popsicle Stick Catapult
- Catapult Cannons
- Catapult Design STEM Challenges
- Candy Catapults
- Catapult Bowling
- And even more catapults!
Enjoy making the “Shooting Hoops Game,” and have fun making those perfect shots!