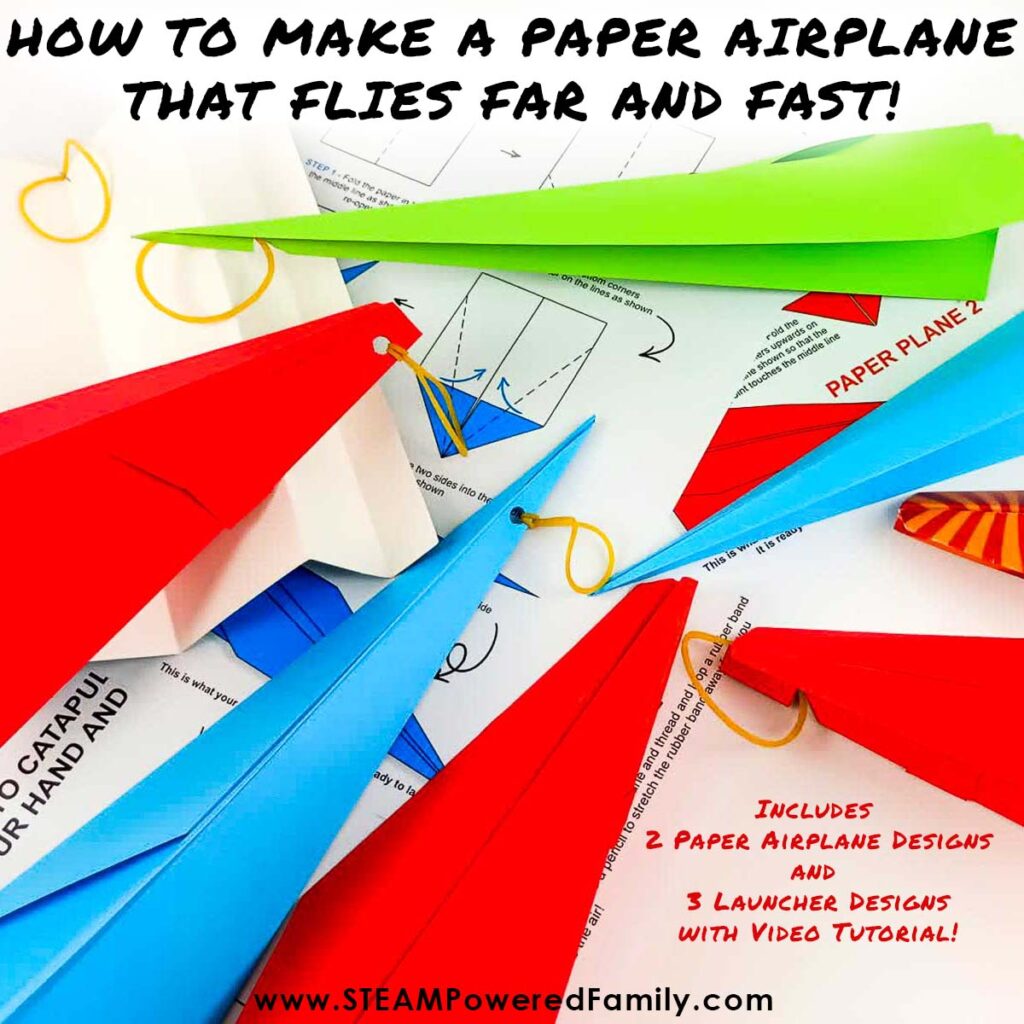
How to Make a Paper Airplane with Launcher that Flies Far
Kids love making paper airplanes, but often the results are a little less exciting than they would like. Today we are going to explore how to power up those paper airplanes so they fly far and fast. We have two different paper airplane designs and three different launchers for you to build and test with your kids in this STEM Project that is perfect for summer fun!
Best Designs for Paper Airplanes with Launchers
Table of Contents
Disclaimer: This article may contain commission, paid partnerships, or affiliate links. We independently review everything we recommend. When you buy through our links, we may earn a commission from qualifying purchases.
I know that I spent a lot of time folding and flying different kinds of paper planes as a child and teenager and I am sure you have too! Making and flying paper planes is a fun and exciting activity all year round.
You could spend a rainy day indoors folding a whole lot of different planes and when the sun comes out you can go outside to fly, test, and even compete against each other with your planes.
This kind of activity is great for the whole family and is enjoyed by people of all ages! It is also a great school activity as kids will learn engineering, science, and forces as they experiment to create the best type of plane using different folds, wings, corners, edges, and shapes.
In this fun activity you will learn to fold two different types of classic paper airplanes and make three different launchers to get the best performance for these planes.
The Science Behind Paper Airplanes
Paper airplanes are simple toys that demonstrate the basic principles of aerodynamics and the way they are folded and shaped affects how they fly. With the right airplane designs you can create pieces that fly far and fast. But with the wrong design your paper airplane may barely take off before crashing to the ground. There are a few scientific factors that decide why some planes fly faster or farther than others.
Let’s look at these factors and expand our science vocabulary.
Lift
Lift is the force that helps an airplane stay up in the air. Different paper airplane designs create lift in different ways. For example, some airplanes have wings that are longer or wider, while others have wings that are more curved. These features help the airplane catch the air as it moves forward. When the air moves faster over the curved or longer wings, it creates a force called lift, which pushes the airplane up. So, designs that have bigger or curved wings tend to generate more lift and can fly higher and farther.
Check out our Hovercraft Project for a demonstration of this concept
Drag
Drag is the force that tries to slow down an airplane as it moves through the air. Some paper airplane designs have sleek and streamlined shapes, while others may have more folds and creases. Smooth and streamlined designs help reduce drag because the air can flow smoothly around the airplane. Less drag means the airplane can move through the air more easily and go faster and farther.
Weight
Weight is the force that pulls objects down towards the ground. Lighter paper airplanes can stay in the air longer because they are not pulled down as much by gravity. So, using lightweight paper or making a lighter airplane by using less paper can help it fly longer distances.
Balance and Stability
Balance and stability are important for a paper airplane to fly well. Some designs have features like fins or small folds at the back, which help keep the airplane steady and balanced in the air. This stability allows the airplane to fly straighter and farther.
Making Paper Airplanes Fly Far with Launchers
In this project, you will make three different launchers to get your airplane flying higher or faster. When you throw a paper airplane with your hand, you can make it go a certain distance, but sometimes it might not go as high or as fast as you want. That’s where a paper airplane launcher comes in to help!
A paper airplane launcher is like a special tool that gives the airplane an extra boost when you launch it. It helps the plane go higher and faster by doing a few things:
More Power
When you use a launcher, you can pull it back and let it go to launch the plane. The launcher has a lot of power, so when you release it, the plane gets a big push forward. This extra power helps the plane go faster right from the start.
Better Launch Angle
The angle at which you launch the plane is also important. With a launcher, you can set the angle just right. By launching the plane at a slightly upward angle, it helps it go higher into the sky. When the plane goes higher, it can stay in the air longer and fly farther.
Consistency
Sometimes, when you throw a paper airplane by hand, it might go in different directions or not go very far. But with a launcher, it’s easier to be consistent. That means you can launch the plane in the same way each time, which helps you figure out what makes it go higher and faster. It also helps you compare different designs to see which ones work better.
It’s time to make and test two different paper airplanes!
Paper Airplanes with Launchers Tutorial Video
Watch the video to see how to fold the paper airplanes and make the launchers. Then see ours take flight! If you can’t see the video, find it on the STEAM Powered Family YouTube Channel.
How to Make Paper Airplanes & Launchers
Materials & Tools
Different colours of A4/Letter paper, and maybe different weights of paper so you can test the results.
A few pieces of cardstock
Ruler
Pencil
Hobby knife
Hole punch
Stapler
Rubber bands
Scissors
Stopwatch and a measuring tape for racing the planes
How to Make Paper Airplanes with Launchers
The Secret to Paper Airplanes that Fly Fast and Far!
Follow these tips to ensure success with your paper airplanes.
- Press every crease well. Sharp creases help a plane cut through the air smoothly and reduce drag. Use the back of your nail or the plastic part of your scissors to strengthen the creases and make them sharp.
- Always fold on a hard, flat surface so that you can make firm creases.
- Make sure your wings are angled up before launching. This helps with stability.
- Follow the folding instructions carefully. When folding, keep checking to make sure your model looks like the step-by-step drawings. If it doesn’t … don’t panic! Just unfold one or two of the new creases until your model looks like an earlier drawing, then try again.
- Want even more distance? Consider adding a bit of tape or a paperclip to the nose. This helps with stability by moving the center of gravity forward, so the nose doesn’t go straight up, forcing your paper airplane to immediate crash down.
Folding Paper Airplanes
Paper Airplane Design 1
Grab a piece of paper. A4 or letter (printer) paper is perfect. Follow all the steps in the correct order.
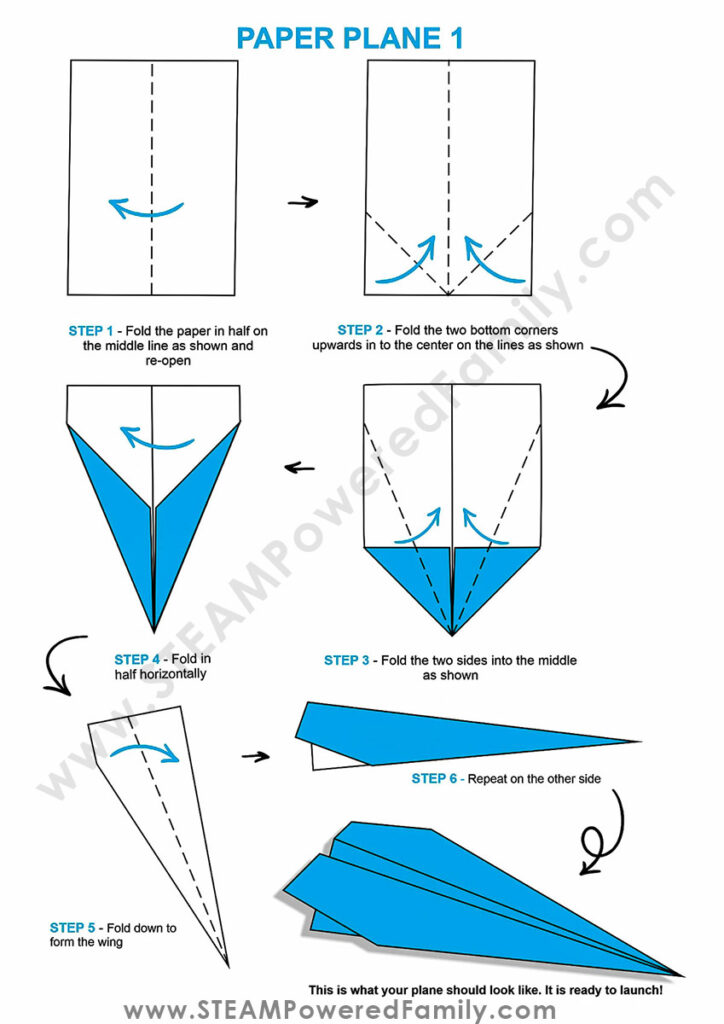
- Fold the paper in half on the middle line as shown and re-open.
- Fold the two bottom corners upwards into the center crease.
- Now, fold the two sides into the middle crease.
- Then, fold in half horizontally.
- Fold down to form the wing.
- Repeat on the other side.
- Press those edges to get them nice and crisp and make that dart nose sharp!
- Now lift the flaps so they come up and make nice wings.
Your first plane is ready! Let’s make the second plane!
Paper Airplane Design 2
Using another piece of A4 or letter (printer) paper, follow all the steps in the correct order to create this second paper airplane design.
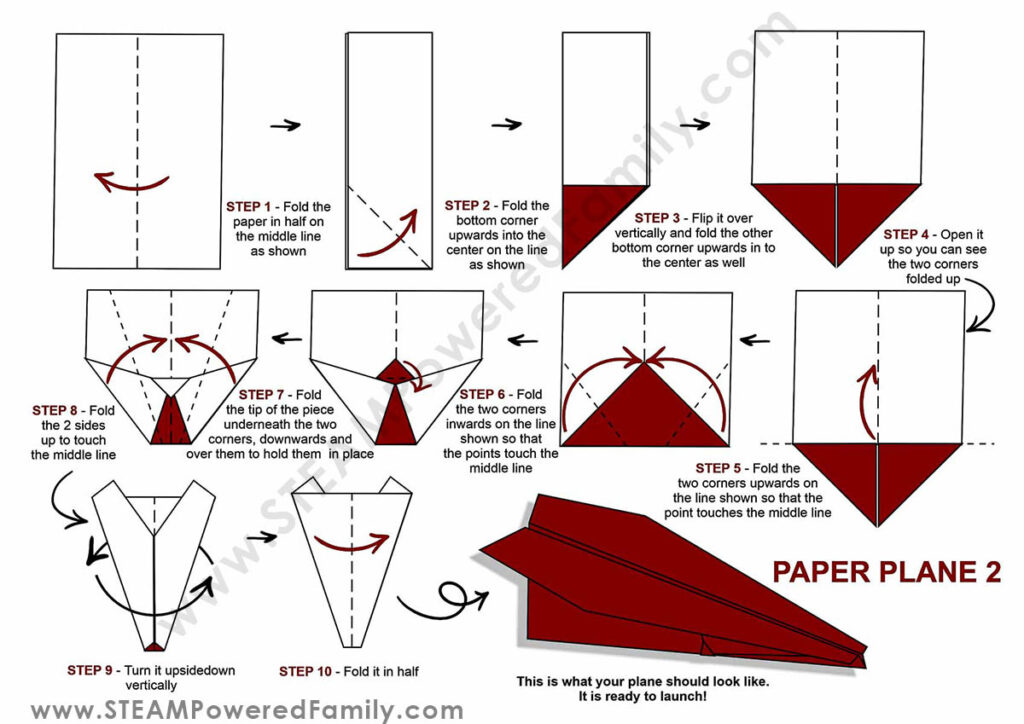
- Fold the paper in half on the center line as shown. Remember to make nice crisp creases.
- Fold the bottom corner upwards into the center on the line.
- Flip it over vertically. Now fold the other bottom corner upwards into the center as well.
- Open it up so you can see the two corners folded up.
- Fold the left corner then the right corner upwards on the line shown so that the point touches the middle line.
- Next fold the two corners inwards on the line shown so that the points touch the middle line.
- Fold the tip of the piece underneath the two corners, downwards and over them to hold them in place.
- Fold the two sides up to touch the middle line.
- Turn it upside-down vertically.
- Fold it in half.
- Now hold the bottom of the plane, and lift the wings up.
Your second plane is ready! Let’s make the three launchers!
Directions for Cardstock or Cardboard Airplane Launcher
You can make this design with cardstock or cardboard. If you use cardboard, simply make sure you score the cardboard so you can fold it neatly.
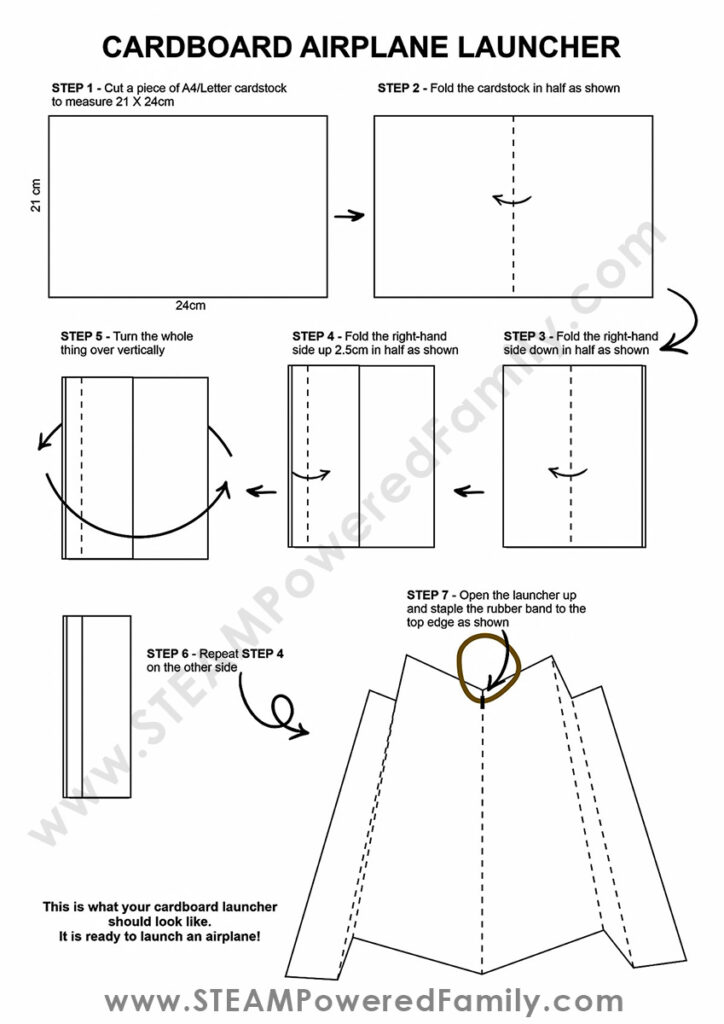
- Cut a piece of A4/Letter cardstock to measure 21 X 24cm.
- Fold the cardstock in half as shown.
- Fold the right-hand side down in half as shown.
- Fold the right-hand side up 2.5cm in half as shown.
- Turn the whole thing over vertically.
- Repeat STEP 4 on the other side.
- Open the launcher and staple the rubber band to the top edge as shown.
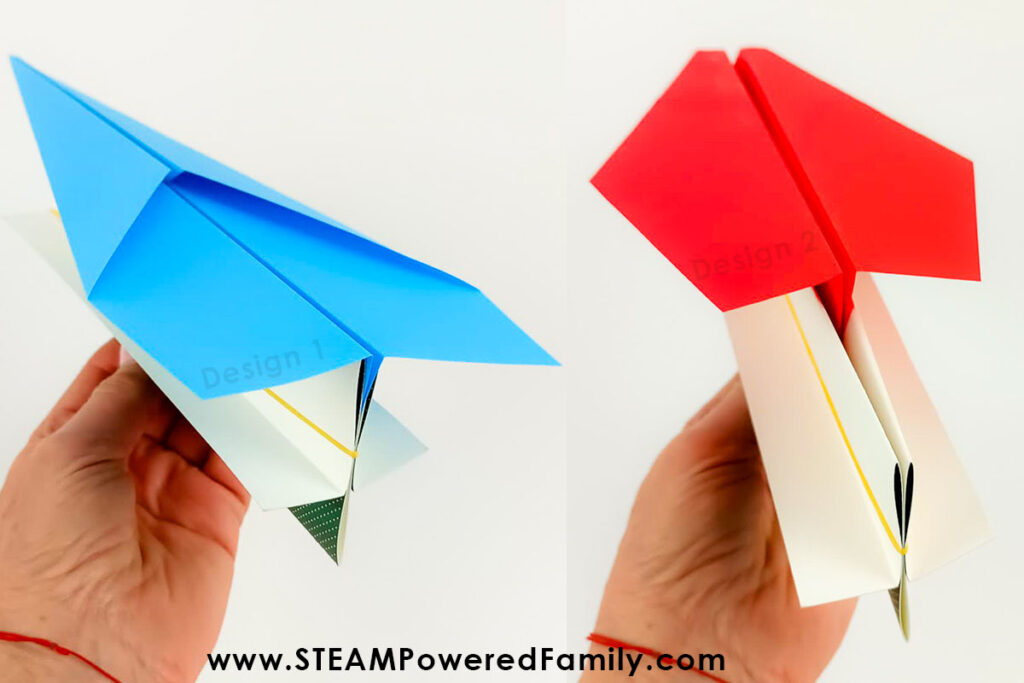
Your cardboard airplane launcher is ready! Here it is pictured with both airplane designs.
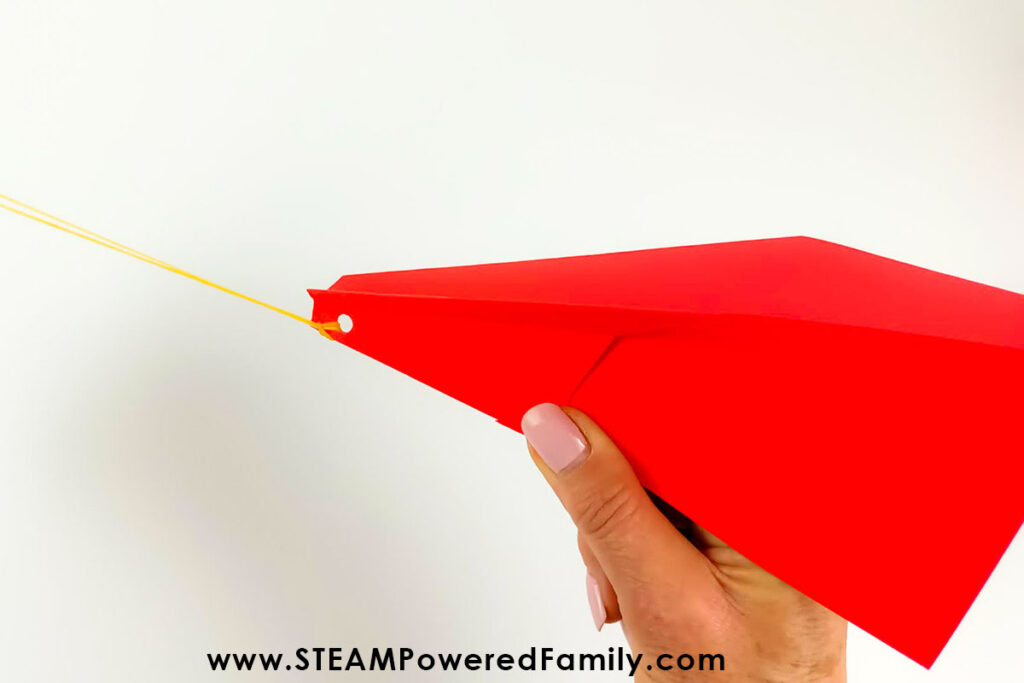
Rubber Band Paper Airplane Launcher
Another simple way to build a paper airplane launcher is to use elastics. There are two different ways you can do this. Both are quite easy, but kids may prefer the hole method if they have difficult holding the paper airplane and elastic on the notch.
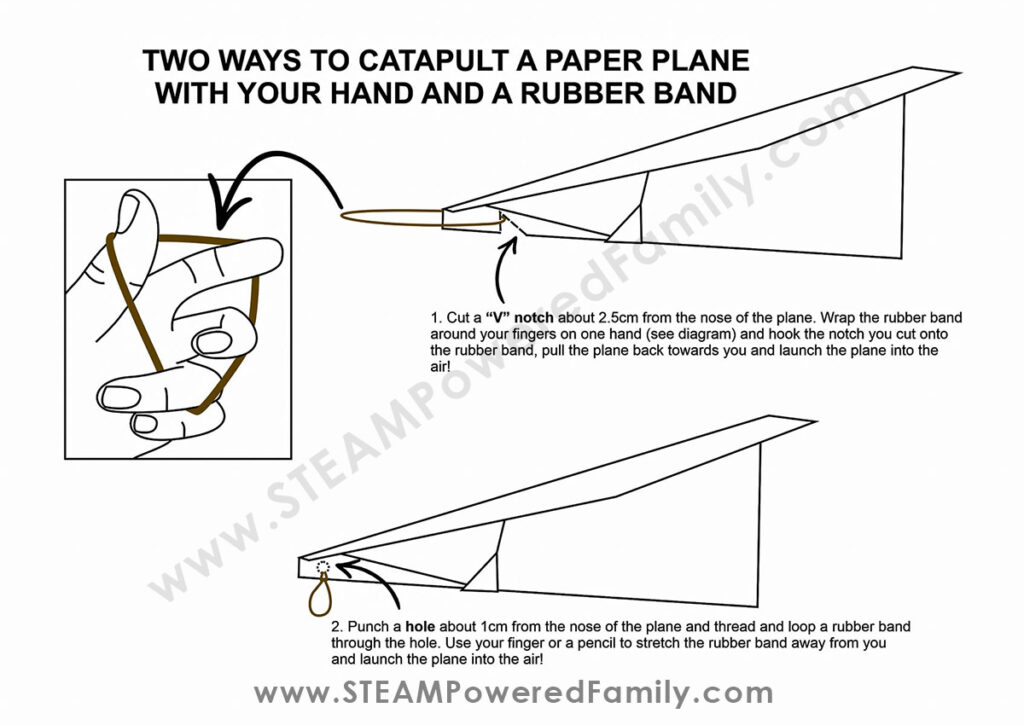
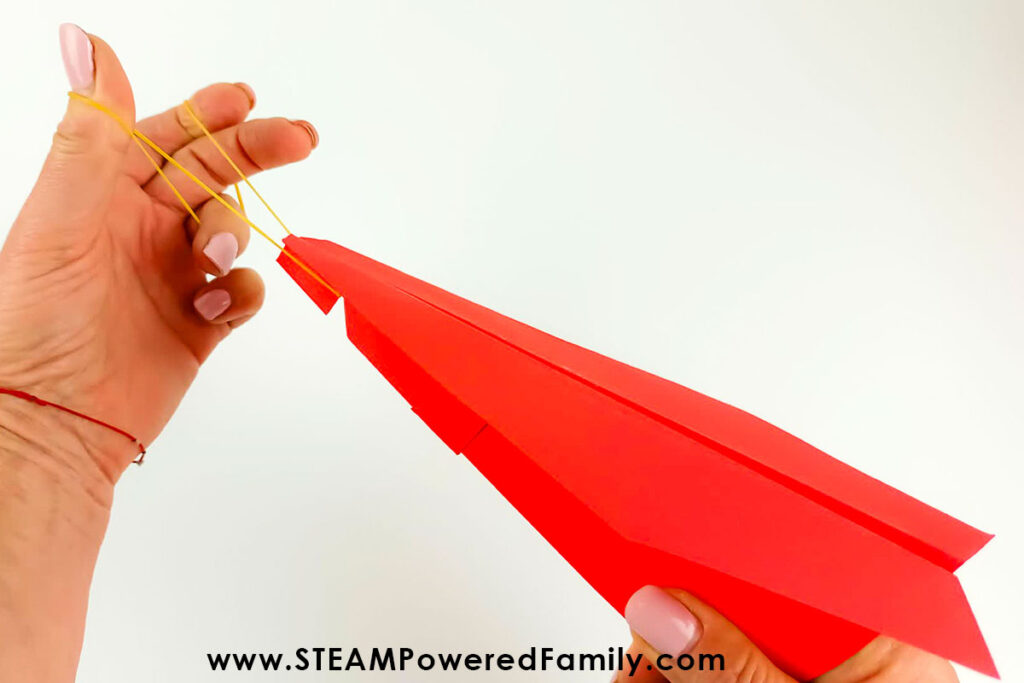
Cut a “V” notch about 2.5cm from the nose of the plane. Wrap the rubber band around your fingers on one hand (see diagram) and hook the notch you cut onto the rubber band, pull the plane back towards you and launch the plane into the air!
Punch a hole about 1cm from the nose of the plane and thread and loop a rubber band through the hole. Use your finger or a pencil to stretch the rubber band away from you and launch the plane into the air!
PRO TIP! You can use a small piece of tape or paper hole reinforcers to strengthen the notch and the punched hole before cutting or punching.
Fly Your Paper Airplanes!
It’s time to fly your paper airplanes! Take them out to the park, or into the school gym, and see how far they’ll go! You’ll probably attract an audience. Give them the show of their lives! Test and see which designs go the fastest and which go the farthest. Then brainstorm how you can make your paper airplane designs with launchers, even better!
IMPORTANT SAFETY NOTE
Never throw a pointed-nosed plane at anyone – the nose can be very sharp and dangerous! Make sure you test this is a wide open area like a schoolyard or large field.
Extension Ideas
What do you think would need to do to one of the planes you made in this activity to change the flying speed or height?
What would happen if you changed the type of paper?
Design and build other paper airplane designs. We have a few other paper airplane design ideas here. Test out the aerodynamic activity of each one! Which one flies the longest, and the furthest?
Design you own launcher using other materials like wood, popsicle sticks or chopsticks. We made a fantastic mini launcher out of craft sticks, how could you adapt this design for paper airplanes?
Power up with an eco-glider that demonstrates the Magnus Effect in this fun and simple STEM activity.
Can you design a plane that looks completely different to a regular plane? Perhaps a paper helicopter or even a bird. Paper crafts are inexpensive and fun. Get creative!
Or, try powering up and creating a Hovercraft with this cool project.
Why not have a paper plane making competition and involve the whole family, class or even the whole grade! This activity would make a fun science or STEM fair activity. Set up an area marked out with tape to start the flight and use a stopwatch and tape measure to see who the winner might be.
Can you up the power by using our Catapult Cannon design to make something that will work with paper airplanes?
We found this fantastic project from NASA about designing paper airplanes that fly farther. What do you think will happen if you combine their suggestions for airplane designs with this activity? Can you beat their distance record?
Remember to have fun, be creative, and enjoy the process of exploring the world of paper airplane flight!
FAQ
It can take about 10-15 minutes, or longer, depending on how complex.
Well, that depends. It can honestly go either way. The one thing that is true is that the rubber band will have more force and push to help launch, which, in theory, should make the airplane go further than throwing it by hand. Regardless, this would be a super fun experiment to test and try. Launch using the tips above, and then throw by hand. Measure the distance, and discuss!
You have to test out different techniques, shapes, and more. This is where projects become fun for kids. They can fold top corners and bottom corners, make parts longer or shorter, try different thicknesses of paper – the options are endless. Once they test all their theories, they can then see which way worked best so that they can tell others the best way to make the paper airplane go further.