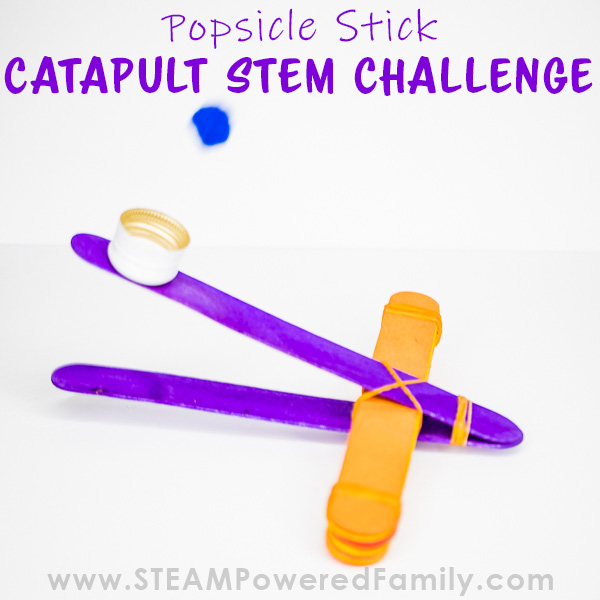
Popsicle Stick Catapult
It’s one of the most iconic simple machine STEM projects for kids. Building the trusty catapult! It is an incredible STEM activity with a strong focus on engineering, but also math and physics all rolled into one amazing learning project. Today we tackled the iconic Popsicle Stick Catapult.
CATAPULT STEM PROJECT FOR KIDS
Table of Contents
Disclaimer: This article may contain commission, paid partnerships, or affiliate links. We independently review everything we recommend. When you buy through our links, we may earn a commission from qualifying purchases.
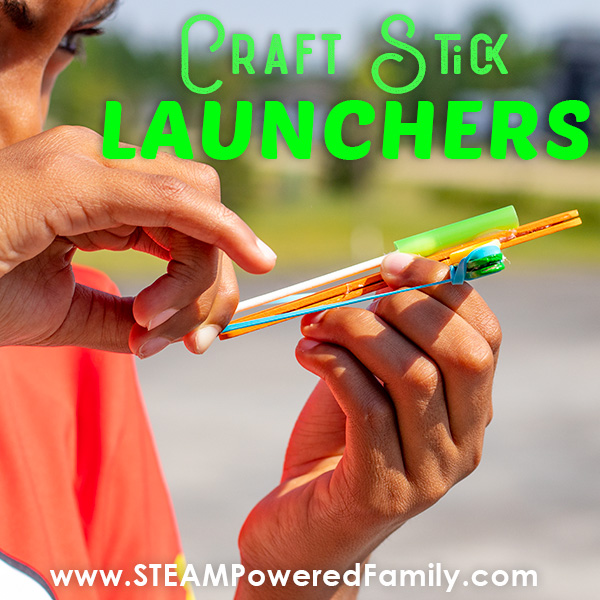
In the past we have built some really fun projects. Our Craft Stick Launchers were a massive hit both with our kids and with kids around the world. But there was one thing we had never done. At least not as a stand alone STEM project. And that was building the much loved catapult! So this week we set about fixing that.
Building catapults is an Engineering challenge, where students learn how to follow a design process, but also learn physics and maths.
The History of the Catapult
This classic STEM activity was first invented in 400 BCE! Invented by The Greek Dionysius the Elder of Syracuse. This weapon of warfare proved incredibly effective and was a key weapon of warfare until Medieval times.
Some catapults could launch projectiles weighing over 350 pounds over 300 feet!
It’s design may be relatively simple, but it packs an incredible punch and is a wonderful way to dig into STEM for all ages. It’s no wonder catapults still capture the imaginations of students everywhere.
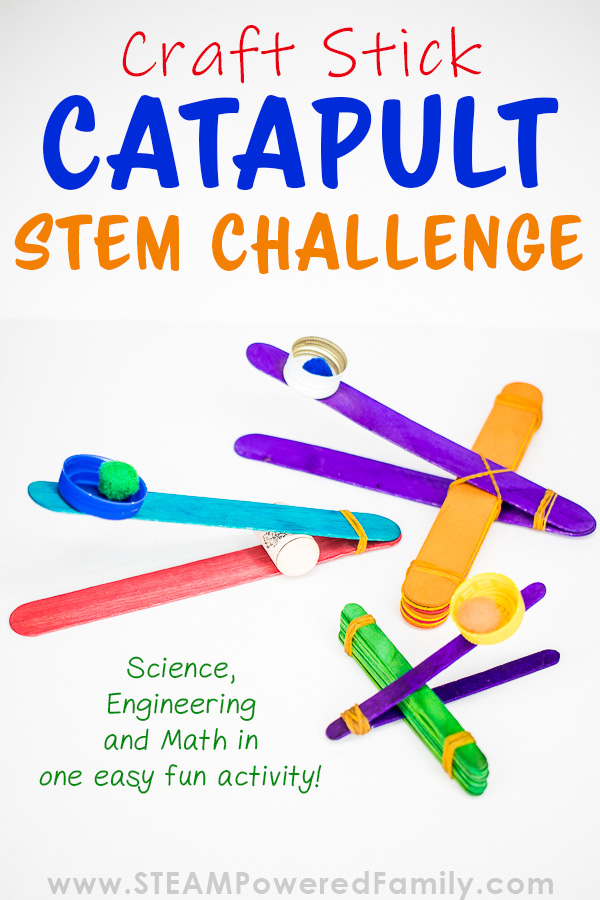
How To Build a Catapult with Popsicle Sticks
The most popular, durable and easy way to design a Catapult is using the ever popular craft sticks, also known as Popsicle sticks. To start I will shared a common and simple design using limited supplies, then I will share an even better design we developed.
Supplies
- Craft Sticks (Jumbo craft sticks work better than regular craft sticks but you can use either size!)
- Rubber bands
- Plastic bottle cap (or engineer a replacement with craft sticks for older kids)
- Glue
- Paints and Paint brushes (optional)
Instructions
Just like we did with the Craft Stick Launchers, I encourage you to have your kids customize their catapults by painting the craft sticks and even the bottle cap if you don’t already have coloured popsicle sticks. You can do this at the beginning of the project before you start building, or wait and paint it once it is built (this is more difficult).
If you chose to paint first, wait for the paint to dry before assembling.
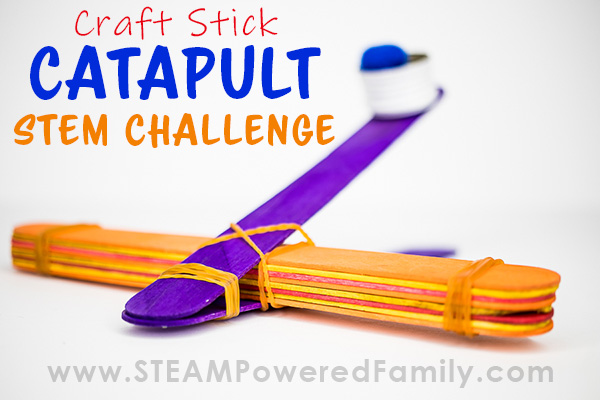
To start engineering your catapult, stack eight craft sticks together, one on top of the other and wrap elastics around the ends to hold them together. This helps create some additional stability and strength. This stack is going to be your fulcrum.
Take a single craft stick and place it perpendicular to the stack on the bottom, start by setting the fulcrum about a quarter of the way up the single stick. For extra stability you can slide the popsicle stick between the last stick in the fulcrum, so it is sandwiched in.
Add a second single stick on top of the fulcrum, also perpendicular to the stack so that it lines up with the bottom stick. Attach the two sticks with a rubber band on the end so you create a V shape.
Pro Tip:
If you are having difficult keeping the elastics in place at the end of the V you can put a small notch on either side of the popsicle sticks, or glue on a small button (see craft stick launchers for a similar application). This creates a little ledge for the rubber band to sit on so it doesn’t slide off.
You can secure the V to the fulcrum using another rubber band in a figure 8 pattern. This is completely optional. We prefer not to do this so we can easily adjust our designs to get the most power, however, if you have younger kids the stability and structure will make it easier for them to use.
On the opposite end from the rubber band attaching the two sticks, glue on the bottle cap. Ensure you leave a little bit of room at the end for your fingers to push down to launch.
You made a catapult!
Simple Catapult design with EXTRA power!
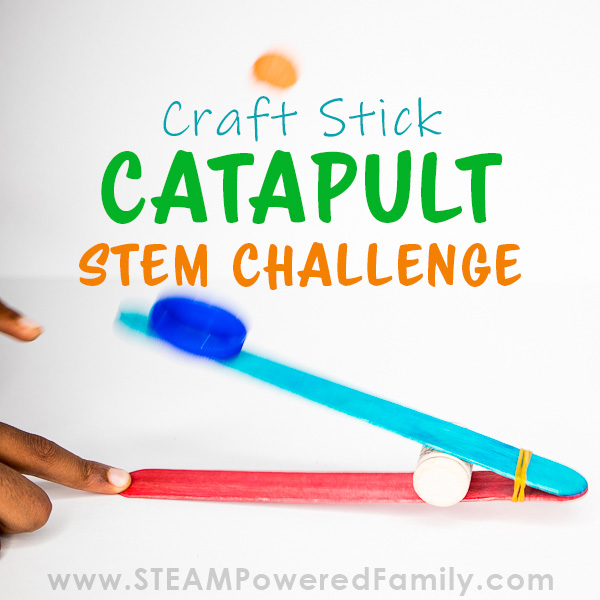
After studying our catapults (we made them with both regular popsicle sticks and jumbo sticks), we decided there was something we could easily do to power up our designs.
Put a cork in it!
That’s right, instead of using a stack of craft sticks for our fulcrum, we thought a round, somewhat springy cork would make a better fulcrum.
So we built that design too, and it worked! Our results were far superior with the cork.
But I’m getting ahead of myself, here’s some of the challenges we did to power up our STEM learning with catapults. First, like we did, challenge students to come up with unique designs.
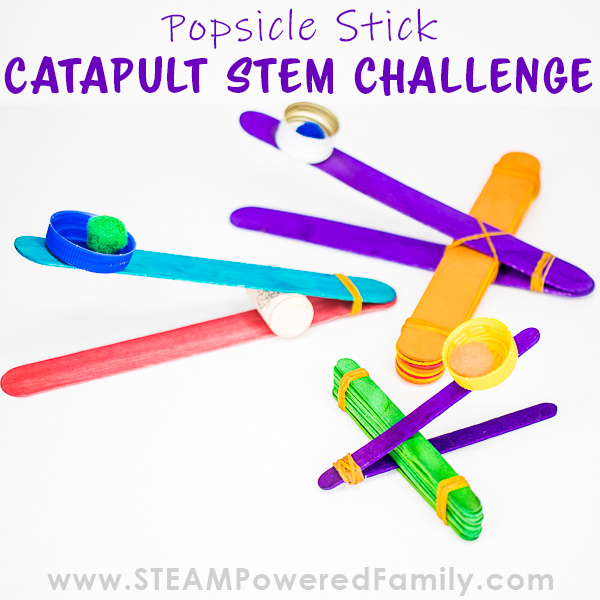
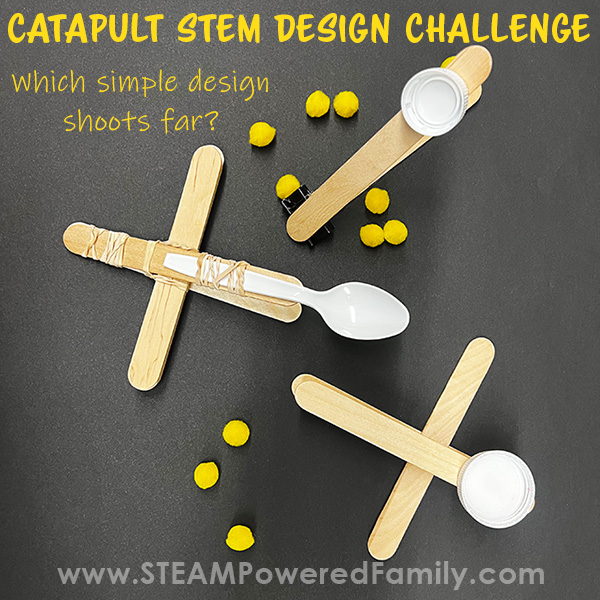
Popsicle Stick Catapult Design Challenge
Building catapults is a design and engineering challenge. So challenge your students to vary their DIY designs so you can evaluate how it affects the effectiveness and power of the final design.
Some variations to consider:
- Have the students vary how far they set their perpendicular sticks up the stack.
- Consider changing the height of your stack to see how that affects your results.
- If you have different sized, especially different length craft sticks, use those to engineer a catapult as well.
- Glue another craft stick onto your top launching stick to make it longer before adding the bottle cap.
- Use different materials, especially for the fulcrum.
Encourage your students to come up with other design alterations and get creative! The next part of the challenge is when things get really fun. Testing the catapults! And the more variation you have in your catapult designs, the more exciting the testing challenge will be.
Once all your catapults are built, it’s time to test our designs!
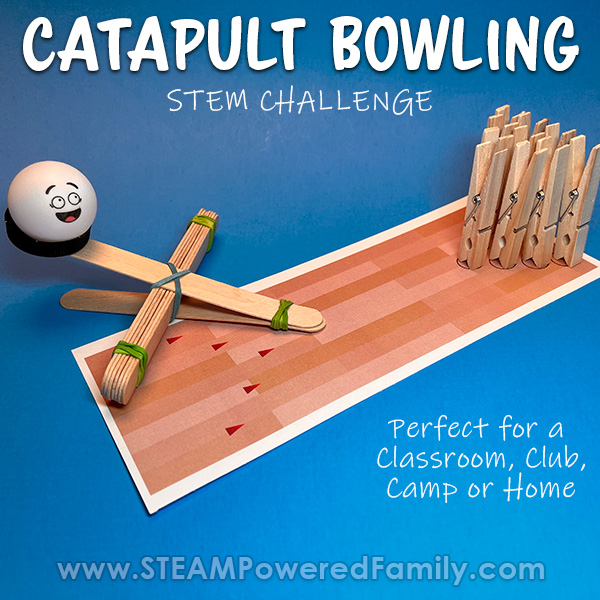
3 Easy Catapult Challenges
Accuracy Challenge
Materials Needed:
● Cotton ball or pom-pom
● Bowl
Place the bowl a few feet away from the catapult. Have the kids measure the distance. The catapult that gets the cotton ball in the bowl in the fewest number of times, wins!
Up the challenge by moving the bowl farther way. Measure the distance each time to see how far you can get the bowl while still being accurate.
Another variation on the accuracy challenge is to have kids paint a bullseye on a plate and see if they can hit the centre of the plate.
Or if you really want to challenge them, cut a hole in the middle of the plate and see if they can fire their projectile through the hole.
Distance Challenge
Materials Needed:
● Cotton balls, marshmallows, or pom poms
● Tape Measure
You can have your children test their craft stick catapults side-by-side or one at a time. Each child gets three chances. Measure the distance, and see which catapult design launches the farthest.
Force Challenge
Materials Needed:
● Duplo, Lego, foam, or other light blocks or objects
● Heavier projectile (such as a marble or small rock)
For this challenge, you want to construct a small tower. If you’re using Duplo or Lego, don’t attach them to each other. Stack them loosely and make it fairly tall. Have students position their catapults a few feet away from the target. Now see if you can create enough force to knock down the tower!
STEM LESSONS LEARNED FROM CATAPULT BUILDING
Catapults are a timeless and ever popular activity for a reason. They are fun, but they also teach some wonderful STEM lessons.
STEM – Science, Technology, Engineering and Math
In this activity we are hitting three pillars of STEM: Science (Physics), Engineering and Math.
And like most STEM activities, this project can be easily adapted to a variety of ages.
Engineering
Younger kids will require adult help, and can make a simple, basic design to start launching and learning about the basics of engineering, measurements and physics.
Older kids should be challenged to come up with new design concepts and alterations to the engineering of their catapults, then challenged to see which designs are most effective. Or build an entirely different design out of completely different materials like cardboard or recycled bottles.
Math
Simple math measurements can be used for younger kids such as measuring the distance objects are launched. For older students have them work out the percent gain based on design differences. Maybe moving the perpendicular sticks 1 cm on the stack (fulcrum) gives a 10% gain on the distance of the shots. Have students work out these calculations.
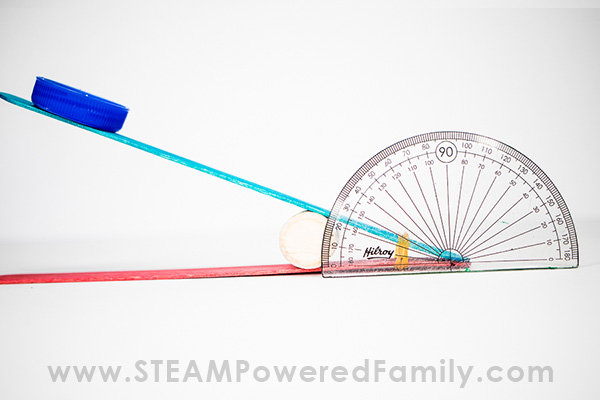
They can also measure the angle and see if they can find the best angle for their catapult design. Hint: there is a perfect angle, it’s 45 degrees.
Science (Physics)
All the science here is focused on our friend Isaac Newton and his laws. Popsicle stick catapults are a simple machine called a lever. When you push down on the arm over the fulcrum (popsicle sticks or cork) preparing to launch the load (pom poms, marshmallows, etc.), you are building elastic potential energy. When you release, it becomes kinetic energy. How levers work can be explained using Newton’s Laws of Motion. Newton’s Third Law of Motion states:
An object at rest stays at rest until a force is applied, and an object will stay in motion until something creates an imbalance in the motion. Every action causes a reaction.
Isaac Newton
Learn more about Newton’s Laws with our fun Newton’s Laws of Motion STEM Challenge building an arcade game.
When we pull down on the catapult we are building up potential energy. You can feel it wanting to GO! When we made our design with the cork it wanted to go so badly we had to use a second hand on the base to hold all that potential energy in.
Release the catapult and all of that potential energy changes to kinetic energy and your projectile goes flying! But there is one more thing at work here, and that’s gravity which causes the projectile to move in an arc, eventually falling to the ground.
Older kids can dig deeper with our catapult project learning more advanced physics. Discuss concepts such as fulcrum, force, stored (potential) energy, kinetic energy, payload and even the angle of the launch platform to see which angle provides the best flight of a projectile. Students can study the work of Galileo on parabola, the relationship between the horizontal and vertical trajectory when a projectile is launched. Projectile motion is a fascinating study that you can dig into more here.
Incorporate the Scientific Method with your Catapult project. Have students make predictions, research, design, build, test, record results and evaluate. Learn more about applying the Scientific Method with this resource.
Most of all, a STEM Catapult Challenge is a fun, exciting and hands on way to get students of all ages learning.
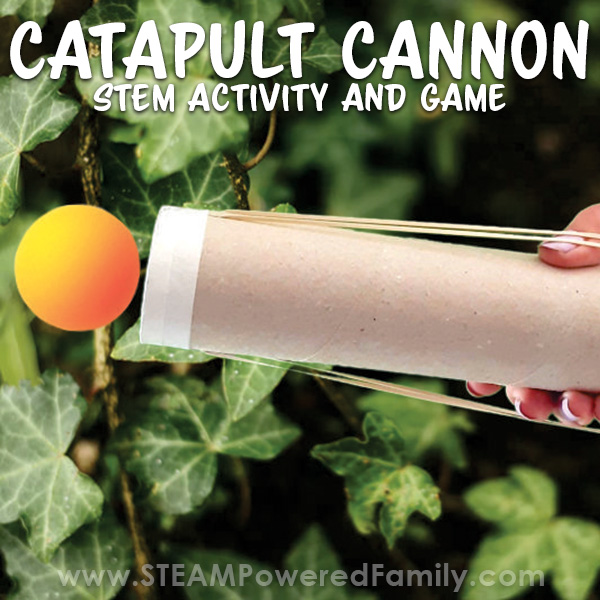
How To Build a Catapult That Shoots Far
Ready to up your catapult with more firing power? Try building a Catapult Cannon!
Want more Catapult STEM Projects? Check these out!
Have fun building, creating and LAUNCHING those catapults!
More STEM Activities for Kids