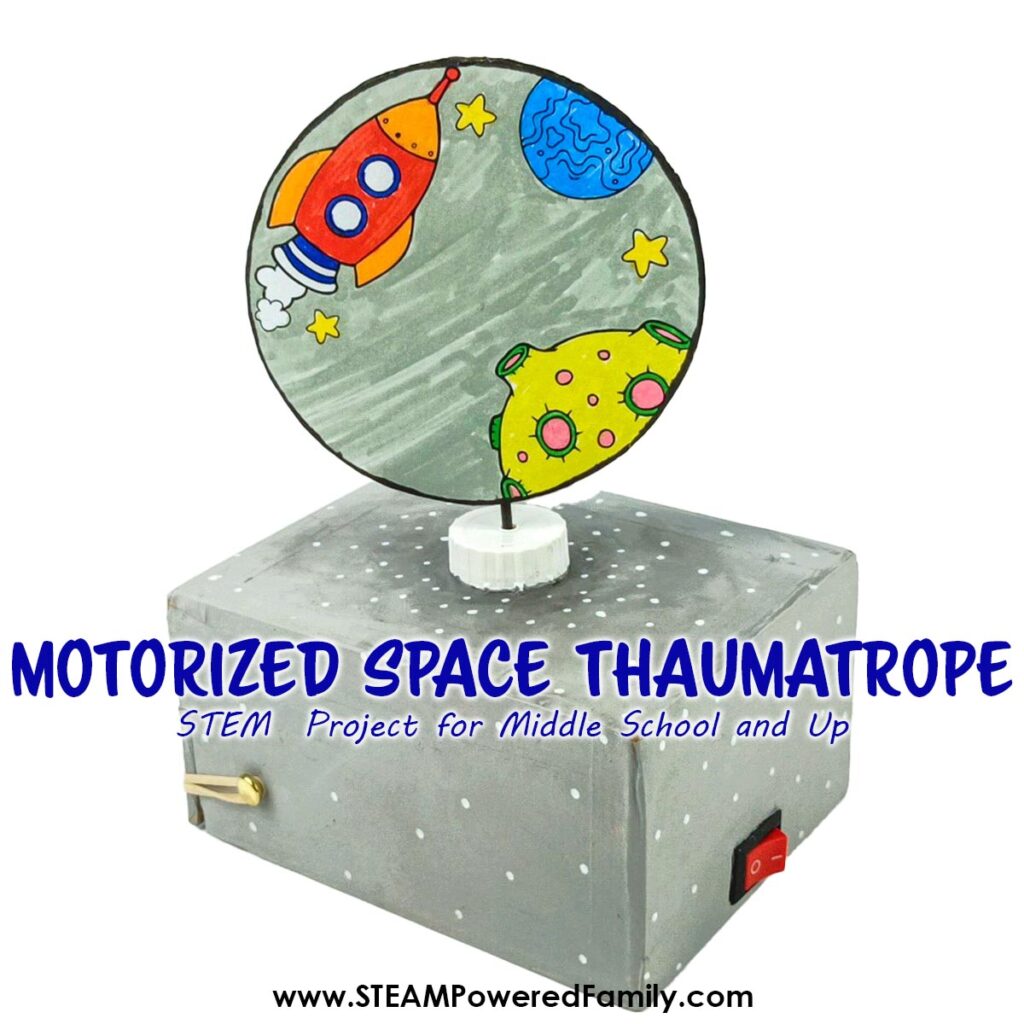
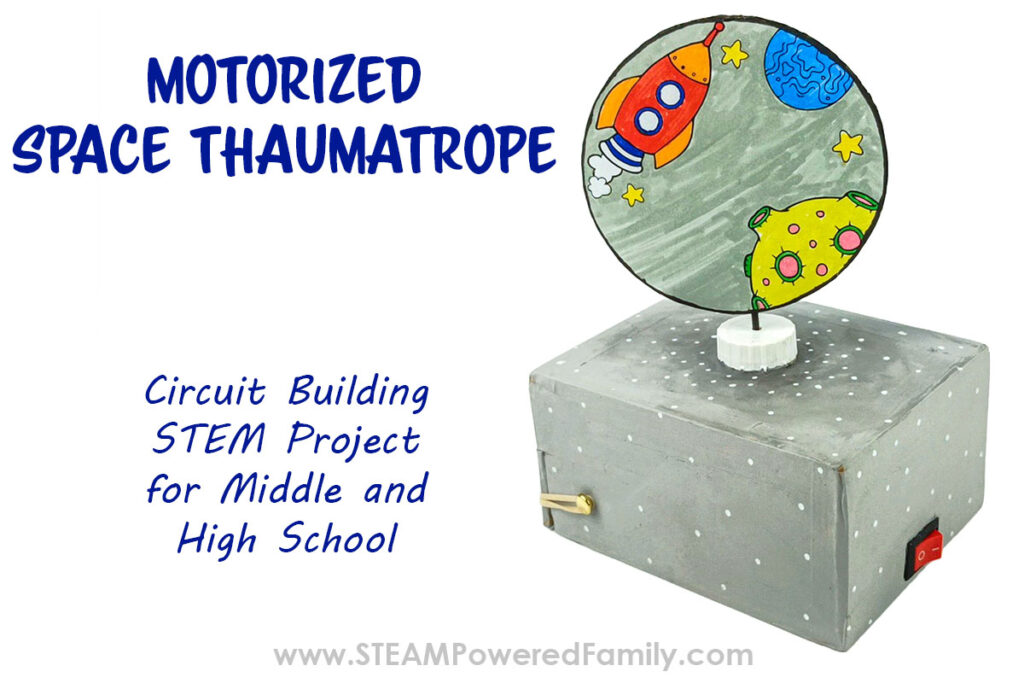
Motorized Space Thaumatrope
We’ve explored thaumatropes a few times in the past. These traditional optical illusion toys are a fantastic project to do with students. Today we are focusing on a more advanced version for your middle school and high school STEM students making a motorized thaumatrope with a space theme.
SPACE THAUMATROPE PROJECT FOR MIDDLE SCHOOL
Table of Contents
Disclaimer: This article may contain commission, paid partnerships, or affiliate links. We independently review everything we recommend. When you buy through our links, we may earn a commission from qualifying purchases.
In the 1920s, one of the most popular toys was the thaumatrope, the modern animated cartoon’s great-grandfather.
Thaumatropes use the same optical illusion science as modern-day cartoonists use to make cartoons. A series of actions are captured by a camera and put together to create the illusion of motion. Our brain captures all these actions, connecting them to create one continuous movement.
The thaumatrope connects two images, one on either side of the thaumatrope disc, and the viewers brain joins these two images together to form one image.
The original thaumatropes were made by gluing two paper circles together, with a different picture on either side and spinning them on two pieces of string attached to both sides. You can see how we did this with our Easy Thaumatrope project.
In this project, you will make a motorized thaumatrope on a stick powered by a small DC motor.
You can sit and watch it spin for hours without effort. All you need to do is turn it on!
More Thaumatrope Projects
In the past we have done a number of Thaumatrope projects including:
- Easy Thaumatropes with Elastics or Strings
- A Spooky Halloween Thaumatrope
- Christmas Thaumatrope with a Stand
And now this motorized Space version! The best thing about all of these projects is that you can download the art templates and use them with any thaumatrope project. Use these space ones with just elastics or a stand, or power up those Halloween thaumatropes with a motor! The choice is yours to adapt and make the perfect STEM project for your students. We recommend this motorized version for your middle school and high school students.
Circuits for Students
I’m sure you are wondering how on earth you will do this. We will teach you how to use a small DC motor, a source of electricity (AA batteries), and some wires to make a circuit to power your thaumatrope. But first, let’s take a quick look at what a circuit is.
A circuit is a complete, uninterrupted path around which electricity can flow, and it must include a source of electricity, such as a battery. Materials that allow an electric current to pass through them easily are called conductors (the wires) and can be used to link the positive and negative ends of a battery, creating a circuit.
One can use a switch to control the flow of electricity in a circuit. When a switch is in the “on” position, it is called a closed or complete circuit, and the electrical current can flow so that the powered object will work.
When a switch is in the “off” position in a circuit, the flow of electricity is broken, and whatever is being powered will not work. It is called an open or broken circuit. There is a break along the line, and the current stops.
When electrical current flows, it can power all electrical appliances, some toys, and even power motors.
Now that you know what a thaumatrope is and how a circuit works, let’s get on with making one and watch the magic happen!
DIY Motorized Space Thaumatrope Project Video
With any of these more complex projects, watching the video is so helpful for understanding how to do this project. If you can’t see our tutorial video, you can either turn off your adblockers (as they also block our video feed) or see the video on the STEAM Powered Family YouTube Channel.
How to Make a Motorized Space Thaumatrope
Materials & Tools
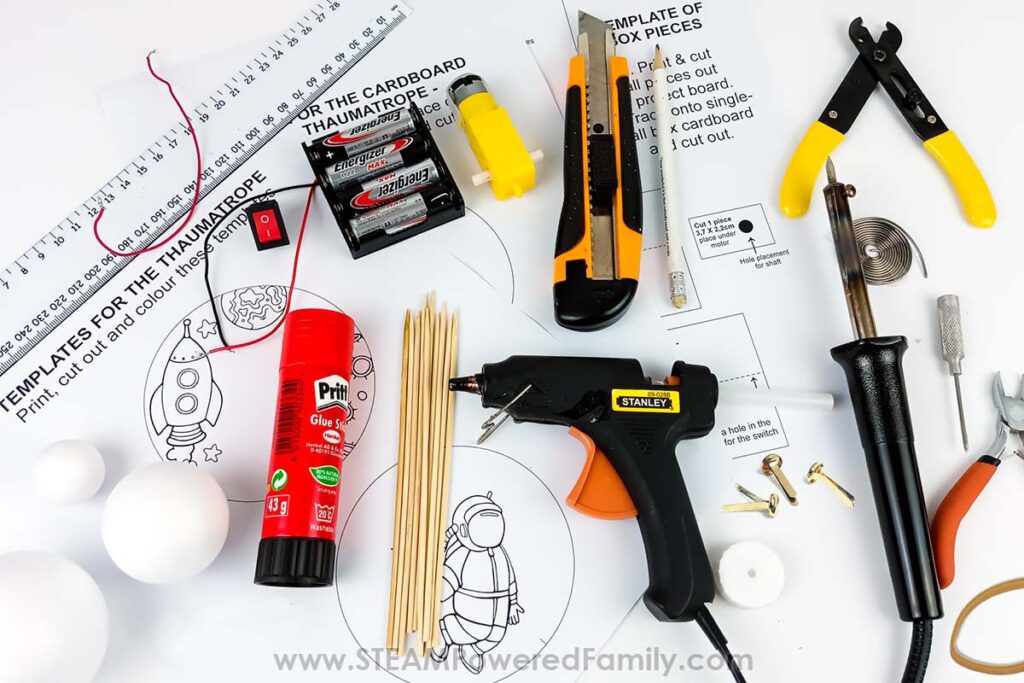
Single-wall cardboard
Glue gun & glue stick
Soldering iron & solder
Side-cutter
Ruler
Pencil
Hobby knife
An awl
Elastic band
Thick wooden skewer
Wooden skewers
Plastic bottle top
Four split pins
3-6V DC Geared Robot Motor
On/Off Switch
4 X AA battery holder
Small piece of wire (red if possible)
Wire stripper
Plus, the space thaumatrope templates! These are available to STEAM Powered Family mailing list members. Simply enter your email to unlock the printable.
Motorized Space Thaumatrope DIY Directions
Getting your pieces ready
Print, trace and cut out all the template pieces.
Copy all the markings from the template onto the relevant cardboard pieces. All the instructions are visible on all the templates.
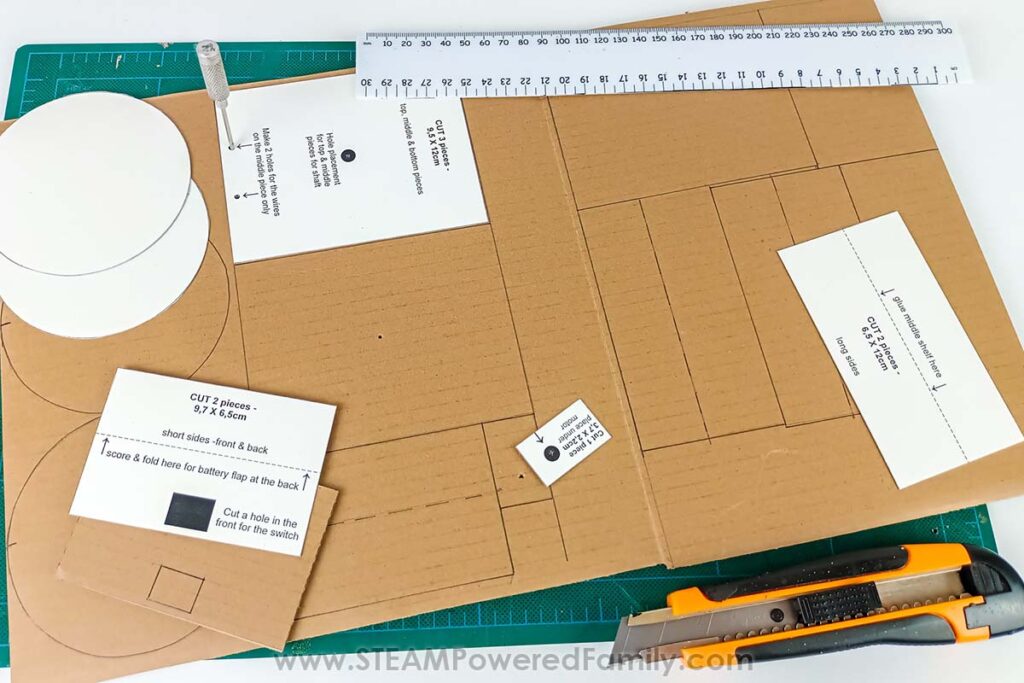
Please ask an adult to help cut the cardboard with the hobby knife. It is very sharp!
Ensure that you mark the templates in the correct places; otherwise, the pieces of the box you are going to make will not fit together correctly.
Use an awl to make the small holes for the wires and a pencil to make the large holes for the motors shaft.
Use a side-cutter to trim the large holes, so they are flush.
Place one of the shafts of the geared motor through all the large holes to check if it is large enough. It should not touch the cardboard and be able to turn freely.
Gluing the box together
Starting with the two long sides, glue these two pieces to either side of the middle piece. This piece has a large hole in the center and two small holes at the bottom for the wires.
Ensure that you glue the two side pieces above the dotted line on the template
Use one of the small wooden skewers to make the holes for the wires a little bigger
Glue the smallest template piece onto the underside of the top part of the box, just over the hole.
Push the switch into the hole you cut on one of the box’s short sides (the front).
Gluing the motor and the battery holder
Place the DC motor with the contacts facing upwards to the top of the middle piece, ensuring that the shaft at the bottom fits into the large hole. Lift it out, put a small amount of glue just below the hole in the cardboard, and press the motor down into the glue.
Get the top piece and check that you will glue it on correctly over the motor. The small piece you glued on the underside of the top piece must lie on the body of the motor, and this will hold it in place.
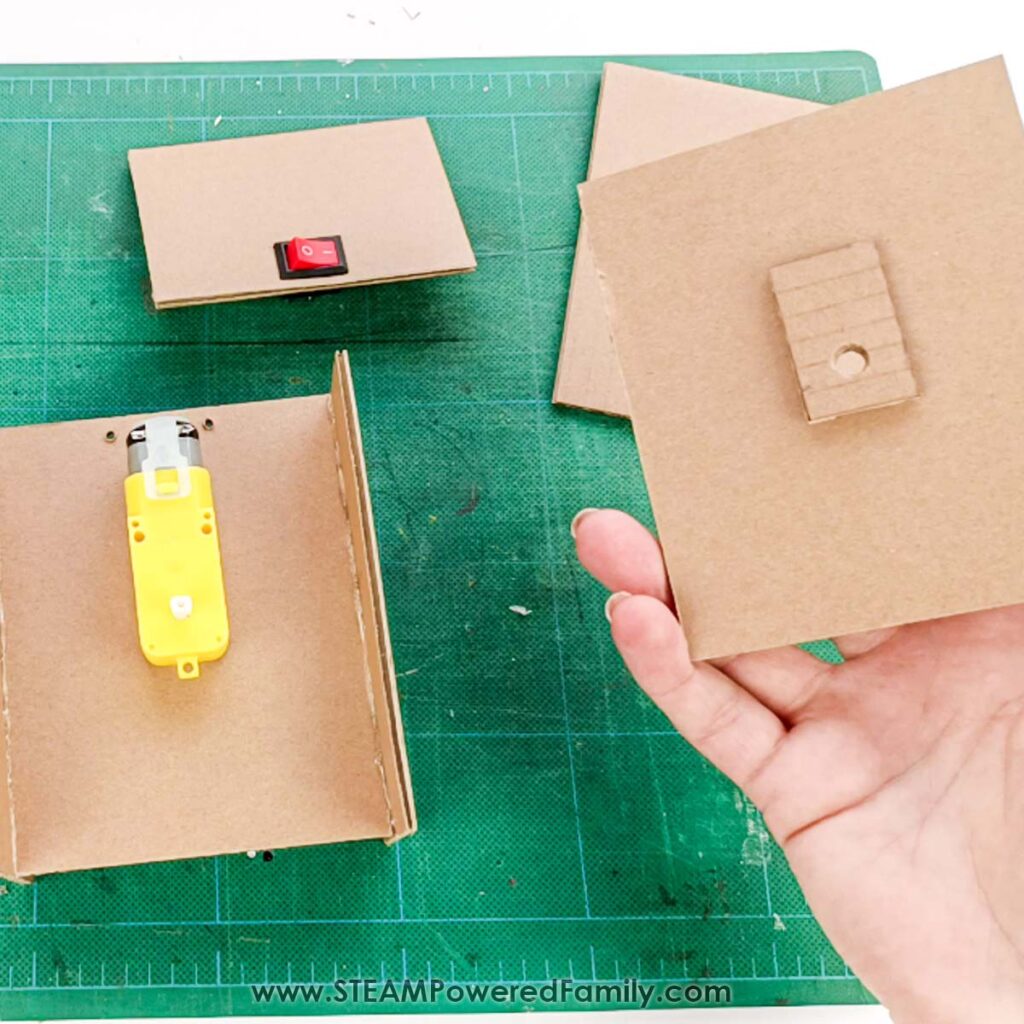
Get the front piece with the switch and ensure it correctly fits the front.
Push the battery holder (without the batteries) underneath the shelf with the motor attached to it.
Soldering all the wires on
Get the front piece with the switch and place it in front of the box so you can see the two contacts on the bottom.
PRO TIPS! Put solder on the ends of all the wires and all the contacts. It makes soldering all the pieces together much more manageable.
Make use of the wiring diagram so that you understand which wires go to which contacts.
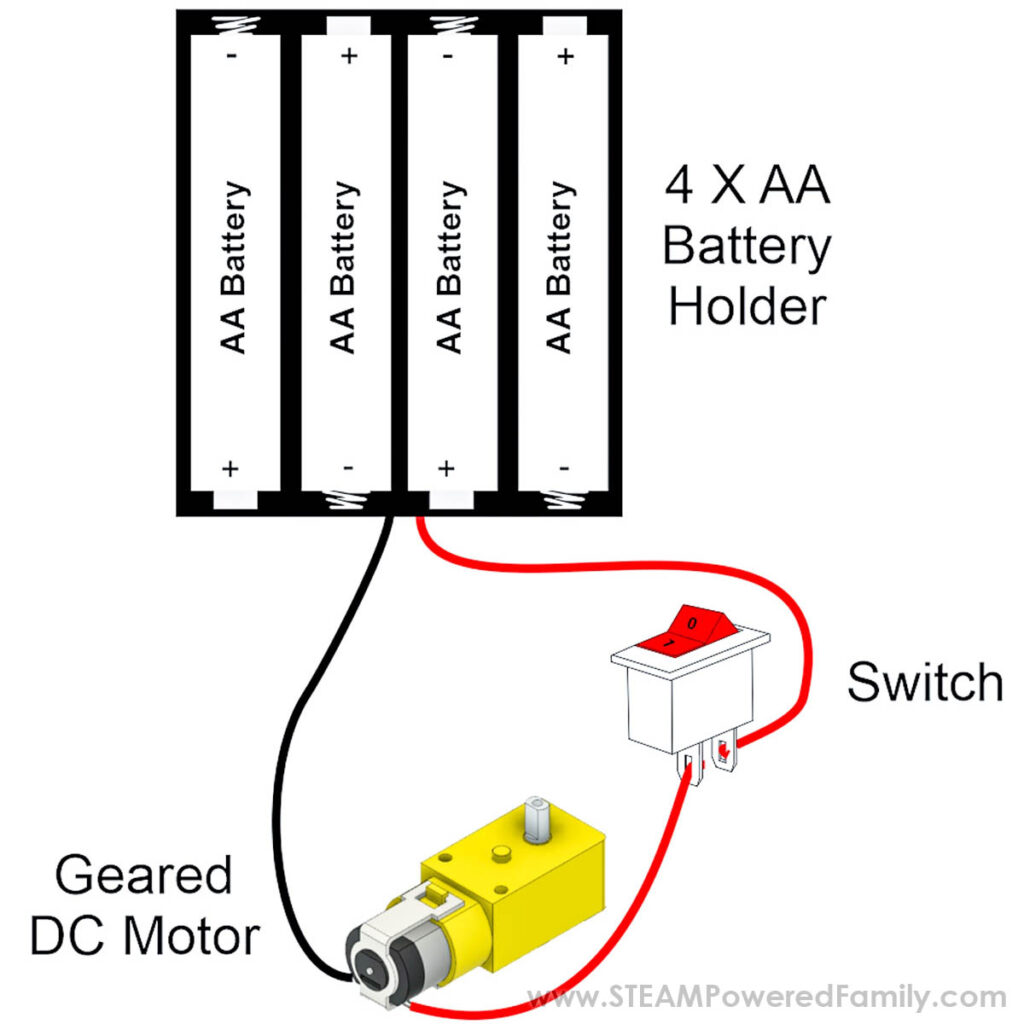
Get an adult to help with the wiring, as the soldering iron is hot!
Solder the red wire from the battery holder to one of the contacts of the switch.
Push the black wire up through one of the small holes to reach the motor.
Solder the other (loose) red wire onto the other contact of the switch and pass it up to the motor as well.
Now glue the front piece with the switch into place.
Turn the whole box upside down, make sure that the battery holder is upside down, and glue the base onto the bottom of the box.
Turn the box up the right way now and solder the black and red wires onto the two contacts of the motor.
Put the batteries into the battery holder, making sure that the switch is in the off position (0) before placing the last battery into its place.
Push a small wooden skewer gently into the shaft and turn the switch on. The motor should turn on.
PRO TIPS! If the motor does not turn on, either your batteries are flat or in incorrectly, or your wiring is incorrect. Please check the wiring diagram below.
If the motor turns on, you can glue the top of the box on. Ensure that you will glue it on correctly before applying it.
Putting the back flap onto the box
Gently score the back piece of the box with the hobby knife on the dotted line.
Do not push the knife through the cardboard! It is to score the cardboard so it can bend more easily.
Gently fold the flap back and forth.
Glue the flap to the box only at the top. The bottom needs to open and close freely to allow you to get the batteries into the battery holder.
Ensure that you are gluing the right sides together; otherwise, the flap will not fit correctly.
The final touches
Make a hole in the center of the bottle cap with the soldering iron.
Glue it over the hole on the top of the box.
Place a wooden skewer through the bottle top hole and into the motor’s shaft to line it up.
The wooden skewer must be straight, not bent, and not touch the bottle top!
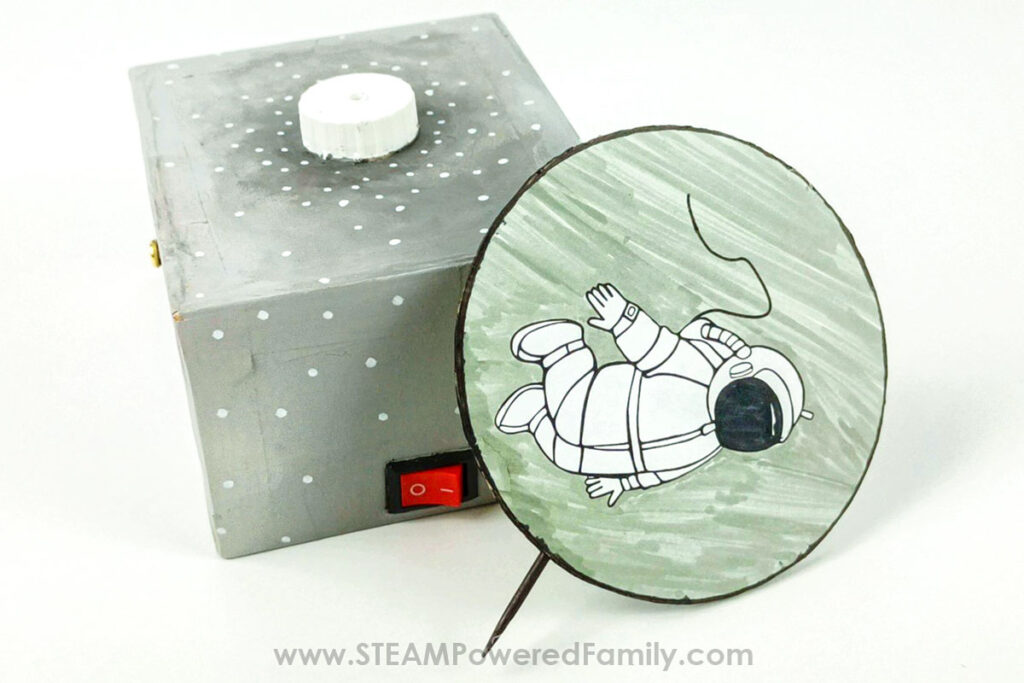
Making the Thaumatrope Disc
Cut out and color the two sides of the thaumatrope and glue them onto both sides of the cardboard circle you cut out earlier, ensuring that you line both sides up with the marks you made from the template.
Cut a small wooden skewer to 12,5cm / 5 inches long and push it up through the cardboard to reach the top (the pointed side must be at the bottom to go into the motor’s shaft). You can add a bit of glue to the top and bottom of the thaumatrope to hold the skewer in place.
Test the thaumatrope to see if it spins evenly.
The last step
Make a hole 2cm / ¾ inch in from the flap and the same distance from the bottom with an awl, and then make the hole a little bigger with the large wooden skewer for the split pins on both sides.
Put a split pin into both sides.
Hook the elastic band onto one split pin and stretch it across the back of the flap to the other split pin.
Your motorized thaumatrope is almost ready!
Paint and decorate your handiwork and make a few more thaumatropes using your drawing skills!
HAVE FUN WATCHING THE MAGIC OF YOUR MOTORIZED THAUMATROPES!
Troubleshooting
If the thaumatropes you made do not look right while spinning, you have not lined them up correctly. Cut out more circles, color them in and stick them over the wrong ones.