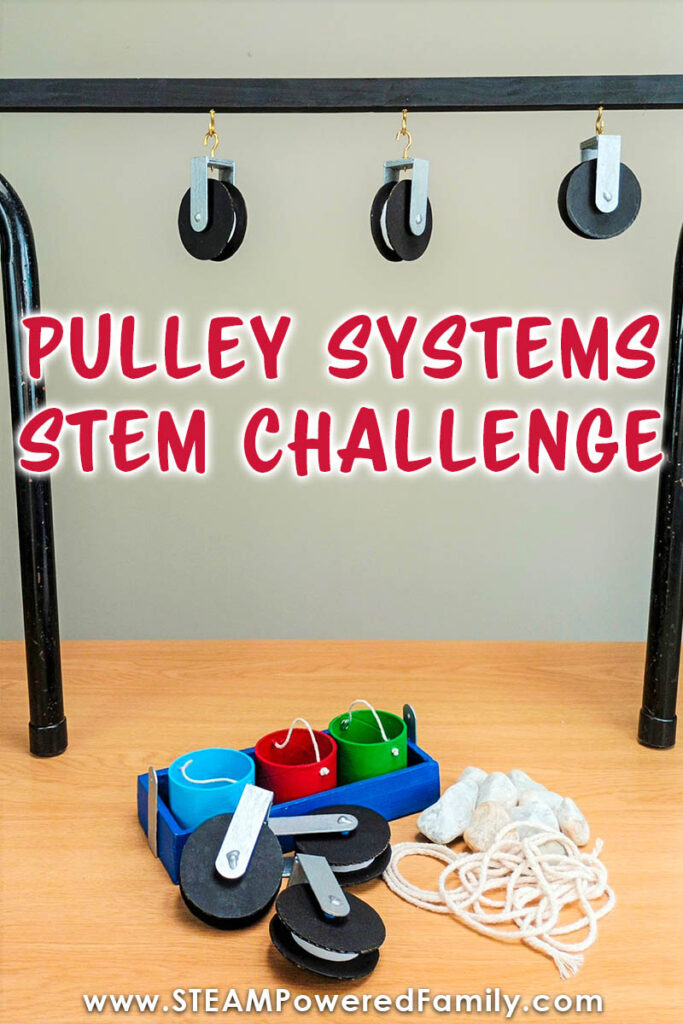
Pulley System STEM Challenge
Today we are diving into some real life STEM as we explore the amazing simple machine pulley. We will learn about the different types of pulley systems. Then it is time to get hands on with a STEM challenge building various pulley simple machines. A pulley printable workbook is also available to supplement student work.
Design a Pulley System STEM Project
Table of Contents
Disclaimer: This article may contain commission, paid partnerships, or affiliate links. We independently review everything we recommend. When you buy through our links, we may earn a commission from qualifying purchases.
Have you ever watched a tow truck pulling a car that has broken down onto its bed to transport it to a mechanic? It is a winch!
Do you know what type of simple machine helps to do this?
You guessed it; it’s a pulley system or pulley simple machine! In physics, a pulley is one of the six simple machines that help lift large and heavy objects by changing the direction and intensity of a force. A pulley consists of a drum with a grooved wheel mounted on an axle, with a rope threaded through it.
REFRESHER! The six simple machines are the wedge, screw, lever, pulley, inclined plane and the wheel and axle. Explore more simple machines by building a Balloon Car, a Piggy Bank that eats your coins, or an Automaton.
Pulley System Classroom Printable
To compliment this project we have a classroom printable available in our Teachers paying Teachers Store.
Or members of the STEAM Powered Family mailing list can access it here.
What is a Pulley? How does a Pulley Work?
Pulleys are used in many circumstances to make heavy lifting much more effortless as you work against gravity. When lifting a heavy weight, there is only so much force your muscles can supply, but using a pulley increases this force, making it easier to lift these heavy weights.
This heavyweight is known as a load, and the force applied to the pulley is known as effort and is usually measured in Newtons. All pulleys need kinetic energy to work effectively, and kinetic energy is moving energy. For example, you pull down on a pulley rope to lift an object upwards.
There are a few different types of pulleys. Here are the three most common types of pulleys:
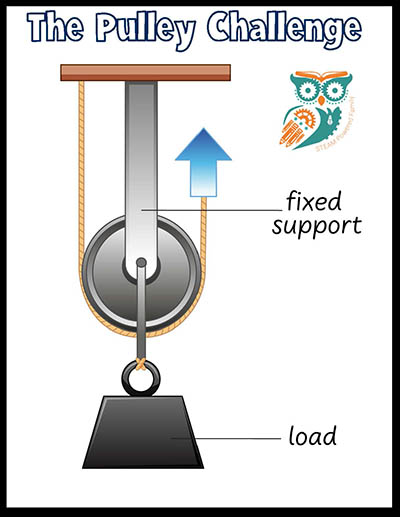
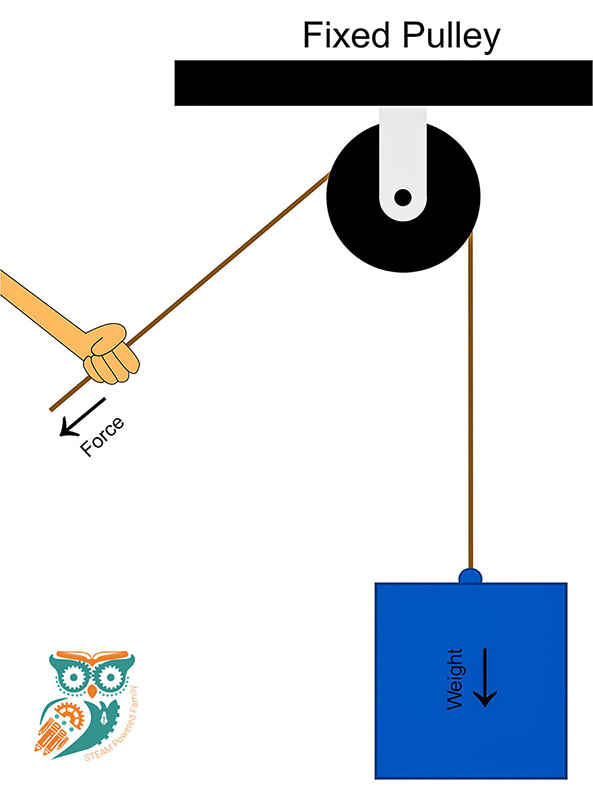
FIXED PULLEY:
The drum is fixed to a single spot called the fulcrum. The force needed to lift a load with this pulley is the same force required if you raise it by hand. The pulley allows you to lift it laterally with one hand rather than vertically, using hand over hand. The load feels the same weight, but it is easier with the pulley.
An example of a fixed pulley is a flagpole. When you pull down on the rope, the pulley changes the direction of force, and you raise the flag.
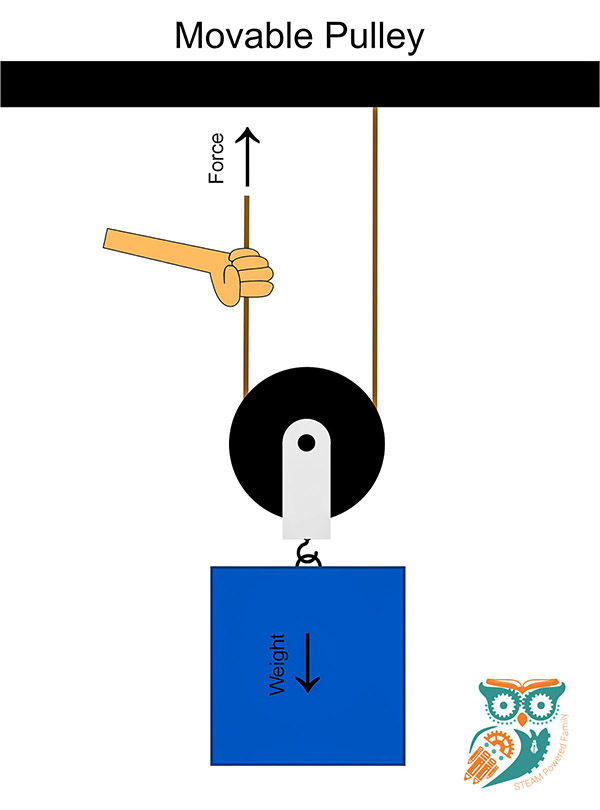
MOVABLE PULLEY:
The rope is fixed to a single spot, and the pulley drum moves freely along the rope as you move the load. There is no change in the direction of the force that is applied, but the load will feel lighter than it is. The pulling force is in a vertical, upward movement.
An example of a movable pulley is an elevator. This type of pulley can move up or down. The pulley is attached to something stable above it, and each side has the exact cable length.
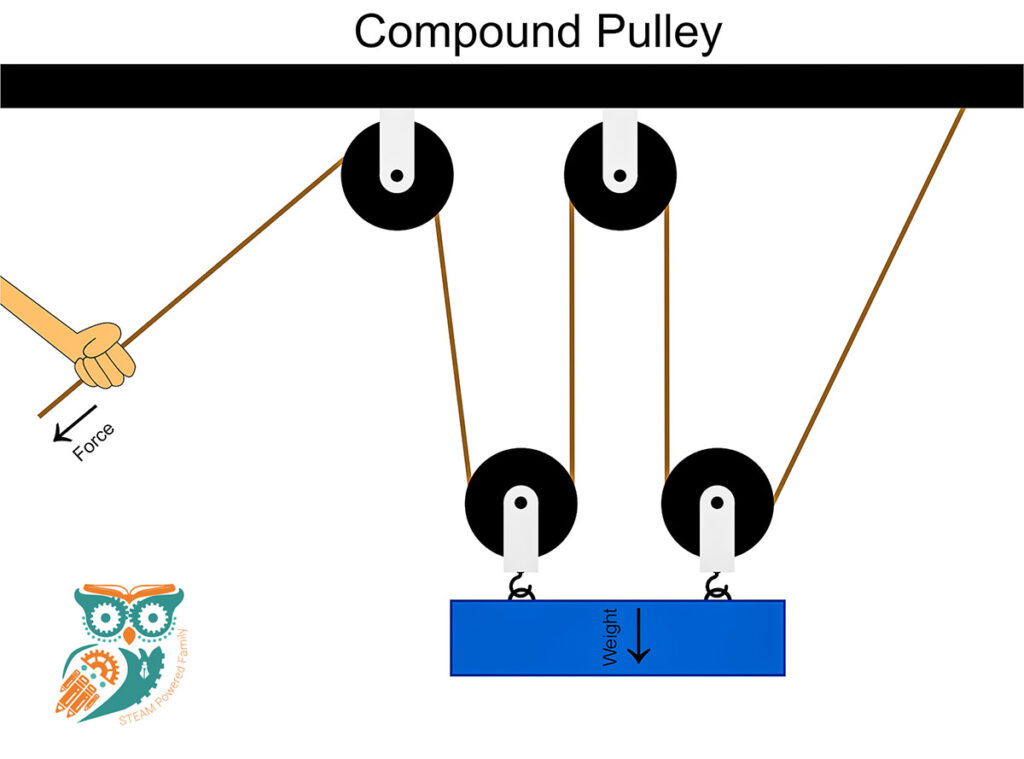
COMPOUND OR MULTI-WHEEL PULLEY:
A compound pulley uses a fixed and movable pulley in one system.
A multi-wheel pulley uses more than one of both fixed and movable pulleys. The load using these types of pulleys feel lighter, and you can change the direction of the force needed to lift the load. It is also known as mechanical advantage.
It might be possible to lift hefty loads easily, but a lot more distance is covered, and a much longer rope is needed to go through a system of pulleys.
An example of a compound pulley is a crane on a construction site. The principle of using such pulleys works like this:
If you were using a multi-wheel pulley to lift 100 kilograms (kg) of weight 10 metre (m) off the ground with a rope that measures 20m in length, the load would only feel like 50kg. With more pulleys added along with more feet of rope, you can reduce the amount of force needed. The load feels lighter and can be lifted higher.
BUILDING A PULLEY SIMPLE MACHINE
Watch our tutorial video for this project to see us building and using the various pulley systems. If you can’t see the video, please turn off your adblockers as they also block our video feed. You can also find this video on the STEAM Powered Family YouTube Channel.
How to make Pulley Systems
Materials & Tools
Any size wooden baton or stick, 75cm / 29¼” in length
Single and double-wall cardboard
Three small cardboard tubes (any cardboard roll inners will work)
Masking tape
Glue gun
Wood glue
Ruler
Pencil
Wooden skewers
11 Wooden tongue depressors or jumbo craft sticks
6 bottle caps
Small eye hooks
Medium cup hooks
Hammer
Thin string or wool
An awl
A drill
How to Build Pulley Systems
Getting your pieces ready
Using a compass, mark & cut twelve single-wall cardboard circles measuring 6cm / 2¼”
in diameter.
PRO TIPS! Rough cut each circle first, then cut them out correctly. This method makes cutting circles out of cardboard much easier!
Preparing the tongue depressors for the pulleys
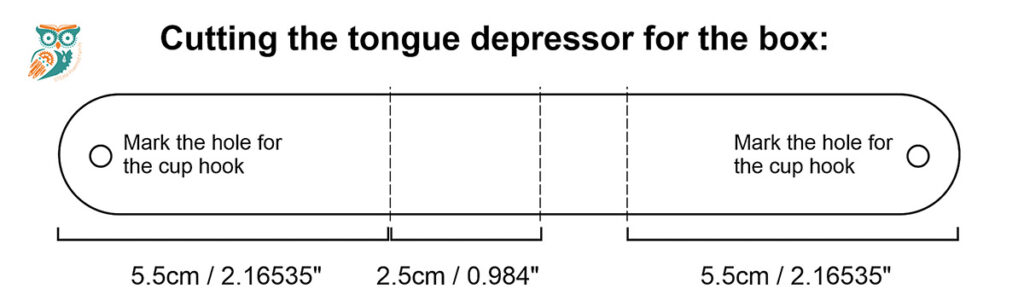
Get the wooden tongue depressors and follow the diagram below for cutting instructions:
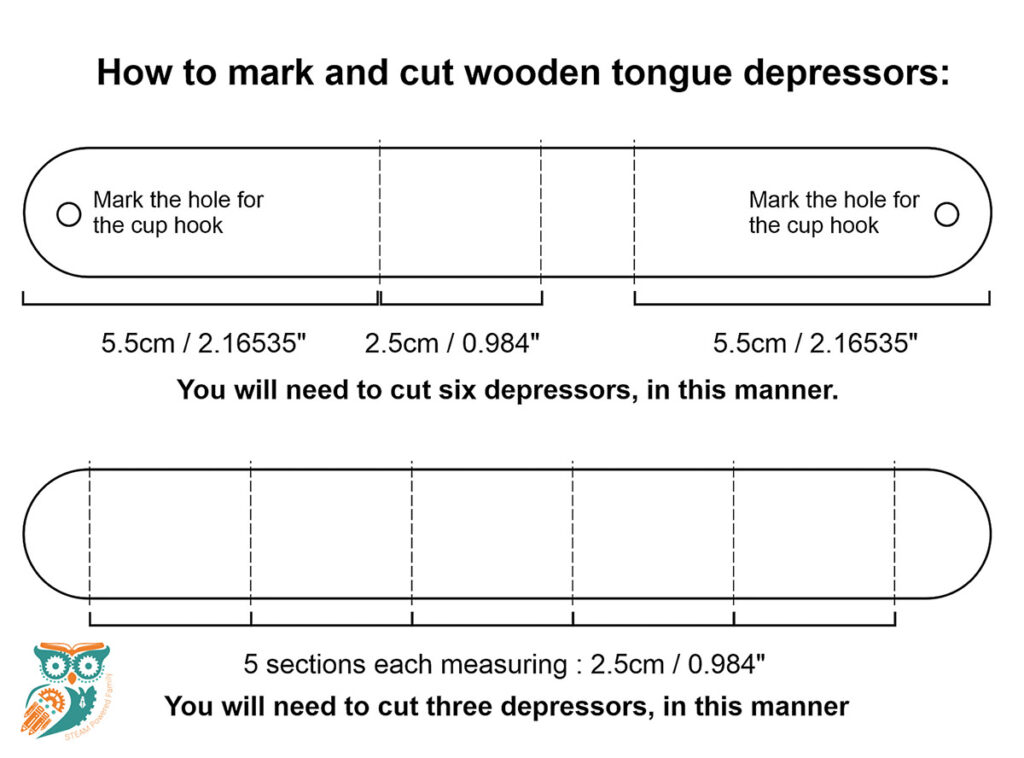
Cover both sides of each depressor with masking tape, as this prevents the wood from
splitting when cutting the pieces with some scissors. Remove the tape after cutting.
Don’t forget to make a mark for the cup hooks.
Using a drill, make all the holes for the cup hooks.
You may need the help of an adult for the drilling. Ensure that the wooden skewers can move freely through these holes. It will allow easy spinning of the pulley.
Using the same drill bit, make all the holes in the middle of the six bottle caps and all the cardboard circles.
PRO TIP! If your bottle caps are hard plastic, use an awl and hammer to mark the centres of each cap. This method stops the drill from slipping.
Always use a scrap piece of wood underneath the object you are drilling – you do not want to make a hole in the table or counter you are working on!
Making the drums of the pulleys
Thread a wooden skewer loosely through a cardboard circle, a bottle cap and another cardboard circle.
Using the glue gun, glue the bottle cap between the two cardboard circles. Do this for all six drums.
Adult supervision with glue guns is required. You may need the help of an adult for the glue gun as it is hot!
Making the axle of the pulleys
Using the wood glue, glue the three pieces of tongue depressor you have left and leave them to dry for about ten minutes.
Glue these pieces between the pieces you drilled the holes in at the top edge with the glue gun.
Do this for each of the other pulleys.
Make a mark in the middle of each of the tops. You will screw the eye and cup hooks into this piece later.
Finishing the pulleys
Thread a wooden skewer through one side of the axle, through the drum, and out the other side.
Put a blob of glue with the glue gun onto the edge of the wooden skewer, and wait for it to dry.
Trim the other side of the skewer (with side cutters or scissors), put a blob of glue onto the edge of the skewer, and wait for it to dry. Do this for each of the other pulleys.
Screwing in the eye and cup hooks
Screw 4 cup hooks and 2 eye hooks into the baton or stick, approximately 15cm / 6 inches apart.
Start with a cup hook in the middle of the baton/stick and measure outwards!
It would be best if you had the same length free on either side to rest on either two chairs, stools, tables or other surfaces.
You can use pliers to turn the hooks in securely.
The cup hooks are for fixed pulleys, and the eye hook is to secure the string.
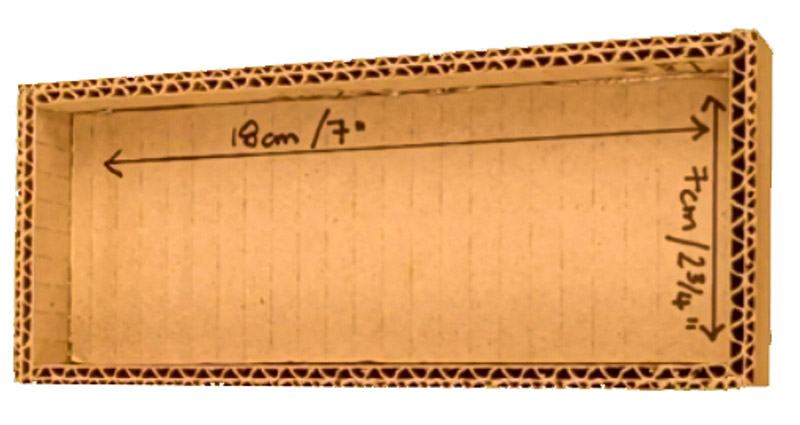
Making the box and the three buckets
Cut the following pieces of double-wall cardboard:
2 pieces: 18cm / 7″ X 3cm / 1¼”
2 pieces: 8cm / 3¼” X 3cm / 1¼”
1 piece: 18cm / 7″ X 7 cm / 2″
Glue the pieces together using the glue gun as shown in the diagrams below:
Trace the base of one of the cardboard tubes onto a piece of single-wall cardboard three times and cut out the circles.
Glue the circles onto the bottom of each cardboard tube to make a bucket.
Cutting the tongue depressor for the box
Cut one tongue depressor for the sides of the box as in the diagram below:
Finishing the box and the buckets
If you can, use paper tape or strips of paper to cover the edges of the box, making it look neater.
Glue the two tongue depressors onto the middle of the side of the box, with the holes facing upward. The cup hooks of the pulleys will hook on here.
Using the awl or a drill, make holes on either side of each bucket for the handles.
Cut three lengths of string to a size of 15cm / 6″ and thread through the holes to make the handles. Make knots on each end and use the glue gun to glue the knots in place. Trim off all the extra bits of string.
PRO TIP! Put a small amount of hot glue onto the end of the string and roll it between your fingers. It makes the end of the string easier to thread through the holes – like the end of a shoelace!
Your pulley system is ready to use, but painting the pieces would make them look better!
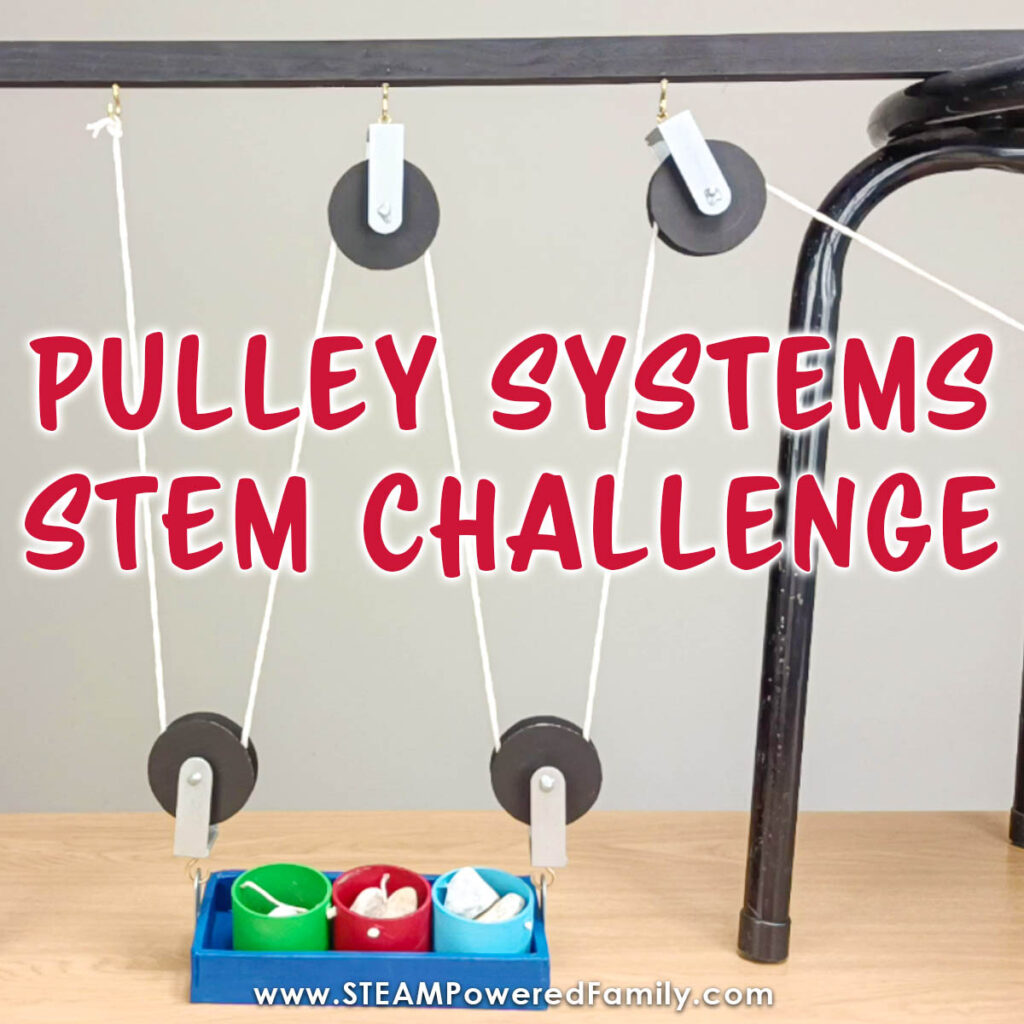
Assembly Time
It’s time to build the three types of pulleys you learnt about in this activity!
Place the baton or stick with the hooks between two chairs, stools, tables or other surfaces that are the same height. You can tape the ends down or use small bits of double-sided tape if you want to.
Screw three small eye hooks into the top of three of the pulleys. These will make the fixed pulleys and hang on the cup hooks for three of the pulleys we will make.
The other three pulleys can have cup hooks screwed into them, and these will make the movable pulleys.
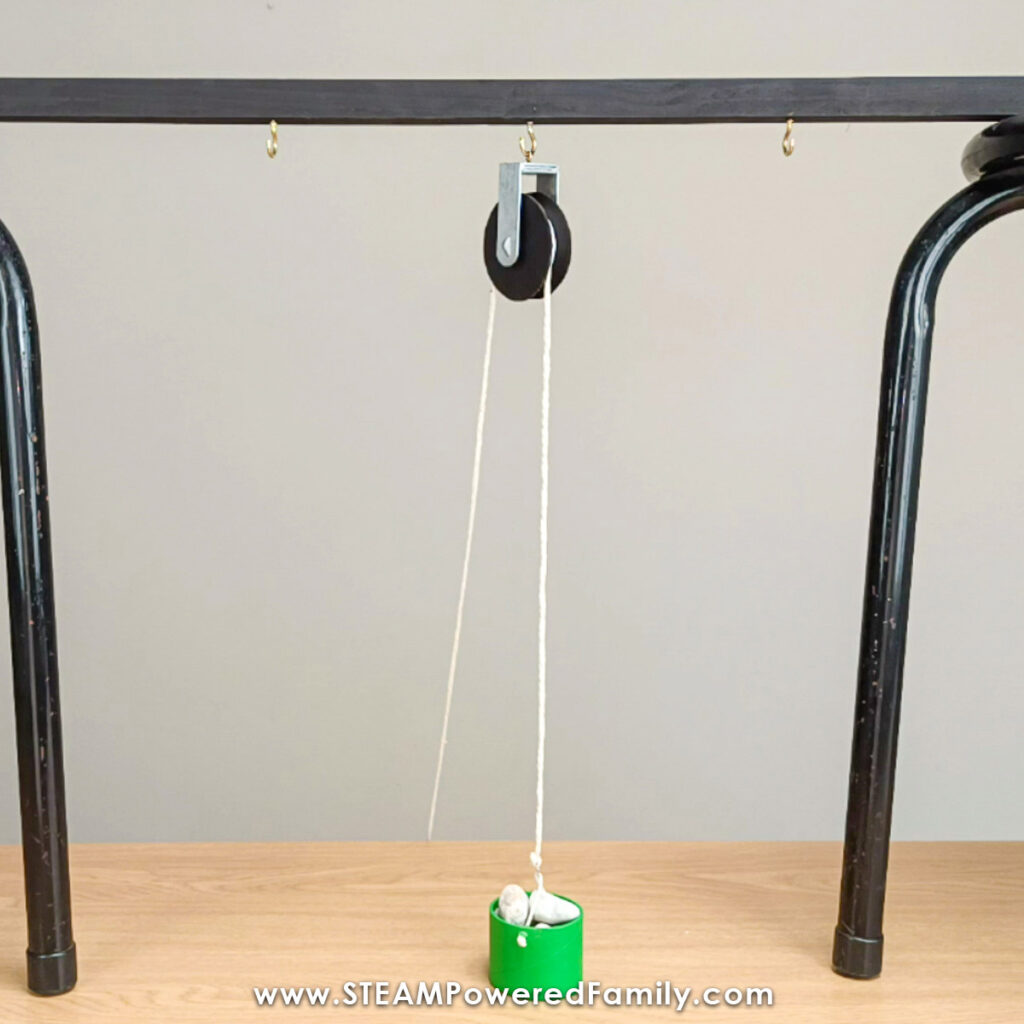
The first pulley is the fixed pulley:
Hand a pulley on the middle cup hook of the baton/stick.
Tie one end of the string onto one of the buckets and thread the string through the pulley drum. I used garden pebbles to add something heavy to the bucket.
Now pull in a downwards motion to lift the bucket.
The second pulley is the movable pulley:
Attach the string to the cup hook on the left. Attach one of the pulleys with a cup hook to one of the buckets (filled with weight). Thread the string through the pulley and lift the string in an upward or lateral motion to lift the bucket.

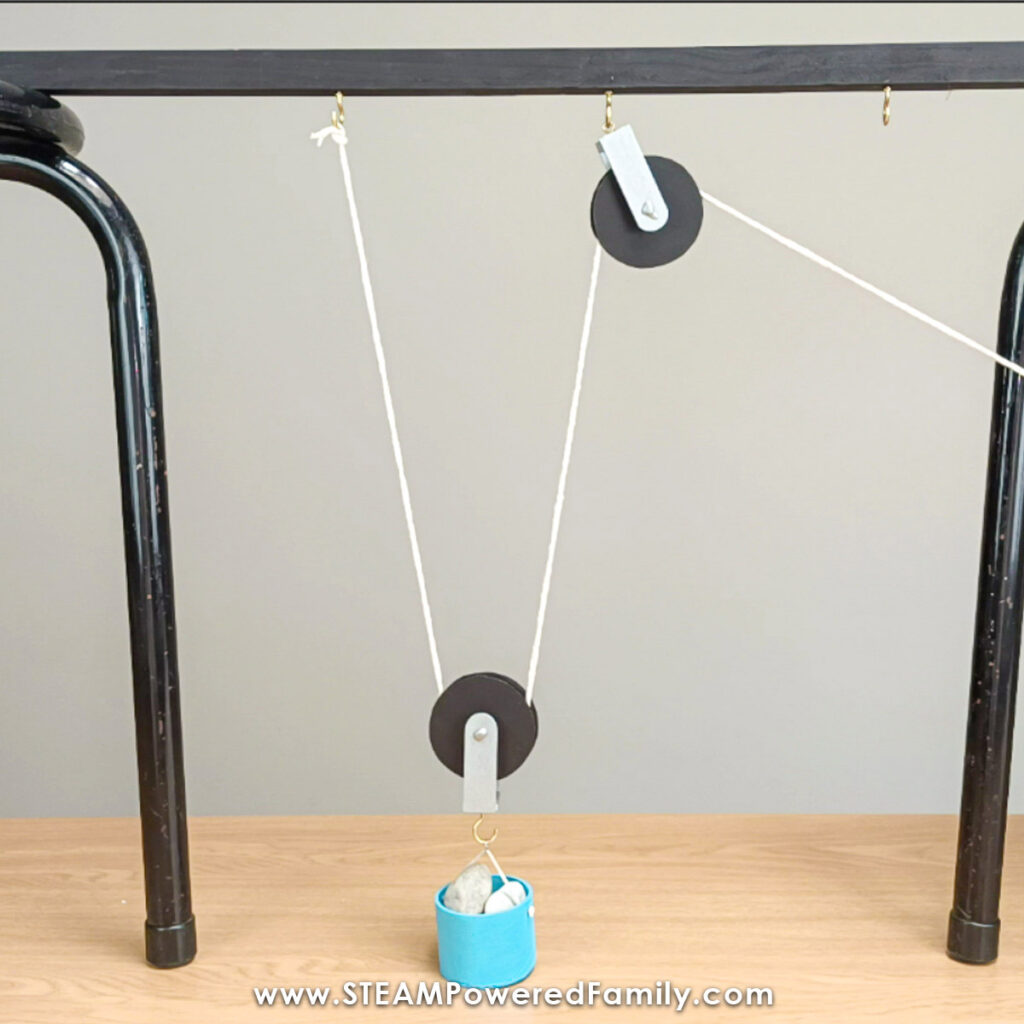
The third pulley is the compound pulley:
Attach the string to the cup hook on the left. Attach one of the pulleys with a cup hook to one of the buckets (filled with weight). Thread the string through the pulley. Hang a pulley with an eye hook onto the middle cup hook. Thread the rest of the string through this pulley and pull downwards to lift the bucket.
In this type of pulley system, you have used a movable and a fixed pulley to create a compound pulley system.
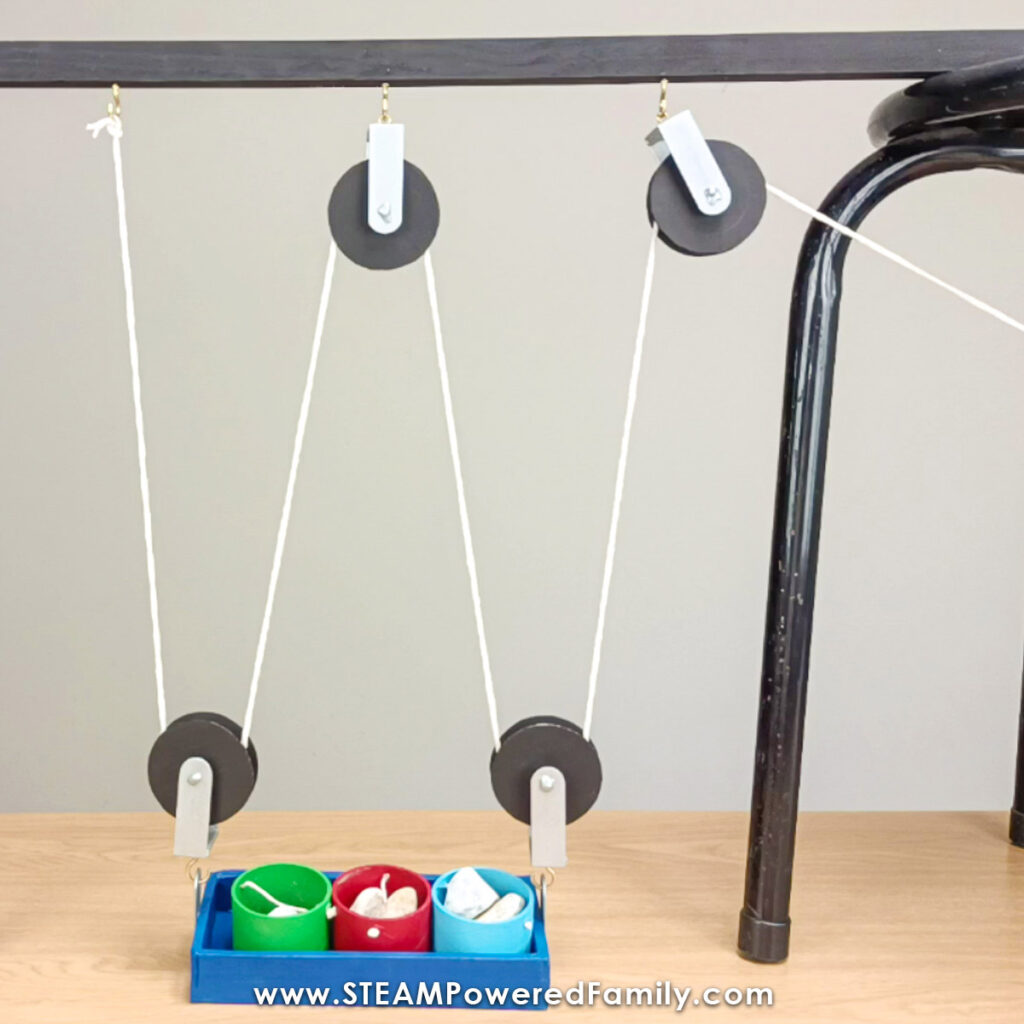
The fourth pulley is the multi-wheel pulley:
This pulley system is like the compound pulley, but you will add another fixed and movable pulley and a larger box with all three buckets to this system.
Attach the two pulleys with cup hooks onto either end of the box. Fill each of the buckets with weight and place them in the box.
Attach the string to the cup hook on the left. You will need a longer string as there are more pulleys for the string to go through.
Thread the string through one of the pulleys attached to the box.
Hang a pulley with an eye hook onto the middle cup hook. Thread the rest of the string through this pulley.
Now thread the string through the other pulley attached to the box.
Hang a pulley with an eye hook onto the third cup hook. Thread the rest of the string through this pulley and pull downwards to lift the bucket.
So now you understand how the different pulleys and some pulley systems work. How much fun was that!
Extension Ideas
Pretend you are an engineer or an architect, and a client has asked you to design or install a specific pulley system for a house or building. It could be to move large pieces of furniture. Or maybe they are farmers moving large bails of hay or equipment.
Devise a solution to this challenge using all the pieces you have just made. What kind of pulley would work best?
Remember to keep trying, testing and possibly improving your ideas until you come up with something perfect for this challenge.
Troubleshooting
If your pulleys do not work perfectly on the first try, check if all the holes in the axles are not too small. Holes that are too small will cause friction, preventing the drum from turning smoothly.
Another possible issue could be if the drum is rubbing up against the axle, which is causing friction. You may need to put a small spacer (cut a straw into small pieces and slit down the middle) onto the wooden skewer on either side of the drum to centre the drum.