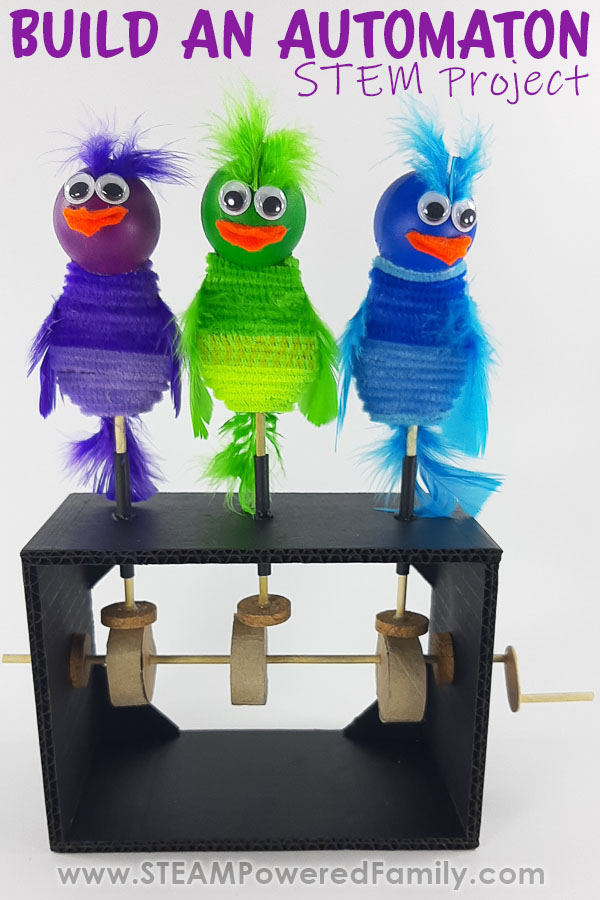
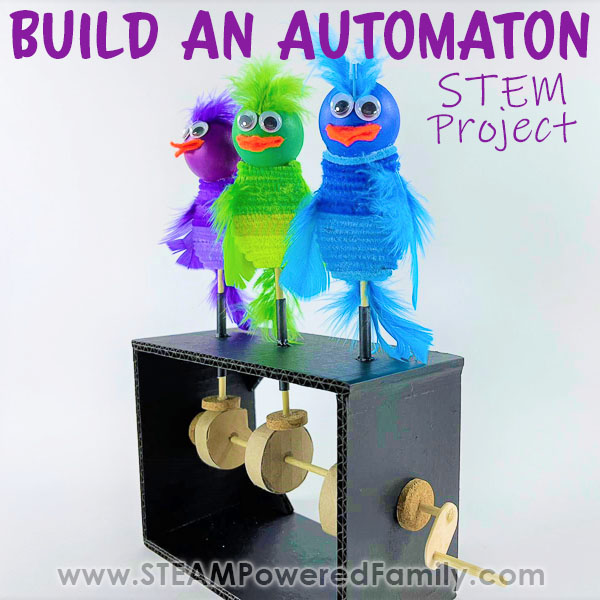
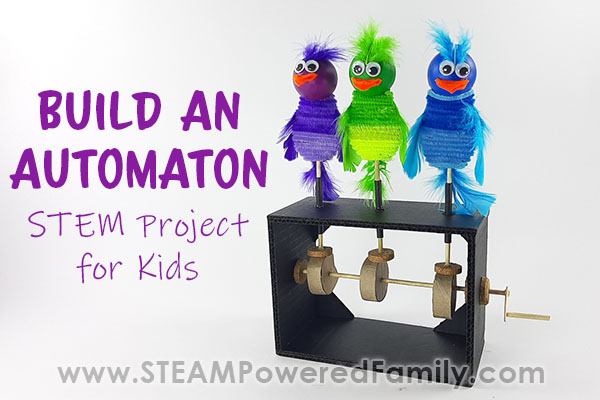
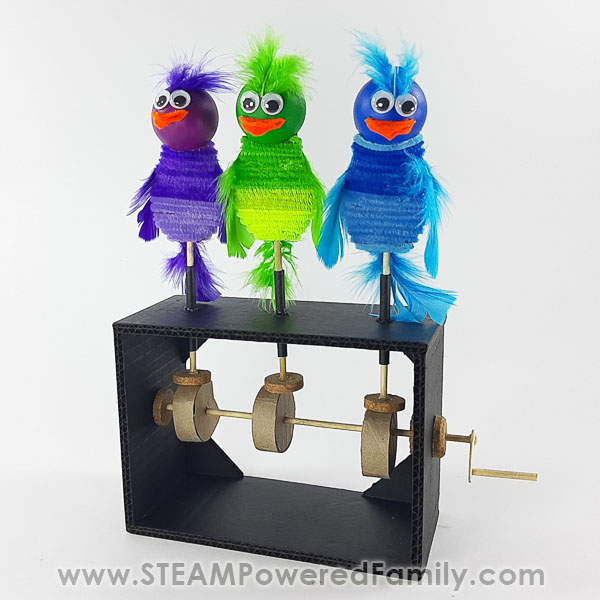
Build a Bird Automaton
How would you make a mechanical toy that magically makes characters come to life, moving up and down and turning round and round? There’s an easy answer for that; in this fantastic project, you will build a simple machine device that uses cams, levers and linkages along with recycled and other materials you probably have lying at home to animate three little birds. This hand-powered mechanical sculpture is called an automaton (plural automata) and makes an incredible STEM Project.
BUILD A BIRD AUTOMATA PROJECT
Disclaimer: This article may contain commission or affiliate links. As an Amazon Influencer I earn from qualifying purchases.
Not seeing our videos? Turn off any adblockers to ensure our video feed can be seen. Or visit our YouTube channel to see if the video has been uploaded there. We are slowly uploading our archives. Thanks!
What is a Automata? What is an Automaton?
This cardboard automaton is a type of mechanical sculpture made of a few simple machines like cams and linkages. It is a hand-powered mechanism that creates different mechanical motions that animate a scene.
Automata is simply the plural of Automaton.
Curious how to pronounce automaton? Listen to this automaton pronunciation!
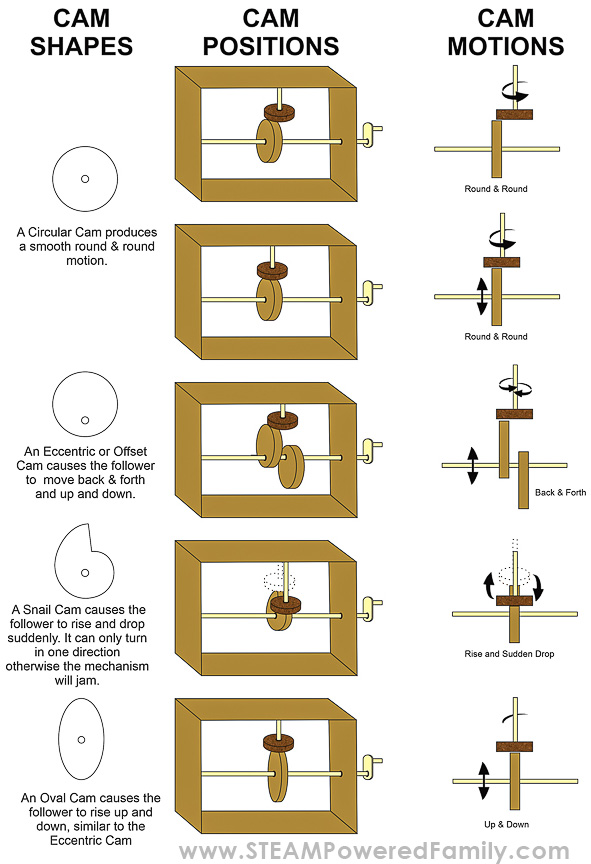
What are cams?
Cams are rotating shapes that push on or rub against mechanical elements called cam Followers to create different types of repeated motions. The simplest way to describe a cam is a wheel with an off-centre or centred axle. The cams, which can be a variety of shapes and the cam-followers, sit on a Rotating Axle or Crank Shaft, which, when turned by a Crank Handle, causes different motions, bringing the machine the characters of the Automata to life. All these elements together are known as a Linkage.
What is a linkage?
Cams, cam followers, axles and cranks create a mechanical linkage. The links or connections between these parts create perfect movement or motion of all the components used in this mechanical structure. The function of a linkage mechanism is to make features change direction or move in a certain way. They produce rotating, oscillating or reciprocating motion from the rotation created from a crankshaft.
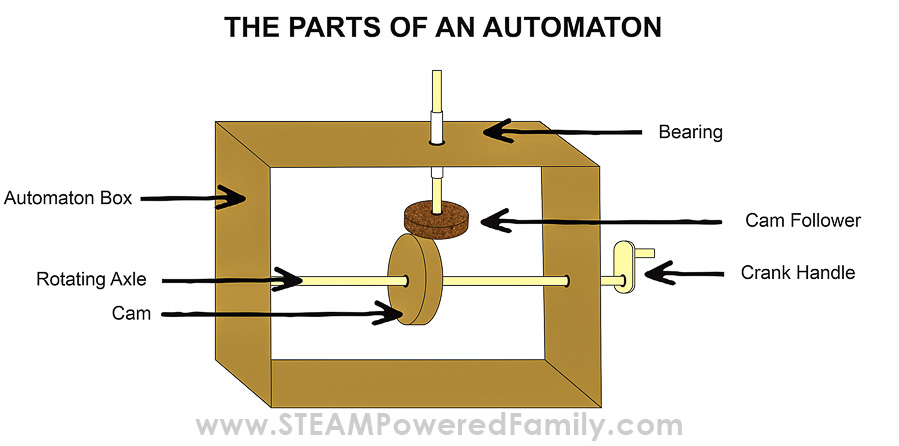
Bringing it to Life
Cams are the parts that add life to the Automaton. They allow the Automaton to do the same motion over and over. The cams cannot do this alone. They need the help of the Cam Follower.
The cam follower rests on the top of the cam and follows the shape of the cam, causing the object attached to it to move in a straight line in one direction. This is called linear motion.
The cams sit on a rotating axle and the bearings guide and stabilize the cam follower. The bearing allows the cam follower to move smoothly. The axle rotates, turning the cams with it.
The different cam shapes cause the cam follower to rise and fall, spin around or move from side to side.
Automaton Build Video
This is a complex, advanced STEM project that is best for tweens and teens, or to be done as a group. Due to the complexity, it is best to watch this detailed tutorial video in its entirety to guide you visually through all the steps. If you can not see the video, please turn off your adblockers as they also block our video feed. Alternatively, you can find this video on the STEAM Powered Family YouTube Channel.
HOW TO MAKE AN AUTOMATON SIMPLE MACHINE
Materials & Tools
Materials to make the Automaton Box:
Double-wall cardboard
Single wall cardboard
4-5 Toilet roll tubes
Paper straws
Corks
4 Thick wooden skewers
Three ping pong balls or polystyrene balls
Craft knife
An Awl
A drill bit the same thickness as the straws
Pencil
Scissors
Side-cutters or Wire cutters
Glue gun
Paint
Materials to make the birds:
A small piece of double-wall cardboard
A craft knife
Googly eyes
Orange felt
3 Colors of craft paint
Pipe Cleaners to match the acrylic paint
Small feathers to match the acrylic paint
Scissors
Glue gun
The bird body template – Fill out the form below to unlock this printable template.
Printable Template
BIRD AUTOMATA DIY DIRECTIONS
Making the Box for the Mechanism
Cut two pieces of double wall cardboard 18cm/7inches X 9cm/3 ½inches for the top and base.
Next, cut two pieces of double wall cardboard 12cm/4 ¾inches X 9cm/3½inches for the sides.
Finally, cut four triangles from two squares – 4cm/1 ½inches X 4cm/1 ½inches for the back.
Using the glue gun, stick the two sides onto either side of the base and then the top piece onto either side.
Glue each of the triangles to the corners of the back of the box. These pieces will keep the box square and stable.
Preparing Box for the Cams
Find the middle of the box on the top, make a mark for the middle cam-follower and draw a straight line from one side to the other.
Find the centres of the two sides for the wooden skewer that holds the cams to slide through the box.
On the top of the box, make two marks, 3cm/1 ¼inches in from the edge for the two side cam followers.
Using an awl or something sharp to pierce the cardboard, make three holes on the top and one on each side.
Push the wooden skewer through the holes on either side and remove it.
Using a drill bit the same size as the paper straw, gently twist it into the three small holes you made with the awl on the top of the box to make the holes large enough for the straws to fit into comfortably.
Mark and cut three pieces of the paper straw, 4cm/1½ inches each in length.
Using the glue gun, put glue around the middle of the straws and gently push them into the holes to have the same amount sticking out the top and inside the box.
Reinforce the straws on the inside of the box with the glue gun.
Cut a cork into seven pieces, 5mm/¼inch thick.
Find the centre of the corks and push a wooden skewer through each piece to make a hole.
PRO TIPS! Ask an adult for help cutting the cork as this can be dangerous as the pieces are pretty thin, and force is needed to get through it with the craft knife!
Making the Cams
Flatten and cut a toilet roll into four pieces, 1.5cm/½inch wide for each cam. We are making four different cams, an oval cam, a drop cam, a circular cam and an eccentric or off-set cam. The 5th cam is called a pear-shaped cam. Each cam has a different motion. You should make all five cams and test each one to see the movement they each create.
Circle Cams
Cut a small piece off a toilet roll as a circle template for the two circular cams.
Get your single wall cardboard and use the inside of the toilet roll to mark four circles and cut them out.
Find the centre of two of these circles and gently push a wooden skewer through them to make a large hole. Put them aside for now.
Stack the other two circles on top of each other, and using an awl, make a hole through both pieces, slightly off-centre. Gently push a wooden skewer through them to make a large hole and put them aside.
Oval Cams
To make the oval cam, take one of the pieces of toilet roll you cut and gently push it into an oval shape, like the cam template, trace it onto the cardboard, and cut it out. Use this shape to trace a second piece.
Stack the two oval cams, find the middle of the oval, make a hole through both pieces with the wooden skewer and then put them aside.
Drop Cams
To make the drop cam, take the last piece of toilet roll and gently push it into the drop cam shape, like the drop cam template and trace this shape onto the cardboard and cut it out. Use this shape to trace a second piece.
Stack the two drop cams and make a hole in the middle of the circle part of the cam with the wooden skewer.
Assemble the Cams
Take one cam from each set and test to see how it fits in the toilet roll. You may need to trim some of them to improve the shape.
Starting with the eccentric cam and using the glue gun, put glue on the toilet roll inside along an inner edge and carefully stick one of the sides into the toilet roll. Reinforce by adding a glue line all the way around on the inside.
To ensure that the holes on either side are in line, push the wooden skewer through the hole on the first side, leaving enough space to fit the glue gun inside the toilet roll and glue line on the other inner edge. Push the other side of the eccentric cam onto the skewer and gently into the toilet roll. Now remove the wooden skewer.
Do the same thing with the other three cams. You don’t need to insert the skewer to line the sides up, as these three cams all have holes in the same place.
PRO TIP! Use the skewer to lift a side back up to the edge if you pushed it in too far by quickly inserting it into the hole and gently pulling it up and into the correct position before the glue dries.
Putting the Automaton Mechanism Together
Get all the cork pieces and the wooden skewers together.
First, you are going to make the cam-followers. Push three skewers through each of the three straws, pointed edge in first.
Push a cork onto the pointed edge of the skewer by twisting it so that it fits on snugly.
Remove the cork, put some glue around the skewer and push it back on.
Do the same thing with the other two skewers.
Using the side cutters, trim the ends of the skewers right up against the corks. Use sandpaper to flatten if necessary.
PRO TIPS! Make sure that the glue does not get onto the end of the straw, preventing the cam follower from turning.
Use a sanding block. It helps to sand the skewers flush with the corks. You can make one easily by wrapping a piece of wood with sandpaper.
Get a wooden skewer and begin by pushing a cork onto the extreme left of the skewer. This cork will be on the outside of the left side of the box.
Push the skewer into the box from the left and push another cork onto the skewer. This cork will be on the inside of the left side of the box. These two corks will hold the skewer in place on the left side.
Choose which three cams you want to use and gently push the first cam onto the skewer and move it across to the left of the skewer.
Push the other two cams onto the skewer as well.
Next, push the third cork onto the skewer.
Push the skewer through the hole on the right side of the box, and finally, push on the fourth cork. The third and fourth corks will hold the skewer on the right side.
Positioning the Cams
Now move all the corks and cams to their correct position.
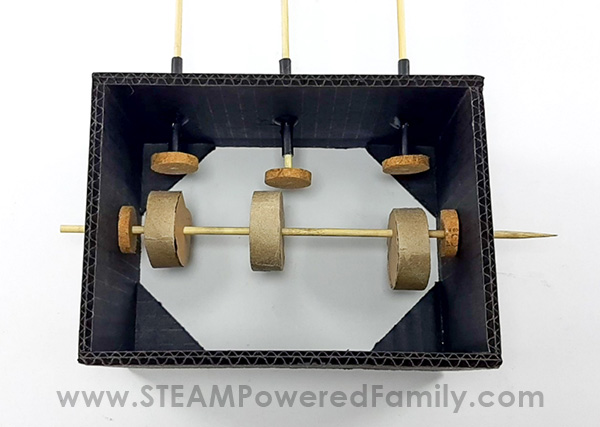
Place each cam under each cam follower. Turn the skewer to see what motion each cam gives the cam follower. You can shift the cams around until you are happy with the movement.
Push the cams right up to the straw inside the box and measure approximately 10cm/4inches on the wooden skewers. Make a mark and trim each skewer with the side-cutter.
Making the Crank Handle
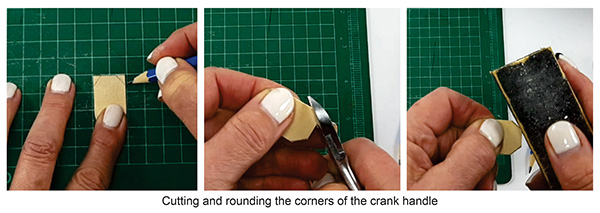
Using a craft knife, get a wooden tongue depressor or lollipop stick and cut it to measure 3cm/1 ½inches, using a craft knife.
You are going to round this edge to match the other side.
Make a triangular mark in each corner, cut the angles off with a side-cutter, and use the sanding block to round the corners.
Make a mark on either side for holes for the wooden skewer.
You can make holes with a drill or use just a drill bit and twist it through the wood to make a hole. The pointed edge of a wooden skewer must fit through these holes. You may need an adult to help you do this.
PRO TIPS! You may need an adult to help you do this.
Do not use an awl and hammer to make the holes, as this causes the wood to split.
Sand the hole with the sanding block to neaten it.
Using the glue gun, put glue into one of the holes and push the pointed edge of another skewer into it. Make sure the skewer fits snugly into the hole.
Reinforce the skewer with the glue gun and trim it with the side cutters. You may need to use the sanding block to neaten it.
Trim the skewer to 3.5cm/1 ½ inches with the side cutters to make a handle. Sand the edge to make it smooth.
Push the other hole onto the pointed edge of the skewer on the right-hand side of the box to see that it fits snugly. Remove it, put glue around the skewer and slide the handle back onto it.
Trim the skewer with the side cutters and use the sanding block to neaten it. Reinforce the join with the glue gun.
Test the crank. YAY…it works!
At this point, you should glue the cams to the skewer, but you may want to change the cams or replace one of the cams with the fourth one you made after you have placed the birds onto the cam-followers. So don’t put any glue on yet!
How to Remove the Cams
Remove the cork on the outer left side and gently pull the skewer and all the cams from the crank handle on the right side. Replace the cams and then put the mechanism back together and test the motion.
Do not glue the cams in place until you are happy with the movement.
Making the Birds
Using the Bird Body Template, cut out one of the templates and use it to trace three bodies onto double-wall cardboard, making sure that the bottom of the bird body lines up with the fluted side of the cardboard as the wooden skewer needs to be pushed up into the cardboard from this side. Cut out the bodies with a craft knife.
PRO TIP! Remember to keep your fingers away from the blade and do not cut through all the layers at once. Make a few cuts until you are through.
Using a glue gun, glue the ping pong balls onto the neck sections of each of the bodies.
Paint each one a different colour.
Get the pipe cleaners, feathers, googly eyes, and orange felt together. It’s time to “dress” the birds.
Wrap the pipe cleaners around the body, right down to the bottom, with the glue gun. Do not cover the fluting of the cardboard at the bottom. The tail feather and wooden skewer need to be pushed into these holes.
Push a wooden skewer up to make sure it is open. Do this for the tail feather as well.
Feathers
Put some glue onto a short feather and push it up one of the holes in the fluting.
Place another short feather against the side of the body and trim it to the right length and glue it down. Do this for the other side as well. Trim the tail feather, too, if necessary.
Face
Cut a small square of orange felt for the beak, fold it in half diagonally and stick it onto the ping pong ball.
Stick the two googly eyes just above the beak and add a small feather between the eyes.
Your first bird is ready! Repeat the process and complete the other two birds.
When ready, slide all three birds onto the cam-followers, crank the handle and watch the magic!
A Brief Automata History
Automata may sound like new technology, but it dates back to ancient Greece. The word Automaton comes from the Greek word for Automata, which means “acting of one’s own will” and was first used by Homer.
Automata have been around since the time of the early Egyptians. They built a statue of the King of Ethiopia near Thebes. The figure made a melodious sound when the sun’s rays struck it at a specific location, during sunrise and sunset.
Chinese mechanical engineer Yan Shi created a life-size human-shaped automaton around 1000 BC. King Mu of the Zhou Dynasty was so amazed by this Automaton that the legend claims it was taken apart before him to prove it wasn’t a natural person.
In 1770, Pierre Jaquet-Droz was generally thought of as the inventor of modern-day Automata. He invented “the writer”, a mechanical boy who looks like an actual boy writing at his desk around.
Between 1860 to 1910, there was a period known as “The Golden Age of Automata”. There were many small family-based companies of automata makers that flourished in Paris. These rare and expensive French automata continue to attract collectors from all around the world.
Modern-day automaton can be seen in everything from fun mechanical toys for children to the machinery in clocks and even complex computer science programs.
An Automaton Challenge
Your Automaton does not yet exist—it’s up to you to be creative and design your own.
Ask yourself:
What types of characters or objects will be in your scene?
How will those things move?
Your vision will need to be mechanical (how the elements move) and visual (how the elements look).
Once you come up with a clear idea for the automata scene you want to create, you can make a few drawings and pick the right cam shape below to bring it to life.
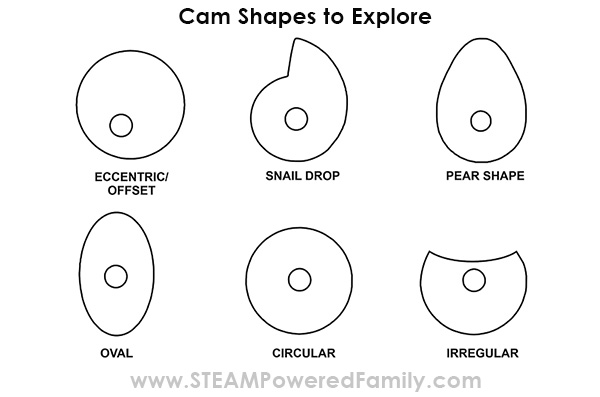
There are many cam-shape possibilities, so experiment with a few options before settling on one. Try designing your cam, like a heart or some other random shape. Make it and test it. You might surprise yourself!
PRO TIPS AND TROUBLESHOOTING
Remember, your goal is to make cams with motions that work smoothly and don’t stop working intermittently.
Take the time to rotate the crankshaft slowly and examine your design carefully, understanding and evaluating if and why your cams aren’t working right.
Constant redesigning and testing at this stage of the process will ensure a successful Automata when you’re done!
If everything’s not cranking smoothly right away, don’t despair!
Using this project design, the Automaton you made allows easy removal or repositioning of all the parts. If you need to remake your cam, slip it off and try again.
Imagine what characters you want on the top of your box. Design your scene and decide what cams will make your characters move in the best way.
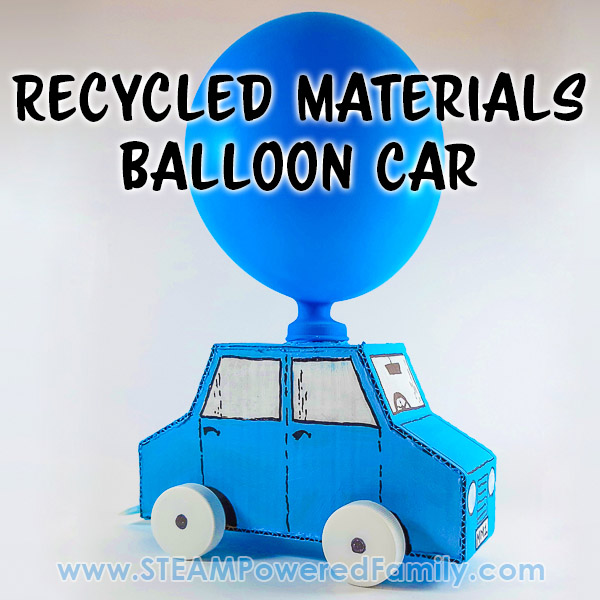
Or try building an Automata out of Lego like our friends did over at Frugal Fun for Boys and Girls.
Get a piece of paper, start designing your own automaton, and remember to have fun with simple machines and STEM!