DIY Piggy Bank STEM Project
Who doesn’t like to save money? Most of us at some stage of our early childhood owned a Piggy Bank, and fondly remember tucking our coins safely into it. Then one day popping it open and counting all your money! Piggy banks are a wonderful way to introduce children to the importance of saving money. In today’s STEM project, we are building a Piggy Bank that is interactive thanks to a simple machine component of the build. This is a great project for elementary students, and will make saving money fun!
DIY PERSONALIZED PIGGY BANKS
Table of Contents

Disclaimer: This article may contain commission, paid partnerships, or affiliate links. We independently review everything we recommend. When you buy through our links, we may earn a commission from qualifying purchases.
In this fun engineering project, we will make a personalized, modern version of a Piggy Bank. It uses a simple machine to help us get the money into the “bank”, adding a fun, STEM twist to our money box. But before we start building, let’s look at the history of this famous device and how it got its name, as well as understand what a simple machine is.
History of the Piggy Bank
About 600 years ago (in the 15th century), in both Western Europe and South East Asia, people would use pots to store what money they had. These pots were made from an affordable orange-colored clay called “pygg” and were known as a ‘pygg’ bank or pot, after the clay they were made from.
Years later, potters from England began to make these “pygg” pots into the shape of pigs as a play on the word “pygg”. These cute money boxes appealed to customers of all ages, but especially children.
The first “pygg” pots had no holes in the bottom. So how do you think they got the money out? They had to break it! That is where many people say the expression “breaking the bank” came from. Of course, this meant that you could only access your money from the bank in one lump sum, so you only broke the bank when you really needed your money!
Piggy banks are popular around the world. In Germany and the Netherlands, the pig represents wealth and good fortune, so it became customary to give people a piggy bank as a gift. In Chinese culture, the Chinese zodiac, the pig, is also a symbol of wealth and good fortune, and giving a piggy bank is believed to bring good luck and fortune to the person who receives it.
I think though, the most important reason for giving a Piggy Bank as a gift to a child is to encourage saving money and teach children how to be responsible with money!
What is a Simple Machine?
A simple machine is an object that makes moving or lifting things a whole lot easier. An inclined plane, a wedge, a lever, a wheel and axle, a screw, and a pulley are all known as simple machines.
All these gadgets change the strength or the direction of a force, like a push or pull.
In this fun project, we will be using a lever so our Piggy Bank can “swallow” our money, plus we will have a screw on the back so we can remove our money. Let’s look at what a lever is and how it works in our Piggy Bank.
The Science of the Lever
A seesaw is also known as a lever. The seat of the seesaw is a long piece of wood that is balanced on a support called a fulcrum, which is placed exactly in the middle of the long piece of wood. Imagine yourself on a seesaw. When you use your legs to push your side of the seesaw upward, the person sitting on the opposite side is forced downward. The fulcrum is there to ensure that the seesaw is evenly balanced.
This is how the inner workings of our Piggy Bank lever works.
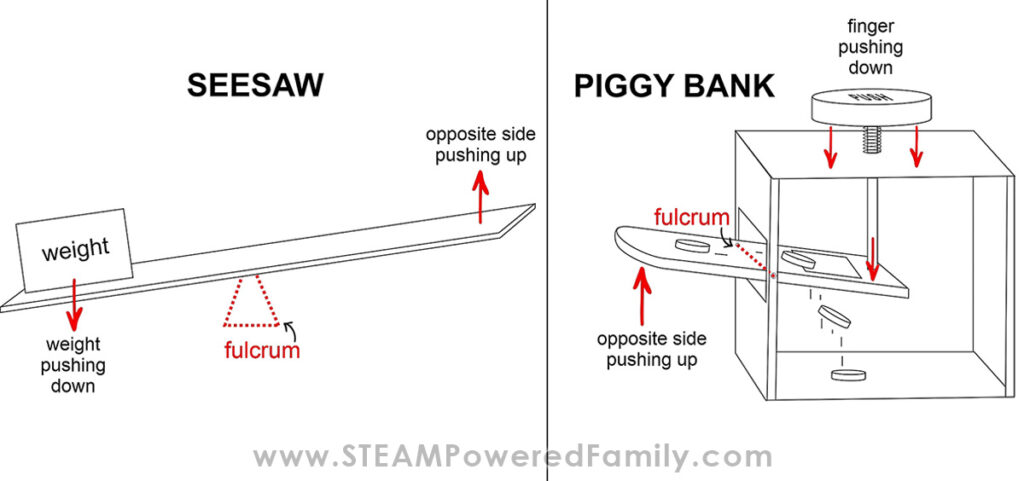
The push button in this fun DIY Piggy Bank project is our simple machine lever. When you push down on the button, the wooden skewer under the button pushes down on the end of the “tongue”(inside the box), causing the “tongue” that is holding the coins (on the outside of the box), to tip upwards allowing the coins to slide down the surface of the tongue and fall through the hole at the end and into the box. The spring makes it easier for the “tongue” to return to its starting point, without you having to pull it back up.
So we can say that a lever can transfer the force applied to one end of it, to its opposite end, making the action a whole lot easier.
Explore more Lever action with Catapults!
Making a DIY Personalized Piggy Bank
Let’s get started so we can start saving money!
DIY Piggy Bank Video Tutorial
The easiest way to learn how to do this project is to watch our video tutorial first. This will help you visualize all the steps as you are reading the directions and building your own. If you can’t see the video or would like closed-captioning, please visit the STEAM Powered Family YouTube Channel to watch this video.
Materials & Tools
3mm sturdy cardboard – minimum dimensions 45cm X 22cm
Glue gun
Glue stick
Ruler
Pencil
Box cutter or Exacto knife
Scissors
Side-cutters
Awl
Wooden skewer
Two small, empty plastic yogurt or bottle with a large lid (the hole needs to allow the largest coin you use to fall through it)
A spring from an old pen
Brown paper tape to cover the edges of the box – optional
A 34cm X 1,5cm strip of corrugated cardboard
Paint or felt-tip pens to decorate and personalize your Piggy Bank
4 Wooden beads to use as legs – optional
All the coins you can find!
Directions
Print Templates
Print out the first two pages of the templates on cardstock. These are the pieces that you are going to use to trace onto the cardboard to make your box. You can access the templates by joining the STEAM Powered Family mailing list in this form:
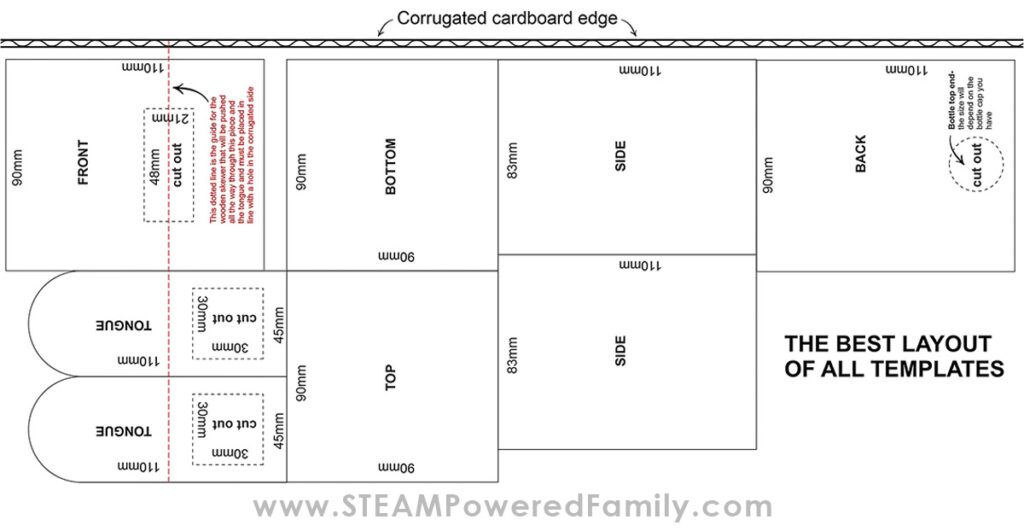
Cut Cardboard Templates
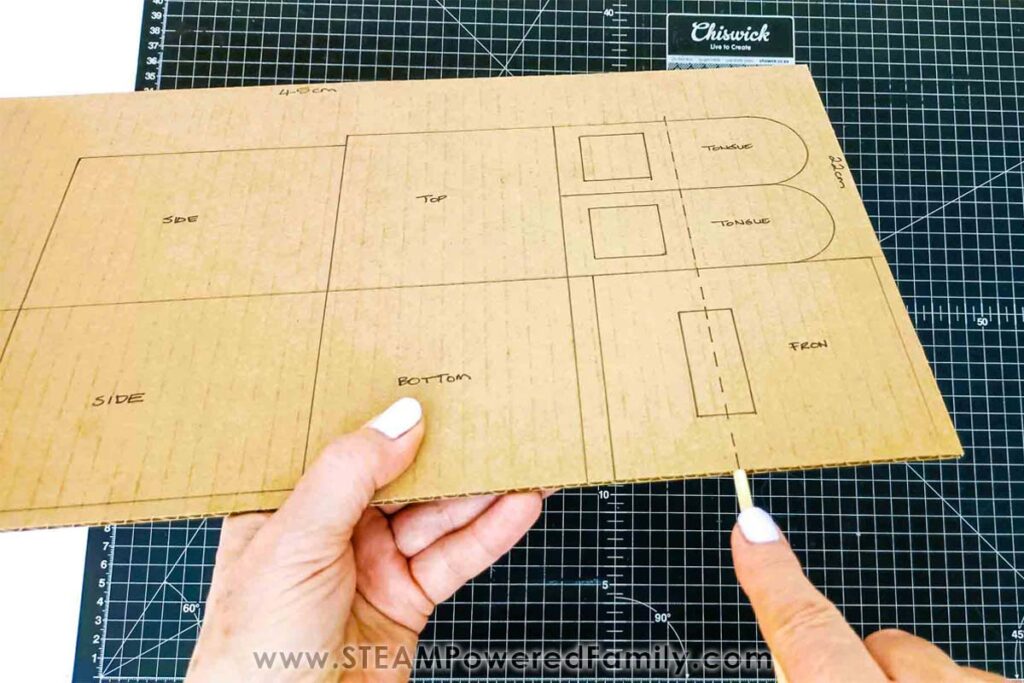
Cut the cardboard to the dimensions: 45cm X 22cm
Draw 3 circles the size of the inside of the cap you are going to use as a pushbutton, onto the cardboard.
Next trace out the middle pieces on the “tongue” and the front templates too.
Ensure that the corrugated edges of the cardboard match the red corrugated edges drawn on the templates.
Label and Mark the Pieces
Label all the pieces you cut out.
Mark all the dotted lines on all the necessary pieces.
Below is a picture showing you the best layout of all the pieces on the cardboard:
Cut Out the Cardboard Pieces
Cut out all the pieces using a craft or Exacto knife, rather than scissors.
Pro Tip! When cutting rounds, always use an Exacto knife. Make small cuts all the way around and then push the point of the knife all the way through and cut out in small movements, keeping your fingers away from the knife’s blade. You may need the help of an adult for this.
Cut a piece of corrugated cardboard to 34cm long X 1.5cm wide. The corrugations should run down the 1.5cm width, not the length.
Creating the Back Access
Cut the top of the small plastic bottle off, so you have the threads for screwing back on the cap. Do this using a craft knife, leaving enough plastic to be glued into a hole at the back of the Piggy Bank. Neaten the edge of the plastic if you need to with scissors.
Find the middle point of the bottom of the BACK piece of the Piggy Bank and trace and cut the circle out.
This is going to be the opening for getting your money out so you don’t need to break the bank!
Assembling the Cap Circles
Find the middle of one of the three circles you cut out for the push button and push the wooden skewer through it.
Put the second circle on top of the first one and push the wooden skewer through it too.
Push the third circle into the cap, ensuring that it fits in tightly. You can use the glue gun for this if you wish.
Glue the other two circles into the cap.
Pro Tip! You may not need all three circles, depending on the depth of your cap. I only used two.
Gluing the Tongue Together
Now glue the two pieces of the tongue together ensuring that you can see the dotted line on one of the pieces. This is where the wooden skewer will go through.
Push the wooden skewer through the cardboard at the dotted line on the top piece only to stretch the hole a bit.
Now we are going to cover the edge of the tongue with the tin piece of corrugated cardboard you cut earlier.
Start gluing it on just after the hole for the skewer, so you can see where to put the skewer once the tongue edge is covered.
I forgot to mark where the hole for the skewer was, so I used an awl to make a small hole where I thought it would be. Luckily I chose the correct spot!!! Make sure you do mark where the hole for the skewer goes. It will make life easier.
Remember to put the tongue flat on the table each time you put glue on the strip. This will ensure that the strip will lie on the edge all the way around.
Put the “tongue” into the slot on the front piece. Remember that the wider part of the front should be above the dotted line.
The dotted lines of the front and the “tongue” should line up.
Push the skewer through both pieces with the point of the skewer going in first.
Before you trim the excess off the skewer, check to see that the “tongue” moves up and down freely.
Now glue both ends with the glue gun.
Glue the Box Together
Place the back piece flat on the table, with the hole for the cap nearby.
Glue one of the side pieces onto the back piece closest to you. The sides you are gluing together should both be corrugated.
Glue these two pieces on top of the bottom piece.
Find the center of the top piece, using a ruler, and make a hole with the wooden skewer here.
Now glue the top piece on top of all the pieces you have glued together.
Glue the front and “tongue” piece onto the box, opposite the back, in the front position, leaving the other side open.
Place the box onto its side, facing upward. You can now see into the box to complete the lever mechanism for the “tongue”.
Assembling the Tongue Lever Mechanism
Push the wooden skewer through the top hole and with the point of the skewer, make a hole for the skewer to fit into on the end of the “tongue”. Ensure that this hole is in the middle, as this acts as the fulcrum for the pushbutton or lever and needs to be evenly balanced.
Cut off the point of the skewer with a side cutter and make a mark at 10.5cm on the skewer.
Do not cut the skewer yet, as you may need a little more length for the spring.
Push the skewer through the top, put some glue in the hole you made in the “tongue” and glue the skewer to the tongue.
Test that the lever mechanism works.
Place the spring onto the skewer and ensure that the tongue is dead straight.
Make a mark 5mm above the spring and cut the balance off with a side cutter.
Glue the pushbutton cap onto the skewer.
Finishing Touches
Glue the other side onto the box to close it.
Undo the plastic cap for the back from its base and glue the base into the hole you made in the back piece with the glue gun.
Your Piggy Bank is complete. At this stage, I use the brown paper tape or brown paper to cover all the edges. This isn’t necessary but it makes for nicer edges when building with cardboard.
Decorating and Personalizing the Piggy Bank
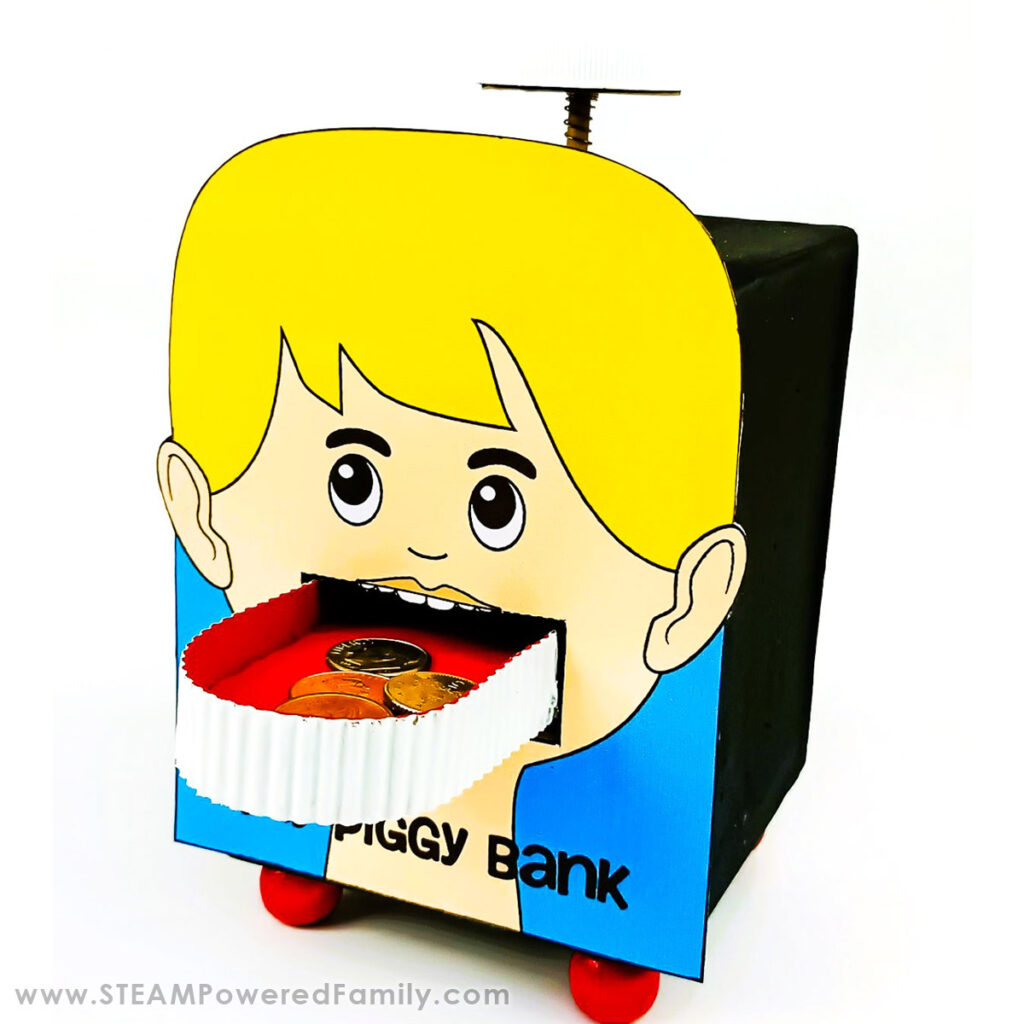
If you use the colour templates provided, Print the template on cardstock, cut it out, and cut out the part that is labeled “cut out”. Cut out the words “PUSH” and “OPEN”. Paint the box black, the “tongue” red and the corrugated cardboard strip white and glue the template onto the front of the box using a glue stick, with the “tongue” popping through the mouth.
If you use the “colour-in” templates provided, paint the box and the “tongue” any colour you like and glue the template onto the front of the box using a glue stick, with the “tongue” popping through the mouth.
If you are doing your own decorations, be creative and just have fun! You could paint it as any animal, as all animals have a tongue, so it could be a pig too.
Glue the words “PUSH” and “OPEN” respectively onto the pushbutton and the back cap with a glue stick.
Finally, if you have beads, glue the wooden beads to the bottom of your Piggy Bank, to finish it off!
This is the front of our finished Piggy Bank:
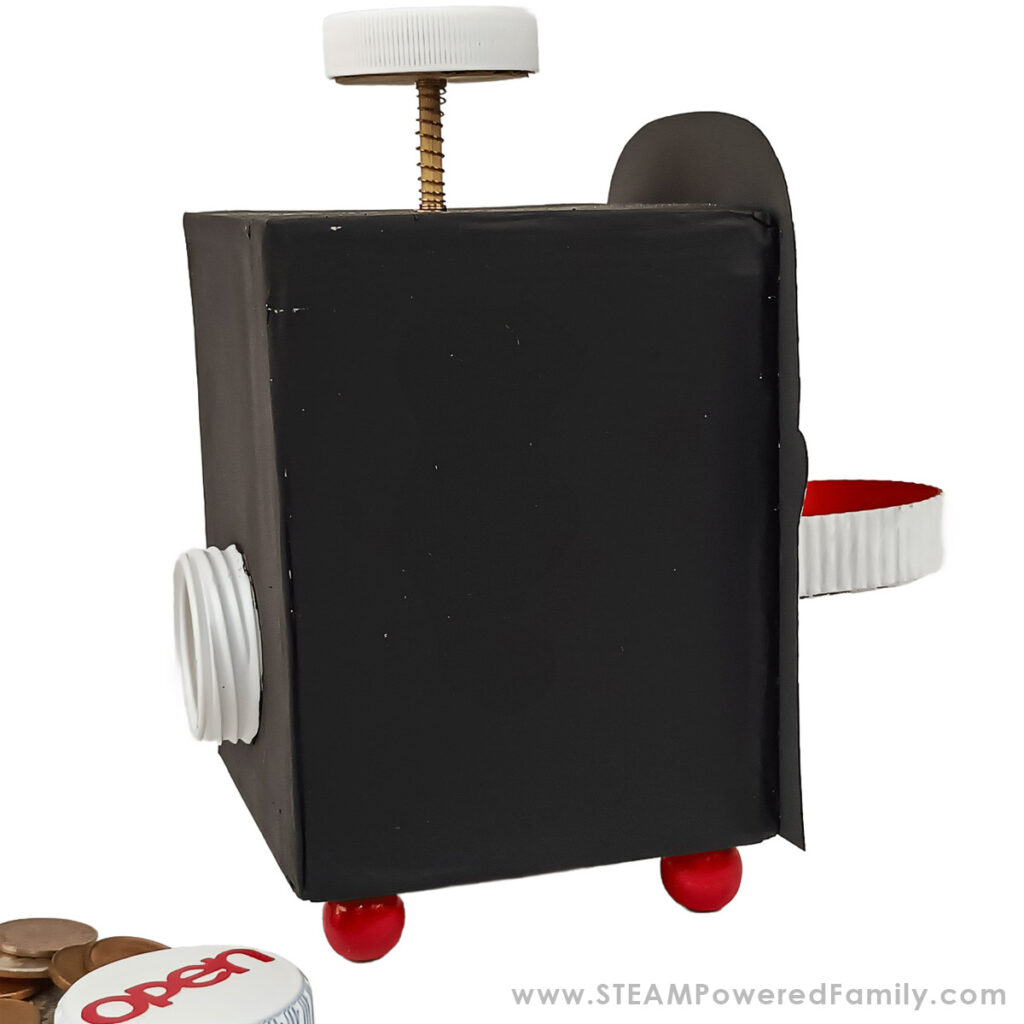
And this is the back and side:
START SAVING MONEY!
Get your coins and start filling your Piggy Bank.
A good idea would be to set yourself a weekly or monthly goal for saving. You could save only coins with a specific value or any coins to reach this savings goal.
Unscrew the back cap and shake the Piggy Bank to get all the coins out.
I hope you had fun making your very own Piggy Bank!
STEM CLASSROOM EXTENSIONS
This project would make a good lesson on Simple Machines. Can you think of any other simple machines that would work on a Piggy Bank? How about a wheel and axle or even a screw? Where and how would you use them?
Design a Piggy Bank using any 3D shape, maybe even an animal. Use your imagination and get creative. With some basic knowledge of STEM concepts, such as simple machines and engineering, you can make your own special piggy bank design!
More Simple Machines
Check out more Simple Machine projects.