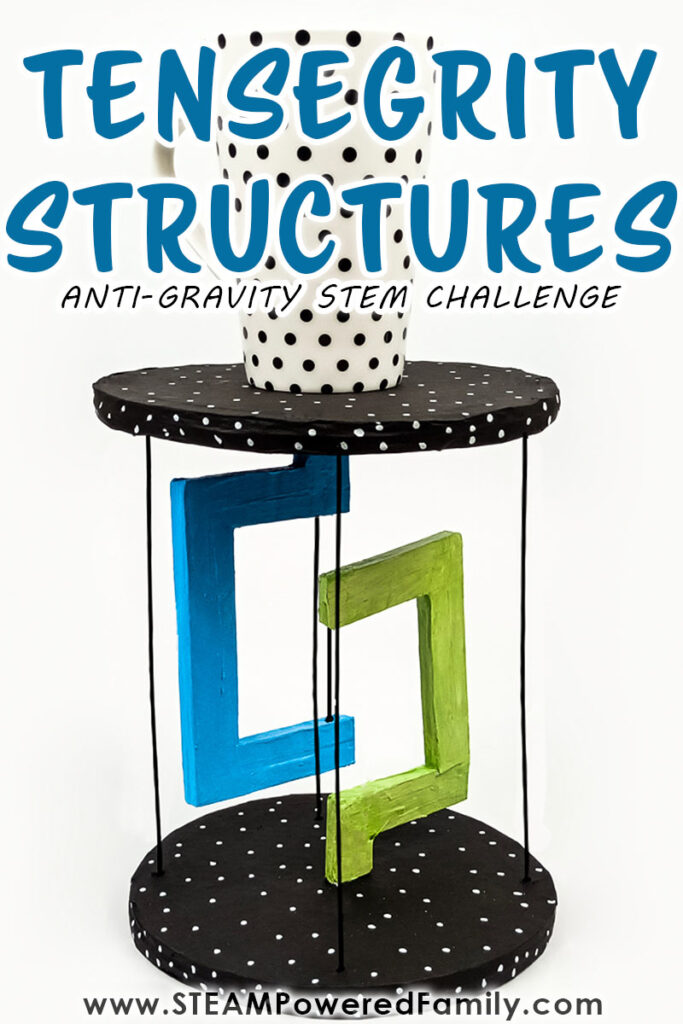
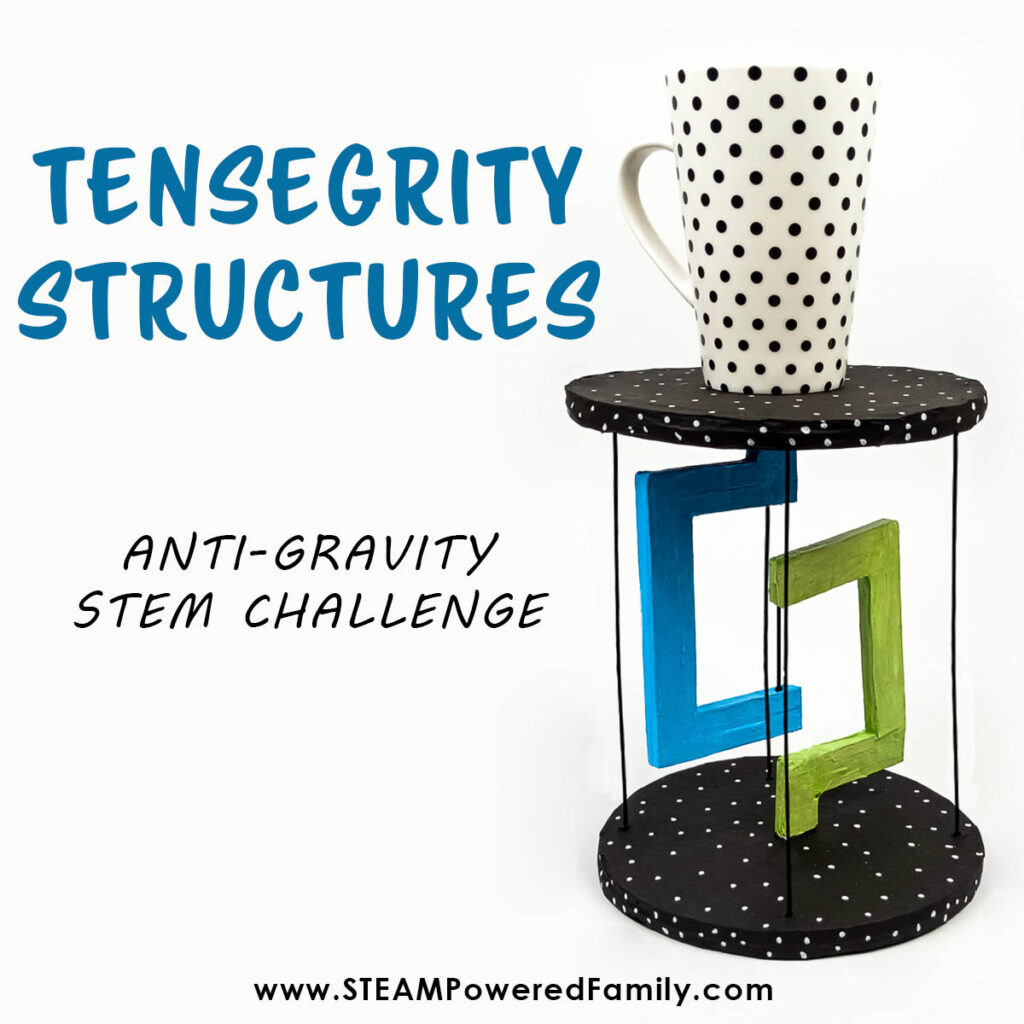
How to Build Tensegrity Structures STEM Project
Tensegrity, I bet you have never heard of it before! In this fascinating STEM project, you will build Tensegrity Structures. These anti-gravity engineering builds are like magic the way they seemingly float with just some strings holding them up. This is a brilliant STEM project for middle and high school students to study architecture, physics and engineering.
How To Build Tensegrity Structures
Table of Contents
Disclaimer: This article may contain commission, paid partnerships, or affiliate links. We independently review everything we recommend. When you buy through our links, we may earn a commission from qualifying purchases.
The term Tensegrity Structures was coined by structural engineer and architect Buckminster Fuller. Fuller used his creative genius to develop unconventional structures that maintain their stability, or integrity, through a pervasive tensional force, hence the term tensegrity.
What is Tensegrity?
The words Tension and Integrity make up the word Tensegrity. Tensional Integrity is a principle of physics where two or more objects push and pull against each other, creating opposing forces which cause a structure to be held stable and in place. The continuous tension and discontinuous compression create stability.
It’s hard to believe that strings or cords could be made to support compressive loads or hold our structure up, let alone allow it to hold an object too.
A compressive load is one that compresses or shortens a structure. Think of it like it is squishing under the weight of a load. We know cords can suspend a load using its tensile strength like we see in a construction yard crane that is lifting heavy materials. But chords aren’t able to support compression on their own. Normally they crumple.
However, with the right setup and balancing in a Tensegrity Structure, they can suspend a system of components that are under compression. A structure that experiences this form of floating compression gains strength from the chords under tension which suspend the compressed components.
A structure based on this principle will combine components that compress, or push against each other, as well as ones that create tension, or pull apart from each other. They work together allowing the structure to be held in place by the opposing forces.
A Tensegrity System can be a difficult concept to grasp for students. The best way to learn and understand this structural principle is to build your very own Tensegrity Structures.
Tensegrity Structure STEM Activity Video
Before attempting to build this structure watch our tutorial video showing how we built our structure. Watching the process will make your own build go more smoothly. If you can’t see this video, please turn off your adblockers as they also block our video feed. You can also find this video on the STEAM Powered Family YouTube Channel.
Tensegrity Structures: Easy Step By Step Instructions
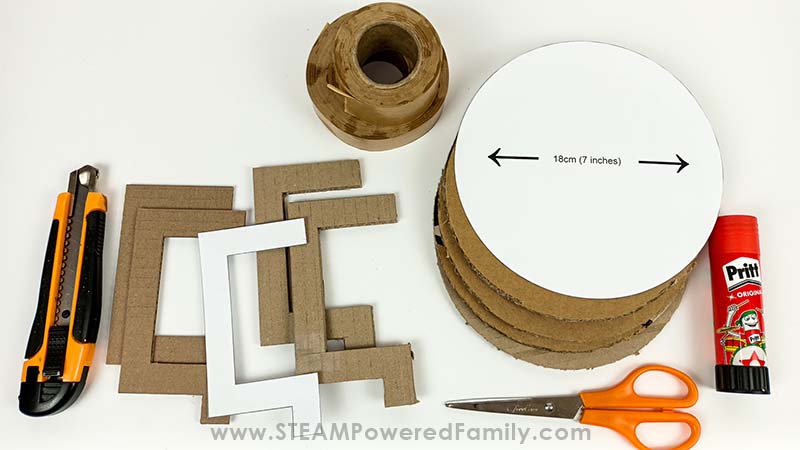
Materials & Tools
Pieces of both single and double wall cardboard
Glue gun
Glue stick
Ruler
Pencil
Hobby knife
Chopstick
A roll of fishing line or jewelry cord or string – It must have no stretch!
Ten small bulldog clips
Brown paper tape
Plus you will need the Tensegrity Structure Templates. These are available by subscribing the to STEAM Powered Family mailing list. Simply put your email into the form to unlock the printable which includes templates, plus written step by step instructions.
Tensegrity Structure DIY Directions
Getting your pieces ready
Print and cut out all the template pieces. Using the templates, trace and cut out the following pieces:
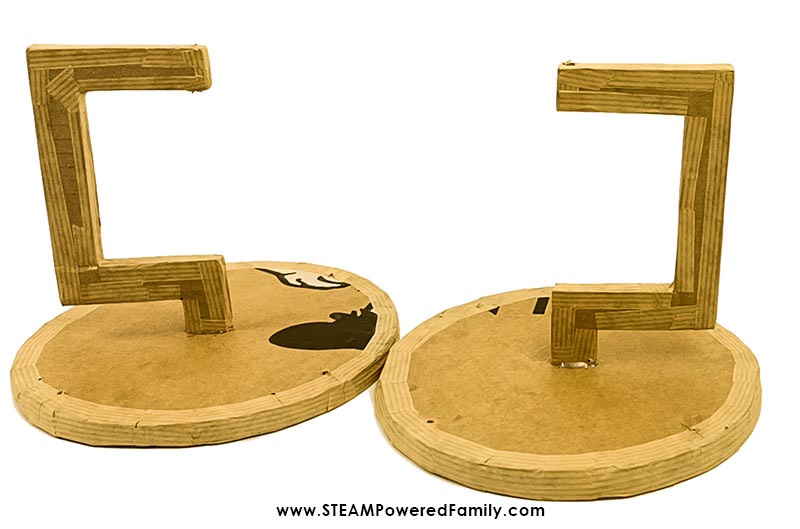
- Single wall cardboard: two parts of the “C” shape.
- Double wall cardboard: two pieces of the “C” shape.
- Double wall cardboard: four circles.
Use a small hobby knife to cut the circles out. Do not try and cut through it in one go. Make at least two to three passes around the circle for a smooth cut.
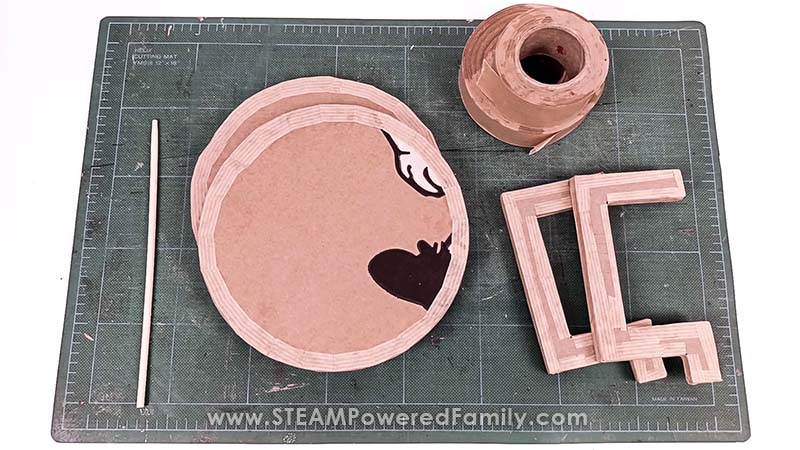
Gluing the pieces together
Glue one piece of single wall cardboard to one piece of double wall cardboard (using the “C” shape) using a glue stick. You should have two of these pieces.
Glue two circles together and then the other two circles together as well.
If you have some, this would be a good time to cover all the edges with brown paper tape. This step is not a must. It just makes the edges neater.
Cutting and gluing the chopsticks
Using the chopstick (reuse some from the daVinci Bridge STEM Challenge), gently make a hole in the middle of the “foot” of the “C” shapes. Do not go through the top edge.
PRO TIP! The reason for using one layer of single wall and one layer of double wall cardboard is that it creates three layers. The chopstick must go through the middle layer.
Cut two pieces of chopstick measuring 5cm/2¾ inches each.
Glue each stick into the “foot” of both “C” shapes.
Gluing the “C” shapes onto the circles
Find the middle of both circles and make a hole using the scrap piece of the chopstick. Do not go through the other side.
Glue both “C” shapes onto each circle.
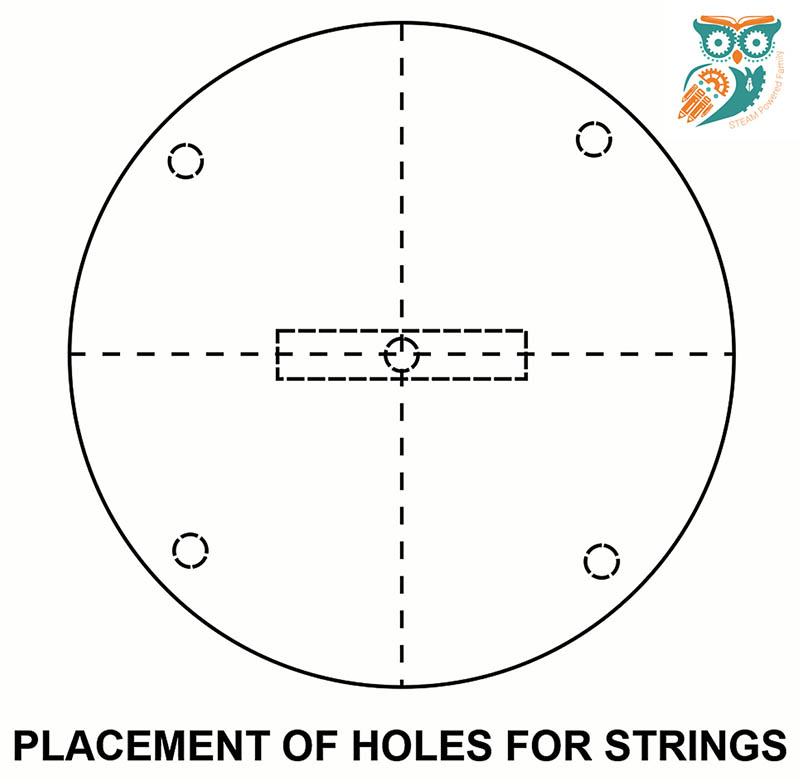
Now is a good time to mark the holes for the strings on the underside of each circle. See the diagram for the correct placement.
Putting the Tensegrity Structure together
Grab your string. Make sure the string has no stretch to it! Once you start trying to balance something on your structure, the forces will cause your string to stretch and your structure won’t stand. You want something with zero stretch.
Cut four strings to 35cm/14 inches each and one piece to 15cm/6 inches.
Get ten small bulldog clips. These will help you to balance the structure before applying the glue.
Start with threading the short piece in the middle. The two middle pieces should measure
approximately 4cm/3½ inches apart.
Use the bulldog clips to hold the loose ends in place.
Now thread all four pieces into the top and bottom circles, using the bulldog clip similarly.
Once all the strings are threaded, glue the string on the underside using a glue gun. Do not make giant, big blobs of glue.
Now glue the middle string in place, ensuring that the two pieces of cardboard are
approximately 4cm/3½ inches apart. Remove the bulldog clips as you glue the strings down.
Now for the tricky part – methodically and carefully tighten the four strings that will hold the
structure together. Ensure that the four strings should be air straight but not
excessively tight.
You may need to do this step a few times until the structure magically stands on its own!
When you are satisfied, you can try placing a small object on the top and it should stand on its own.
What if it Collapses?
If the structure collapses, you need to balance the whole thing again. Keep making small adjustments to get the perfect balance.
PRO TIP! Do not permanently glue the strings until the structure can hold up without collapsing! If you put an object on top, don’t use an object that is too heavy and that won’t break easily if it collapses.
If your strings start stretching, your structure will collapse or tilt when you try and balance something on the top. Make sure your string has no stretch in it. If your strings stretch you will need to replace them with a string that has no stretch or give to it.
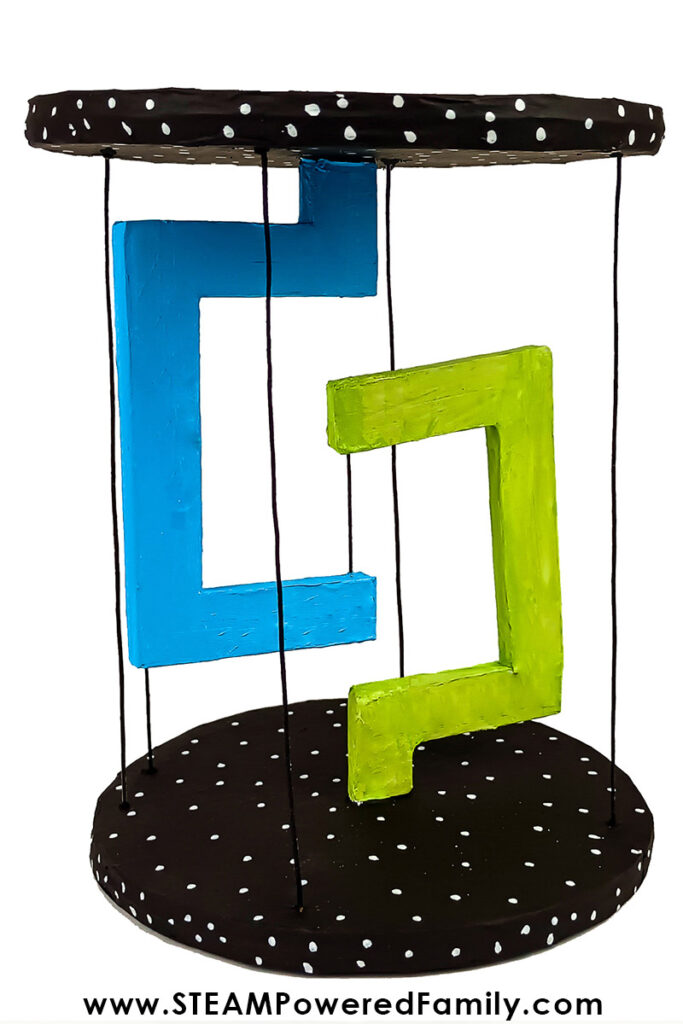
Now that your Tensegrity Structure can hold up without collapsing, you can glue all the strings down and trim off all the excess string.
Your Tensegrity Structure is now ready! All you need to do is paint it to give it some life!
A Few Examples of Tensegrity Structures
There are many instances of this incredible physics principle around you that you never knew! Many bridges and towers use this principle. All humans and animals have muscles and bones, which act together to keep us strong and stable, just like a Tensegrity structure.
One of the most iconic examples of Tensegrity is The Needle Tower in Washington. It was designed by artist Kenneth Snelson for the Hirshhorn Museum and Sculpture Garden. It is made up of aluminum tubes that act in compression and are held up by tension created through steel cables attached at the ends of each tube. When the viewer stands in the middle of the tower, they will notice a six-pointed Star of David, but when viewing it from afar, the steel cables seem to disappear, leaving the thick aluminum tubes to float in midair.
Another unique tensile structure is NASA’s Super Ball Bot. It is the only Tensegrity Structure to be used outside of Earth and it is designed to be a landing and mobility platform. It can be dropped from high altitudes without suffering damage due to its flexibility. Like many tensegrity structures, it uses less material and has a lower cost than all its alternatives.
Many furniture designers have used Tensegrity in the design of furniture innovations, like chairs and tables.
Troubleshooting
If your Tensegrity Structure cannot hold anything up without collapsing, don’t lose hope; check the tension on all the strings and adjust if necessary. Part of STEM is learning from our failures.
Want more Tensegrity challenges? Check out this Lego one from our friends at Frugal Fun for Boys and Girls.