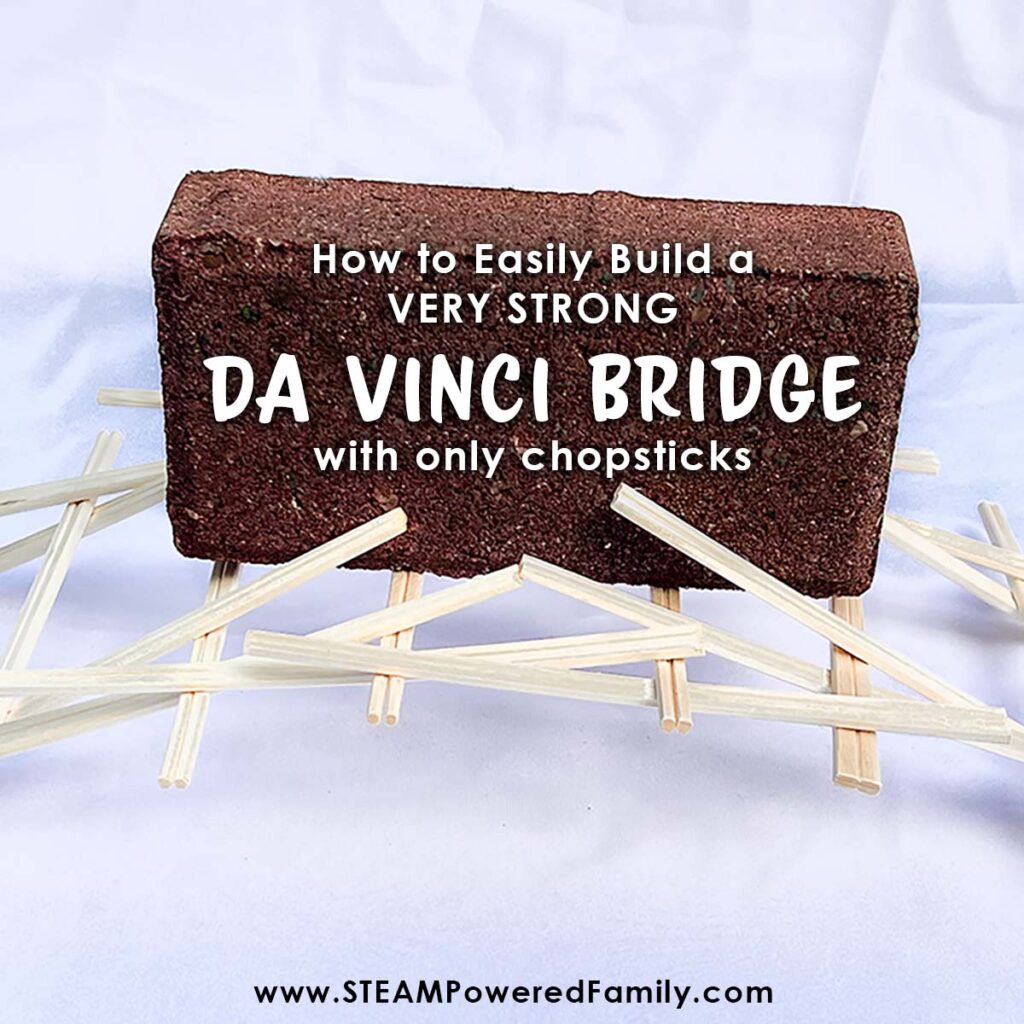
da Vinci Bridge Design Challenge
Can you imagine building an entire bridge with only the bridge materials to support it? No bolts, no welding, no rivets, no nails, no screws – nothing but the building pieces themselves supporting each other. Could that even be possible? Not only is it possible, but it is a truly engaging and fascinating lesson to do with your kids or your class. It will take some trial and error and there are steps you can take that will save you some frustration along the way, but this project is sure to pull plenty of ooooooos and aaaahhhhhs.
The da Vinci Bridge: A Self Supporting Masterpiece
Table of Contents
Disclaimer: This article may contain commission, paid partnerships, or affiliate links. We independently review everything we recommend. When you buy through our links, we may earn a commission from qualifying purchases.
Leonardo da Vinci
If you ask your students about Leonardo da Vinci and what they may know about him, you will more than likely get answers pertaining to his beautiful works of art. Kids will surely recognize the Mona Lisa or The Last Supper, but do they know that he was an inventor as well? A renaissance-era mastermind, Leonardo is credited with the early designs of inventions like the helicopter, the parachute, a diving suit, and my favorite – the self-supporting bridge.
What da Vinci’s self-supporting bridge?
During his career, da Vinci worked as a military engineer for Cesare Borgia. He worked mainly on weapons of war, but one design stands out as both simple and genius. da Vinci’s bridge is designed to be able to be assembled and broken down quickly and efficiently so that the military could move swiftly across bodies of water and be able to remove the ridge so others couldn’t follow.
da Vinci’s design featured notched poles or logs that would be placed so that as pressure is applied by someone or something moving across it the friction of the pieces would not only hold the load but make the structure stronger as well. This force is called SHEAR – the perpendicular force on an object. So as whatever is crossing the bridge pushes down on the bridge pieces toward their axis points, it strengthens the pieces underneath making the structure MORE secure.
da Vinci Bridge Video Demonstration
Check out this video of us making a da Vinci Bridge. If you can’t see the video, please turn off your adblockers as they also block our video feed. You can also find this video on the STEAM Powered Family YouTube Channel.
What do I need to build a da Vinci Bridge?
It’s simple! You need something to act as your poles or beams. That is it!
Some ideas:
Pencils (I saw some people wrap rubberbands at axis points to act in place of notches which also holds the structure from slipping, I, however, thought this took away from the visual of the self-supporting structure)
Wooden Craft Sticks
Tree Branches
My choice? Chopsticks
Reader Tip! One reader offered a suggestion if you are having issues with the chopsticks slipping, try surf wax! Just apply a bit to your chopsticks and it will help them to not slide so easily.
Printable Directions
That’s it! Nothing else is needed to build a really strong bridge. Well except you might find it even easier if you grab our free printable instructions that include colour coded step-by-step diagrams illustrating each step.
Chopstick da Vinci Bridge
I attempted this project with craft sticks with my own kids who are a little older (11,15 and 18) before attempting it with students. It was really frustrating and the thought of trying it with a class full of kids made me nervous. Because the craft sticks were flat and smooth and short, they slid very easily and we had to start over so many times.
I was getting ready to try again when I thought of trying chopsticks. They were a little longer like a pencil, but my favorite part was that they are squared off so they don’t roll like a pencil or slide like the craft sticks. The best part is that you can buy them really cheap and in bulk on Amazon. It is well worth it to buy some. Since there is no gluing or fastening in any way they can be used again and again!!
How To Build a da Vinci Bridge
This is a great group project for the classroom.
Give each group 12 pairs of chopsticks to start. Make sure you have plenty of extra, once your kids start building they may want to keep going to see how big and strong they can make their bridge! If you’re working with young kids or easily frustrated kids I would hand them out unsplit. Chopsticks come fused together in pairs. You can split them if you prefer but I didn’t for the first attempts.
Pro Tip: Note the colored lines in the diagram. If your students struggle, try painting your chopsticks. Not only will it make following the instructions easier, but the result will be a gorgeous rainbow coloured bridge!
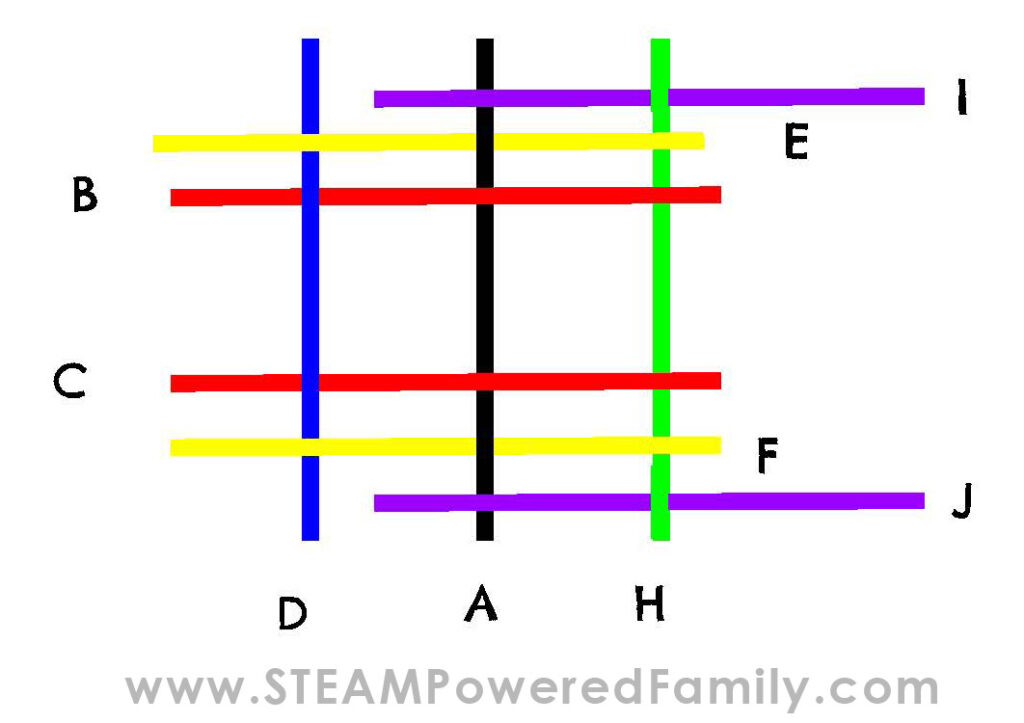
Step 1: Lay one chopstick on the table in line with you so if you look down it looks like a small letter “L”. Call this chopstick A.
Step 2: Place two chopsticks parallel to each other but perpendicular to the first chopstick and resting across it with about an inch of the two chopsticks over the first. Call these chopsticks B & C.
Vocabulary check:
Parallel: two lines side by side and always have the same distance between them.
Perpendicular: at an angle of 90° to a line, plane, or surface.
Step 3: Place a fourth chopstick over the two that you just placed. The structure should look similar to a hashtag symbol. Call this chopstick D
Step 4: Carefully lift up on your first chopstick A and slide your next two on the outside of B&C going under A but over D.
Step 5: Slide another chopstick under everything. Parallel to A & D then slide it toward and under A – this will become your next lifting stick. Call this chopstick H
Step 6: Lift carefully on H and slide two more chopsticks parallel to E & F under H but over A. Call those chopsticks I & J
Repeat Steps 5 & 6 as many times as you can to make your bridge.
Testing the da Vinci Bridge Strength
This is the WOW moment! Put something heavy on your bridge to test it. I used a brick. Personally, I was sure that the chopsticks would snap under the weight but just like da Vinci showed us, the structure just became stronger and more solid.
We loved this project. Even though it was tricky, the end results and the “Ah Ha!” moments were so worth it.