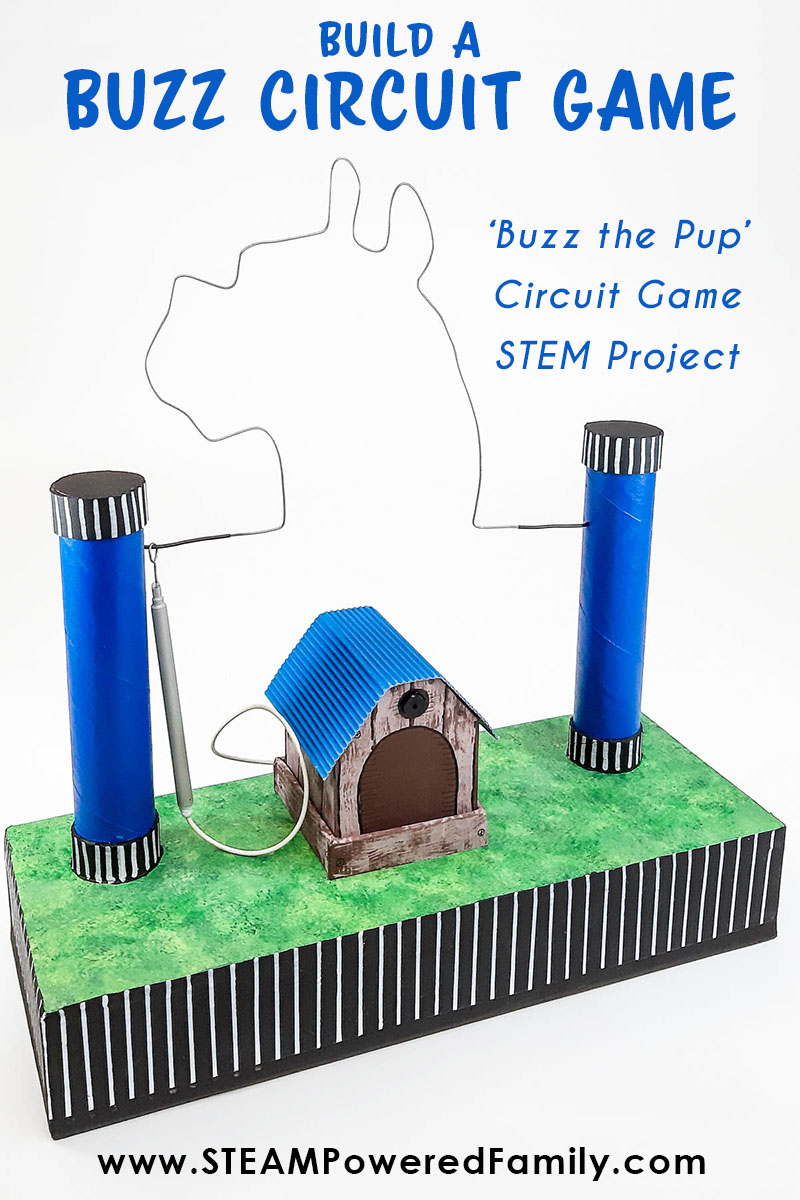
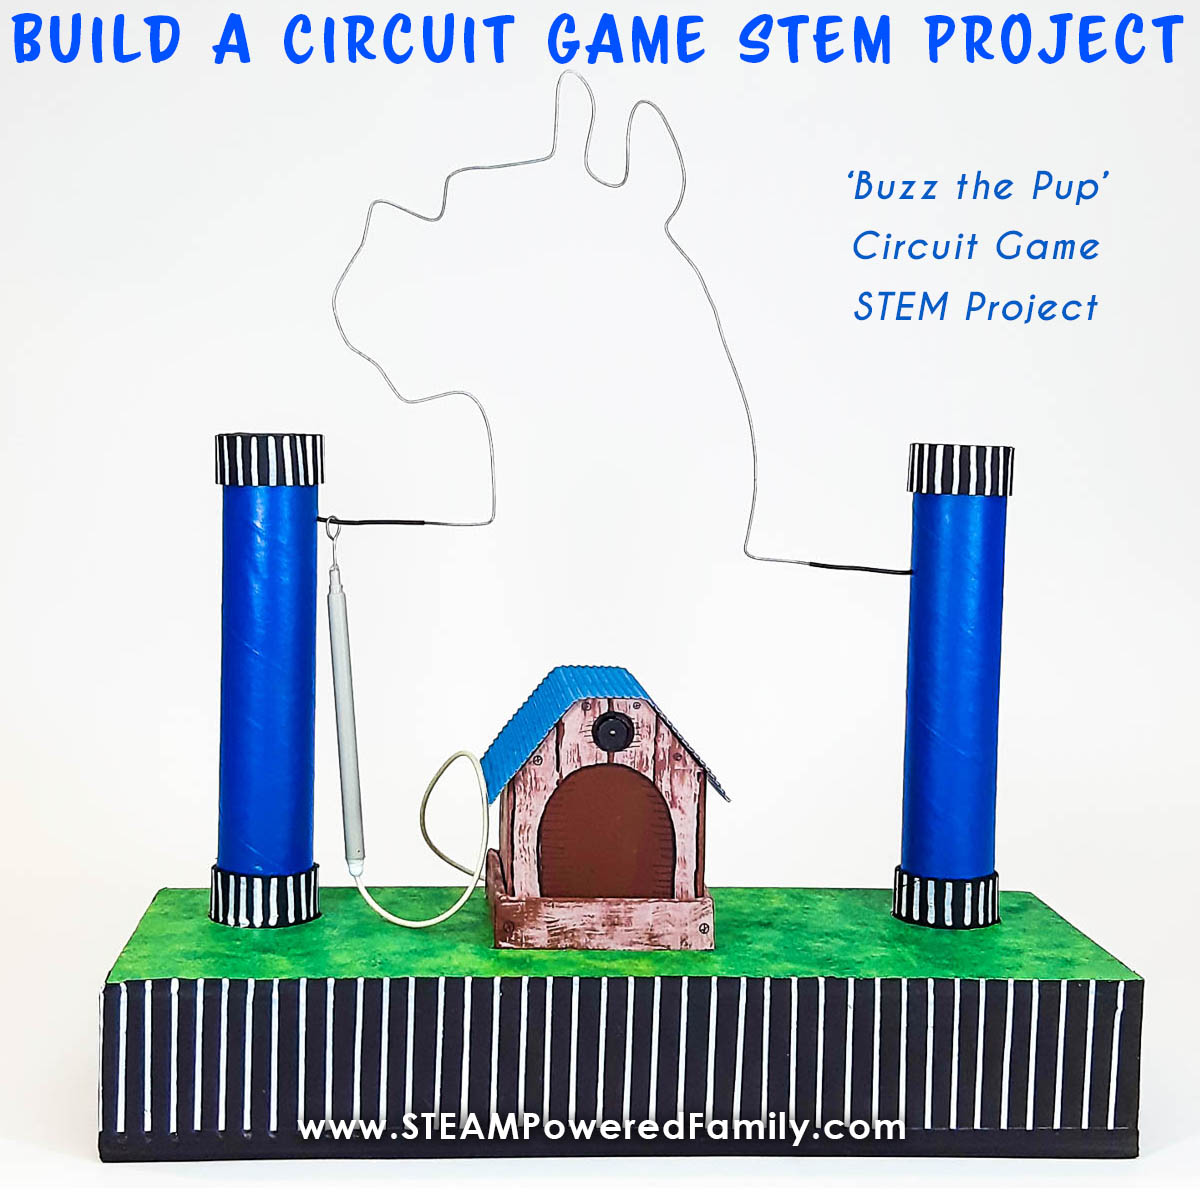
Buzz The Pup – DIY Circuit Game STEM Project
Do your tweens and teens love to tinker, build and create? Well today we have an incredible project for them… building a Circuit Game! Kids will need to put those tinkering skills to the test (and require some adult help), as this project will have them building, engineering, wiring, and even soldering. Then when it is all finished, compete with your friends to see who can free Buzz the Pup without a buzz!
A BUZZ WIRE CIRCUIT GAME PROJECT
Disclaimer: This article may contain commission or affiliate links. As an Amazon Influencer I earn from qualifying purchases.
Not seeing our videos? Turn off any adblockers to ensure our video feed can be seen. Or visit our YouTube channel to see if the video has been uploaded there. We are slowly uploading our archives. Thanks!
This is a fantastic project for a teen STEM club. Have the kids break off into groups and see who can build the coolest circuit game. We went with a dog design, but your kids can use their creativity to come up with their own innovative themes for their circuit game design. Working as a team will help everyone build their STEM skills together.
How Electricity Works
Have you ever wondered what makes the lights you turn on every day or the toaster you use to make toast in the morning work? The answer is Electricity.
How electricity works can be a little complicated. Imagine that electricity is made up of tiny particles that are called electrons. But how do these electrons make all these different appliances work? The electrons don’t do much on their own, but when they move, their movement creates energy, which can power all these different things.
Imagine a torch or flashlight. It has a light which is attached by two wires to a battery. When all these things are connected, we call this a simple circuit. The electrons flow through a loop, and this is called an electric current. This current causes lights to turn on and motors to move and heat things.
The battery provides the power that causes electricity to move through a circuit. It has a positive and a negative end. The electrons move out of the battery’s negative end and around the circuit to the positive ends through the wires connecting everything.
A circuit only works if it is closed. If there is a break anywhere in the circuit, like a broken wire or a loose connection to the battery, the circuit will not be able to work. In some appliances, a switch breaks the circuit on purpose, giving you the choice of opening it or closing it.
Building a Circuit Game STEM Project
In this fun circuit game project, you will see the magic of a simple circuit in action. You will be making a “Buzz Wire Game” with recycled materials. In this game, you will guide a metal wand along the length of a bent wire without touching the wire. The wand, the wire, and a buzzer are connected to a battery. The minute the wand touches the wire, the circuit is closed, causing the buzzer to make a loud buzzing noise.
Circuit Game STEM Project Video
This is a complex STEM Project and it really helps to watch the video tutorial. If you can’t see this video, please turn off your adblockers as they also block our video feed. Alternatively, you can also find this video on the STEAM Powered Family YouTube Channel.
How to Make a Buzz Wire Circuit Game
Materials & Tools
Double-wall cardboard
Single wall cardboard
Glue gun and glue sticks
Gaffer tape
Ruler
Pencil
Old felt-tip pen
A large hobby knife and a small hobby knife
Scissors
1.20m (47 inches) thick metal wire – a wire hanger will work too
Side-cutters
Wire stripper
Small pliers
Sharp object to make small holes in the cardboard – a wooden skewer will work too
Two kitchen paper towel tubes
A cardboard tube slightly wider than the kitchen towel tube
1.20m (47 inches) electrical wire
Two AA batteries
A battery holder with a built-in switch for two AA batteries
Electrical tape
Very thin heat-shrink (to cover the metal wire) – you can use electrical tape too
A mini-Piezo buzzer
Soldering iron and solder
Soldering arm (optional but makes it easier)
Paint & paintbrush for decorations
Plus you will need the The Dog Kennel and Wire templates which are available to STEAM Powered Family Mailing List members. Simply enter your email in this form to unlock a printable version of the instructions, plus the template.

DIY Circuit Game Directions
Make the Base
First, let’s get all the pieces ready to make the base.
Cut all the double-wall cardboard to make the base as indicated below:
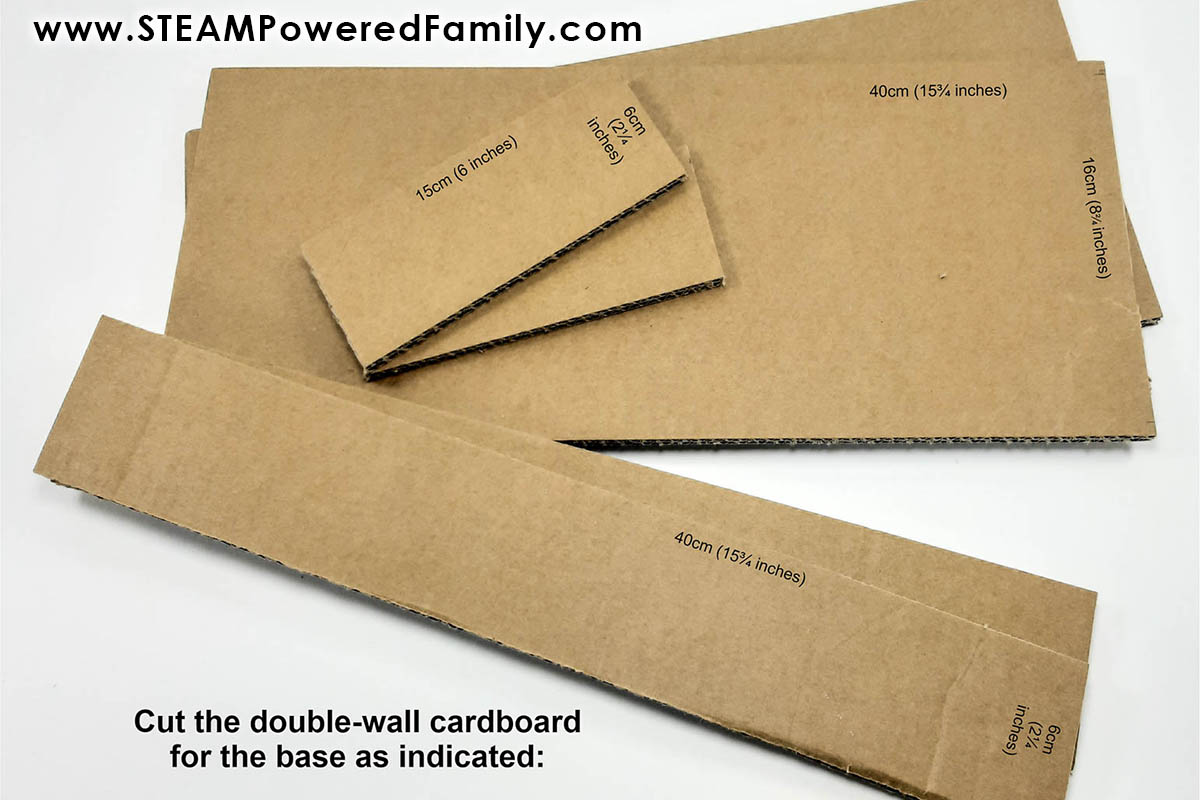
You may need the help of an adult when using a hobby knife.
Now, we need to glue the base together.
Using the glue gun, glue the front and back sides onto the top piece (the top and bottom pieces are the same sizes).
Then glue the two side pieces in between the front and back sides.
Mark 5cm (2 inches) from the back and 5 cm (2 inches) from the left side with a pencil and make a hole. The electrical wire must fit through the tube placed on the left side of the base.
Make the Wire Stands
Now we need to make the two stands for the metal wire.
Mark and cut the two kitchen towel tubes to a length of 20cm (8 inches) each.
Cut the larger cardboard tube into four pieces – 2.5cm (1 inch) tall.
Make a slit in them and fit them onto an end of one of the kitchen towels to get the correct fit. You may need to cut a piece out to get it to fit snugly.
Use the glue gun to close them.
Remember, the glue gun is hot. Keep your fingers away from the nozzle!
Using one of these pieces, trace the circle twice onto a piece of single-wall cardboard and cut the two circles out. These are for the two caps to close the kitchen towel tubes.
Glue the circles into two of the four tubes you just made.
Make a mark 5cm (2 inches) from the back and 5 cm (2 inches) from the right side with a pencil. The other tube must be placed here.
Glue the other 2.5cm (1 inch) pieces you made and glue close onto the top of the base where you measured and marked.
Glue the two kitchen towel tubes into each of these.
Mark 3cm (14 inches) from the top of the left tube (on the inside) and make a small hole. The wire of the game will be placed here.
Mark 5cm (2 inches) from the top of the right tube (on the inside) and make a small hole.
IMPORTANT – These holes need to face each other!
Place the two caps onto each of the tubes.
The base is ready!
Building the Dog Kennel
The dog kennel is where all the electrical components are located. And our Buzz the Pup deserves a great kennel!
Using the Dog Kennel Template, trace and cut out all the pieces on single-wall cardboard.

Get the battery holder, the buzzer, a plastic circle stencil, and a small hobby knife.
Check the size of the buzzer shape using a stencil, or you can trace around the buzzer straight onto the front piece just below the roof’s edge.
Cut out the small circle using a small hobby knife.
PRO TIPS! Do not cut through the cardboard in one go. Cut one side first, then turn it around and cut through to the other side.
On the back piece, mark and make 2.5cm (1 inch) holes up from the bottom for the electrical wire to go through.
Glue the four sides of the kennel together.
Glue the four small pieces of the base together.
Making the Wand
Now we need to make the game wand.
Pull out all the inside bits of an old felt tip pen.
Make a hole in the top of the cap from the back of the pen using the soldering iron.
Cut an electrical wire length of 60cm (23 ½ inches).
Strip both ends of the wire with a wire stripper and put solder onto each end of the electrical wire and one end of the small piece of metal wire for the wand with a soldering iron.
PRO TIPS! You may need the help of an adult if you have never used a soldering iron before. It is very hot! I use a soldering arm to hold the wires when soldering. This leaves both hands free to complete all the soldering that needs to be done.
Solder the one end of the electrical wire to the metal wire. Cover this join with insulation tape.
Thread the metal wire up into and through the body of the felt tip pen, leaving enough out the top side to make a loop in the wand.
Using a pencil, wrap the end of the wand around the pencil to get a loop shape. Adjust the shape using small pliers.
Hot glue the wire metal to the opening of the top of the felt tip pen body.
Thread the other end of the electrical wire through the hole in the end cap, push the cap back into the pen, and hot glue to keep it in place.
Assembling the Kennel
Glue the base of the dog kennel between the two tubes towards the back.
Ensure the dog kennel fits into the base correctly.
Make a hole in the middle of the floor for the electrical wire to fit through. You can use a wooden skewer to do this. Check that the wire fits through the hole.
Glue the battery holder to the inside of the dog kennel with the wires coming out of the top.
Glue the buzzer into the hole in the front piece.
Wiring the Circuits
The wiring can be confusing, so look at the diagram below.
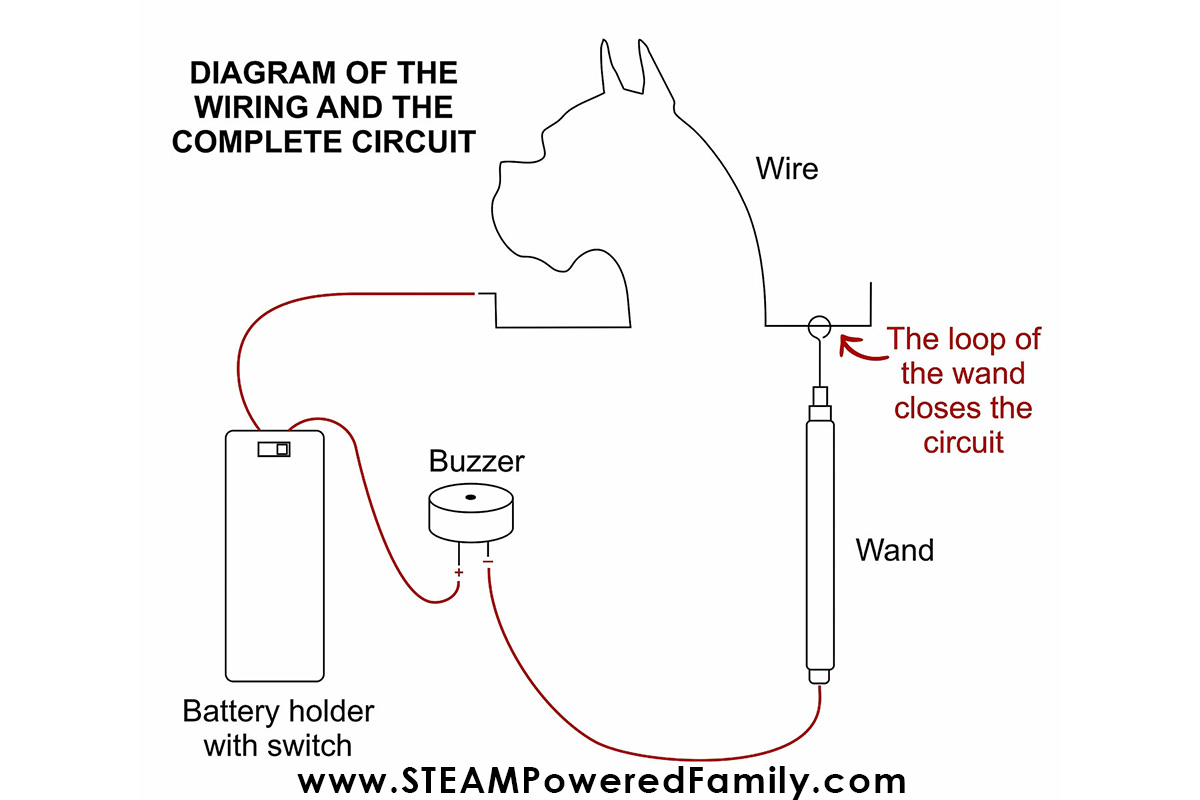
Solder the red wire from the battery holder onto the longer leg of the buzzer.
Thread the electrical wire of the wand through the hole in the back of the dog kennel and solder the end to the short leg of the buzzer.
Solder the black wire from the battery holder onto one end of the second piece of electrical wire you have left.
Cover the join with some insulation tape.
Put the kennel on top of the large base, ensure that electrical wire is coming out of the bottom of the dog kennel, and thread it through the hole you made in the middle of the dog kennel base.
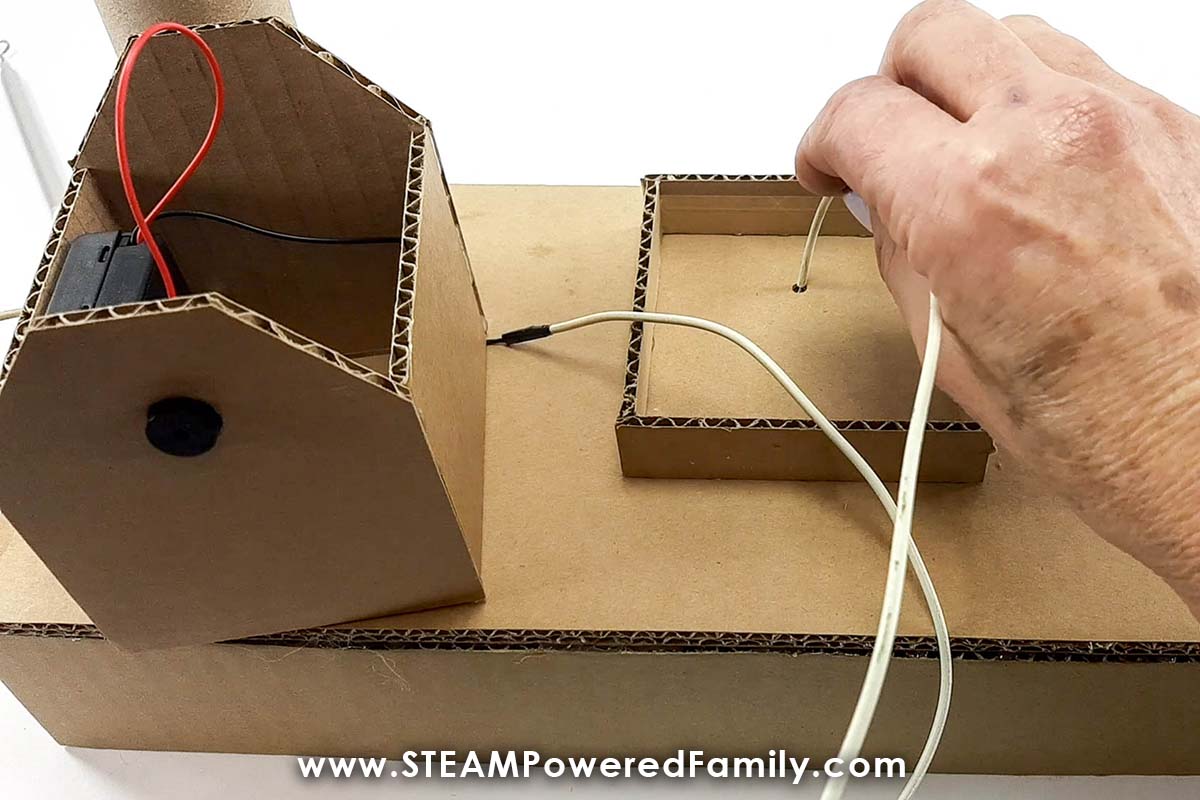
Now thread the wire through the other hole and up and out the tube on the left.
Cut a piece of colored cardboard or corrugated cardboard for the roof of the dog kennel to measure 10.5cm (4 inches) X 14cm (5 ½ inches).
Glue it onto the top of the dog kennel. There will be a small overhang on all sides.
Glue on the bottom of the large project base.
Completing the Circuits
Strip the end of the electrical wire sticking out of the tube on the left and put the solder on the end.
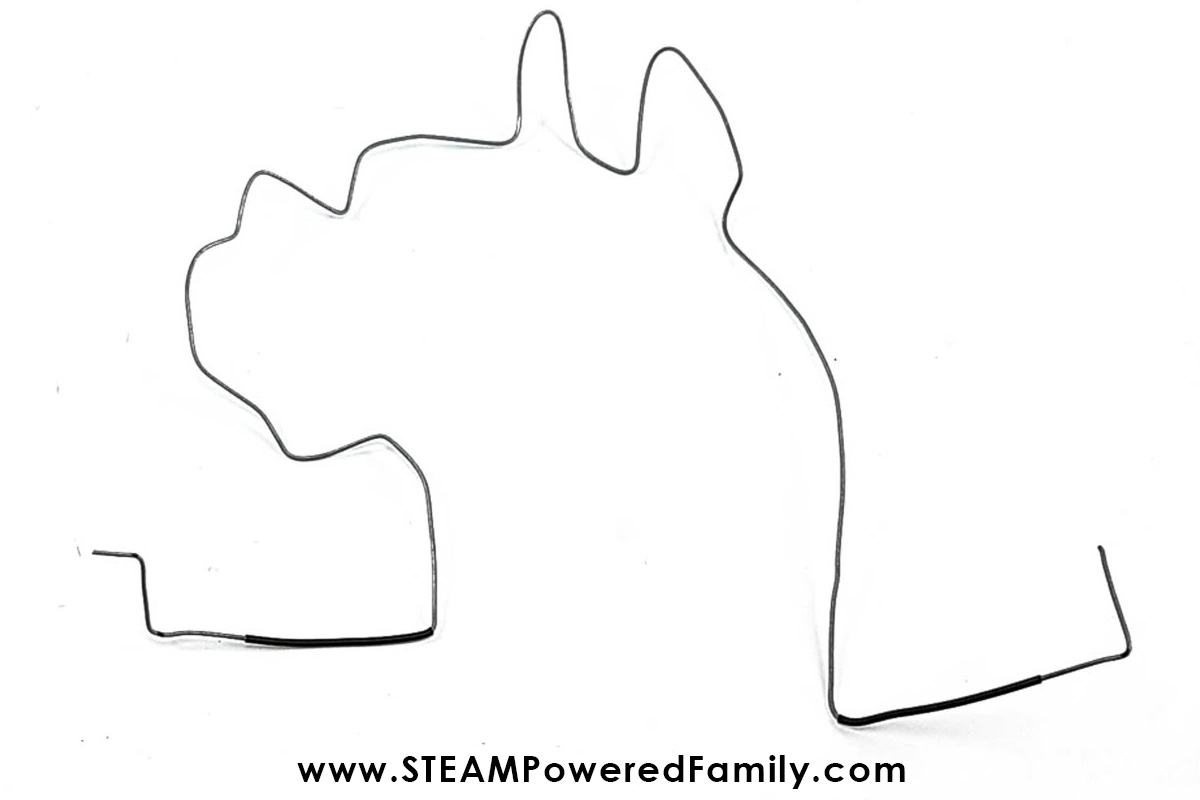
Making the Wire Dog
Now we need to make Buzz the Pup!
Print and place the dog template onto a scrap piece of wood and hammer in small nails following the design.
Now wrap the wire as indicated below:
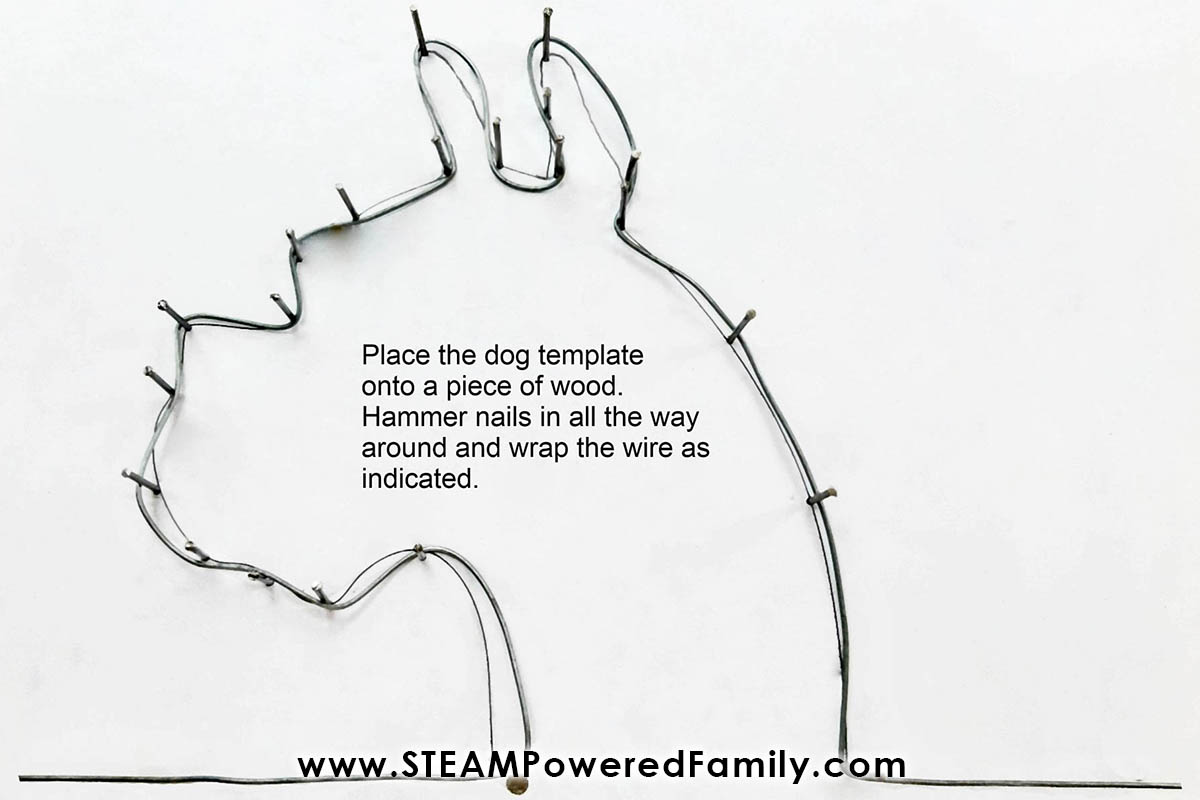
You can use some pliers to help with this if needed. Leave long “legs” on either side.
Thread some thin heat-shrink onto both sides. The heat-shrink prevents the wand from unnecessarily touching the metal wire and sounding the buzzer. You can use insulation tape if you don’t have any heat-shrink.
Push the legs of the dog into the holes you made on the inside of each tube.
Starting with the left tube, glue the metal wire in place, making sure it is stable, and cover it with a small piece of gaffer tape.
Solder the electrical wire sticking out of the tube to the metal wire.
Put the cap of the tube on.
The right tube needs to be glued and taped in.
Put the cap of the tube on.
Adjust the dog wire until it is sitting in the correct position.
Hang the wand onto the wire by opening the loop slightly and then closing it again once it is on.
YOUR BUZZ WIRE GAME IS READY TO PLAY!
I decided to paint the whole thing at this point, but you may want to play this amazing circuit game right away!

How to Play Buzz the Pup Circuit Game
To start the game, lift the dog kennel out of its base, put the battery holder’s switch into the “ON” position, and have some fun with your family and friends. Test to see who has the steadiest hand or who can get around the wire in the shortest time without making Buzz the Pup buzz!
PRO TIP! Don’t forget to switch the batteries off when you are done playing, or your batteries will go flat!
Troubleshooting
If the buzzer is not working, check the wiring diagram to see that all your wires are in the correct place, that your batteries are in the battery holder correctly, or that you have soldered all the connections properly and haven’t come loose.
Remember that a circuit only works if it is closed. If there is a break anywhere in the circuit, like a broken wire or a loose connection to the battery, the circuit will not be able to work.
More Circuit Projects for Kids