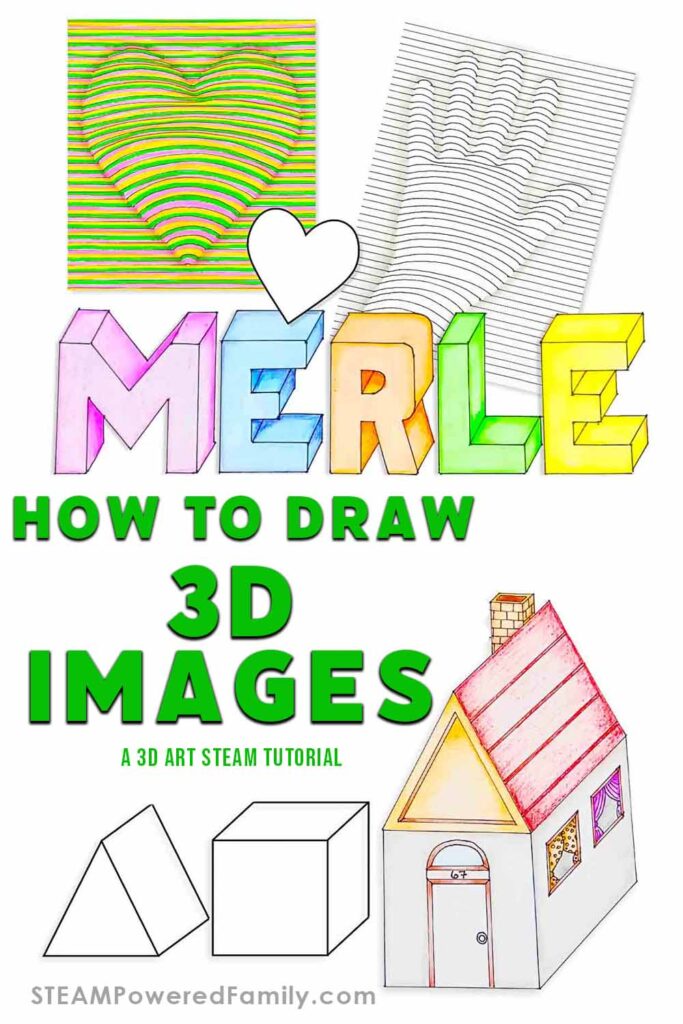
How to Draw 3D Images
How many times have you heard yourself say “I wish I could draw in 3D like that?” Well, the secret is that it is very easy when you know how! It involves understanding a little math and a little science, but most of all a little creativity and practice and you can draw 3D images too! Let’s dive in and learn how to draw 3D.
How to Draw 3D Images Beginner Tutorial
Table of Contents
Disclaimer: This article may contain commission, paid partnerships, or affiliate links. We independently review everything we recommend. When you buy through our links, we may earn a commission from qualifying purchases.
In this STEAM drawing project, we will learn how to draw a simple objects in 3D, using a very easy method, but before we do this, let’s look at the differences between 2D and 3D.
2D vs 3D, What’s the Difference?
Everything around us is made up of shapes that all fit together to create the objects in our environments.
2D shapes are completely flat and have a top and a bottom. They have a width and a length only. The width tells us how wide a shape is and the length generally tells us how tall a shape is.
3D shapes have a magical ingredient called depth. Depth gives us the ability to pick a shape up and turn it around to see all its sides. It has volume and is solid. These 3D shapes have form.
3D shapes have different sides called faces which are also known as planes. They even have vertices or corners and they have edges. If you look at a cube, it has many faces and you can see that it is made up of many squares. Six squares to be exact! The places where all the squares meet each other are called the edges and the places where all the edges meet each other and form points are called corners or vertices.
3D Optical Illusions
So when we draw squares and triangles in art, they remain flat, until we use a few magical techniques to trick our eyes into believing that the shape is 3-dimensional. When done well, it feels like we could reach right into the picture and pick up the item. This is known simply as an optical illusion.
We have played with Optical Illusions many times including making an Optical Illusion Flip Book, Thaumatropes, Zoetropes and Benham Discs, Tunnel Books, and Agamographs.
Some of the techniques we use to create a 3D effect in drawing are shading, contour lines and adding a few more of the same faces or planes to create shapes that have form. By adding these to our drawings our eyes and brain mistakenly interprets what it sees as having depth, rather than being just a 2D flat drawing, which is what it actually is.
Famous Optical Illusion and 3D Art
Here are a few links to famous artworks that involve 3D shapes or optical illusions. I love to look at these famous creations, as it shows how these simple techniques that we are learning today and can be used in incredible ways. Hopefully looking at these will give you some inspiration!
The Persistence of Memory, Salvador Dali
Famous pavement artist, Julian Beever
So let’s get on with learning all these magical techniques that will change the way you tackle your art, with a whole lot of confidence!
How to Draw 3D Art Video Tutorial
We love to share our projects in action and we have a video tutorial for how to draw these 3D images. Often it helps to watch the video tutorials to really understand what we are doing. If you can’t see the video, it is likely being blocked by an adblocker or firewall. If you can’t see it, hop over to the STEAM Powered Family YouTube Channel and watch it there. On YouTube you can also access closed captioning. Enjoy!
How to Draw in 3D
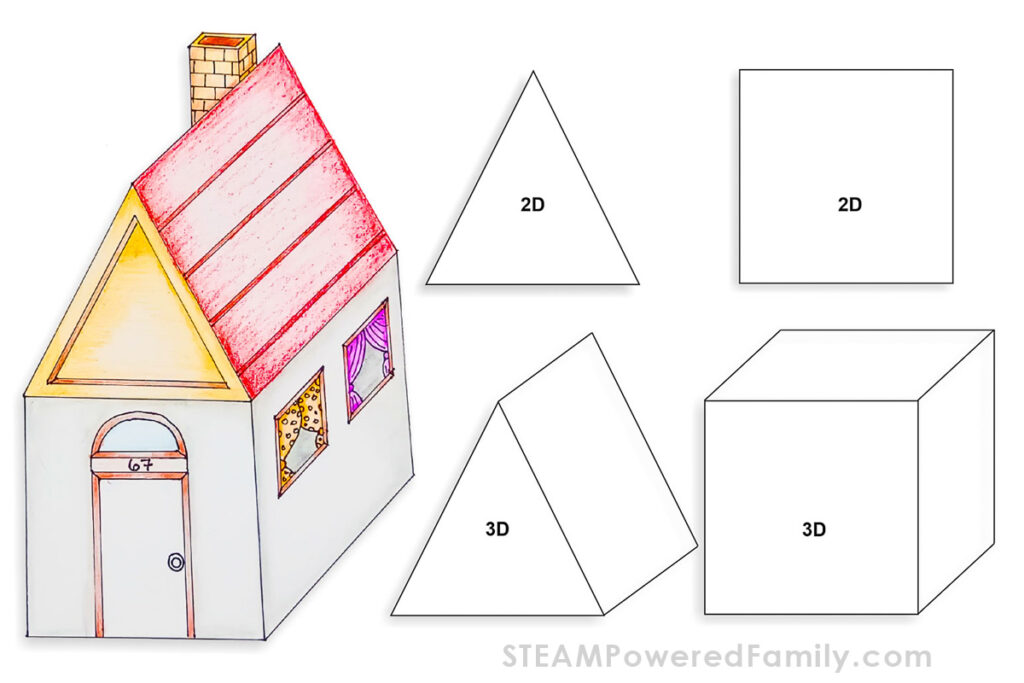
First, we are going to learn an easy way of turning 2D shapes (a square and a triangle) into 3D shapes (a cube and a pyramid).
In the next step, we will learn how to draw block letters and then turn them into 3D letters.
Then we will learn the art of turning flat, 2D shapes and objects into 3D artworks, using lines.
The final step is using the cube and the pyramid from the first step and turning them into an easy-to-draw house.
Get all your drawing materials and tools together and let’s learn to draw like a pro!
Materials & Tools
Paper
Ruler
HB pencil
4B or 6B pencil for shading
Eraser
Fine point permanent marker
Blending stump or tissues
Scissors
A selection of thin and thick felt-tip pens
Pencil crayons
Plus the templates – some of the pages should be printed on cardstock to make it easier to use them as traceable templates. For a classroom setting, you may even want to laminate these so you can reuse them.
HOW TO DRAW 3D SHAPES
Print out the square, triangle and heart on the first page of the templates on cardstock. Cut out all the pieces using a scissors, then put the heart aside for now.
Get some paper and trace both the square and the circle with a pencil, onto the paper, leaving a good amount of space between the two shapes.
Place the square template on top of the square on the page, slightly to the right and about halfway up and trace the square again.
Do this with the triangle too.
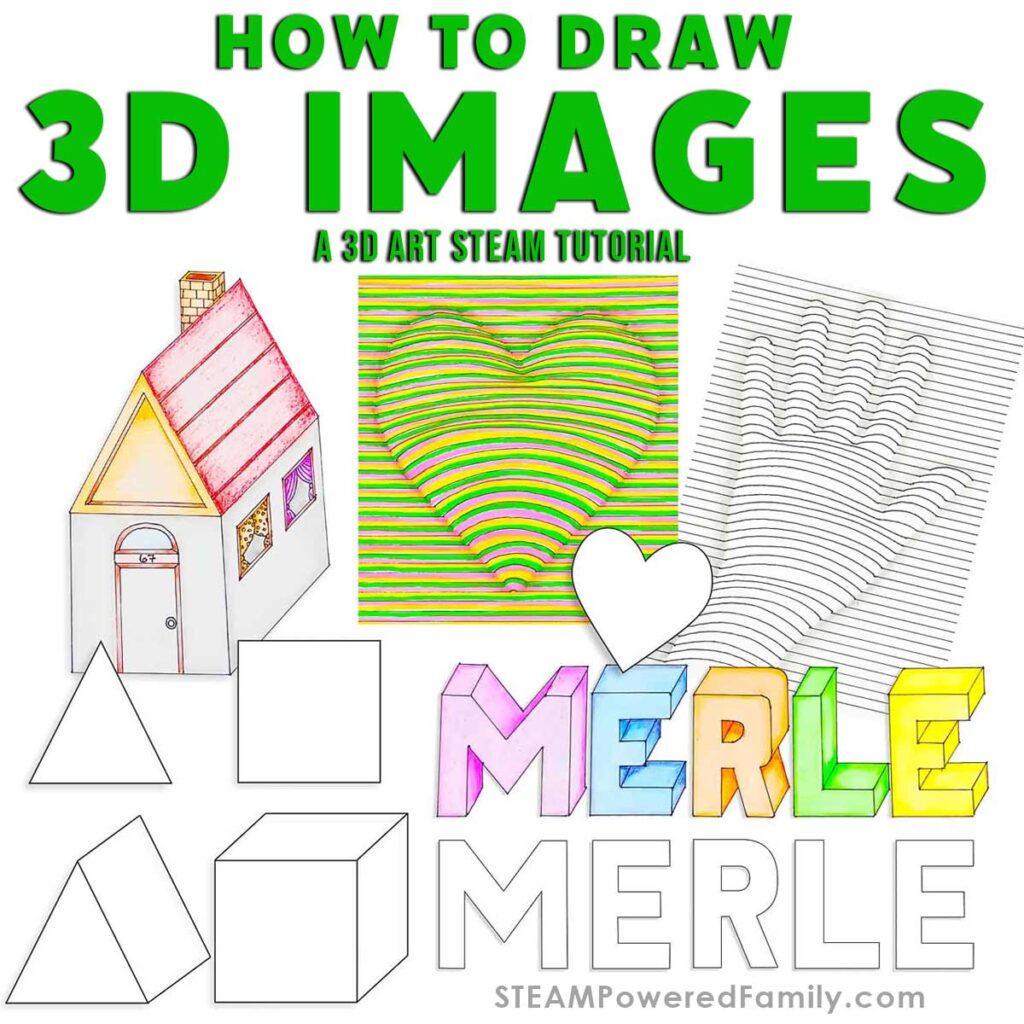
Draw lines joining the two squares together from each corner. You should have drawn four lines.
Repeat this step for the triangle. You should have drawn three lines.
What do you see? 3D shapes that you can see through, right? You can outline both shapes with a permanent marker and erase the dotted lines to give you a solid 3D shape. See the diagram below:
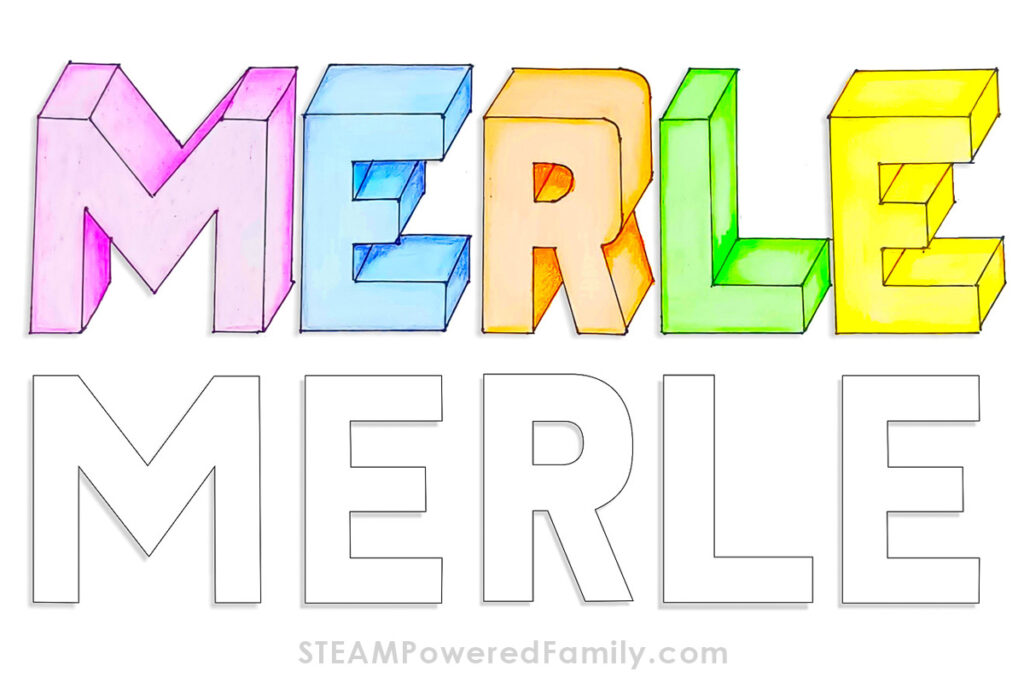
HOW TO DRAW 3D BLOCK LETTERS
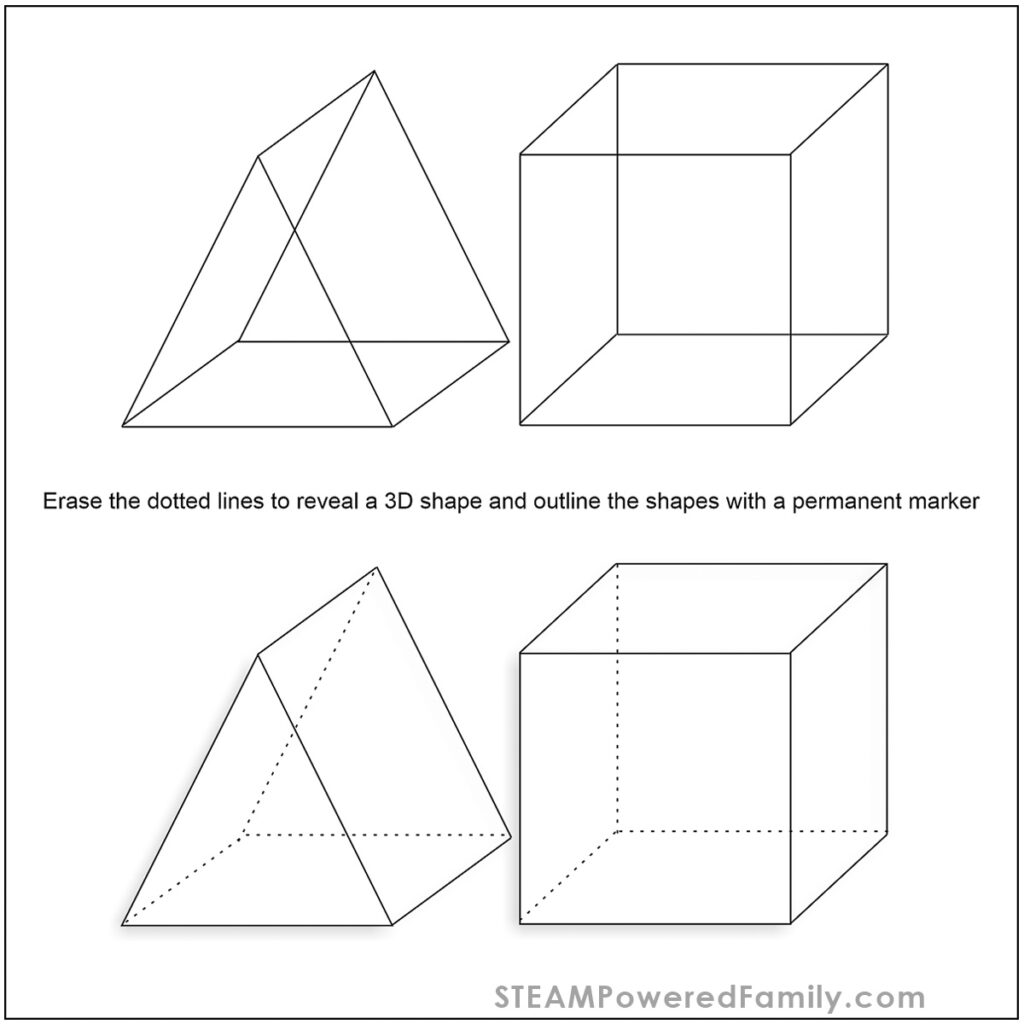
Print out pages 2, 3 and 7 of the templates on printer paper. These pages will teach you how to draw block letters using a grid. See the diagram below:
All the letters are done on a 3X5 grid except for “M” and “W”. These two letters are wider than the rest and need to be done on a 5X5 grid.
Print out pages 4 and 5 of the templates on printer paper, if you would like to trace the letters first. This makes understanding the whole grid concept much easier.
Grab the “Graph paper for 3D letters”, and choose a word for this project. I used my name MERLE.
Copy each letter of your word onto the graph paper, remembering to leave a space of two blocks between each letter.
Did you get it right? Easy, right?
There are a few ways, to use the grid method to change the shapes of block letters, like making letters taller or shorter or even italic(slanting). See the diagram below:
TURN THE BLOCK LETTERS 3D
Print out page 6 of the templates on cardstock. This page has a larger grid to make your word.
Try and do the letters without the help of pages 2 and 3. I’m sure you will do it easily!
When you have done all your letters, cut them out with scissors. If you have any letters with a hole or holes in the middle, poke the point of a pencil through the center and then insert the end of the scissors into the hole and cut the piece out.
Grab another piece of paper and turn the paper so that it is landscape orientation (this means it is wider than it is taller). Make a pencil line across the bottom of the page using a ruler. This will keep all your letters straight.
Place your cut-out letters on the line, leaving a good space between each of the letters and trace each letter onto the paper.
Starting with the first letter of your word, place it on top of the traced letter, slightly to the right and up from the bottom line. Ensure that it does not touch the next letter.
Make a mark under this letter and use a ruler to make another line across the page. Trace the letters along the line.
Now join the corners of each letter to its copy.
When you are done joining the pairs, erase the parts that you don’t want to see and outline each 3D letter with the permanent marker.
I bet you realized that this is the same process as the square and triangle we did at the beginning of this project!
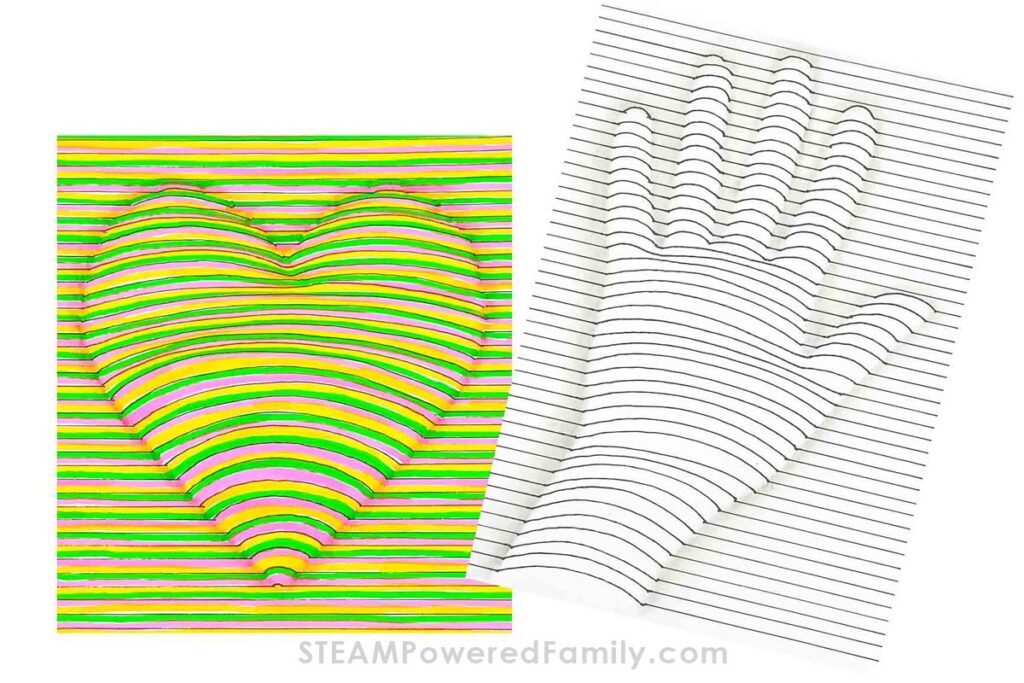
HOW TO DO 3D LINE DRAWINGS
For this 3D art lesson we are going to make a 3D heart and a 3D hand… your hand!
Print out two pages of page 8 on printer paper for this section of the project.
On one page, place the heart you cut out at the beginning of the project in the middle of the page and trace it onto the page using a pencil.
On the other page, put your wrist and hand down flat on the page and open your fingers slightly.
Trace around your hand and wrist remembering to keep the pencil straight up (90 degrees to the page) all the way around. If you tilt the pencil your hand and fingers will be very thin!
Starting at the top of the page, join the dots, going from one dot across the page to the other using a ruler and a pencil.
As you get further down, you will start seeing the tips of your finger. Do not trace the tips!
Stop and leave a space and continue the straight lines, until you reach the bottom of the page.
You should see the outline of your hand now.
Now starts the 3D magic!
At this stage, you need to keep the skin on the side of your baby finger on the page all the time. This will keep your hand steady as you make curved lines in all the spaces you left blank on your fingers.
Do all the fingers first, and continue making curved lines down the page. Work slowly, don’t rush this step!
WOW! Your hand should already look 3D but there is more to come!
Go over all your lines with the permanent marker.
Repeat the whole process with the heart. You can use a pencil first, as it is easier to erase your mistakes. I used the permanent marker straight away. You may want to do this too.
I used a permanent marker for the heart because we are going to use coloured felt-tip pens in between the black lines and it will not smudge or run.
Let’s give the shapes more depth, by using shading!
Start with the hand and use a 4B pencil, make a very soft line of colour about 5mm wide around each shape, using the side of the pencil to do this shading.
Using the blending stump or a tissue, gently blend the pencil outwards.
It should look like your hand is popping out of the page!
Choose three to four coloured felt-tip pens and make coloured lines between all the black lines of the heart.
Repeat the shading process with the 4B pencil around the heart.
You should notice that the colours make the heart pop out of the page, but the shading makes it even better!
HOW TO DRAW A HOUSE WITH 2D SHAPES
Now let’s take a bunch of 2D images and make it 3D as we draw a house.
Grab a piece of paper and the square and triangle you used at the beginning of the project.
Keeping the page in a portrait orientation, trace the square towards the left bottom of the page.
Trace another square over the first square, overlapping it just a little.
We want to make a rectangular prism (cuboid), not a cube. Join all the corners to make the 3D shape.
Place the triangle on top of the first square and trace it.
Place the triangle on top of the second square and trace it.
Join the corners of the top of the triangles.
You should now see the shape of a house!
When you are done joining the pairs, erase the parts that you don’t want to see and outline the house and roof with the permanent marker and a ruler. You may be brave enough to outline without erasing. Just do it slowly and keep removing the ruler so you can check what needs to be outlined.
You can now add doors, windows, a chimney and anything else your house needs.
Pro Tip! Use all the existing lines of the house and roof as a guide for your ruler to keep your windows, doors, roof tiles and chimney in the correct perspective.
The final step is to give your house some color! You can use what we learned in the last lesson to make your house special and unique.
Amazing! You can call yourself a 3D expert now! Hopefully, it will change the way you draw.
3D Science Review
Using two shapes and joining them together at all their corners and the use of shadows, shading, and contour lines can trick the human eye and brain into seeing any 2D shape as a 3D object!
This project can be linked with a Math, Engineering, and Life Skills lesson. It can also be broken up into five separate Art modules and dealt with in more depth.
Ideas for Extension Activities
Turn a picture of your favorite cartoon character into a 3D drawing using the line technique.
Build an object using any 3D shapes. It could be a famous building or landmark, an animal, or just about anything. Use some of your lesson themes for inspiration.
Make a card for someone special using 3D or block letters for all the text.
Play with 3D Nets in this fun math center idea.
Did you enjoy drawing a 3D house? Why not build a Treehouse using Geometry?