3D Nets Geometry Activity
Geometry projects are a fantastic way to do some hands on math with kids. In this 3D Nets Geometry Activity, students will learn about shapes, dimensions and calculating area by exploring geometry in 3D. Fun geometry projects that are interactive are a wonderful way to engage students in math. You can either build this ahead of time, or have your students build it themselves. This project makes the perfect addition to a math center. It is simple and fun math!
Fun Geometry Project
Table of Contents
Disclaimer: This article may contain commission, paid partnerships, or affiliate links. We independently review everything we recommend. When you buy through our links, we may earn a commission from qualifying purchases.
WHAT IS GEOMETRY?
First let’s start with a very obvious question our students are going to have… What is geometry? Geometry is one of the oldest sciences and a branch of mathematics. It focuses on shapes and their properties such as size, position, angles, and dimensions (think 2D and 3D). It is also the study of lines, angles, symmetry, and space.
Geometry is used every day by people all over the world. Some real life applications include: art, architecture, engineering, robotics, astronomy, sculpture, blacksmithing, space, nature, sports, machines, cars, and so much more.
In this particular activity we are focused on shapes and dimensions. Learning how to take a flat 2D shape and make it 3D – three dimensional.
Check out the Geometry 3D Nets Video
This is a fantastic activity to help kids interact and develop a solid understanding of these concepts. Just watch this video! You can also find this video on the STEAM Powered Family YouTube Channel.
THE BASIC PROPERTIES OF 3D SHAPES
Everything on earth is made up of shapes. Some of these shapes are 2D and others are 3D. So, what is the difference between the two? Let’s compare a square and a cube:
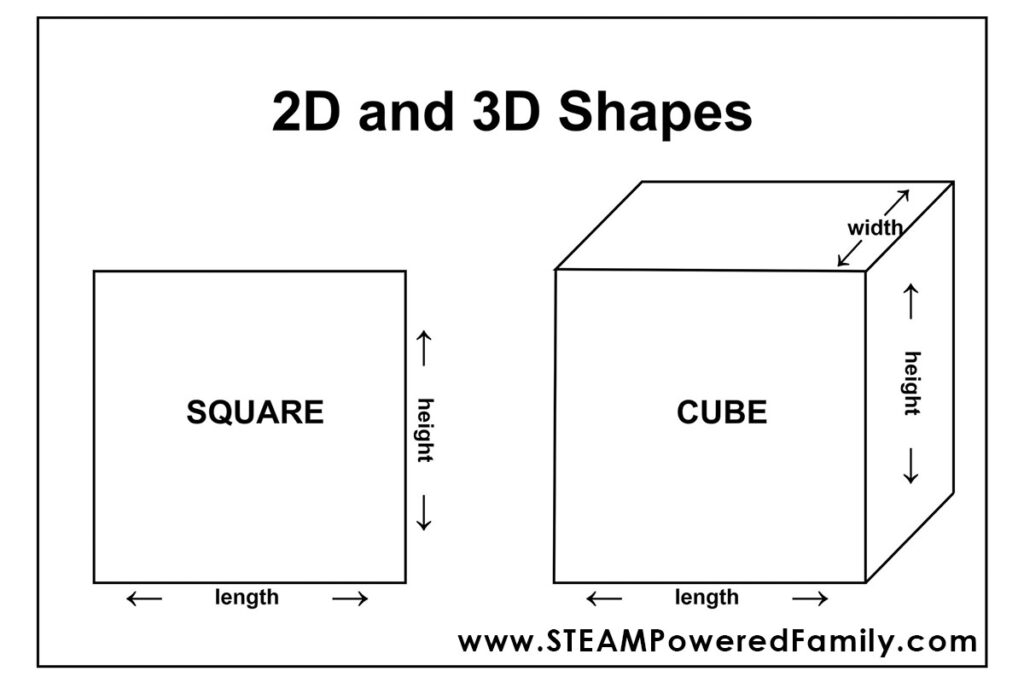
The letter “D” tells us that the shape has dimensions. 2D shapes have two dimensions and 3D shapes have three. The dimensions of the 2D shape are length and height and the 3D shape has three: length, width, and height.
2D shapes are flat shapes and are known as 2-dimensional. They have a surface area only. 3D shapes are 3-dimensional and in Geometry are also known as solid shapes. They take up space and have a surface area and volume. Volume is the space inside a 3D shape.
Learn how to draw 3D images with our easy tutorial.
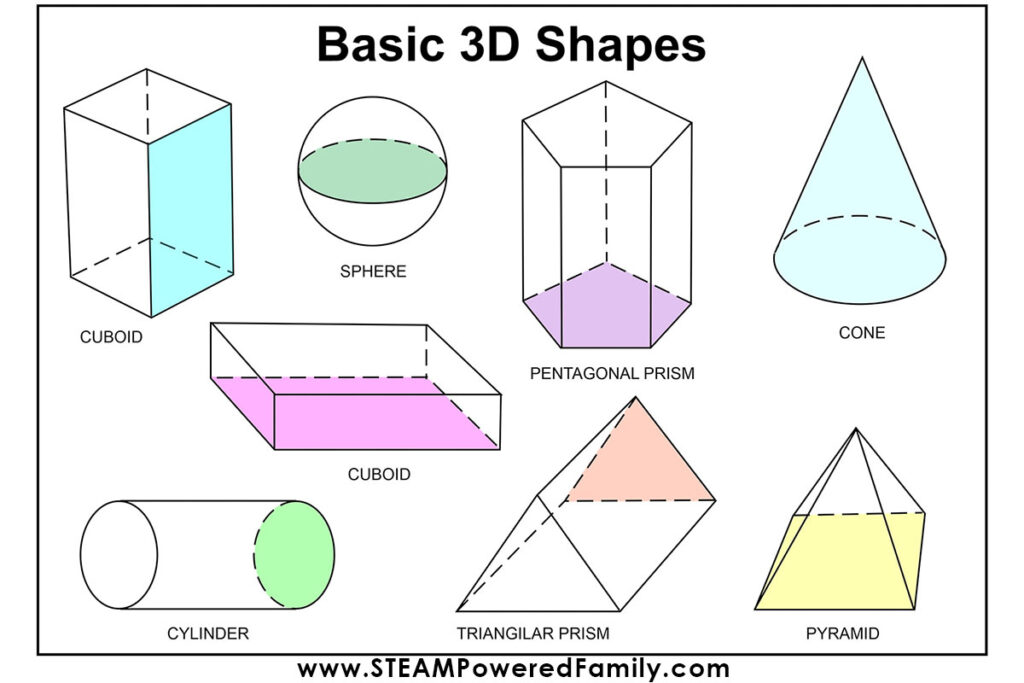
Here are some basic Geometry 3D shapes:
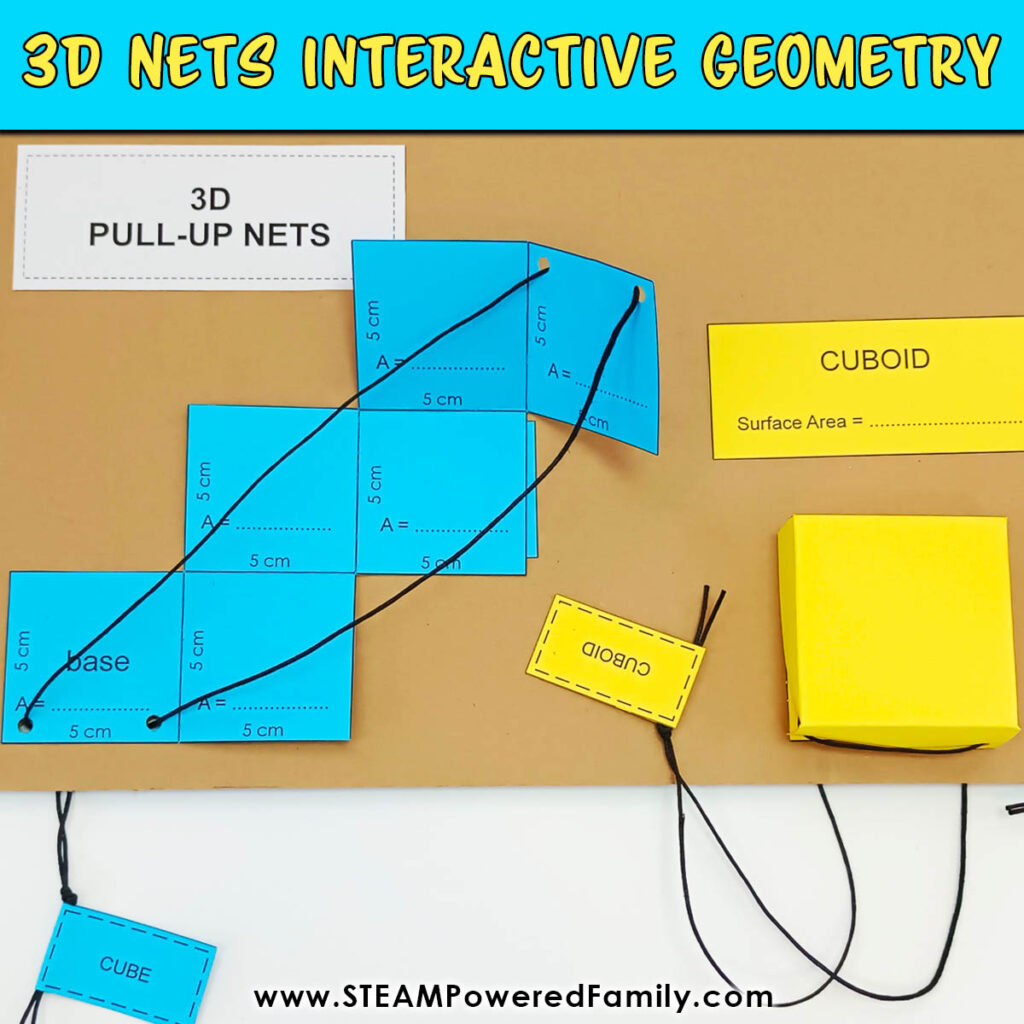
This concept can be a bit confusing, so you are going to make 3D Pull-up Nets to understand the differences between 2D and 3D shapes.
WHAT IS A GEOMETRIC NET?
A net is a 2D picture of what a 3D shape would look like if it was opened out and laid flat. Some 3D shapes, like a cube, have many different nets, but end up looking like a cube when folded and glued together.
The three pull-up nets you are going to make are three of the four shapes you will be using in your tree house design. They are a cube, a triangular prism, and a cuboid.
The fourth shape is a cylinder. You are not going to make a net for this shape, as there is something you use in your home daily that is a cylinder and instead of throwing it away, you are going to give this item a new purpose in this project. Can you guess what it is?
3D PULL UP NETS DIY INSTRUCTIONS
Supplies and Materials
Single-wall cardboard cut to 45cm (17¾ inches) X 20cm (8inches)
Glue stick
Small hole punch or a thumb tack and wooden skewer
3 pieces of string or yarn cut to 70cm (28inches)
Scissors
Plus you will need the printable templates which are available to members of the STEAM Powered Family mailing list. Simply enter your email in this form to unlock the printable.
Directions
To do this fun activity, you first print the templates on cardstock in 4 different colours.
Cut out all the pieces on the solid lines.
Punch holes on all the dots on each of the 3 pull-up nets with the hole punch.
Place all three nets onto the cardboard and mark the two holes that are on the “base” section of each net.
Fold the nets on the solid lines in both directions (first away from you then back towards you). This will allow the net to fold easily when pulling them up to form the 3D shapes.
Punch the two holes for each net on the bottom of the cardboard that you marked earlier.
Glue each “base” section of the net to the carboard, lining up the holes at the bottom of the nets and the cardboard.
Glue all the labels onto the cardboard, matching up the net with each label.
Start threading the string from under the cardboard up through the hole at the bottom of the net and then through all the other holes and finally back to the last hole, through to the back of the cardboard.
Take both strings and make a knot.
Fold the pull tag in half and glue it over the strings just under the knot, then trim the strings to the same length on the ends.
The nets are done! Let’s watch the video to see the pull-up nets in action.
USING 3D NETS WITH STUDENTS
Now that you have completed your amazing 3D Nets, here are fun geometry activities for you to explore:
Identify the parts of 3D Shapes
3D shapes have faces or sides, edges and vertices or corners.
A face is a flat or curved surface on a 3D shape. A cube has six faces, a cylinder has three and a sphere has just one.
An edge is where two faces meet. A cube has 12 edges, a cylinder has two and a sphere has none.
A vertex is a corner where edges meet. The plural is vertices. A cube has eight vertices, a cone has one vertex, and a sphere has none.
Have your students examine the 3D Nets and identify the faces, edges and vertices.
Calculate the number of faces, edges, and vertices of the shapes you used.
Calculate Area
Now that students have explored the shapes, it is time to do some math. Have them calculate the area of all the faces and the surface area of each of the 3D shapes.
PRO TIP! The area of one face of a cube = Length X Height. (Example: if the length is 5cm and the height is 5cm, the area equals 5 X 5 = 25). The surface area of a 3D shape = The sum of all the areas of all the faces. (Example: A cube has 6 faces. The area of each face = 25. The surface area = 6 X 25 = 150).
Go on a 3D Scavenger Hunt
Have students go on a scavenger hunt and find real-life examples of the 3D shapes used in this project.
Engineer with 3D Shapes
Now your students have learned about 3D shapes, challenge them to build using those shapes. We took this concept and challenged the kids to a Dream Treehouse Building Project using Geometry.
Make a Flexagon Math Infinity Paper Puzzle Toy
Really have some fun by making these cool paper toys. This quick and easy Flexagon project is one that will have kids enthralled with math, geometry and patterns!
Make Math Festive with Geome-Tree
Why not try using geometry to make fun ornaments for the holidays?
Have fun with geometry and 3D Nets!