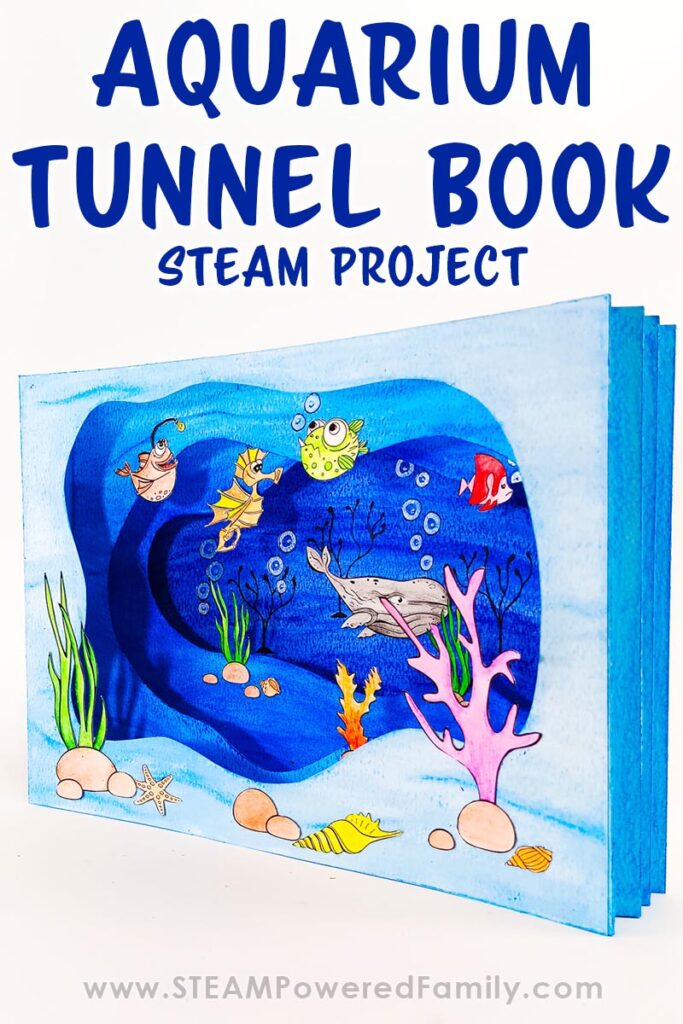
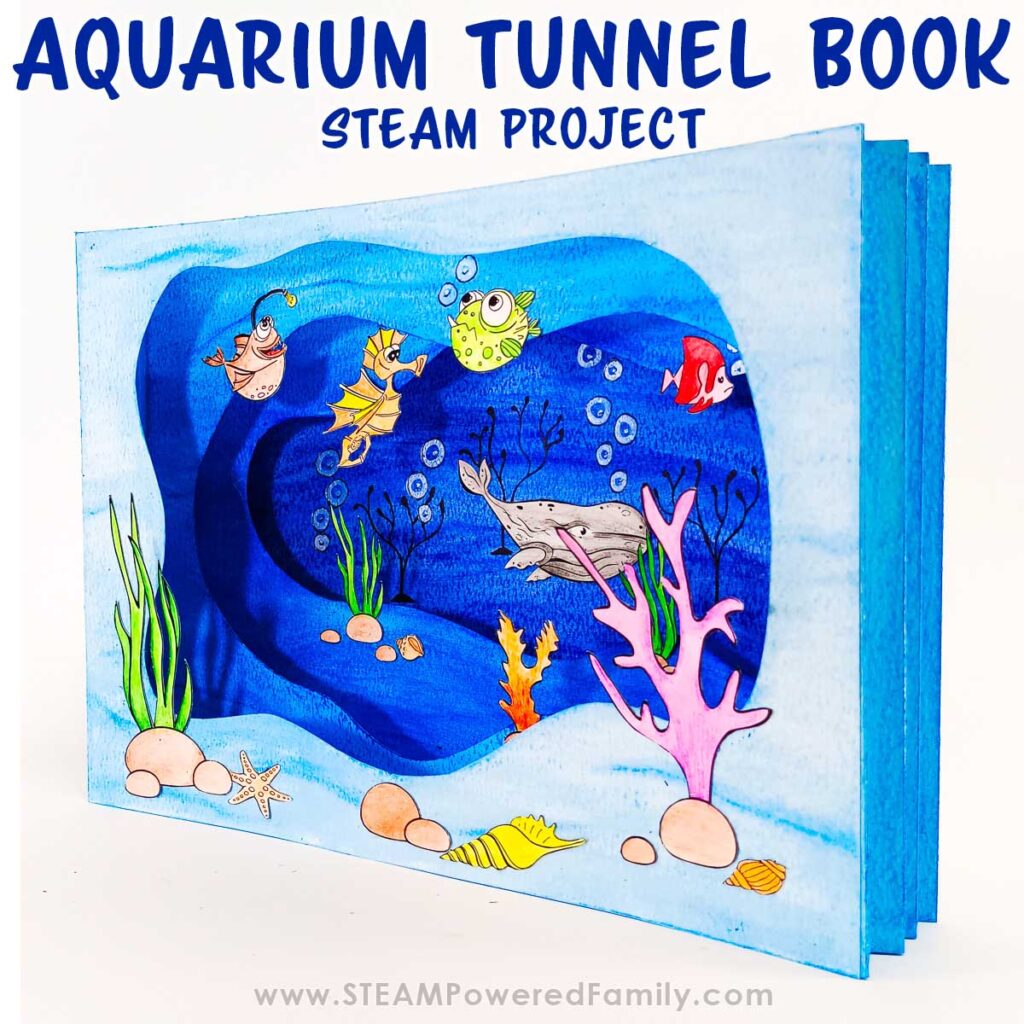
Ocean Tunnel Book STEAM Craft Project
Do you think it is possible to read a book by looking through the book, at a series of layers filled with pictures, rather than turning the pages with your hands? In this fun and easy STEAM project, you will make a traditional Tunnel Book with an ocean or aquarium theme.
HOW TO MAKE A TUNNEL BOOK
Table of Contents
Disclaimer: This article may contain commission, paid partnerships, or affiliate links. We independently review everything we recommend. When you buy through our links, we may earn a commission from qualifying purchases.
What is a Tunnel Book?
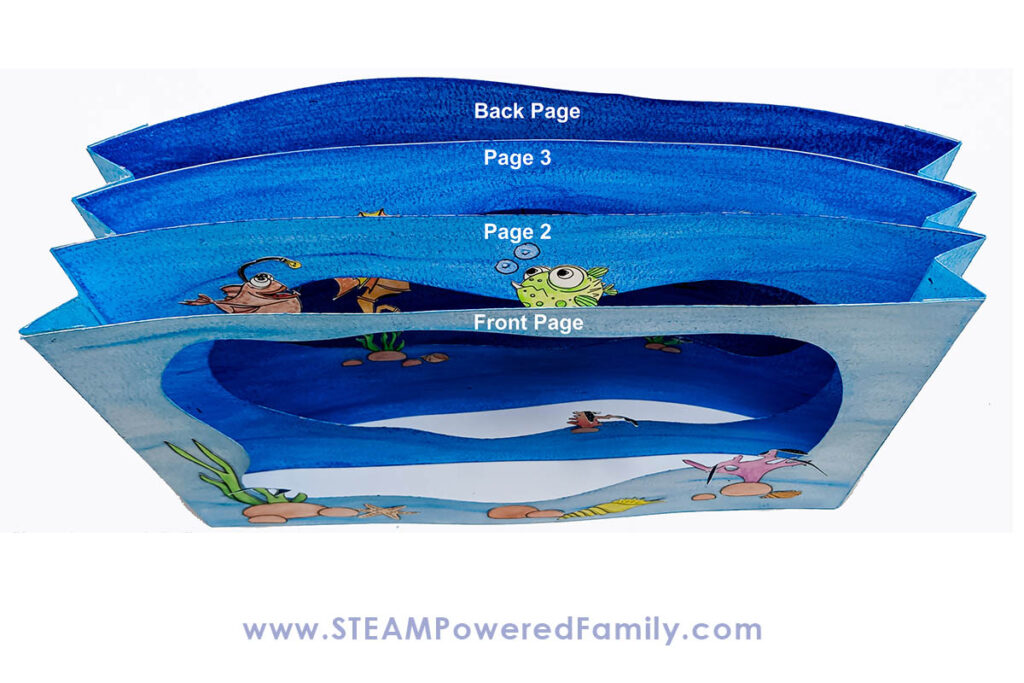
A tunnel book is a three-dimensional book made up of various layers. The Tunnel Book looks like an accordion, as all the book’s pages are held together on each side by accordion folded strips.
Each page is filled with different images, forming a three-dimensional artwork that tells a story. The Tunnel Book gives you the illusion of depth and works with perspective to create these illusions. When you look at the book, you can see all the way through to the back without turning pages. Tunnel Books don’t usually have words, as the viewer uses the illusion of depth to make sense of the scene. They are more like stunning 3 dimensional art storytelling.
The Science of How A Tunnel Book Works
A page in a regular book is two-dimensional. Therefore, each page has only two measurements – length and height. Each page of the Tunnel Book represents the different layers of a single picture. These layers are bound together by an accordion fold on each side, giving the book three dimensions with three measurements – length, width, and height.
Every layer in the tunnel book demonstrates any artwork’s concept of foreground, middle ground, and background. These concepts create the illusion of depth.
What are the foreground, middle ground, and background?
- The foreground of any scene is always closest to the viewer, and all the objects in this scene appear larger.
- The background of a scene is the furthest away from the viewer, and the objects are always smaller in size, darker in color, and have less detail.
- The middle ground is the space between the foreground and the background.
The History of Tunnel Books
Tunnel books first appeared in the mid-18th century and were generally based on theatrical stage sets. They were created for adults and often as keepsakes of special events and stunning pieces of art.
Although it is unknown how they became known as Tunnel Books. Many of these 3D books were created to celebrate the building of the tunnel under the Thames River in London in the mid-19th century. So it is possible the name came from that time.
Today Tunnel Books are very popular as an art form for children and adults alike.
Are you up for a challenge? Let’s make a three-dimensional Tunnel Book and learn a binding technique that involves folding paper in a specific manner.
DIY Aquarium Tunnel Book STEM Activity Video
Check out our video tutorial to see how we made our Aquarium Tunnel Book. If you can’t see the video, please turn off your adblockers as they also block our video feed. You can also find this tutorial video on the STEAM Powered Family YouTube Channel.
How to make an Aquarium Tunnel Book
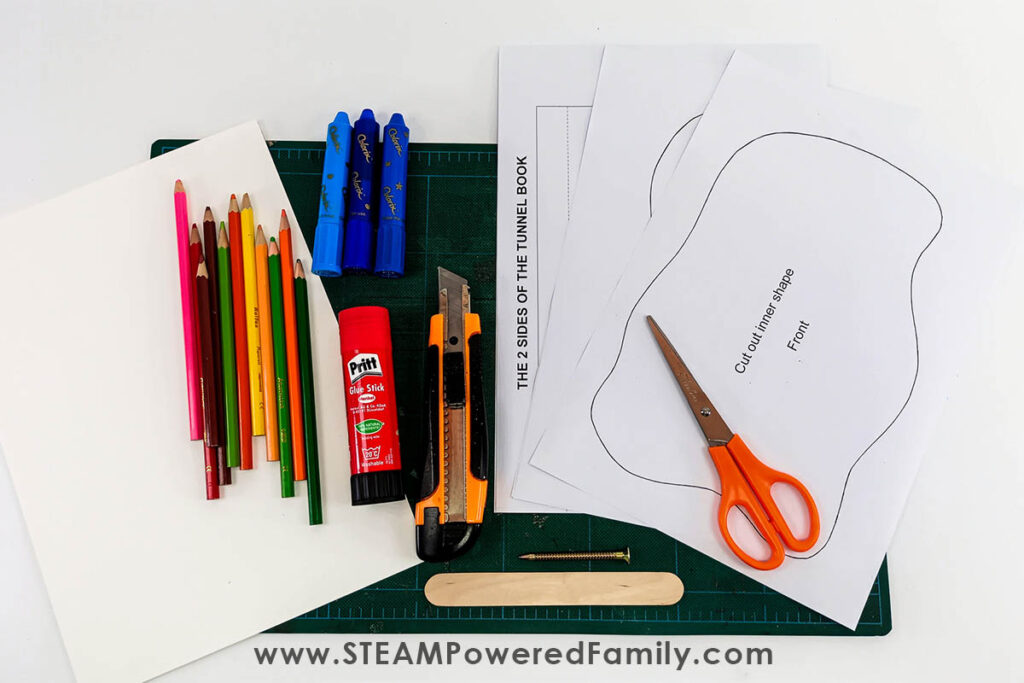
Materials & Tools
Thick watercolor paper, thin cardboard or heavy weight white cardstock
Glue stick
Ruler
Hobby knife (craft knife)
Scissors
Wooden tongue depressor, large craft stick, or a bone folder
A large screw or something with a point to score the cardboard
Watercolor pastels/crayons, pencil crayons, or paint
Plus you will need the templates! Members of the STEAM Powered Family mailing list can access this free printable for this project that includes the instructions and templates to make your own Aquarium Tunnel Book.
Tunnel Book DIY Instructions
Getting your pages ready
First you need to print and cut out all the template pieces on white cardstock.
Starting with the pages of the tunnel book, trace the three pieces onto the three pieces of the cardboard.
Using a hobby knife cut out the center pieces to create the windows through which you will see the aquarium world you are creating.
The back page is a blank page with no cut-out.
PRO TIP! Keep your fingers away from the knife blade. Remember, the hobby knife is very sharp! Adult supervision and assistance is highly recommended.
Preparing the accordion folds for the sides
Trace the shape of the accordion templates onto the cardboard and copy the measurements.
Use a screw to score all the inner lines. These scores will help with making the folds nice and clean.
Fold the cardboard to look like an accordion – backward and forwards, using a tongue depressor or bone folder to flatten each fold.
Never heard of a bone folder? It is a traditional tool use to create creases and folds in bookbinding, crafts and more. They are traditionally made from bone, hence the name!
Cutting out and coloring all the pieces
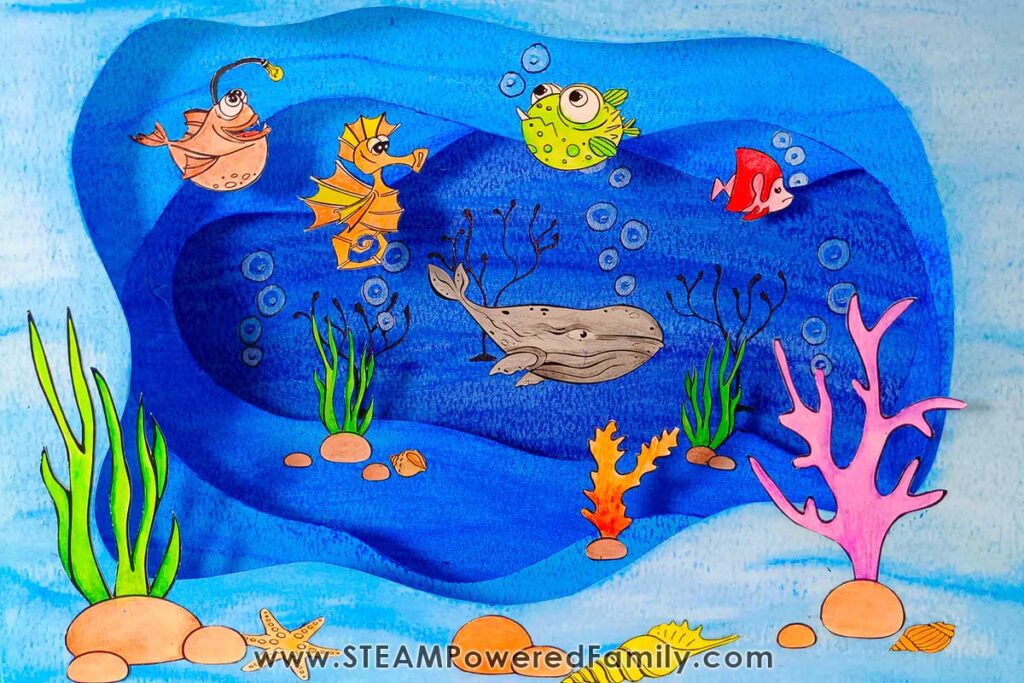
Print out all the sea life onto a piece of white cardstock.
Color the four pages of the book different tones of blue & turquoise.
Remember that the front piece will be the lightest color, and the back portion will be the darkest color. This helps with the perspective and illusion of depth. The back piece is the one with no cut-out.
Color the two accordion folded pieces any color you choose that fits your color scheme.
Color in all the sea life first, then cut each piece out.
Sticking all the sea life in place
Starting with the back page (page four), place the whale in the center of the page.
Next, do the same for the other three pages, placing each page on top of the other. (See the placement photos below).
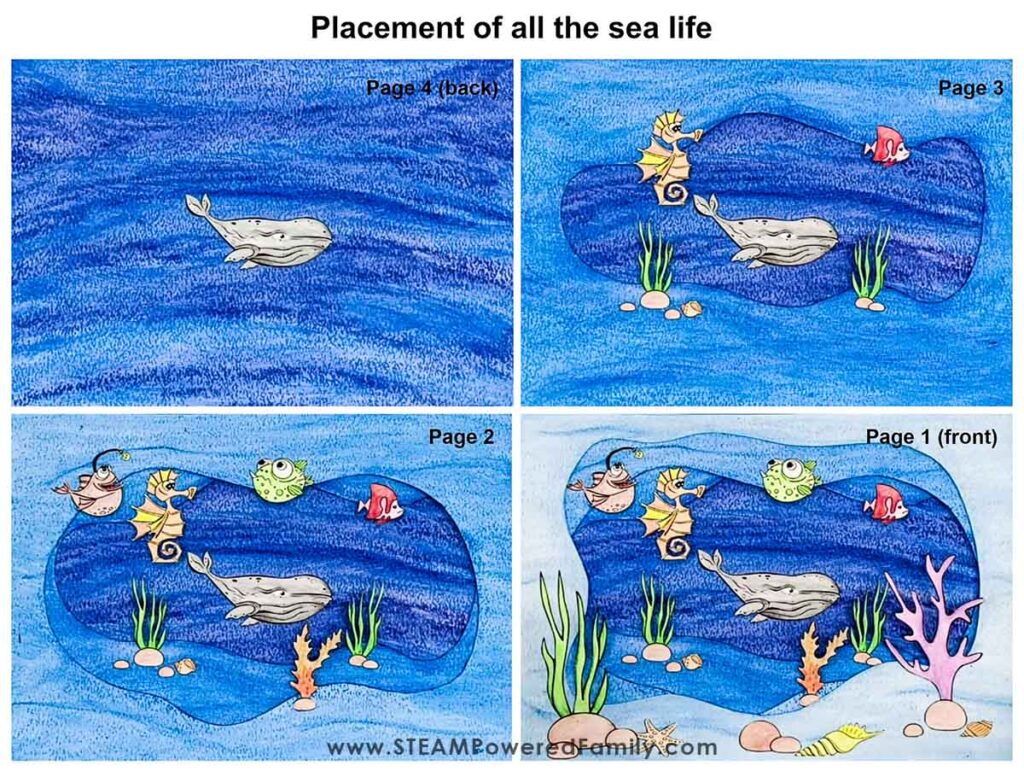
PRO TIP! You will work from the back to the front of the book, so ensure you have your pages in the correct order before placing the sea life onto each page.
Do not stick anything down now. Instead, place all the pieces first to ensure they are correct, then glue them down. This allows you to play until everything is perfect.
Placing the Accordion pieces on either side
Glue the edges of the last page on top of the last fold on the left-hand side and the opposite side onto the first fold on the right-hand side.
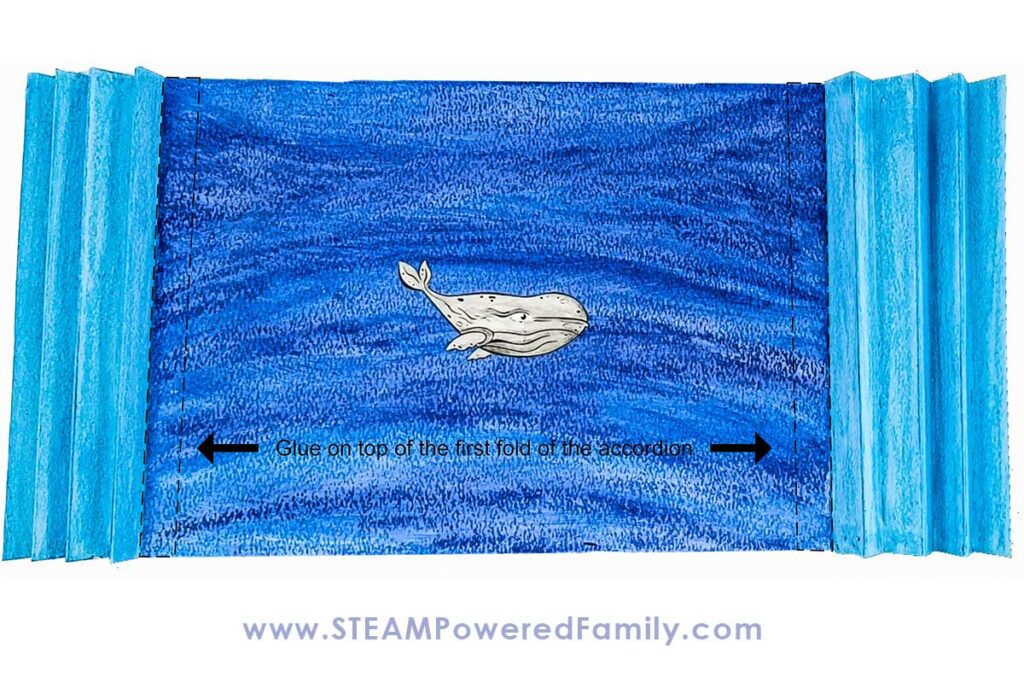
Glue all the pages into place, as shown below.
Your Tunnel Book is finished!
How incredible is this book! Imagine the stories you could tell with a Tunnel Book. It also makes an incredible art piece to hang on the wall.
Extension Ideas
Find a scene from a famous fairytale and turn it into a Tunnel Book.
Illustrate a poem in a Tunnel Book.
Write your own short story and turn it into a Tunnel Book.
Turn the tunnel book into a puppet show stage by placing cut outs on craft sticks, then moving them around in the scene. You can also use this concept to make a stop motion video.
Create a tunnel book using a variety of materials other than paper to create dynamic and interesting experiences for viewers.
Get creative! The layers you cut for your book do not have to be the same shapes you used in this project. They could be rectangles or even circles. The circles can create an actual tunnel. Most of all, let your creativity fly as you create your tunnel book.
What is the “A” in STEAM?
When we talk about STEAM, most people only mention the four main subjects of the STEM curriculum: Science, Technology, Engineering, and Math, but in recent years, the word
STEM changed to STEAM. The “A” brings ART into this fantastic curriculum.
With Art now in the curriculum, children can express themselves through the arts. In addition, the creative arts nurture the concept of thinking out of the box, which is always a valuable skill in engineering, science, and math to solve complex problems.
The creative arts are known to develop fine motor skills, even hand-eye coordination, flexibility, and the need to collaborate efficiently. But unfortunately, some children are not interested in engineering, technology, science, or math. When these artists see the creativity involved in a STEM lesson like this it draws them in to engage, explore and embrace STEM.
The inclusion of Art in the STEM Curriculum allows children to use both sides of their brain – analytical and creative, making them the best thinkers of the future!
Troubleshooting Tip
If your Tunnel Book does not close flat, your pages have not been glued in straight.
MORE STEAM Projects for Kids