

How Do Magnetic Fields Work? Build a Levitating Valentine Heart
Have you ever held two magnets close together and felt them push each other away? Or turned one around and watched them snap together? Magnets can be surprisingly bossy little things!
So how do magnetic fields work, and what’s actually happening when magnets attract or repel, and how can we use those invisible forces to create a heart that appears to float in mid-air?
In this project, we’ll explore magnetic poles, field lines and how magnetism and gravity work together, then use a little clever engineering to make a decorative Valentine’s heart with a floating effect. You’ll find a kid-friendly science explanation, a full step-by-step build with troubleshooting tips, and ideas for taking the learning further.
It looks a little magical, but there’s science behind the trick, therefore, no magic wand is required, just magnets, careful construction and a bit of curiosity!
Table of Contents
Table of Contents
- How Do Magnetic Fields Work? (Explained for Kids)
- Levitating Valentine Heart STEM Project
- The Science Behind the Floating Heart
- Troubleshooting Tips
- Extend the Learning
- Free Printable Heart Template and Lab Sheet
- How Do Magnetic Fields Work? FAQs
- More Magnetic STEM Fun
How Do Magnetic Fields Work? (Explained for Kids)
Disclaimer: This article may contain commission, paid partnerships, or affiliate links. We independently review everything we recommend. When you buy through our links, we may earn a commission from qualifying purchases.
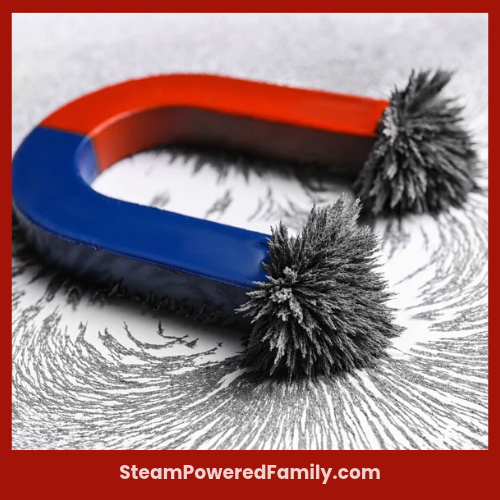
The invisible region around a magnet is the magnetic field where its force can push or pull on other magnets and attract materials like iron, nickel and cobalt. Every magnet has a north and a south pole: opposite poles attract and like poles repel. The field is strongest near the poles, which is why iron filings bunch up there.
You can’t see a magnetic field directly, but you can observe what it does. Bring two magnets close together, and they may pull towards each other or push apart, even when they aren’t touching. No hands required! Well, except for the hands holding the magnets, of course.
Every magnet has two poles: a north pole and a south pole. These poles determine how magnets interact. Let’s have a closer look.
Magnetic Poles: Attract and Repel
Here’s the golden rule of magnets:
- Opposite poles attract. A north pole and a south pole pull towards each other.
- Like poles repel. Two north poles or two south poles push away from each other.
Try it with two magnets, and bring them together one way, then turn one magnet around and try again. Feel the difference? One moment they’re pulling together; the next they’re pushing apart. Magnets certainly keep us on our toes!
This happens because the magnets’ fields interact. Where field lines from a north pole meet a south pole, they link up and the magnets pull together. On the other hand, where two like poles face each other, the fields push against each other and the magnets are shoved apart. That push is how magnets repel.
For our heart, however, we’re using attraction rather than repulsion. The magnets are positioned so they pull towards each other, while a thread holds the heart in the right position. The clever part is arranging the magnets and thread so the heart appears to float. Let’s see what’s happening behind the magic.
Seeing Magnetic Field Lines
Magnetic fields are invisible, which is rather inconvenient when you’re trying to explain them to curious children. Fortunately, we can investigate their shape without needing X-ray vision!
- Pour some iron filings into a sealed zip-top bag or a clear sealed container made for this purpose, and lay it flat on top of a bar magnet. Then, gently tap or shake it and watch the filings form curved patterns around the magnet, bunching up thickly at the two ends. Keep the filings sealed in and have an adult supervise. We want to explore magnetism, not spend the afternoon picking tiny bits of iron out of the carpet (or out of someone’s eyes)!
- Scientists use diagrams called magnetic field lines to represent these invisible fields. Outside a magnet, the lines are drawn from the north pole round to the south pole, and inside the magnet they carry on from south back to north, so every line makes a complete loop. Where the lines are closer together, the field is stronger. That’s why the filings crowd around the poles.
- The lines aren’t actual threads floating around the magnet. They’re simply a way of showing the field’s direction and strength. You can also use a compass to explore a magnetic field. A compass needle is a tiny magnet itself, so it lines up with the field. Move a compass slowly around a bar magnet and watch the needle swing to follow the field lines.
It’s a good reminder that we don’t always need to see something to investigate it. Sometimes we just need to look carefully at the clues it leaves behind!
Where Do Magnetic Fields Come From?
Magnetic fields are made by moving electric charges. Inside every atom are tiny particles called electrons, and each electron behaves like a minuscule magnet. In most materials, these tiny magnets point in every direction and cancel each other out.
In a few materials, mainly iron, nickel, cobalt and some of their alloys such as steel, the atoms line up in small groups called magnetic domains. When most of the domains point the same way, the whole object acts as a magnet. That’s why a magnet will grab a steel paper clip but ignore aluminium foil, copper, plastic, paper and wood. You can even turn a steel paper clip into a weak, temporary magnet by stroking it in one direction with a magnet a few times, which nudges more of its domains into line.
Electricity can make a magnetic field too. When electric current flows through a coil of wire, it creates a magnetic field that disappears as soon as the current is switched off. This is called an electromagnet, and you can build one that picks up metal in our Electromagnet Crane STEM project.
Earth Is a Giant Magnet
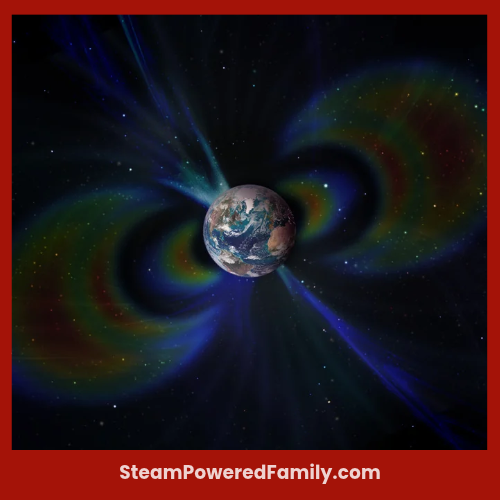
Our whole planet has a magnetic field. Deep below our feet, Earth’s outer core is made of hot, liquid iron and nickel that is constantly moving. That swirling, electrically conducting metal generates Earth’s magnetic field, a process scientists call the geodynamo.
This is what makes a compass work. The north end of a compass needle points towards Earth’s magnetic north pole, which is near, but not exactly at, the geographic North Pole, and it slowly wanders over time. Here’s a fun brain-twister: because opposite poles attract, the magnetic pole in the Arctic that pulls the north end of a compass needle is actually a magnetic south pole! Want to try it? You can make your own compass with a needle and a magnet.
Earth’s magnetic field also helps shield the planet from the solar wind, a stream of charged particles from the Sun. When some of those particles are guided towards the poles, they create the glowing northern and southern lights.
Balancing Magnetism and Gravity
Now let’s bring another familiar force into the picture: gravity.
Gravity pulls objects towards the Earth. It’s why your cup of tea stays on the table and why dropping your scissors on the floor is generally a much better way to damage them than putting them away carefully. We’ve all been there!
Magnetic forces can pull as well as push. In our model, the magnets attract each other. Because one magnet is in the stand’s top arm and the other is inside the heart, that attraction pulls the heart upwards while gravity pulls it downwards.
The thread is an important part of the design, too. It’s anchored to the base, so it stops the heart from simply jumping up to the magnet in the top arm.
The combination of magnetic attraction, gravity and the carefully adjusted thread creates the appearance that the heart is floating. The magnets aren’t doing all the work on their own!
Getting the effect just right takes a little adjustment. The magnet spacing and thread length matter, so don’t worry if you need to experiment to find the sweet spot. And that’s where the making gets interesting!
Levitating Valentine Heart STEM Project
Who says a science project can’t look pretty?
For this Valentine’s Day STEM project, we’re turning recycled cardboard and a few other materials into a decorative heart that appears to float below its stand. It’s a magnetic levitation project with a sweet twist, and it makes a lovely gift.
The science and engineering make the effect possible, and we get to have fun with the design. Now that’s my kind of project!
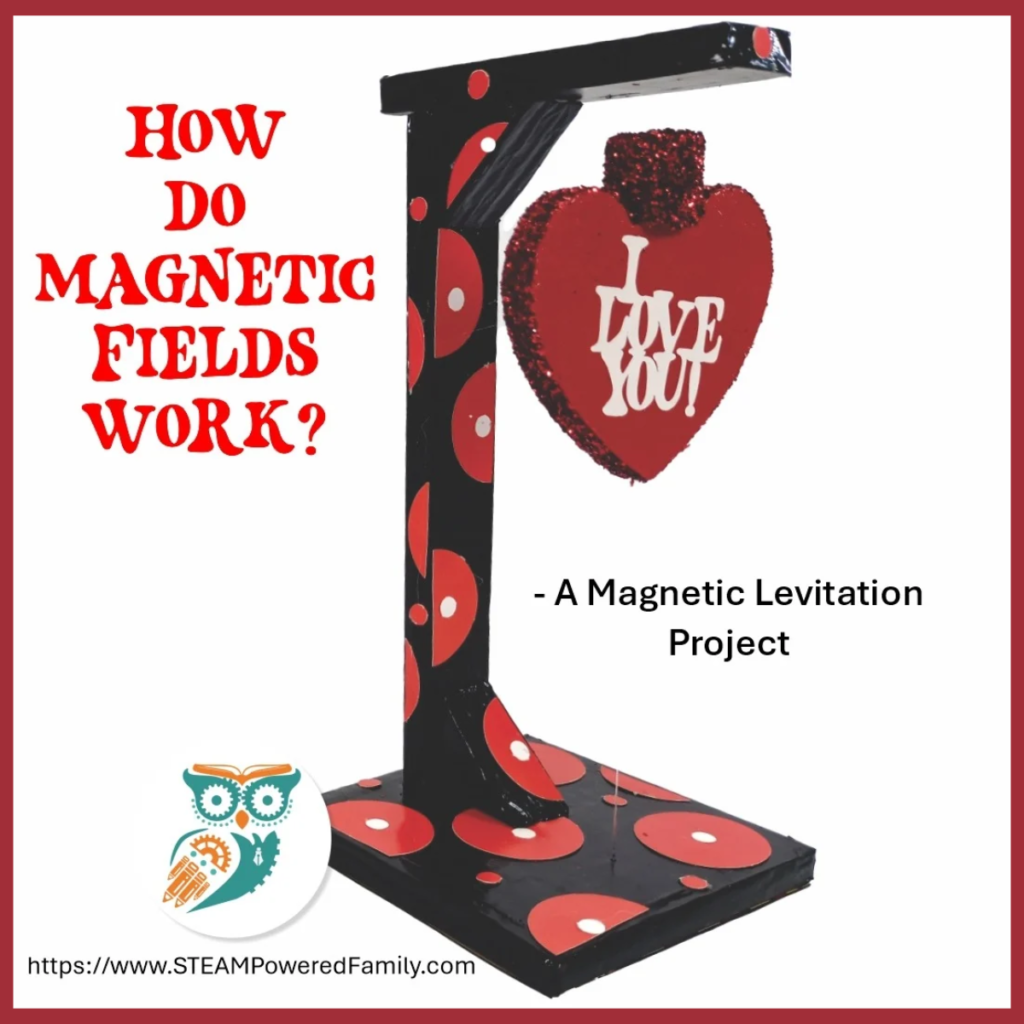
Look closely at the finished model. The magnets attract each other, while the thread keeps the heart in position. With the support arranged carefully, the heart appears to float in mid-air.
Before showing children how the model works, ask them what they think will happen. Will the heart rise? Will it move towards the stand? What might the thread be doing?
Encourage them to make a prediction and then observe what happens. There are no marks for guessing correctly. The interesting part is discovering why something happens!
Let’s make a Magnetic Levitating Heart to give someone you love for Valentine’s Day, and share the magic of magnets!
Best for: ages 8 to 14 with an adult handling the strong magnets, craft knife, super glue and glue gun. Younger children can help with predicting, painting and decorating.
What Materials and Tools Will You Need?
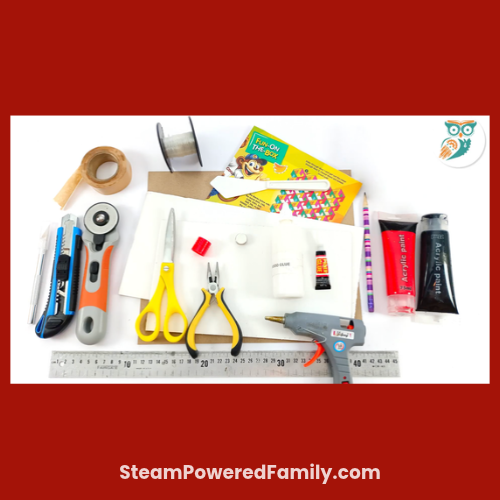
- Recycled cardboard boxes, 1 mm and 3 mm thick
- 2 small round neodymium magnets, about 1.5 cm across
- The Magnetic Levitating Heart templates (see the free printable below)
- White paper or cardstock
- Recycled cereal box
- Gut (fishing line) or cotton thread
- Long sewing needle
- Water-activated paper tape
- A recycled plastic glue-stick lid (from a 9 g glue stick); this is the “plastic cap” in the steps
- Wood glue
- Super glue
- Glue gun
- Red and black acrylic paint
- Black permanent marker
- Craft knife (such as an X-Acto knife)
- Rotary cutter
- Scissors
- Small pliers
- Metal ruler
- Pencil
Magnet Safety
- Swallowing hazard: Small magnets, especially powerful neodymium magnets, can cause serious internal injuries if swallowed. If two or more are swallowed, they can pull together through the walls of the intestines. Keep loose magnets away from young children and pets, have an adult handle them, and if you think a magnet has been swallowed, get emergency medical help right away.
- Pinching: Neodymium magnets snap together hard enough to pinch skin and can chip or shatter. Bring them together slowly.
- Electronics and medical devices: Keep strong magnets away from phones, tablets, credit and bank cards, and anyone with a pacemaker or other implanted medical device.
- Tools: Craft knives, super glue and hot glue need adult supervision.
How to Build the Levitating Heart
Follow the step-by-step instructions below to build your heart and stand.
Watch this activity in action in the video below, if you can’t see the video due to your settings, visit our YouTube channel.
Step 1: Cut Out the Templates
Print the page of templates on cardstock and cut out all the pieces.
Trace the templates onto cardboard and cut out all the pieces.
Step 2: Glue the Stacked Pieces Together (Use Wood Glue)
- The first piece you will make is the top arm of the stand. One magnet will be hidden in this piece.
- Glue the 3 pieces together, keeping the piece with the hole for the magnet on the top of the stack.
SPECIAL TIP: Each time you make a piece, make sure all the edges are even and straight by turning the piece over onto each of its sides and gently tapping it on the surface you are working on.
- Place each stack that you glue together under weights or something heavy to dry.
- The next piece is the back of the stand. Glue the 3 pieces together and place them under a weight.
- Next, glue the 3 pieces for the base together, keeping the holes at the bottom lined up.
- Next, glue 2 stacks of 8 triangles together. These will be used as corner blocks to help the stand stay upright.
- Now, glue the 7 hearts together, making sure they are lined up properly. The space at the top of the heart is where the plastic cap (with the other magnet hidden inside) will fit.
- Finally, make a stack of the small cardboard circles you cut out earlier. These will hold the magnet in the plastic cap. Start by gluing 7 circles together and let the stack dry. You should have extra small circles left over. Keep these for later in the build.
Step 3: Mark the Magnets and Hide the First Magnet
- Hold one magnet in each hand and slowly bring them together to find the two faces that attract each other. Put a black dot with the marker on each of those two faces (the faces that want to “stick” together). Do this very slowly.
SPECIAL TIP: Be very careful doing this, as neodymium magnets are very strong, and once they stick together, they can be very difficult to get apart or can shoot out in another direction. If you cannot get them apart, place them on a wooden surface, push down on the top magnet and slide it off the bottom one. You may need the help of an adult for this.
- Place the first magnet into the plastic cap with the dot facing the bottom of the cap. (When the cap sits on top of the heart, this dotted face will point up towards the stand’s top arm.)
- Push the stack of small circles you glued together into the cap to keep the magnet secure.
- You may need to glue another circle or two into the cap depending on the height of your plastic cap. Make sure you keep one extra small circle to glue onto the heart.
- Glue the last small circle onto the flat top of the heart. Put it aside to dry.
Step 4: Hide the Second Magnet
- Glue the second magnet with the glue gun into the hole of the top arm you made earlier.
- Make sure the black dot you made on the magnet is facing up, so you can see it. This side becomes the underside of the arm once the stand is assembled, so the two dotted faces will point towards each other and attract.
- Now use wood glue to glue the piece of cereal box you cut out earlier over the side with the magnet to secure it in place. DO NOT PUT GLUE ONTO THE MAGNET!
- Put this piece aside with a weight on it, and don’t forget to make a mark on the cereal box cardboard where the hole for the magnet is.
Step 5: Get the Gut or Cotton Thread Ready
- Cut a piece of gut or cotton thread that is 40 cm long.
- Thread the gut through a long needle.
- Push the needle up into the heart from the bottom point and out through the small circle at the top. You may need to use pliers to pull the needle out.
- Tie a knot in the end of the gut a few times over.
- Glue the knot down with super glue and let it dry for a minute or two.
SPECIAL TIP: Use caution not to squeeze the super glue tube too hard. You only need 2 or 3 small dots of glue.
Step 6: Finish the Heart
- Use the glue gun to put glue onto the top of the stack of small circles inside the cap and push the cap onto the small circle on the top of the heart.
- Turn the plastic cap with the heart upside down and push down on the surface you are working on for a minute.
- Then a little super glue must be squeezed into both sides of the plastic cap. This will make sure the stack of circles inside the cap stays secure.
Step 7: Make the Hole in the Base
- Place the base template on the base stack and use the needle to make a hole for the gut.
- Do not push the needle all the way through. The hole must be very small.
- Check that the gut fits through the hole.
Step 8: Cover the Sides with Water-Activated Paper Tape
- You do not have to do this step for each piece, but it makes your stand look neat and tidy!
- Measure and cut the amount of tape you will need for each piece.
- Keep a cup of water and a paintbrush close by.
- Paint the piece of tape with water and wrap it around the sides of the piece.
- Use scissors to cut into the corners, fold each of the sides down neatly and put it aside to dry.
- Repeat these steps for all the other pieces.
Because the hearts were cut out of 1 mm-thick cardboard, I painted wood glue into the tiny holes on the sides of the heart instead of using the water-activated paper tape.
Step 9: Glue the Stand Together (Use the Glue Gun)
- Begin by sticking the back of the stand into the hole on the base. Turn the stand upside down and push up against the table to make sure the back does not come out the bottom.
- Stick one of the corner blocks onto the base and the bottom of the back piece. This will keep the stand square and the back standing straight up.
- Now take the top arm with the hidden magnet and mark 1 cm from the end opposite the magnet. (The arm is glued onto the back of the stand, hanging off the top by 1 cm.)
SPECIAL TIP: Earlier, you made a mark on the cereal box piece where the magnet is positioned, on the underside of the top arm. If you forgot to, or you cannot find it, take the heart with the magnet in the cap and move the top of the cap along the top arm to feel for the pull from the hidden magnet. The pull will be strong, so be careful!
- The end where the magnet sits is the front of the arm. The opposite end is where your 1 cm measurement should be.
- Turn the stand upside down, put some glue on the top of the back and stick the arm onto it so that it hangs off the back by 1 cm, with the cereal box side (and the magnet’s dotted face) facing down.
- Stick the other corner block on to hold the back and the top arm in place.
Step 10: Paint Your Stand and Heart
- Paint the stand and heart any way you like for now. You can decorate the whole thing once it is all put together.
- Remember to cut out the words “I love you” for both sides of the heart on the template.
- I put glitter on the sides of the heart for a little sparkle!
Step 11: Attach the Heart to the Base
- Thread the gut through the top of the base and turn the base upside down.
- Use a craft knife to cut a narrow channel on the underside of the base to stick the gut into.
- Now for the tricky part: pull the gut down through the hole to the underside of the base with one hand, and use the other hand to feel for the magnetic pull between the two magnets.
- Stop when you feel a strong pull. If you are not sure, let the heart up or pull it down a little until you find the point where the pull is strongest, or ask someone to help you.
SPECIAL TIP: If the pull is too weak when you turn the stand the right way up, the heart will drop, and if it is too strong, the heart will jump up and stick to the magnet in the top arm.
- Remember that the “magic” here is that the heart looks like it is floating or levitating in mid-air. I found the best gap between the magnets was 1.3 cm. This is not an exact measurement for every build, so you need to play around with it and test it until the heart stays in place when you turn the stand the right way up.
- When you are happy with the position, use super glue to stick the gut into the channel you cut.
- Stick a piece of tape over the gut when it is dry.
- Finally, with the glue gun, glue the square piece of cereal box over the gut and tape.
- Your amazing Magnetic Levitating Heart is done!
All that is left is to add any other decorations you would like.
Make It Personal: Add a Message or Photo
The heart can be decorated with the words “I love you” on both sides, making it a lovely Valentine’s Day gift. You can also attach a small photograph to turn it into a special keepsake photo holder. Add a little glitter or your own decorative touches to make it uniquely yours!
And if your first design doesn’t work quite as expected, don’t throw it across the room just yet! Sometimes the most interesting discoveries happen when we have to rethink something.
The Science Behind the Floating Heart
The heart looks as though it’s floating, but there’s a little more going on than meets the eye.
Magnetic attraction helps support the heart
The magnets in the top arm and the heart are positioned with opposite poles facing each other. Opposite poles attract, so the magnets pull towards each other.
That attraction pulls the heart upwards. Gravity pulls the heart downwards, and the thread, anchored to the base, stops it from rising any further. When the upward magnetic pull is a little stronger than the heart’s weight, the thread stays tight and the heart hangs in place below the arm.
Magnetic fields can act across a gap, so the magnets don’t need to touch to attract each other. The field also passes straight through the cardboard and cereal box covering the hidden magnet.
So, is the heart truly floating freely? Not quite. The thread is part of the support system, but when it’s carefully positioned, the heart can look as though it’s suspended in mid-air. Pretty clever, isn’t it?
Why does the gut or cotton thread matter?
Here’s where things get a little tricky. Magnetic pull gets much stronger as magnets get closer. So if the heart drifts up even slightly, the pull increases and it zooms up to the top arm. If it drifts down, the pull weakens and it falls. Without the thread, there is no “just right” spot where the heart would stay put on its own.
In fact, a scientist called Samuel Earnshaw showed back in 1842 that ordinary magnets that aren’t moving can’t hold an object perfectly still in mid-air all by themselves. Something always has to help: a thread, a guide rod, a spinning motion, or, in real maglev trains, electronic controls that keep adjusting the magnets.
In our model, the thread does that job. That means this model is not an example of a freely floating object held up by magnets alone. Adjusting the thread and the gap between the magnets helps you find the position where the heart looks as though it is floating.
The magnets provide the attraction, gravity pulls downwards, and the thread keeps the heart aligned. Each part has a job to do.
Sometimes even a little pretend magic needs a bit of engineering supervision!
Want to see the same idea in another form? The Wingardium Leviosa experiment also uses magnetic attraction to make an object appear to levitate.
Why can the heart move or spin?
The heart is held at just one tiny point: the thin thread below it. Nothing else touches it, so there’s very little friction to stop it from turning. A small breath of air can set it rotating, and the thread twists and untwists as it goes.
How much it moves depends on the thread, the balance of the heart and whether any parts rub against one another.
Think of spinning a coin on a table: it gradually slows down because of friction and air resistance. Your heart slows down for the same reasons, plus the twisting thread gently pulling it back.
It’s a lovely reminder that the way an object is supported affects how it moves.
Troubleshooting Tips
Is your heart refusing to create its floating effect? Before you accuse the magnets of being difficult, let’s investigate!
The heart jumps up and sticks to the top arm.
The thread is too long, so the magnets get too close. Shorten the thread a little so the gap between the magnets is bigger.
The heart doesn’t lift, or it flops over.
The gap is too big, or the magnets are facing the wrong way. Check that the two dotted faces point towards each other so they attract. If they’re repelling, one magnet is upside down. Then lengthen the thread a little to bring the magnets closer.
The heart flips or tilts.
Check that the magnet in the cap is centred on top of the heart and lined up under the magnet in the top arm, and that the thread comes straight up from the base.
The heart moves but doesn’t stay in place.
Check that the thread is secure in its channel and adjusted to the right length. Make small adjustments until the heart appears to float where you want it.
Change one thing at a time and observe what happens. If you change five things at once, you’ll have no idea which one fixed the problem. We don’t want our little science investigation turning into a guessing game!
Extend the Learning
Once children understand the basic idea, there are several ways to take the investigation further. And no, you don’t need to build a full-sized train in the classroom. Let’s start small!
Explore magnetic levitation in real life
Magnetic levitation is used in some trains, known as maglev trains, where magnetic forces lift and guide the train so it doesn’t roll on wheels along its track.
Different systems use different combinations of magnetic attraction, repulsion and electronic control. Many use electromagnets, which produce magnetic fields when electric current flows through them.
Imagine travelling on a train that uses magnetic forces to lift it above the track. That’s a real engineering application of the science we’ve been exploring! You can try a small version with our Electromagnetic Train Project.
Investigate magnet strength and distance
Ask children to predict what will happen when the distance between two magnets changes.
Bring the magnets closer together and then move them further apart, keeping them under control. What do you notice about the attraction or repulsion? Magnetic forces get weaker as the distance between magnets increases, and they drop off quickly. Doubling the gap makes the pull much weaker than half as strong.
Encourage children to record their observations and explain what they notice. They may not be able to measure the force directly, but they can still make useful comparisons, such as how many paper clips a magnet can pick up through 1, 2 or 5 sheets of cardboard.
For more hands-on ideas, visit our Magnet Experiments for Kids.
Connect science with maths
Here’s a chance to bring a little maths into the fun without making anyone groan!
Children can record measurements in a table, draw a graph or compare results from repeated trials. For example, they could measure the gap between the magnets and describe what happens as that gap changes.
Ask them to make a prediction before each test. Were they right? If not, what surprised them?
Science isn’t about getting every answer right the first time. It’s about asking questions, testing ideas and learning from the results. Even professional scientists don’t get everything right on the first attempt!
Free Printable Heart Template and Lab Sheet
Grab the free printable Magnetic Levitating Heart templates and a lab sheet for recording predictions and measurements.
[]More Magnetic STEM Fun
Ready to explore more ways to make magnetic forces do interesting things? Here are a few more projects to try:
- Jitter Bugs: Science with Magnets
- Magnetic Christmas STEM Activities
- Magnetic Flying Ghosts Science Experiment
- Valentine’s Day STEM Activities for Elementary
- Valentine’s Day Coding Projects
- Valentine’s Day Mailbox Projects
Sometimes the best way to understand science is to make something with your own hands. Build it, test it, change it and see what happens.
You might start with a few bits of cardboard and some magnets and end up discovering a whole new world of magnetic forces. And if your first attempt doesn’t work? Well, that’s just science giving you another excuse to make something! If you build a levitating heart, we’d love to hear how far apart your magnets ended up.
Happy making!
How Do Magnetic Fields Work? FAQs
Yes. Magnetic fields pass easily through materials that aren’t magnetic, like paper, cardboard, wood, plastic, water and skin. That’s why the hidden magnet in the top arm can still pull on the heart through layers of cardboard. Only magnetic materials such as iron and steel bend and redirect the field, which is why a thick sheet of steel can block much of a magnet’s pull.
You get two smaller magnets, each with its own north and south pole. No matter how many times you break a magnet, every piece still has two poles. You can’t make a magnet with only a north pole or only a south pole.
Yes. Strong heat, hard knocks or being stored next to a stronger magnet in the wrong direction can knock its domains out of line and weaken it. Neodymium magnets are especially sensitive to high temperatures, so keep them away from ovens and open flames. Stored safely, a good permanent magnet keeps most of its strength for many years.
The magnetic field explanation and the build suit children around 8 to 14. An adult should handle the neodymium magnets, craft knife, super glue and glue gun, and loose magnets should stay well away from younger siblings and pets. Younger children can still join in by making predictions, painting and decorating the heart.
Maglev trains don’t rely on fixed magnets alone. Some use electromagnets with sensors and computers that adjust the current thousands of times a second to keep the gap steady. Others use the train’s own high-speed motion to create magnetic forces in the track that push the train up and keep it centred.