Build an Electromagnetic Train Project
Have you ever wanted a hands-on way to demonstrate electromagnetism without complex equipment or expensive kits? This simple electromagnetic train project is a high-impact STEM activity that allows educators to visibly demonstrate how electricity and magnetism interact to produce motion. Using just copper wire, a battery, and neodymium magnets, teachers can guide learners through a powerful example of energy transfer, forces, and engineering design in action.
Build a Simple Electromagnetic Train (STEM Classroom Project)
Table of Contents

Inspired by real-world magnetic levitation (Maglev) trains, this activity connects classroom science concepts to modern transportation technology making it ideal for upper elementary, middle school, and enrichment settings.
In this kid approved project, we are going to build a train that moves without touching it. Students will see how electricity and magnetism can come together to create motion, called electromagnetism.
Homopolar Motor Trains
Have you heard of the super-fast Maglev trains in Japan and China? They float above the tracks using magnetism! These trains are also known as homopolar motor trains.
Homopolar motors are direct current (DC) electric motors that can produce constant circular or linear motion and are possibly the simplest example of a motor, and are also really easy to experiment with.
Today, we’re going to build our own mini version. A tiny train that moves using the same science that powers real magnetic trains, and all we need are some copper wire, a small battery, and some small magnets. Get ready to see these amazing forces in action!
But first, let’s look at the science behind these amazing electromagnetic trains.
The Science Behind an Electromagnetic Train
This electromagnetic train project provides educators with a powerful, hands-on way to demonstrate the relationship between electricity, magnetism, and motion, collectively known as electromagnetism. While electricity and magnetism are often introduced as separate topics in the classroom, this activity allows learners to see how deeply connected these forces truly are.
Electricity Creates Magnetism
Whenever an electric current flows through a wire, it generates a magnetic field around that wire. This magnetic field is invisible, but its effects can be observed through motion, exactly what happens in this train experiment.
A familiar classroom example is an electromagnet: when wire is wrapped around an iron nail and connected to a battery, the flowing current temporarily turns the nail into a magnet. Disconnect the battery, and the magnetism disappears. This demonstrates that magnetism can be created and controlled using electricity.
Magnetism Can Create Electricity
The relationship also works in reverse. When a magnet moves near a coil of wire, it can induce an electric current in that wire. This principle is the foundation of electric generators, which use spinning magnets to produce the electricity that powers homes, schools, and transportation systems.
Together, these two principles explain how electrical energy and magnetic fields can interact to produce motion and power.
How This Applies to the Electromagnetic Train
In this project, a battery provides electrical energy that flows through the copper wire coil, creating a magnetic field along the track. The neodymium magnets attached to the battery already have strong magnetic fields of their own.
When the magnetic field created by the current in the wire interacts with the magnetic fields of the magnets, a force is produced that pushes the battery and magnets forward through the coil. This motion continues as long as the circuit is complete and the battery supplies current.
The direction of motion depends on:
- The direction of the electric current
- The orientation of the magnets’ north and south poles
Reversing the battery or flipping the magnets reverses the direction of the train, making this an excellent demonstration of how engineers control motion by managing electric current and magnetic polarity.
Energy Transformation in Action
From a physics and engineering perspective, this activity clearly demonstrates energy transfer: Electrical energy from the battery is converted into magnetic energy which then becomes kinetic energy (motion).
There are no gears, motors, or moving parts, just fundamental forces at work. This makes the electromagnetic train an especially effective model for teaching abstract concepts in a concrete, observable way.
Real-World Connections
The same principles demonstrated here are used in everyday technologies, including:
- Electric motors in appliances and vehicles
- Generators in power stations
- Speakers and audio devices
- Magnetic levitation (Maglev) trains used in countries such as Japan and China
By connecting this simple classroom model to real-world systems, educators can help learners understand how foundational physics concepts scale up to modern engineering solutions.
How to make an Electromagnetic Train
Project Tutorial Video
Watch our video as we make this simple electromagnetic train. If you can’t see the video, it is likely being blocked by a firewall or adblocker. Visit our YouTube Channel to watch it there.
Teacher Tip!
Pre-test one completed train before the lesson to confirm battery compatibility and magnet polarity.
Materials and Supplies
- 4-5 meters of bare copper wire (18-20 gauge, uninsulated)
- AA or AAA alkaline battery (verify magnetic terminals, newer Duracell or Energizer batteries usually work)
- 4 neodymium disc magnets (slightly wider than the battery diameter, we used 15 mm)
- Wooden dowel or broom handle (~16 mm in diameter, find them at the hardware store)
- 2 small clamps or clothespins
- Safety googles and optional gloves
Safety Notes for Educators
- Use only low-voltage AA or AAA batteries
- Neodymium magnets are very strong and can pinch fingers—adult supervision is required, gloves may help protect fingers
- Avoid prolonged short-circuiting, as batteries and wire may become warm
- Magnets should be kept away from electronics and pacemakers
- This activity is best suited for ages 9+ with supervision
Directions
Making the wire track
Cut about 4m of the copper wire. Yes, it is a long piece of wire!
Get someone to sit in front of you and guide the copper wire in your direction, and keep it straight.
Using the dowel stick, attach the end of the wire to the dowel with some masking tape and begin wrapping a coil tightly around the diameter of the dowel so that all the coils are touching, but not overlapping.
Once you have wrapped all the wire around the dowel, push the coils together, then place one clamp on either of the coils. Make sure you push the loops of the coil so that they are touching each other. Leave it like that for 5 minutes. This will help to keep the loops evenly spaced.
After 5 Minutes
Remove the clamps and gently slide the coil off the dowel. You should have a spring-shaped copper coil (it looks like a tunnel of copper wire).
Stretch the coil out a bit so that the spaces between each coil are even and check that no coils are touching each other, as this will cause a short in the circuit.
Make sure the loops of the coil are wide enough for the battery with magnets to move freely inside, but still close enough for contact.
TIP: The copper wire must touch at least one of the ends of the magnets when the train moves through for the circuit to work.
Building the train
Let 2 magnets attract each other and stick together, and then do the same for the other 2 magnets.
This happens when the north pole and a south pole of the magnets are brought near each other, their magnetic fields combine in a way that lowers the overall energy state, causing them to be pulled together.
Neodymium magnets are very strong and can hurt your fingers when they are attracted to each other, so be careful. You will also notice that they are very difficult to get apart once they have attached.
The easiest way to separate them is to slide them apart.
Make sure both magnets are facing the same direction (the same poles should face outward). This is important, if one is flipped, the train won’t move!
Place one pair of magnets on one end of the battery, then do the same with the other magnets on the other end. This is your train!
Here is a diagram demonstrating how everything should look:
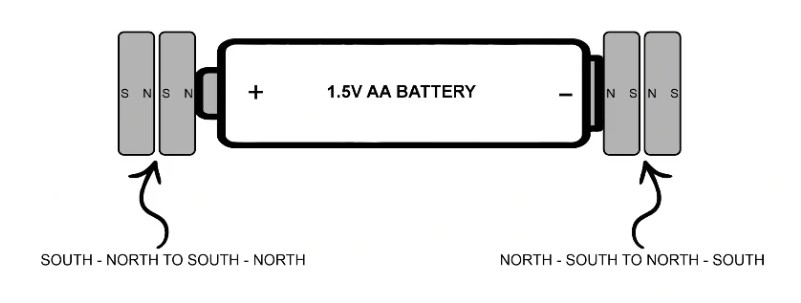
You are now ready to see your electromagnetic train in action!
Making the Train Go
Gently place the battery and magnet train inside one end of the copper coil. Remember to always place the “train” with the positive side of the battery entering the coil first. The train should start moving!
Troubleshooting
If the train does not move in the coil, turn one set of magnets around. You may have to do this a few times until you get it right. Refer to the diagram again.
Make sure the magnets touch the wire. This completes the electric circuit, allowing current to flow.
Step back and watch the train should begin to move forward on its own!
Classroom Experiments & Inquiry Prompts
- How long can the “track” be, and can it go up or downhill?
- Try changing variables to see how the train behaves.
- What happens if I use thicker copper wire?
- Does the train go faster with two batteries?
- Does the size of the battery make a difference to the train’s speed?
- How do more magnets affect the train’s motion?
- Flip the battery by pushing the negative side in first, and ask: “Does it go in the opposite direction?”
- Make the wire coil tighter or looser and ask: “Does it move faster or slower?”
- Add extra magnets and maybe even another battery, and ask: “How does that change the distance or speed?”
- Will a bigger battery give the “train” more power?
- Bend the coil into a circle, ensuring that the ends are connected. Now watch the train go round and round!
- Encourage students to record their observations and make scientific predictions before each test.
How the Electromagnetic Train Works (Teacher Explanation)
This electromagnetic train operates as a simple linear motor, providing a clear and observable example of how electrical energy can be converted into motion through magnetic forces. Although the materials are simple, the physics involved mirrors the same principles used in electric motors and magnetic transportation systems.
When the battery with attached neodymium magnets is placed inside the copper wire coil, the magnets make contact with the wire, completing an electrical circuit. This allows electric current to flow from the battery, through the copper wire, and back to the battery.
As electric current flows through the copper wire, it generates a magnetic field around the wire. This magnetic field interacts with the strong magnetic fields produced by the neodymium magnets attached to the battery.
The interaction between these magnetic fields produces a force that pushes the battery and magnets forward through the coil. This force is the result of electromagnetic interaction. No mechanical pushing or pulling is involved.
The direction of motion depends on two key factors:
- The direction of the electric current
- The orientation of the magnets’ north and south poles
Reversing the battery or flipping the magnets reverses the direction of the train’s motion. This feature makes the activity particularly valuable for discussing polarity, vector direction, and controlled motion in engineering systems.
From an energy perspective, the train demonstrates a clear transformation of energy: Electrical energy stored in the battery is converted into magnetic energy which results in kinetic energy as the train moves through the coil.
Because there are no gears, engines, or moving mechanical parts, this activity isolates electromagnetic forces in a way that is easy for learners to observe, analyze, and explain. This makes the electromagnetic train an effective instructional model for reinforcing concepts related to forces, motion, energy transfer, and system interactions.
Learning Objectives
By completing this project, learners will:
- Observe and explain electromagnetism in action
- Analyze how electrical energy transforms into motion
- Apply the engineering design process to improve performance
- Collect and interpret data related to speed and distance
- Make real-world connections to transportation and energy systems
This simple electromagnetic train may be small, but the learning impact is powerful. With just a few everyday materials, educators can bring electromagnetism to life in a way that is visual, memorable, and deeply connected to real-world technology. From sparking curiosity about forces and motion to encouraging engineering-style problem solving, this project turns abstract physics into something learners can literally watch in motion.
Whether used as a core lesson, a STEM club favorite, or an extension activity, this electromagnetic train is a reminder that big science ideas don’t require complicated setups, just thoughtful design and a willingness to experiment. All aboard for hands-on learning that keeps curiosity moving forward!