

Electromagnet Crane STEM Project
Kids love to play with magnets! Over the years we have played and learned with magnets in many ways, but the one thing we hadn’t made was an electromagnet. So today we are taking the concept of an electromagnet and making an Electromagnet Crane! This project is perfect for the Science Fair or STEM lovers.
Electromagnet Crane Science Fair Project
Table of Contents

Disclaimer: This article may contain commission, paid partnerships, or affiliate links. We independently review everything we recommend. When you buy through our links, we may earn a commission from qualifying purchases.
The Science of Magnets
Magnets. The way they seem to magically attract and repel is fascinating. But what exactly is a magnet?
Magnets are typically made of iron or steel and can attract specific types of ferromagnetic metals. These are metals that can produce a magnetic field, which allows the attraction to magnets.
Magnetism is the force that attracts objects to a magnet, while a magnetic field is the space around a magnet. Metals such as iron or steel are attracted to magnets and can be pulled towards them. This is known as an attraction. When this occurs, the metal will adhere to the magnet and become difficult to pull apart.
A magnet has two poles. The poles of magnets are called the north and south poles. These two poles are drawn to each other and will always move towards one another when they are close. When two magnets with identical poles come close together, they will repel or push away.
The Science of Electricity
We also know what electricity is, but let’s recap – electricity powers our lights and appliances, but how does this happen?
Electricity often flows through wires or cables. A circuit is a circular path through which electricity flows from a power supply. An electric current is the movement of electrons and protons in a circuit.
In this exciting project, we will explore how magnets and electricity can work together to create an electromagnet—a marvel of physics!
We will make an Electromagnetic Crane to help you understand how electromagnetism works.
The Electromagnet
Let’s look at the word “electromagnetic.” It has the word “electro,” which is short for electricity, and the word “magnet,” which we all know means magnets stick to most metal surfaces.
Electromagnets are magnets with the presence of electricity that can power up everything in our homes, make our cars run, and even make some toys more fun to play with.
An invisible force field is created in a wire as the electricity flows through it. This field is called a magnetic field.
This magnetic field in an electromagnet makes magnets stick to the wire when electricity flows through it. Because electromagnets can be turned on and off, they are known as temporary magnets.
Electromagnetism is one of the fundamental forces of nature.
How does electromagnetism work?
When the magnet is exposed to an electric current, it generates a temporary coil-shaped magnetic field that attracts specific metals to it, and when that current is shut off, the field disappears. The objects stuck to the magnet fall off.
What are some of the daily uses of electromagnets?
The most common use is in electric motors. Some household appliances that use electromagnets are microwaves, washing machines, refrigerators, and fans, to name a few. Some industrial uses are generators, Transformers, medical equipment like an MRI, hard drives and loudspeakers, elevators, and machines in a scrap yard that separate and lift heavy metal objects for recycling.
So, let’s start making our Electromagnetic Cranes so you can get on lifting and separating ferromagnetic metals from scrap.
DIY Electromagnetic Crane Project Tutorial Video
Like many STEM projects, they can seem really complicated until you see the builds in action. This tutorial video takes you through the entire build of our electromagnetic crane, so you can confidently build it with your own students. If you can’t see the video, it is being blocked by an adblocker or firewall. But don’t fret! You can also find it on the STEAM Powered Family YouTube Channel (don’t forget to like and subscribe!), where it also has closed captioning. Enjoy!
Materials & Tools
Thin cardboard – like an old small postage box
Single-flute cardboard from an old packing box – 45cm X 25 ( Important note: the grooves should be running along the long edge)
Small piece of cardstock or cereal box cardboard
Sheet of single-sided corrugated cardboard
Glue gun
Soldering iron & solder (with stand)
Ruler
Pencil
Black or white permanent marker
10mm paper or plastic straw (these are the large ones like Boba or smoothie straw)
2 Medium-thickness rubber bands
50mm long roofing screw or iron nail
Compass to draw circles
Box cutter
Exacto knife
Scissors
Side-cutters
Pliers
Wire stripper
Fat wooden skewer
Toothpicks
Pringles tin-empty
Toilet roll tube
Assorted wooden beads
Assorted nuts, bolts, washers & paperclips
Brown paper tape or masking tape
Electric wire (coated)
Hobby on/off switch
9V Battery
9V Battery Connector
Heat shrink or electrical tape
Small lighter
Electromagnet Crane Directions

If you haven’t watched the video tutorial, go watch it now. It will clearly show you step-by-step how to do this project so you have the full visuals, then you can use this section to guide you during the build and remind you about each step.
Preparing and cutting all the cardboard pieces:
Using a box cutter, cut the silver edge off the top of the Pringles tube. Do this by measuring down 5cm around, and cut this piece off. Discard the rest of the tube.
Trace the circle of the Pringles tube and the toilet roll on a small piece of thin corrugated cardboard, then cut both pieces out with scissors. Put all these pieces aside.
Get the piece of single-flute cardboard. Using a ruler and the reference picture below, measure and cut out all the pieces. Keep the pieces for each part in separate piles.
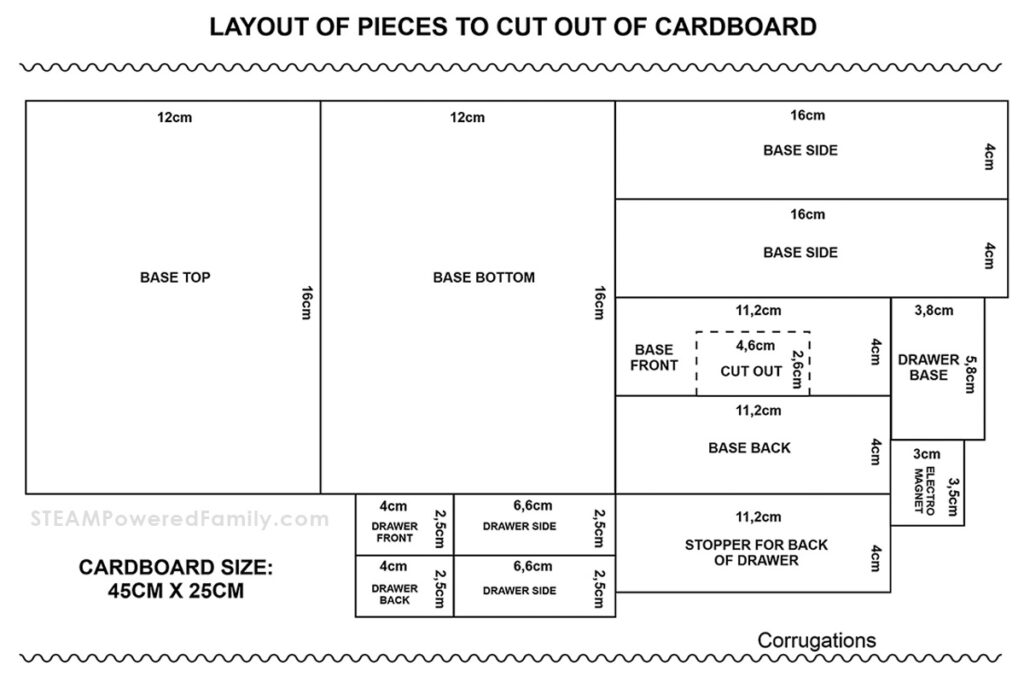
Constructing the base of the “crane” and the drawer for the battery:
Get the pieces for the base.
Glue the long side pieces onto either side of the base.
Glue the front and back onto the base, ensuring the front is glued with the drawer opening facing upward. All the base’s side, front, and back pieces fit onto the top of the base, not on the sides!
Get the pieces for the battery drawer.
Glue the two short pieces onto the sides of the base. Turn the whole piece onto its side and glue one of the long sides onto the drawer. Turn it over onto the other side and repeat this step.
All the pieces of the battery drawer fit onto the side of the base, not on top!
Making the template for the slot on the toilet roll:
Get your straw and a small piece of cardstock to make a small template. Draw a vertical line on a small piece of cardstock measuring 3cm. Place one end of the straw on the left side of the line at the top and trace around the rounded edge of the straw. Turn the cardboard around and repeat this step on the opposite end of the line. Make another vertical line on the opposite side to complete the slot. Measure and mark the middle of the slot and cut the slot out.

Find the middle of the toilet roll and make a mark around the tube. Use a ruler with a flat edge to make a straight line up the tube on one side. Using your eyes, find the position of the line on the opposite side of the roll and make a straight line up the tube on this side.
The position of the slots needs to be in perfect alignment!
Trace the slot onto the toilet roll on either side, lining up the middle line on the slot. Using the Exacto knife, cut out the slots on both sides.
SAFETY NOTE: Remember to keep your fingers away from the blade and make minor cuts with the point of the blade!
The straw should fit snuggly in the slots, so do not cut out on the traced line but slightly in from it (Cutting off too much means starting again!).
Preparing the straw:
Using a permanent marker, mark 7cm from one of the edges and make a hole with a toothpick from one side of the straw to the other side by gently pushing the toothpick through the straw.
Make a single hole on the underside of the straw 7.5cm from the edge, between the two holes you made on the sides, with a toothpick.
Use the pointed side of a wooden skewer to make the hole bigger. This hole must fit the two wires for the electromagnet to go through.
Joining the straw to the toilet roll tube:
Using your eyes, find the middle of the tube’s sides between the two slots and mark both sides for the toothpick to pass through.
Push the end of the toothpick into the tube to make a hole. Repeat this step on the opposite side of the tube.
Making the coil for the electromagnet:
Get the small piece of cardboard 3.5cm X 3cm that you cut earlier. Ensure that the grooves are running along the shorter side!
Carefully screw the threaded part of the screw onto the middle hole of the corrugations until the flat part of it touches the cardboard. Keep your finger over the threaded part as you screw the screw in. It will prevent the cardboard from tearing.
Get the 3m length wrapping wire you have and thread one end of the wire through the fist groove next to the screw.
Pull out 50cm of wire from the opposite end.
Hold this free end and the cardboard with one hand and begin to make the coil around the smooth part of the screw. Ensure the coil is tight, but not too tight, as the wire might snap. Coil the wire to just under the head of the screw, then coil down on top of the coils you just made.
Repeat both steps once more. It will create four rows of coils on top of each other.
All the coils you wind onto the screw should touch the one you made before! Do not leave spaces! (See the picture below)

When you have completed all four rows of coiling, you should be at the point where the coil touches the cardboard.
Thread the rest of the wire through the nearest groove on the other side of the screw and out the bottom of the cardboard.
Twist the two wires together for a few centimeters to keep them in place.
Cut the longer wire to the length of the first wire (50cm).
Threading the wire through the hole in the straw:
Take the excess piece of wire you cut off and double it, ensuring it is long enough to go through the length of the straw.
Thread the wire loop through the single hole you made in the straw and out to the front of the straw. Twist the ends of the electromagnet wire you made, put it through the loop of the scrap wire, and twist it again onto the loop. Pull the wire backward, up, and out of the straw through the single hole.
WOW! You just made a “needle” and didn’t even realize it!
Putting the toilet tube and straw together:
Push the straw into one of the slots and out the other side.
Watching from the top of the tube and holding the straw, push the toothpick through the tube and straw and out the other side. The toothpick acts as the fulcrum for the “crane” arm. Trim the toothpick and put a blob of glue over the ends coming out of the tube.
The electromagnet wire you twisted (from the small cardboard) should be between 6 and 7cm long. The excess wire can be pulled through the tube and out the other side. Do not over-twist the wire. Electricity running through it can cause a short in the coil!
To hold this twisted wire in place, find a wooden dowel, an old felt-tip maker lid, or a piece of cardstock rolled until it fits easily into the end of the straw’s front to use as a “stopper.” Hold the wire and the straw in place and gently push your “stopper” into the straw. If it is too tight, you may again cause a short. The electricity should flow through the wire easily!
Glue another “stopper” into the other end of the straw and glue a large bead onto the “stopper.” The stopper and bead together form the handle. You can also use a bottle top for a handle. If you have used a paper straw, you can glue the bead or bottle top directly onto the straw, as it will not melt. If you have tiny beads, glue a bead to either end of the toothpicks on the tube.
Reinforcing the edges of the cardboard base and drawer:
Reinforce the edges of the battery drawer and the base with brown paper tape before you do anything else. You can use masking tape if you don’t have brown paper tape. It looks neater and makes it easier to paint and decorate later.
Preparing the base for wiring:
Get the reinforced base, battery drawer, a thick skewer, a bead, and the last cardboard piece you have left over.
Glue a bead onto the front of the drawer (short side), this is going to function as a drawer pull or handle.
Turn the base upside down and put the battery drawer in place. The drawer should be 7cm long from the outer edge of the base.
Remove the drawer and use a ruler to make a mark 7cm from the base’s outer wall on the top of the side walls on both sides. Glue the last piece of cardboard right here. This wall will stop the drawer from going further into the base.
Use the wooden skewer to make a hole in the left wall of the drawer toward the back. The wires from the 9V battery will go through this hole.
Completing the base of the electromagnet:
Find the middle of the top of the base and trace the Pringles tin onto the base. Position it in the middle and hold it with your hand while you glue the tube onto the top with a glue gun from the inside, around the rim.
Ensure that no glue is on the outside of the tube and that the outer ring (corrugated cardboard) will spin smoothly on the top of the base.
Cutting and gluing the Corrugated Cardboard in place:
Cut a piece of corrugated cardboard 6cm wide and the length of 30cm. Ensure that the corrugations run upwards on the short side.
Wrap this corrugated cardboard around the Pringles tube, and remember not to make it tight or cut off the extra.
Test to see that the “sleeve” can spin around the tube comfortably.
Use two rubber bands to hold the “sleeve” closed and glue the ends with some glue.
Get the larger cardboard circle you cut earlier. Find the middle of the circle, and make a hole with the wooden skewer for the wires to pass through.
Joining all the pieces:
Get the tube you worked on earlier and pass the wires from the tube through the hole of the large circle.
Place the tube in the middle of the circle, trace it around it, and carefully glue it into place on the circle. You may need another set of hands to help with this. DO NOT GET GLUE ONTO THE WIRES!
Get the base with the Pringles tin, and from the front left side, measure 4cm from the front of the base and make a mark just before the Pringles tin, and up the outer left of the base, make a mark at 6.7cm just before the Pringles tin again.
It would be best if you eyeballed where the two lines intersect inside the Pringles tin and, using a wooden skewer, made a hole for the wires to go through to the base.
Pass the wires from the toilet roll through the hole inside the Pringles tin to the base.
Glue this whole section onto the top of the corrugated cardboard “sleeve” wrapped around the Pringles tin. You may need another set of hands to hold the base for this step.
Glue the small cardboard circle on top of your toilet roll to close it.
Test that the corrugated cardboard spins smoothly and that your “crane” arm moves up and down quickly.
Remember this is what the final project will look like.

It’s time for the “electrics”!
Connecting the electromagnet to the switch and the battery:
Measure your switch and mark it on the top of the base, about 4cm from the front and 1.3cm from the side. Cut the cardboard for the switch to fit into with an Exacto knife.
Push the switch into the hole to check that it fits. Remove the switch.
Put the connectors on the 9V battery. Pass the wires out of the side of the drawer and drop the battery into it.
Pass the wires under the base to the inside.
Ensure that the toilet tube is glued onto the large circle properly.
Remove the switch and turn the base onto its side.
Prepare the wires:
Strip the ends of all the wires about 1cm with a wire stripper or a side-cutter. Do this carefully, as you do not want to damage the wires!
Pass one of the white wires and the red wire from the battery through the hole from the inside, up and out of the hole for the switch. You may need to move the battery drawer closer to the hole, as the wires can be short.
Turn the whole crane the right way up with the two wires coming out the hole of the switch.
Get the roll of solder and solder the red and white wires to either of the switch terminals.
I used a soldering stand to make it easier to do this alone. Remember to prime the terminals and the ends of the wires with solder first. Soldering them in place is easier this way!
If you don’t have a soldering iron:
If you do not have a soldering iron, you will notice that each terminal has a hole. Pass the bare wire through the hole and twist it onto the terminal tightly and neatly. Ensure no wires’ ends are sticking out or touching other bare cables. Doing so will cause a short, and the electromagnet will not work! Use electrical insulation tape to cover each terminal and the wires.
Push the wires carefully back through the hole and place the switch into its place.
Only glue the switch once you have completed the circuit and are sure it is in good working order! It is so important to test the circuit. Once you know it works, ensure that the switch is in the OFF position.
Turn the “crane” on its side.
Slip a small piece of Heat Shrink onto the battery’s black wire and solder the other white wire from the electromagnet to the black wire. Move the Heat Shrink over the join, use a lighter to heat it gently, and watch it shrink over the two wires!
If you do not have Heatshrink, use insulation tape to cover the join.
Your electromagnet is now wired and ready to go!
Turn the crane the right way up, and let’s test the electromagnet before we close the base permanently!
Using the Electromagnet Crane:

Get some paper clips, screws, and washers and place them in front of the crane.
Direct the electromagnet to the paper clips, screws, and washers by pushing it forward or backward and turning the “crane” left or right.
Turn the switch ON and lower the arm of the crane. It should pick up the metal items like paper clips.
To drop the paper clips, turn the switch OFF and watch them fall.
Finishing Touches
The last step is to close the underside of the base with the last piece of cardboard using the glue gun. Don’t forget to reinforce the edges with brown paper tape, too.
Now it’s time to decorate your electromagnetic crane and have some fun!

Classroom Activities and Challenges
There are lots of fun things you can do with an electromagnet crane.
It is a fantastic project idea for the science fair.
Set up a challenge to see who can get the most paper clips, screws, and washers into a container in a specific amount of time.
What size battery works the best?
How will more coils or less coils on the screw affect the strength of the magnet?
Design your own electromagnet project. Maybe instead of a crane design, try a car or an electromagnet train!