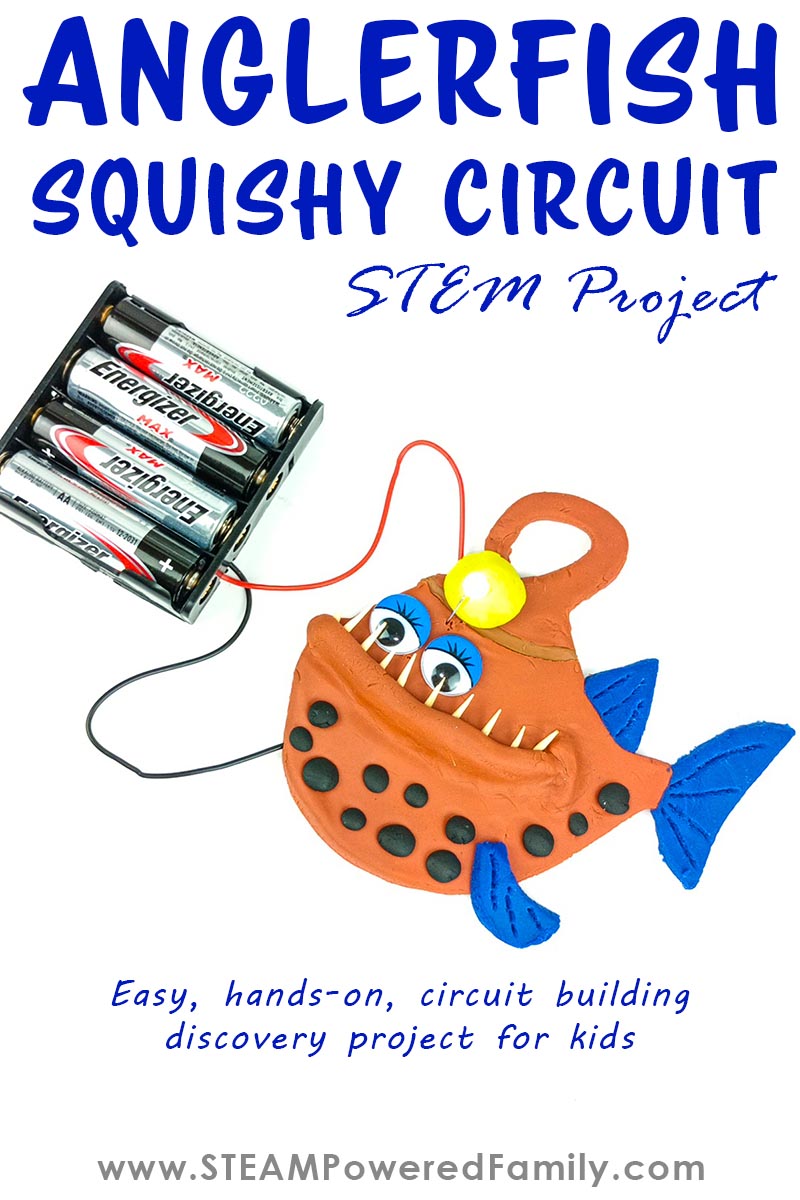
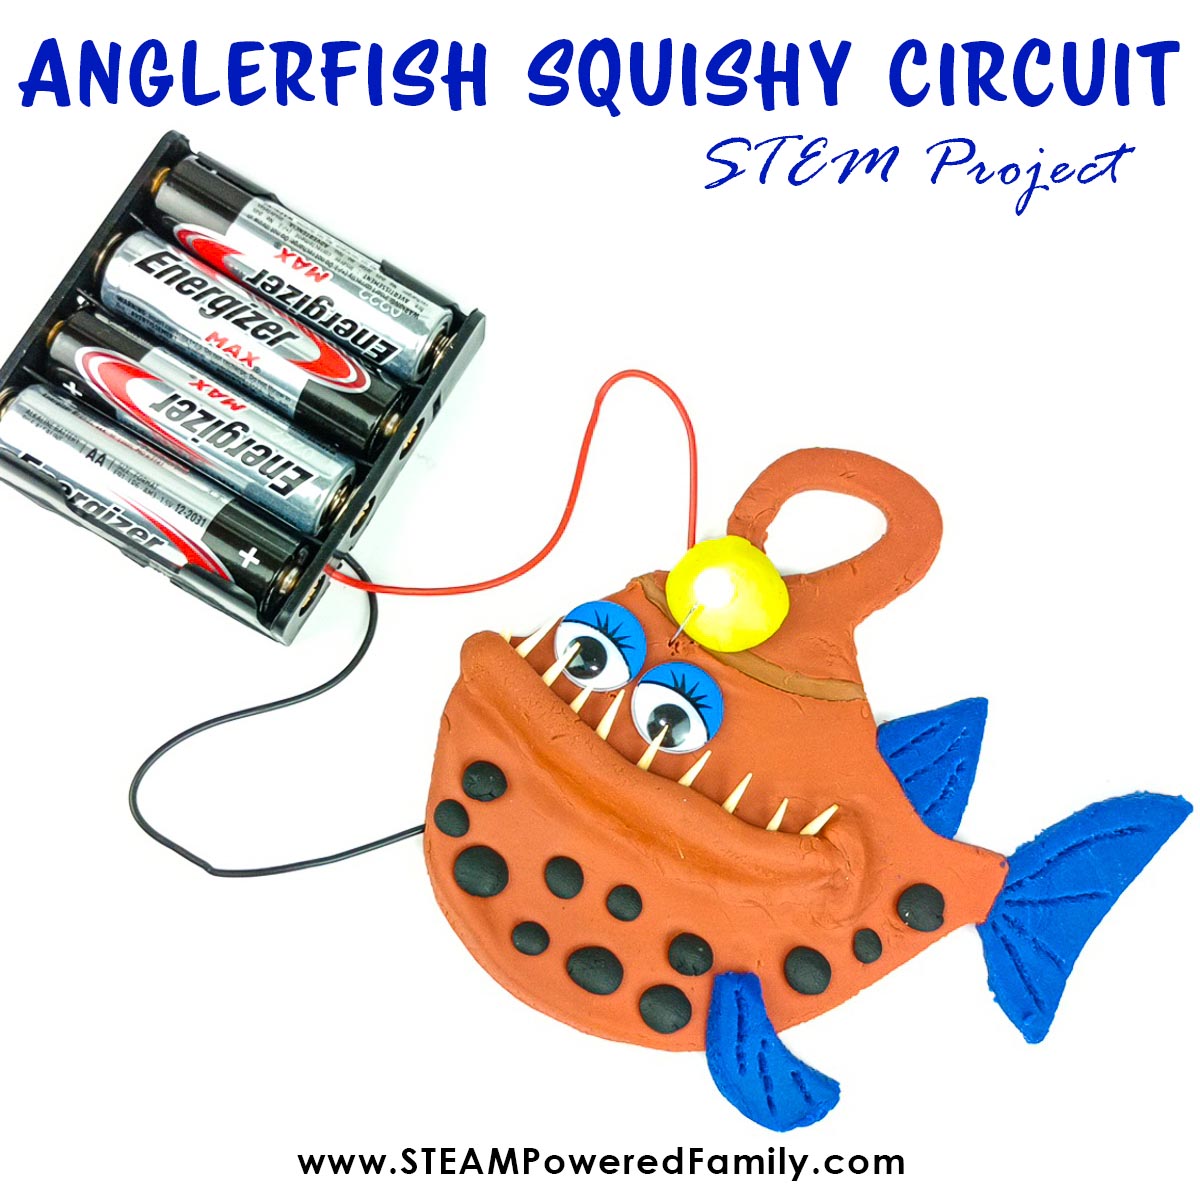
Anglerfish Squishy Circuits Project
This easy project is a fun way to learn and understand what a squishy circuit is, using Play Dough! You can create all kinds of different sculptures and then, with LEDs, motors, and buzzers, make any sculpture come to life.
Anglerfish Squishy Circuit Project
Disclaimer: This article may contain commission or affiliate links. As an Amazon Influencer I earn from qualifying purchases.
Not seeing our videos? Turn off any adblockers to ensure our video feed can be seen. Or visit our YouTube channel to see if the video has been uploaded there. We are slowly uploading our archives. Thanks!
What is a Squishy Circuit?
Squishy circuits were first developed by a scientist and teacher called Dr. Anne-Marie Thomas.
She discovered that using a mix of Play Dough, which is a conductor because of its salt content,
and other materials like craft foam, paper and rubber, known as insulators, it was easier to
teach children about circuits and electricity without using traditional circuitry components. Plus kids loved building squishy circuits, because it is such an easy, playful and creative way for children to explore electric circuits.
Squishy circuits help build STEM skills, independent thinking, problem solving and creativity skills.
Anglerfish Facts
When it came time to decide on what to make with our Squishy Circuits, we wanted something really cool. We did Squishy Circuit Jack O’Lanterns a few years ago. We needed something different this time. Then it hit us… the incredibly cool and amazing Anglerfish! Why is the Anglerfish so cool? Here are some amazing facts about the elusive and fascinating Anglerfish.
- Anglerfish have a bioluminescent organ called the esca at the tip of a modified dorsal ray. That’s the part that comes out of the top of their head, so it dangles in front of their faces kind of like a fishing rod with a lit up lure.
- Only female anglerfish have the glowing lure and rely on bacterial symbionts to produce their bioluminescent light.
- There are over 160 species of deep-sea anglerfishes living in the deep, bathypelagic waters of the oceans. That’s an incredible 1000 to 4000 metres below the surface. It is very dark, very cold, and under an immense amount of pressure.
- Male anglerfish are much smaller than the females and when they find their mate, they will bite onto the female’s body, attaching itself for the rest of its life. Talk about a lifetime commitment!
- Females lay eggs in a thin sheet of gelatinous material about one meter wide and about 9 meters long. This egg raft floats in the ocean rising up to the sunlit upper layers of the ocean where the eggs hatch into tiny larvae. Once hatched, the larvae swim to the surface and feed on plankton. As they mature, they return to the deeper ocean waters.
- Although scientists don’t know for sure, they believe the bioluminescent light could be used for attracting mates and prey in the pitch black waters of the deep ocean.
- Learn more about the Anglerfish from National Geographic.
Making an Anglerfish Squishy Circuit
Check out the video of this project to see the entire circuit build using playdough and modeling clay. If you can’t see the video, please turn off your adblockers as they also block the video feed. You can also find this video on the STEAM Powered Family YouTube Channel.
Materials & Tools
Exacto/hobby knife or for younger kids use a butter knife or playdough tools
Wood chopsticks
Wood toothpicks
4 X AA battery holder
4 X AA batteries
LED bulbs (we prefer jumbo sized or 10mm for this project)
Anything that will work as a rolling pin (I used a piece of PVC pipe)
Side Cutters or scissors – to cut the toothpicks
A plate to work on
Plus you need the Squishy circuits dough!
You can use store bought materials for this project and save yourself the time and hassle of making the dough. All you need for pre-made dough is:
Play Dough (any colours) – the conductors
Modeling clay (any colours) – the insulators
Another option is to buy a Squishy Circuits kit. Or you can make your own conductive and insulating dough. Here are the dough recipes you will need.
How to Make Conductive Dough
Conductors allow electricity to pass through them. To make a dough conductive it needs to have salt and water which allows electricity to flow and bring your Squishy Circuit creations to life.
Ingredients
1½ Cup (355 ml) Flour 1 Cup (237 ml) Water
¼ Cup (59 ml) Salt
3 Tbsp. (44 ml) Cream of Tartar
1 Tbsp. (15 ml) Vegetable Oil
Food coloring (amount varies based on type used and intensity of colour desired)
Directions
Step 1: Mix water, 1 cup of flour, salt, cream of tartar, vegetable oil and food coloring (if using) in a medium-sized, non-stick saucepan.
Step 2: Cook over medium heat, stirring continuously. The mixture will thicken, and lumps will begin to form.
Step 3: Continue heating and stirring until the mixture forms a ball and pulls away cleanly from the sides of the saucepan.
Step 4: Turn the dough out onto a floured surface. Be careful, as it is very hot at this point.
Step 5: Allow the dough to cool for a few minutes before kneading flour into it until the desired consistency is reached.
Storage
Keep the dough in an airtight container or bag for several weeks. For longer periods, the dough can also be frozen.
Always check the dough for mold if stored for any length of time before using, and knead the dough after removing it from the storage container to make it pliable.
How to Make Insulating Dough
Insulators do not allow electricity to easily pass through them. Resistance is a measurement of how insulating something is. This dough has high resistance which means electricity does not flow through it.
Ingredients
1½ Cup (355 mL) Flour
½ Cup (118 mL) Sugar
3 Tbsp. (44mL) Vegetable Oil
½ Cup (118 mL) Deionized Water – Note: distilled or regular tap water can be used, but the resistance of the dough will be lower.
Food coloring (amount varies based on type used and intensity of colour desired)
Directions
Step 1: Set aside ½ cup flour to be used later. Mix remaining flour, sugar, and oil in a pot or large bowl.
Step 2: Mix in a small amount (about 1 Tbsp.) of deionized water, stirring until the water is absorbed. Repeat this step until large, sandy lumps begin to form.
Step 3: Turn the dough out onto a sheet tray or a floured surface gathering it into a single lump.
Step 4: Add small amounts of flour or water to make a dough-like, pliable consistency.
Storage
Keep the dough in a sealed container or bag for up to a week. For longer periods, the dough can be frozen. While in storage, the oil may separate and the dough may lose its dough-like consistency. Simply add additional flour to remove the stickiness before using again.
Anglerfish Squishy Circuit DIY Directions
Getting your pieces ready
First, to make things easier you can grab our template for the shapes here. It is available for all STEAM Powered Family mailing list members.
Print the template on project board and cut out all the body pieces.
Get the piece of glass, an Exacto knife, a rolling pin, the chopsticks and all the dough & modelling clay you have chosen.
You need one colour of play dough for the Anglerfish body, another for the fins and a colour for the “light”. You will need a piece of modelling clay, the same as or like the colour used for the body, which will go in between the top and bottom sections of the body.
The Science Insights
Play dough is conductive, which helps the current to flow because of its salt content. The modeling clay is insulative and does not allow current to flow through it.
If you do not have play dough or modeling clay, use the recipes I have supplied to make your own.
Place the two chopsticks about 10cm/4 inches apart on the glass or plate.
Place a piece of play dough in the middle of the two sticks. Flatten it with your hand, then place the rolling pin on top of the chopsticks and roll the dough until it is evenly rolled out.
PRO TIP! The two chopsticks will help to keep the thickness of the dough even.
Now cut out all the pieces of the template. I used googly eyes, but if you do not have any, the parts for the eyes are included on the template.
Place all the pieces onto the relevant colours of play dough and cut them out with the Exacto knife.
Remove the template pieces and use the line drawing on the top right corner of the template to guide how to put the parts of the Anglerfish together.
Putting the Anglerfish Together
Use your fingers, one of the chopsticks, or the back of a small paintbrush to smooth the edges of all the pieces.
Once all the body pieces are in place, roll out a thin sausage of play dough for the mouth.
Roll a small piece of play dough into a ball for the fish’s “light” and put it in its place at the top of its head.
Cut about 8 – 10 little pieces off both pointed ends of the toothpicks using a side cutter. These will be the fish’s teeth. Push these “teeth” into the inside of the mouth.
Use any colour to roll out little dots to put onto the body.
Place the googly eyes or the eyes you made from play dough into place.
Make all the lines in all the fins with a toothpick.
Your Anglerfish is ready! Let’s make it light up!
Completing the Circuit
Get the LED, the battery holder and the four AA batteries.
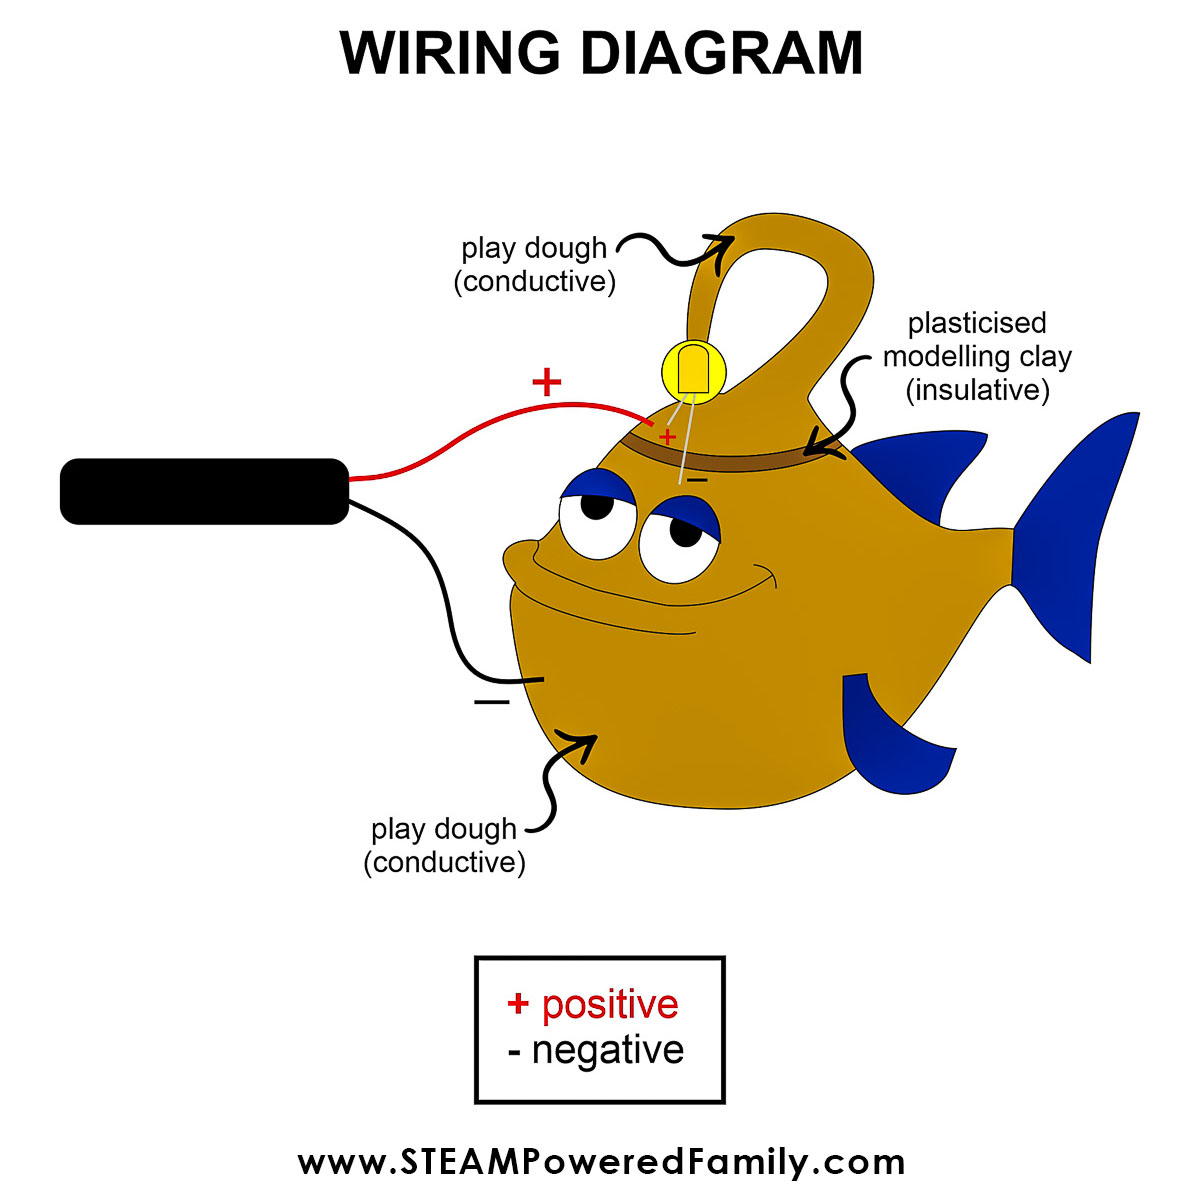
Look carefully at the wiring diagram above to see where everything must go.
Start by placing the LED into the ball of dough that you rolled at the top of the head.
Take note that the longer leg of the LED is the positive leg, and the shorter leg is negative.
The positive side must go into the ball of dough, and the other side must go into a space between the fish’s eyes.
PRO TIP! Ensure that the two legs of the LED are on opposite sides of the small piece of insulative modelling clay. You may need to bend the legs to reach their respective positions.
Put the batteries into the battery holder, taking note of which way they go in by the pictures inside the holder.
Push the positive (red) wire into the side of the top of the head and the negative (black) wire into the side of the bottom half of the body.
The LED should light up and your Anglerfish now has its glowing esca that makes it famous!

Troubleshooting
If the LED does not light up, check that the positive and negative wires of the battery holder and the LED are all in the correct place.
Ensure that the LED or the ball underneath are secure and not coming over the modeling clay to touch the play dough.
Remember that the positive wire and the longer “leg” of the LED need to be on the top section of the head, and the negative wire and shorter “leg” of the LED needs to be on the bottom of the body.
The Science of Squishy Circuits
A circuit is a path through which electricity flows; this path is a loop that always starts and ends at the battery or other source of electricity.
Conductors of electricity are materials that electricity will readily flow through – this
includes things like metal and water that has electrolytes or salt in them. Play Dough has a large amount of salt and water, making it suitable for squishy circuits.
Insulators are materials that electricity does not flow through. There are many more types of materials that are insulators than conductors, and wood, paper, rubber, plastic, glass, and fabric are just a few insulators.
A Quick Experiment
To make the concept of squishy circuits easy to understand, get the materials and tools you used in this project and do this quick experiment:
Start one lump of conductive dough. This project uses Play Dough. Insert the battery wires into the dough on opposite sides. Push both legs of the LED into the dough. The LED does not light up.
Break the play dough into two separate pieces. Push one wire from the battery into each piece and push one of the LED “legs” into the dough on one side and the other “leg” into the other part of the dough. The only way the LED will light up is if the red wire and the LED’s longer ” leg ” are on the same side and the shorter “leg” and the black wire are on the other side.
The red wire and the longer “leg” of the LED are both positive (+), and the black wire and the shorter “leg” are both negative (-). So, the positive elements need to share one side, and the negative elements share the opposite side.
Push the two pieces of play dough together so that they touch. The LED will go out, creating a short circuit, making the electricity go around the LED and through the dough instead.
The LED will light up again when you pull the two pieces apart because the electricity must go through the LED to complete the circuit.
When you put an insulator, like modelling clay, between the two balls of play dough, the electricity cannot flow through it, so it has to go around it and through the LED, which allows the LED to light up.
Extension Ideas
That was so much fun. Now see if you can put your creativity to work and make your own unique squishy circuit design.
Can you make a squishy circuit with more than one LED?
Can you add a buzzer or a motor to your squishy circuit?
Try making this project with our colour changing playdough recipe!