Pinhole Camera STEM Project
Dive into the enchanting world of Pinhole cameras with this exciting STEM project! Discover how these simple yet ingenious devices have been used for centuries to capture photographs without the need for complex technology. We’ll unravel the science behind Pinhole cameras, explaining how they work and why they’re a fantastic tool for photography enthusiasts of all ages. Explore the history, mechanics, and creative possibilities of Pinhole photography, then learn how you can create your very own Pinhole camera to embark on a unique photographic adventure. This activity will not only educate your kids about the magic of Pinhole cameras but also inspire them to explore the art of photography in a refreshingly simple and captivating way.
DIY PINHOLE CAMERA PROJECT
Table of Contents
Disclaimer: This article may contain commission, paid partnerships, or affiliate links. We independently review everything we recommend. When you buy through our links, we may earn a commission from qualifying purchases.
Could you capture an image of something by looking through a cardboard tube? Well, it is possible, and that’s what we will do in this fantastic STEM project! We are going to make a simple but effective pinhole camera or a “camera obscura” (which is Latin for “dark chamber”) as it is known.
Before we build the pinhole camera, let’s explore the history of the camera and how an actual camera works.
The History of the Camera
A long time ago, people played with light and realized that light could create pictures. They discovered that when light passes through a tiny hole into a dark box, an image would appear on the opposite wall of the box, but the image was upside down. This camera was called a pinhole camera.
In 1816, a Frenchman called Joseph Nicéphore Niépce invented the first camera, but it wasn’t used until 1826 when he photographed the view from his window in France. This photo took eight hours to produce.
In 1829, he and an artist called Louis-Jacques-Mande Deguerre came together to make a camera that took a shorter amount of time to produce a photograph. This camera was called the daguerreotype.
Between the early 20th century and now, many different types of cameras were invented by various other people. So we have many kinds of cameras, like the Kodak camera, Polaroid cameras which develop the photo in a few minutes after being exposed to light, disposable cameras, film cameras, digital cameras which do not need film which meant no more waiting for film to develop, smartphone cameras, action cameras like the GoPro and even underwater cameras.
How Does a Camera Work?
A camera is a fascinating tool that can capture pictures of anything around us. The camera records what we see on a photographic film made from plastic. This film is stored in a small compartment inside the camera, and when the film is processed in special chemicals, a picture of what we saw magically appears on a piece of photographic paper.
So, how does this all happen?
Inside the camera, there is a piece of glass called a lens. This lens is like the “eye” of the camera. It is a round transparent piece of glass like the lens in our eye. When we point the camera at something, the lens helps direct the light from that object to the sensor or film. When light from an object or scene hits the sensor, the film records all the colours and shapes it sees.
For this to occur, the camera has a button you press when you are ready to film the scene. When we press this button, the camera opens a small door called a shutter that covers the film. The shutter opens and closes quickly, almost as if it was blinking. When this happens, the film in the camera soon captures all the colours and light coming through the lens.
After the picture is taken, you can look at it on a screen at the back of the camera, save it on your computer or send it to a photo lab, where it can be developed in various chemicals onto a piece of paper called a photograph. The photograph has all the colours and shapes that the camera captured.
The camera allows us to save and share all the special moments we experience!
Photography Vocabulary
Composition
This is how and where to place all the objects you want to photograph.
Aperture
The aperture is a vital component of a camera’s lens system. It is an adjustable opening in the lens that controls the amount of light that enters the camera’s image, sensor, or film.
Focus
Before taking a photo, the camera makes sure the focus is correct so that the picture is not blurry.
Exposure
The camera adjusts the amount of light it lets in. If the scene you use is dark, the camera lets in more light and does the opposite for bright scenes.
Shutter
When composition, focus and exposure are set, you are ready to take the perfect photograph by pressing the button on the camera. The shutter opens quickly to allow the light into the camera, and your scene is captured on the film.
What is a Pinhole Camera?
A pinhole camera is a simple camera that uses a small hole to project an image onto a surface. This style of camera has been used for centuries and is a very simple way to explore photography.
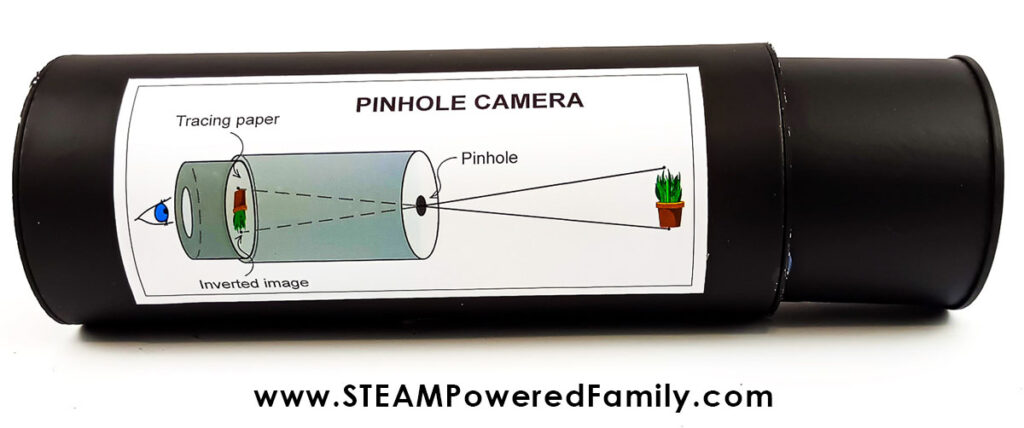
How does a Pinhole Camera Work?
When light from a scene enters through a tiny hole (the “pinhole”) in the front of the camera, it forms a beam of light rays.
These light rays travel in straight lines and create an upside-down image of the scene on the back wall of the camera (the tracing paper), which acts as the film or sensor. This happens because each point in the scene sends out rays in different directions, and the pinhole lets only a small set of rays from each point through to the back wall.
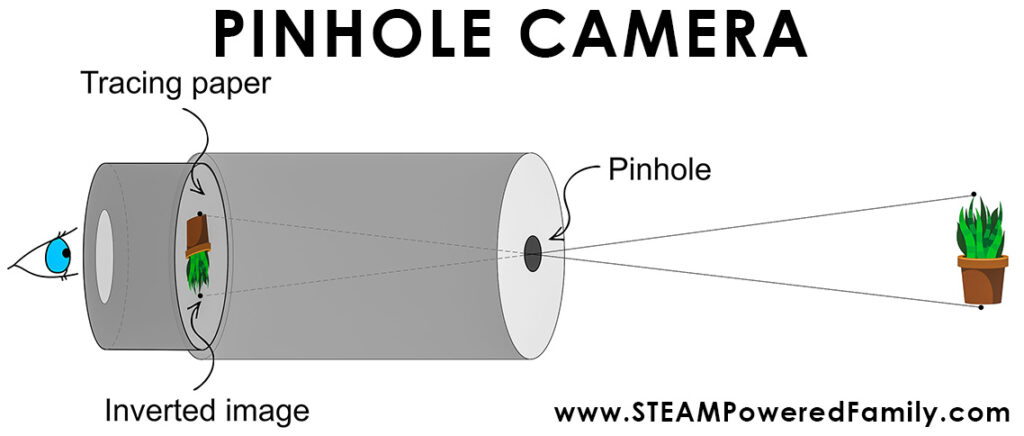
The closer you get to an object, the more blurred it becomes. The smaller the pinhole, the sharper the image will be. By allowing less light to pass through it makes the image less blurred.
Capturing Pictures With A Pinhole Camera
We can also use film in a pinhole camera to capture and develop photos. The tracing paper we use in our project is replaced by film, and the pinhole has a cover. When the cover is removed from the pinhole, the pinhole lets in only a tiny amount of light, and the film needs to be exposed to the image you are capturing for many hours.
After the correct exposure time is reached, the pinhole is closed, and the film is taken into a dark room, where it is developed in various chemicals to produce a photograph.
Using A Pinhole Camera To View The Solar Eclipse
One of the most popular uses for a pinhole camera is to safely view a solar eclipse without looking directly at the sun.
For this to work, the sun must be behind you so you are facing away from the sun, and the camera’s pinhole faces the sun.
IMPORTANT SAFETY NOTE: NEVER LOOK THROUGH THE PINHOLE CAMERA AT THE SUN!
On the opposite side of the pinhole camera place a piece of white paper where the projected image of the eclipse will appear.
As the sunlight passes through the pinhole, it creates a small, inverted image of the Sun on the white paper.
Learn more about viewing a Solar Eclipse safely from NASA.
Learn more about the Solar Eclipse with our lesson.
How to Make a Pinhole Camera
This is a really quick and simple project that is perfect for the classroom. Watch the tutorial video to get all the details. If you can’t see the video, it may be that your firewall or adblocker is blocking the feed. You can also find this pinhole camera video tutorial on the STEAM Powered Family YouTube Channel.
Materials & Tools
Two Tubes – I used a mini Pringles can and a car tissue holder* See note below
Hammer
Ruler
Hobby craft knife with cutting board
Scissors
Pencil
A piece of tracing paper, wax paper or baking paper
Glue gun
Black paint & a paintbrush or a can of black spray paint
A push pin
*IMPORTANT TUBE INFO – For the two tubes, they need to be different sizes with the smaller one fitting perfectly inside the larger one. I used a mini Pringles can and a car tissue holder. But you can use other tube types. The dimensions of my tubes are:
The tissue tube is 19cm tall X 7.4cm in diameter. A postage tube would be good, but the Pringle tin or a smaller postage tube must fit perfectly into it.
Pringle tin diameter is 6.5cm, which I then trimmed down to 6 cm tall.
Pinhole Camera DIY Directions
Using a hobby knife, cut out a circle from the solid lid of the tissue box, leaving a small lip to attach to the tracing paper. You may need the help of an adult to do this as the knife is very sharp. Remember to keep your fingers away from the knife’s blade.
Do not try and cut through the plastic in one go. You should cut it out in two rounds slowly.
Measure 6cm from the bottom of the Pringles tube around the tube. Use a hobby knife to cut it. A sharp kitchen knife or scissors will do the trick too.
Painting the Camera
It’s time to paint the two tubes inside and out matte black. I found it easier to use spray paint both tubes and the lids, but if you don’t have a spray paint safe area, have kids use a brush and paint the tubes.
Do not paint the circle you cut out of the tissue tube lid or the bottom outside of the can. A quick trick is to place the plastic circle you cut out of the tissue box lid at the bottom of the inside of the Pringles tube. This will help keep it silver while you paint. The same applies to the bottom of the outside of the can, as this is where the pinhole will go.
Final Touches
Make a mark in the centre of the bottom of the Pringles can, and using the push pin, make a tiny hole in the base. You may need to tap it gently once or twice with a hammer.
Trace a circle onto the tracing paper with the top lid of the tissue tube and cut it out.
Using the glue gun, glue the circle onto the top of the lid you cut the circle from at the beginning of the video.
Trim the tracing paper close to the plastic if it is too big, as the lid must fit easily into the tube.
Put glue around the mouth of the Pringles can with the glue gun and glue the whole thing into one of the ends of the tissue tube.
Put the lid that is left over (the lid with the small circle) into the opposite end of the tube. Here is what the two ends will look like.
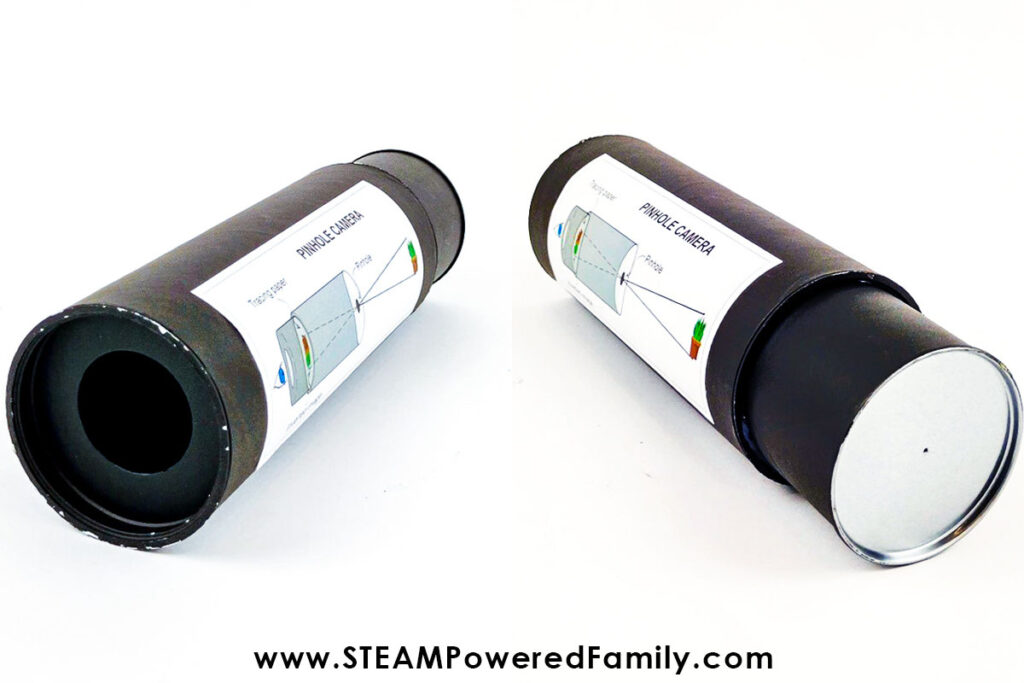
Get creative and decorate your pinhole camera to personalize it.
Your Pinhole Camera is now ready!
How to use a Pinhole Camera
Take your pinhole camera into a bright space. Outside on a sunny day is perfect. Aim the pinhole camera at an object and you should see the images upside down.
The pinhole camera always works best in bright light. The brighter the better. So if you are struggling to see the images, move to a brighter space or turn on more lights.
Extension Ideas
Experiment with different distances between the object and the pinhole and how it affects the image.
Experiment with different pinhole cameras that have different-sized pinholes. How does it change what you see?
Make a pinhole camera in a box. Does this affect how the image looks?
What happens if you put a towel or a blanket over your head and the pinhole camera while looking at an object?
A fun activity is to test different types of crackers with holes and document which cracker makes the best pinhole camera. Use them inside or outside! Can you read a book with a cracker?
Make a pinhole camera that can take photos that can be developed. See more details earlier in the article, but essentially you replace the tracing paper with film. Then place a cover over the pinhole to control the exposure time. You will need to leave the camera for many hours to capture the image, but the results are so cool. This is a fantastic way to adapt this STEM project for older students, especially as a science fair project.
More Project Ideas
Another fun activity is to capture images using Cyanotype paper. What would happen if you used that in your camera?
Or maybe you can play with magnification and make a magnifying glass.
Enjoy this magical STEM activity!