How to Make a Magnifying Glass
Have you ever seen how a magnifying glass can make things look bigger? Whether you are trying to read tiny print, or want to get a close up look at that flower or bug, a magnifying glass makes an object appear bigger. It’s kind of like having a superpower! Today we are going to learn how to make a simple magnifying glass. This is a fantastic project for upper elementary and middle school students.
DIY MAGNIFYING GLASS STEM PROJECT
Table of Contents

Disclaimer: This article may contain commission, paid partnerships, or affiliate links. We independently review everything we recommend. When you buy through our links, we may earn a commission from qualifying purchases.
Imagine a plastic surface curved inward like a little bowl or spoon. Something magical happens if we put a drop of water in the middle of that curved surface. The drop of water acts like a lens, just like the ones in a magnifying glass.
In this fun project, you will make a simple magnifying glass in the same manner and a stand for easy hands-free exploration, but first, let us understand the science of magnification.
Video Tutorial
One of the easiest ways to learn how to do this project is to watch our video tutorial. It takes you through all the steps as we created this magnifying glass project. Can’t see the video here? No worries, sometimes firewalls will block the video feed. You can also find a HD version of this video on the STEAM Powered Family YouTube Channel which also includes closed captioning.
How to Make a Magnifying Glass
Materials & Tools
Twelve standard craft sticks (always have extras on hand)
Twenty-six jumbo craft sticks or tongue depressors (always have extras on hand)
6cm diameter clear plastic bath bomb mold (see the list of alternatives below)
Two plastic lids from large yogurt cups
Glue-gun
Ruler
Pliers
Pencil
Marker
Hobby knife
Small and large pair of scissors
Sandpaper or sanding block
White cardstock or thick paper – 1 sheet
Plus you will need the Printable Project Templates & Worksheet. Enter your email into the form to unlock the printable.
Options for Clear Plastic Concave Item:
Don’t have plastic bath bomb molds? You can also use a Christmas tree bauble from a make your own ornament set, or a clear plastic chocolate mold. If your concave plastic is smaller than 6cm, adjust the circle template on the first page of the templates to the correct size.
But if you do have bath bomb molds, check out our fun chemistry lessons making bath bombs!
Step-by-Step Directions
Getting your pieces ready
Print out the template.
Cut out and trace the template for the plastic rings onto the plastic yogurt lids using the marker. Carefully cut out the plastic rings.

Use the diagrams in the printable to cut the craft sticks into the correct lengths.
Tips for Cutting
Use the hobby knife to score the tongue depressors, and then using the long-nose pliers, gently bend the sticks up and down until they snap apart. You may need the help of an adult as the hobby knife is very sharp! Use sandpaper or a sanding block to make the edges smooth.
Making the magnifying glass
Using the glue gun, glue the concave plastic onto one of the two plastic rings you cut earlier.
Glue the two wooden handles you cut onto opposite sides of the ring.
Now glue the second ring on top. The plastic and wooden handles should be sandwiched between the two plastic rings.
That is your magnifying glass complete!
You can start using the magnifying glass now, but we wanted to add some functionality and fun to this project by building in some engineering STEM skills with a 3 level stand.
So let’s make the stand!
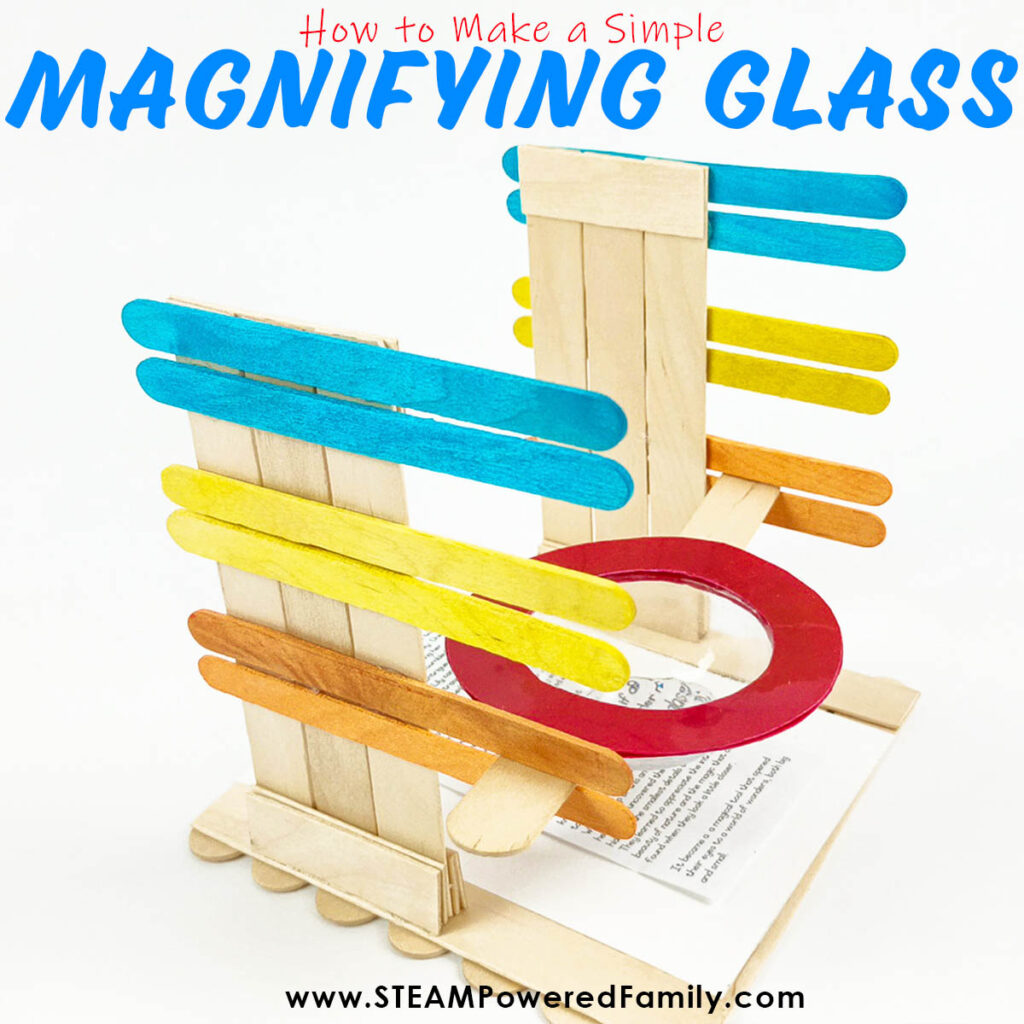
Building the Stand
This stand has three levels where you can place the magnifying glass. This allows students to test using the device at different distances to see if there is an optimum setting.
Using the template, place and glue all the sticks together as shown. To make our levels really clear we used coloured craft sticks to colour code each level. So we have an orange, yellow and blue level. You will need four of each colour if you want to copy our design.
There are three pieces to this design: a base, a left side and a right side. Follow the details in the template to ensure your pieces are assembled correctly for each side.
PRO TIP! If you are struggling keeping your pieces in place, use small pieces of BlueTac to hold the sticks down on the template before you glue them together.
Now that all three pieces are ready, it is time to complete the stand assembly.
Glue the two sides onto the base 2cm away from one of the edges. Make sure the two sides are right across from each other. See the video or pictures for a visual.

Finally, cut a piece of white cardstock to fit the base between the two sides. The white paper makes it easier to see whatever you are magnifying.
Your magnifying glass and stand are now ready!
Using the Magnifying Glass
Cut out the short story on page three of the templates document, slide it on top of the white cardstock, and place it at the bottom of the stand.
Slide your magnifying glass onto the lowest level, add a few drops of water into the concave plastic of the magnifying glass and watch the magic!

Try and read the story on each of the levels.
Could you read it as clearly as you did on the lowest level?
What did you have to do to read it?
Did you find it easier to use the magnifying glass on the stand or off?
Don’t forget to complete page four of the templates document.
Extension Ideas
You can remove the magnifying glass and take it outside to discover interesting things about objects you find in the garden.
Have fun with your magnifying glass on its stand, or use it hands-free all around your house or classroom. Take a close look at things you see every day, how different do they when magnified?
Go on a scavenger hunt and see what you can discover with your magnifying glass that you can’t see normally.
Explore more science experiments and STEM Projects exploring vision by making an Animation Flip Book, Agamograph or Thaumatrope.
Or make a Pinhole Camera and explore the magic of photography.
The Science of Magnification
Now let’s learn how a magnifying glass works.
Have you ever used a magnifying glass to look at small things like insects or tiny words in a book? It’s cool how it makes them look bigger! Let me explain how it works.
A magnifying glass has a special lens that is curved and thicker in the middle. This lens is called a convex lens. When light passes through this lens, something interesting happens.
When light normally travels, it goes in a straight line. But when it goes through the curved lens of a magnifying glass, it gets bent or refracted. This bending of light makes things look bigger when you look through the magnifying glass.
The lens’s curved shape changes the light rays’ path. It makes them come together and focus in one place. This place is called the focal point. The focal point is where the magnified image is formed.
When you hold the magnifying glass close to an object, like a small bug, the light from the bug goes through the lens. The lens bends the light rays and brings them together at the focal point, creating a magnified image of the bug. It’s like looking at a much larger and clearer picture of the bug!
Positioning your eye behind the lens to see the magnified image would be best. This way, the image is focused on your eye, and you can see it bigger and more detailed.
The magnifying glass can make things look bigger because it bends the light and brings it all together. It’s a special tool that helps us explore and see small things in more detail.
Remember, when using a magnifying glass, be careful not to point it towards the sun or shine it in anyone’s eyes. And have fun exploring the world of tiny things with your magnifying glass!
Different Types of Magnifying Glasses
Now that we have learned how to make a magnifying glass, let’s explore the different types available and how they can be used to make life easier when dealing with really small things!
Handheld Magnifying Glass
This is the most traditional and widely used type that many kids grow up using. You can find them very easily in most stores. It consists of a handle and a convex lens that magnifies objects when held up to them. Handheld magnifying glasses are available in different sizes and magnification powers.
Stand Magnifiers
This is the type of magnifying glass we made in this project. These magnifying glasses mounted on a stand or base allow hands-free use. Stand magnifiers often have adjustable arms or flexible gooseneck designs, enabling users to position the magnifying lens at a comfortable height and angle.
Illuminated Magnifiers
These magnifying glasses have built-in lighting features to provide additional illumination. The light source helps enhance visibility, especially when working with small objects or in low-light conditions. Illuminated magnifiers may use LED lights or bulbs for illumination. They are great for doing close up work that is very detailed.
Pocket Magnifying Glass
These small, compact magnifying glasses are designed to fit in a pocket or purse. They are portable and convenient for quick magnification on the go. Pocket magnifiers usually have a folding design to protect the lens when not used. They may or may not have a light.
Headband Magnifiers
Headband magnifiers consist of a headband worn around the head, with one or more magnifying lenses attached. This magnifier frees the hands for tasks while providing a stable and adjustable magnification option. Headband magnifiers are commonly used by professionals working on detailed tasks such as jewelry making or watch repair.
Digital Magnifiers
Digital magnifiers use a camera and a screen to display magnified images. They are more advanced and offer adjustable magnification levels and contrast options, and some even have additional features like image capture or text-to-speech capabilities. Digital magnifiers are helpful for individuals with low vision or in a classroom where you want to show a group of students up close visuals. We use this one and love it!
Now you have learned all about magnifying glasses, and made one with a stand, what other types of magnifying glasses can you build? How can you use your magnifying glass? Have fun building and creating!
