No Knead Bread Science Experiment
The No Knead Loaf – No need to knead, or sweat! Doesn’t that sound like a great way to make bread? I know, you are totally thinking, “but wait! we must knead the bread! That’s what you said in our other bread science experiments!” Ah, but that’s where science gets really interesting, when we find the rule breakers. And making no knead bread is like the Oobleck of bread science, breaking all the rules. So let’s dig into this fascinating twist on bread science.
NO KNEAD BREAD RECIPE AND SCIENCE FOR KIDS
Table of Contents
Disclaimer: This article may contain commission, paid partnerships, or affiliate links. We independently review everything we recommend. When you buy through our links, we may earn a commission from qualifying purchases.
We’ve looked at the science of bread and we’ve made soda bread and bannock and flatbreads like pita pockets. We’ve learned how the magic of flour and water can transform into a tasty staple of life – with a lot of work!
The need to knead was explored extensively, and is such a integral part of bread making that some inventor created bread machines to do all the sweaty kneading work for you.
Now we all love bread, but do we really want to work that hard to make it?
Turns out there is a solution! No knead bread!
The History Of No Knead Bread
There once was a baker from New York named Jim Lahey who thought that flour and water and yeast don’t need a lot of knocking about to get delicious bread. He came up with a revolutionary no-work, no knead method of making bread and suddenly, like a fairy tale, bread making, and bread science got really, really interesting.
See, when you understand the science behind what you are doing, new discoveries and advancements, are just a few thoughts and tests away. Apply a little scientific method and suddenly Baker Jim is a scientist, his lab just smells really, really good.
What do we need to do to Not Knead?
All you have to do is introduce the flour and the water and a tiny bit of yeast to each other with a quick stir and leave them to get to know eat other for a day and the magic happens.
Yes, it’s that easy!
No Knead Bread Science
When you add water to flour the gluten molecules begin to unravel and stretch out and over 12 – 18 hours become the elastic membrane to hold the carbon dioxide bubbles and allow the bread to rise.
Check out all the bubbles and stretchy gluten!!!
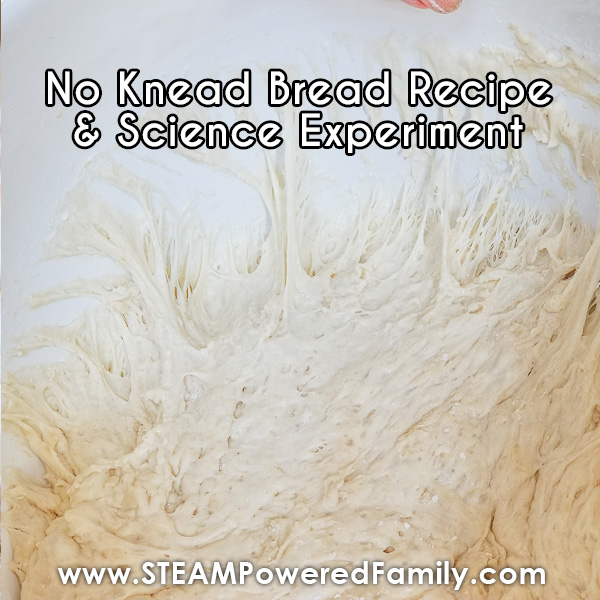
See, that’s science for the win!
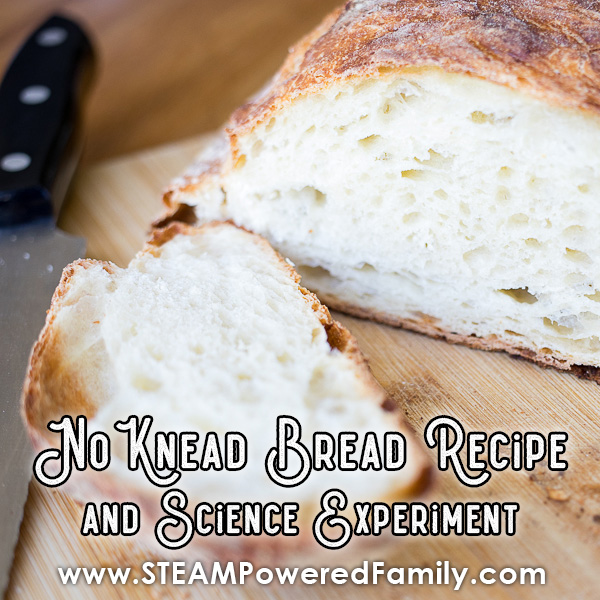
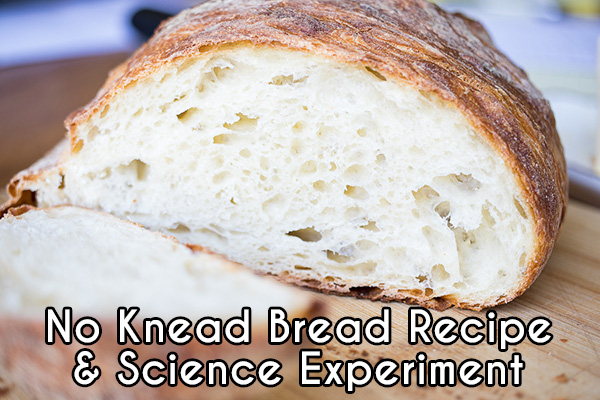
Best of all, it results in this gorgeous, delicious bread! All with no kneading and no sweating!
No Knead Bread Recipe
INGREDIENTs
3 cups of bread flour
1 tsp of salt
¼ tsp of yeast
1 1/3 cups of water
Flour or cornmeal for dusting
Equipment:
Large bowl
A linen tea towel
A Dutch oven 4 – 5 quarts.
DIRECTIONS
Stir together the flour, salt and yeast in a large bowl.
Add water and mix everything together. The mixture will be very wet and sticky.
Cover the bowl and let it sit at room temperature for a minimum of 12 hours. 18 hours is better. Slow fermentation will happen during this time, so don’t disturb it. The fermentation gives this bread recipe it’s rise and wonderful flavour.
Once it is finished sitting, dust a work surface with flour and turn the raised dough out in one piece. Use a scraper to encourage the dough to slip out of the bowl in one big lump.
Dust your hands and begin to pull the edges of the dough into the middle and continue until you have a ball. Note that the dough is still very sticky. Use the dusting flour very sparingly. We are NOT kneading the dough. Simply shaping it.
Dust your linen towel with cornmeal or flour and gently lift the dough ball onto the towel.
Fold the towel loosely over the dough and leave it to rise for 1 to 2 hours until it has doubled in size.
Preheat your oven to 475°. 1 hour before the second rise is done. Place your empty Dutch oven with the lid on into the oven to heat.
When the dough has risen, carefully remove the very hot Dutch oven and quickly turn the dough from the towel into the Dutch oven. Put the lid back on and cook for 30 minutes.
Remove the lid and cook for another 15 to 30 minutes until the bread crust is dark brown.
Remove the bread from the Dutch oven and place it onto a cooling rack. Let it sit for at least 1 hour before eating. I recommend eating with some homemade butter. YUM!
You will have achieved a wonderful crusty loaf with time and love and NO KNEAD or SWEAT!!!

MORE FOOD SCIENCE FOR KIDS


No Knead Bread Recipe
The No Knead Loaf – No need to knead, or sweat! Learn how to make this bread and the bread science behind it all!
Supplies
- 3 cups bread flour
- 1 tsp salt
- 1/4 tsp yeast
- 1 1/3 cups water
- flour for dusting
Instructions
-
Stir together the flour, salt and yeast in a large bowl.
-
Add water and mix everything together.
-
Cover the bowl and let it sit at room temperature for a minimum of 12 – 18 hours.
-
Once it is finished sitting, dust a work surface with flour and turn the raised dough out in one piece. Use a scraper to encourage the dough to slip out of the bowl in one big lump.
-
Dust your hands and begin to pull the edges of the dough into the middle and continue until you have a ball. Note that the dough is still very sticky. Use the dusting flour very sparingly. We are NOT kneading the dough. Simply shaping it.
-
Dust your linen towel with cornmeal or flour and gently lift the dough ball onto the towel. Fold the towel loosely over the dough and leave it to rise for 1 to 2 hours until it has doubled in size.
-
Preheat your oven to 475°. 1 hour before the second rise is done. Place your empty Dutch oven with the lid on into the oven to heat.
-
When the dough has risen, carefully remove the very hot Dutch oven and quickly turn the dough from the towel into the Dutch oven. Put the lid back on and cook for 30 minutes.
-
Remove the lid and cook for another 15 to 30 minutes until the bread crust is dark brown.
-
Remove the bread from the Dutch oven and place it onto a cooling rack. Let it sit for at least 1 hour before eating.