Ladybug Life Cycle Activity
Ladybugs are one of those whimsical little creatures that show up in children’s stories and songs. Sweet little red bugs with tiny black spots that will fly in and land gently on your hand, so gently that you don’t even realize at first it’s there. Ladybugs have long been associated with luck, it has been said that if a ladybug lands on you good luck is sure to follow close behind it! These little beauties are also often associated with spirituality and religion as a sign of protection and healing. Today we are going to explore these popular bugs and learn about their lifecycle with a special craft activity.
Ladybug Life Cycle Craft Activity
Table of Contents
Disclaimer: This article may contain commission, paid partnerships, or affiliate links. We independently review everything we recommend. When you buy through our links, we may earn a commission from qualifying purchases.
About Ladybugs
Ladybugs, also known as ladybirds in some areas, are small beetles belonging to the family Coccinellidae. They are easily recognizable by their distinctive spotted pattern and bright colors. Although they can range from red and orange to yellow and black, and even have stripes, here in North America they are mostly recognized by their bright red color and black spots.
Ladybugs are found in all parts of the world, and there are over 5,000 species. Although they are small, and many consider them very cute, they are actually voracious natural predators of agricultural pests, such as aphids, mites, and scale insects. This makes them a favorite of farmers and gardeners as biological pest control. This reduces the need for pesticides on crops and gardens and makes them a highly valued member of the ecosystems.
Throughout history, ladybugs have been very popular. They are often seen as symbols of good luck or good fortune in many cultures. Even today, many people believe that seeing a ladybug can bring good luck or a positive change in their life.
In terms of behavior, ladybugs are social insects that often cluster together in large groups, especially during the winter months when they seek shelter from the cold. They are also able to secrete a foul-tasting liquid from their joints when threatened, which helps deter predators. Growing up we used to say that the ladybugs peed on us when we caught them!
Why are they called Ladybugs?
The ladybug’s spiritual connection actually came into play a long time ago in the Middle Ages when farmers in Europe prayed to the Virgin Mary to protect their crops from predators. The small red and black beetles came in and wiped out the pests, protecting the crops. These beneficial bugs came to be known as Our Lady’s Beetles or Lady Beetles – which evolved into how we know them today – Ladybugs.
Ladybug Life Cycle
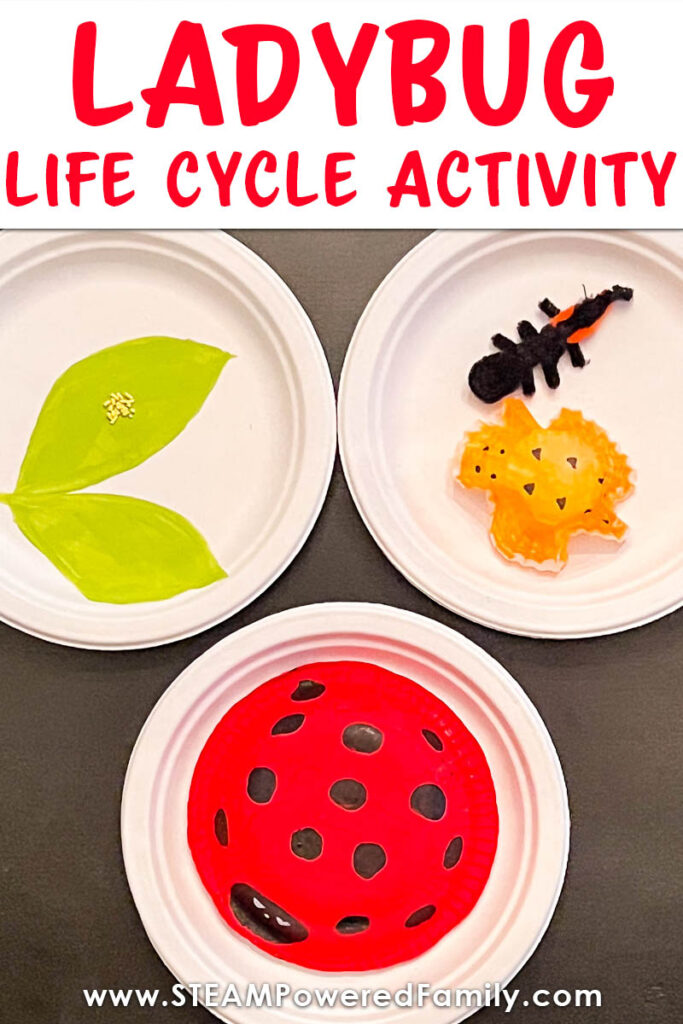
There are four stages to a ladybug’s life cycle. The egg, the larvae, the pupa and the adult lady bug. From egg to adult the cycle will last about a month and a half.
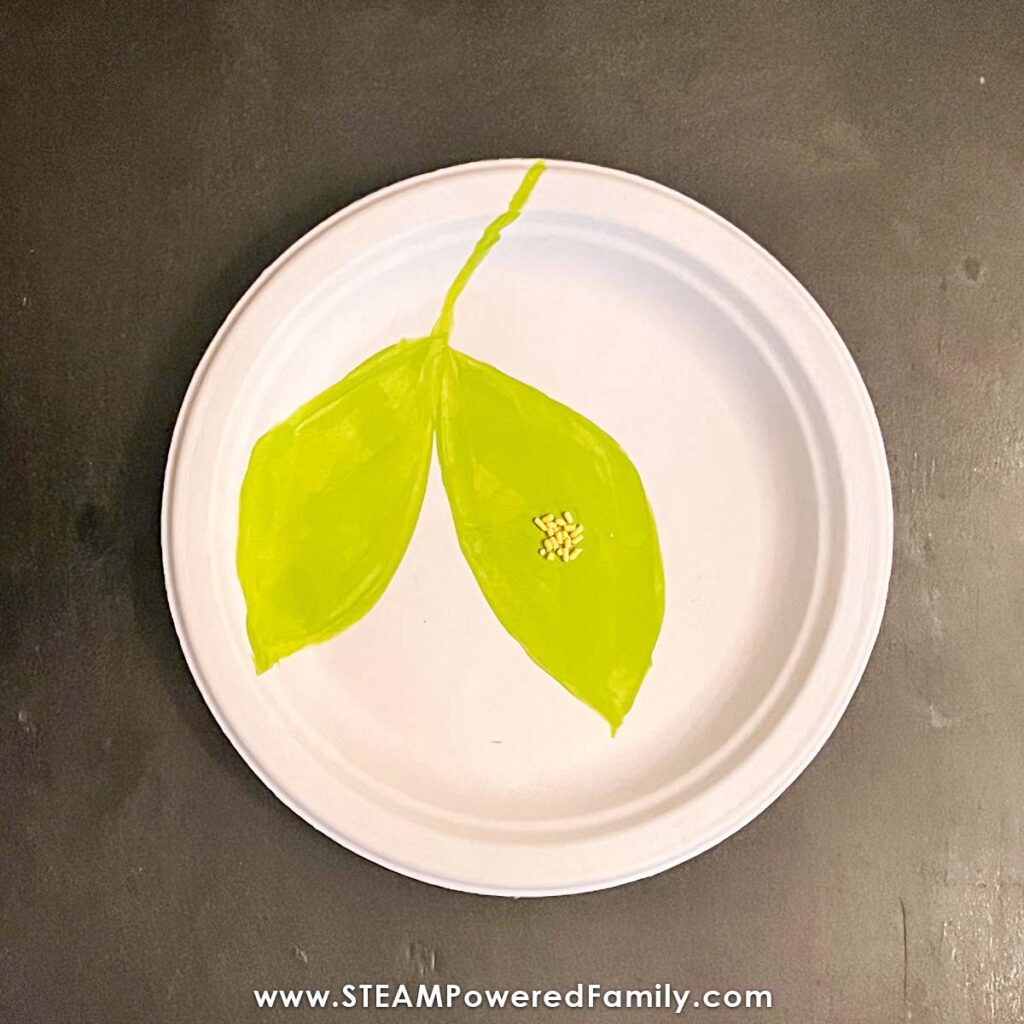
Eggs
A female ladybug lays her eggs on a leaf and those eggs will hatch anywhere from three to ten days after they are laid. The time can vary depending on the temperature of the air around them!
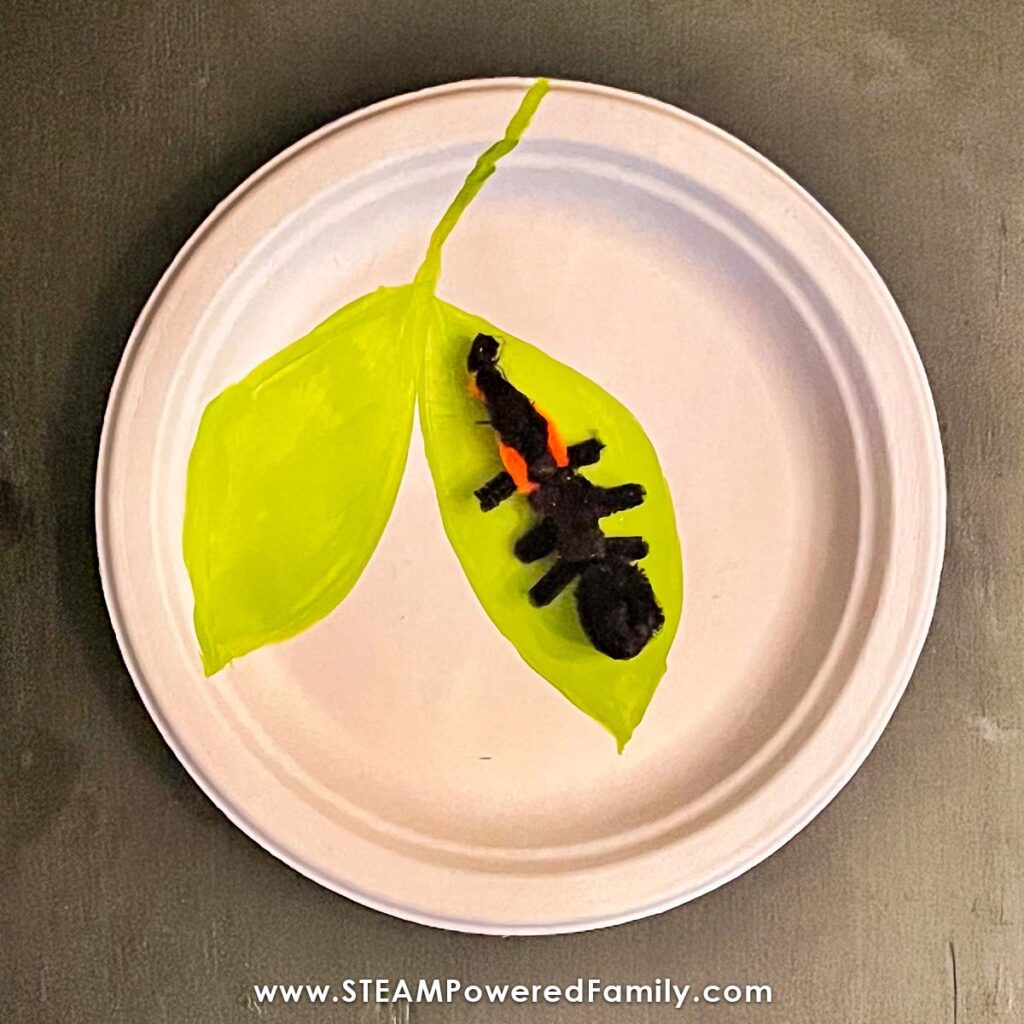
Larva
Once the eggs hatch they are known as a larva. You might mistake a ladybug larva for a creepy little bug – it is long and spiky and is black with orange markings on it. This larvae will eat and grow and eat and grow and eat more for a whole month before it enters the next stage – the pupal stage.
Pupa
During this stage a ladybug will attach itself to a leaf and enter a stage of rest where they form a shell around themselves which is also orange and black protects the ladybug while it transforms. This stage lasts around two weeks.
Mature Ladybug
When the ladybug emerges from the pupa its shell is soft and quite vulnerable to predators but it will quickly form the hard shell that you know a ladybug to have. This is an adult ladybug and it will live for about a year. Adult ladybugs have six legs, a hard outer shell that protects its soft beetle body and wings underneath the shell. It also has a rounded head with two eyes, antennae and a mouth!
What do Ladybugs eat?
Ladybugs eat small pests – especially aphids and mites. Some types also eat leaves and other plants. For being such tiny bugs they actually eat a lot – up to 50 aphids a day!
Are ladybugs safe?
Ladybugs are only poisonous to other bugs, they are not harmful to humans, although they can bite or pinch and if you are allergic to a ladybug bite you will feel it!
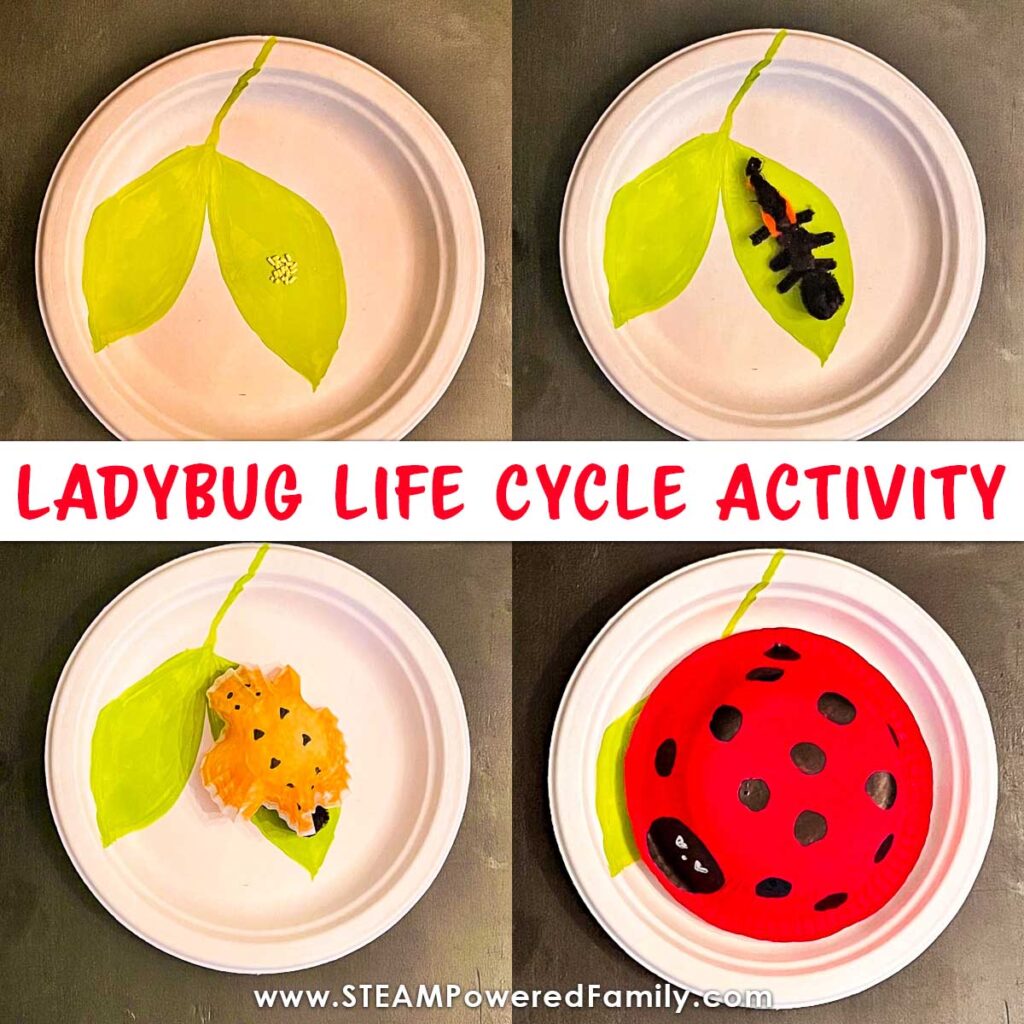
Ladybug Life Cycle Model
I have a super cute classroom ladybug life cycle project for you and your students and it uses mostly paper products and a couple of other little things that you can easily find in a grocery store or your local dollar store. I used acrylic paint for my model, but you could easily use crayons or markers as long as you are sure to buy paper plates and bowls (rather than plastic or styrofoam).
When I was trying to picture the lady bug life cycle I kept thinking of her domed shell, which made me think of nesting dolls, like the ones where you remove a doll to reveal another underneath. For our model we are going to use the same concept but add pieces onto a base rather than pull them apart.
Materials
Paper Plates – 7” inch or bigger
Paper Bowls – 6” inches or that when flipped over sit easily inside the plate that you chose.
A paper cupcake wrapper
Acrylic Paint and Paintbrushes or Crayons or Markers
Yellow Candy Sprinkles
White School Glue
Orange and Black Pipe Cleaners or orange and black felt
Scissors
Directions
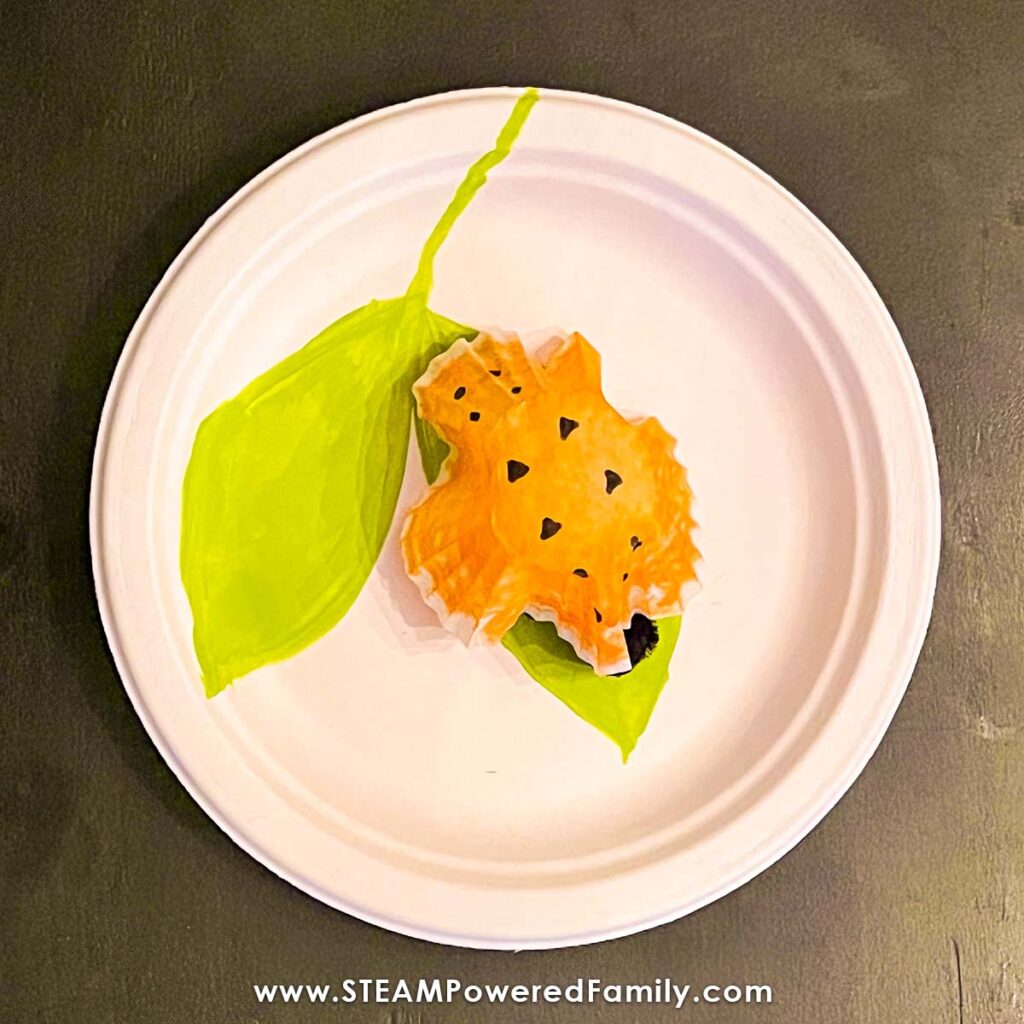
Step 1: Paint a broadleaf or two on the top side of your paper plate, then set it aside to let it dry. This will be your leaf for the eggs.
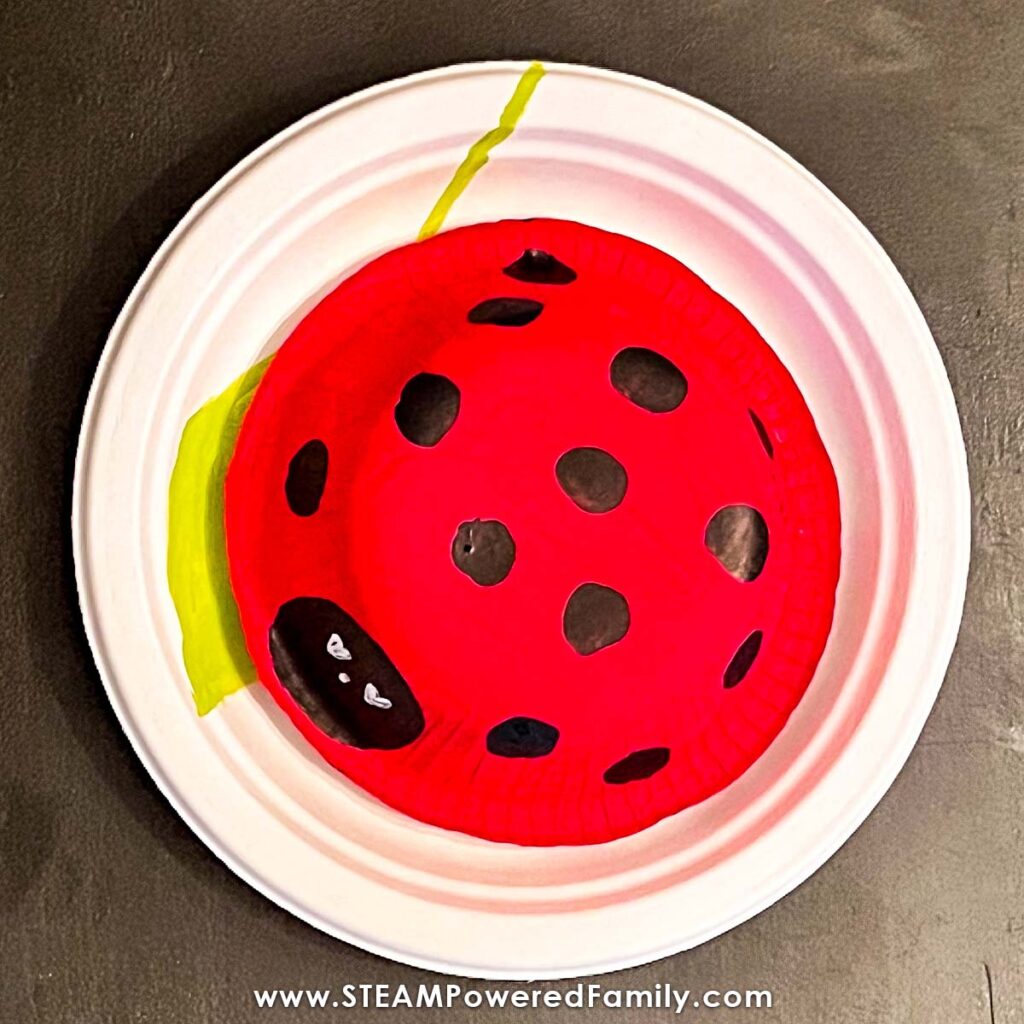
Step 2: Next, paint the bottom side of your bowl with red paint and again set it aside to dry. This will be your adult lady bug.
STEP 3: While those are drying, use a marker to color the outside of the cupcake wrapper orange. When you’re done, spritz the wrapper with a little water and set it aside to dry. This will be your pupa shell.
STEP 4: Grab your pipe cleaners and bend and twist it into a little bug – the ladybug larvae has six legs and orange markings on its back. This will be your larvae.
STEP 5: On the leaf plate put a small puddle of glue and gently place several yellow candy sprinkles on the glue. Let that dry.
STEP 6: Add black dots and eyes to the ladybug bowl. Remember, every ladybug has unique black markings.
STEP 7: Add black markings to the cupcake wrapper.
STEP 8: Assemble the model. First is the plate with the eggs, which gets covered by the larvae, which gets covered by the pupa and then finally by the adult lady bug. Talk to the students about each stage and how the ladybug changes in each step.
Extension Activities
Make a fun Magnetic Science STEM Project we call Jitter Bugs, that has a lady bug dancing about thanks to the science of magnetism.

Explore the lifecycle of Butterflies and build an interactive 3D model of their lifecycle stages.
Life Cycle Printable
Learn about the lifecycles of even more insects, animals and plants in our Life Cycle Codebreakers activity.
Enjoy exploring nature and the lifecycles of ladybugs and more!