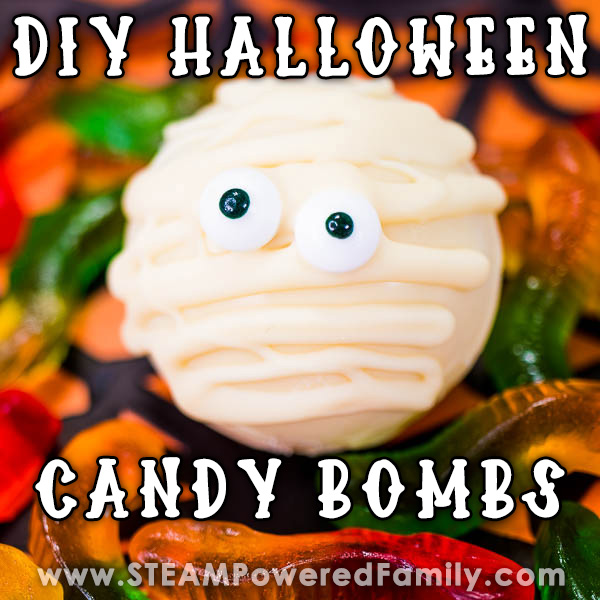
Halloween Candy Bombs
I love a good surprise and these Halloween Candy Bombs homemade treats are so much fun for October! Chocolate goodness hides a candy surprise treat inside. Customize to make them perfect for your kids or have the kids help make their own. Simple to make and packed full of tasty surprises, these Mummy Halloween Treats are a surefire hit!!!
Homemade Halloween Treats
Table of Contents
Disclaimer: This article may contain commission, paid partnerships, or affiliate links. We independently review everything we recommend. When you buy through our links, we may earn a commission from qualifying purchases.
Every Halloween we celebrate all month long! It is the kids favourite holiday, so we go all out. It is also a great time to incorporate some learning that kids will enjoy. And create memories that will last a lifetime.
Last winter we discovered the wonderful world of homemade Hot Chocolate Bombs. The kids loved making these sweet treats all winter long. So when we were brainstorming new ideas for this years’ Halloween festivities we thought about making more hot chocolate, but then came up with an even better idea.
Halloween Candy Bombs
Oh yeah, we totally went there and they are amazing!
My kids love those chocolate egg treats with the surprises inside. What if we made our own version but with candies inside? It would be like a surprise candy crossed with a hot chocolate bomb crossed with a piñata.
And the result was spooky perfection!
Not only did the kids have fun making these, they have even more fun eating them!
See, you can’t just eat them normally. Nope, that would be boring. Instead we have to bonk the mummy treat to crack it open and release the surprises inside.
So much fun!
These homemade Halloween treats would be perfect for a Halloween Party, classroom project, or to make with the kids at home as a special treat.
Mummy Surprise Treats Supplies
For this project we are making about 8 Halloween Candy Bombs. The number you make will vary based on the size of your molds. Adjust amounts as needed for your particular needs. For this project you will need:
400 grams of White Chocolate or Candy Melts (more on this in a second)*
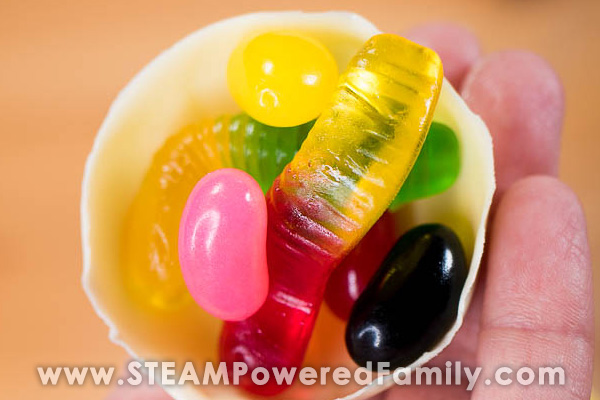
Small candies, we used gummy worms and jelly beans
Candy eyes
Hot chocolate bomb silicone molds
Spoons
Microwave
Bowls
Pan with water*
Stove top*
Fridge
Mini muffin tray
* I used Callebaut Coverture white chocolate. If you are not used to tempering and working with real chocolate an easier alternative is to use candy melts.
Directions
Start by setting out your supplies.
Chocolate Directions
If you are using white chocolate, chop up about 300 grams of the chocolate (reserve the remainder for decorating the mummies). Fill a saucepan with a little bit of water. Set a bowl in the top of the saucepan, ensure it doesn’t touch the water. Fill the bowl with 3/4 of the chopped chocolate. Set on medium low heat. Stir and let it slowly melt.
Once it is melted add in the remaining 1/4 chocolate and mix until it is all melted.
Candy Melts
Measure out the appropriate amount of candy melts into a microwave safe bowl, remember to reserve some for the final decorating. Melt according to the package directions (each one varies slightly, so follow the package).
Filling the Molds
Once your chocolate or candy melts are ready, spoon about a teaspoon worth into the mold and gently spread it up the sides of the mold. Ensure you cover the whole thing. Especially up to the edges.
Set in the fridge to set up for 15 to 20 minutes until hard.
Assembly
Gently pop the shells out of the silicone molds. Set out whatever candies you want to fill your Mummy Treats with.
Warm a small plate in the microwave for 30 seconds. You don’t want it too hot. Just warm enough to melt the edges.
Take one half of the shell and place it face down on the plate and turn a bit to melt the edges. Then hold it up and fill it with your candies.
Grab the other half and repeat the edge melting process on the plate. Place the two halves together and use your finger to seal the edges. If it is a bit thin in some places, don’t worry about it! The nice thing with this project is that we are reinforcing it with our final touches to turn them into mummies.
Place on a mini muffin tray. This is a super handy way to hold them so they don’t roll while setting up.
Repeat until all your spheres are filled with candies and then set them in the fridge for 15 to 20 minutes to set up.
Decorating
When it comes time to decorate, simply melt your remaining chocolate or candy melts the way we did to make the shells.
Remove the mini muffin tray with your spheres from the fridge.
Using a spoon drizzle the melted chocolate back and forth over the spheres kind of like Mummy bandages.
Add candy eyes.

Repeat until they are all finished.
Place back in the fridge for 20 minutes to set up or until you are ready to eat them!
Eating Halloween Candy Bombs
This is the best part! When it is time to eat the treats simply take a spoon, nut cracker, small toy hammer, whatever you wish and give your mummy a whack to crack it open and reveal the treats inside!
My kids LOVED using a potato masher to release their treats.
I recommend doing this in a breakproof dish or bowl as the kids really love to whack at these. The dish will catch all the candies and chocolate bits as they spill out, making it easier for the kids to eat.
Enjoy!


More Sweet Halloween Fun