

How to Make a DIY Xylophone: Easy STEM Music Experiment for Kids
Get ready to build, test, and play your very own homemade musical instrument. This DIY Xylophone STEM project lets kids explore the science of sound by creating music with vibrating copper pipes. It is one of those projects that looks like a craft and teaches like a physics lesson, and the moment your child taps that first clear note, you will see why we love it so much.
This project is a true STEAM activity because it combines everything:
- Science: sound waves, vibration, and pitch.
- Technology: testing materials and designs.
- Engineering: building and improving the instrument.
- Art: creativity and decoration.
- Math: measuring lengths and ordering notes.
Through hands-on experimenting, measuring, designing, and music-making, young engineers and scientists will discover how sound waves, pitch, and vibration work together to create a real DIY instrument they can actually play.
What Is a DIY Xylophone?
Table of Contents

Disclaimer: This article may contain commission, paid partnerships, or affiliate links. We independently review everything we recommend. When you buy through our links, we may earn a commission from qualifying purchases.
A DIY Xylophone is a homemade musical instrument that turns simple, everyday materials into a working set of musical notes. In this build, we are using copper pipes cut to specific lengths, but you can also make a homemade xylophone with glass jars, bottles, wood pieces, other metal pipes, old knives and forks, or craft sticks. Each material has its own sound, and that is part of the fun.
By the end of this project, your kids will have built their own DIY Xylophone, played real notes on it, and learned exactly why each pipe sounds the way it does.
The Science Behind a DIY Xylophone
A xylophone works because sound is made by vibrations. When you strike a pipe, stick, jar, or bar, it vibrates very quickly. Those vibrations move through the air as sound waves, and the waves travel to your ears so you can hear them.
Sound Waves and Vibration
Different sizes of materials vibrate at different speeds. When you tap your DIY Xylophone:
- Each pipe has a different length.
- Each length vibrates at a different frequency, creating a different musical note.
- Metal pipes create bright, ringing sounds because metal vibrates very well.
Pitch and Frequency
Pitch is how high or low a sound is. Frequency is how fast something vibrates. The two are linked tightly.
- Longer copper pipes vibrate slowly and produce low notes.
- Shorter copper pipes vibrate quickly and produce high notes.
If your child can arrange the pipes from longest to shortest, they have just sorted them by pitch too.
What Are Nodes?
When a pipe vibrates, some parts move a lot and some parts barely move at all. The spots that hardly move are called nodes. The easiest way to think about it is that nodes are the quiet balancing spots on the pipe.
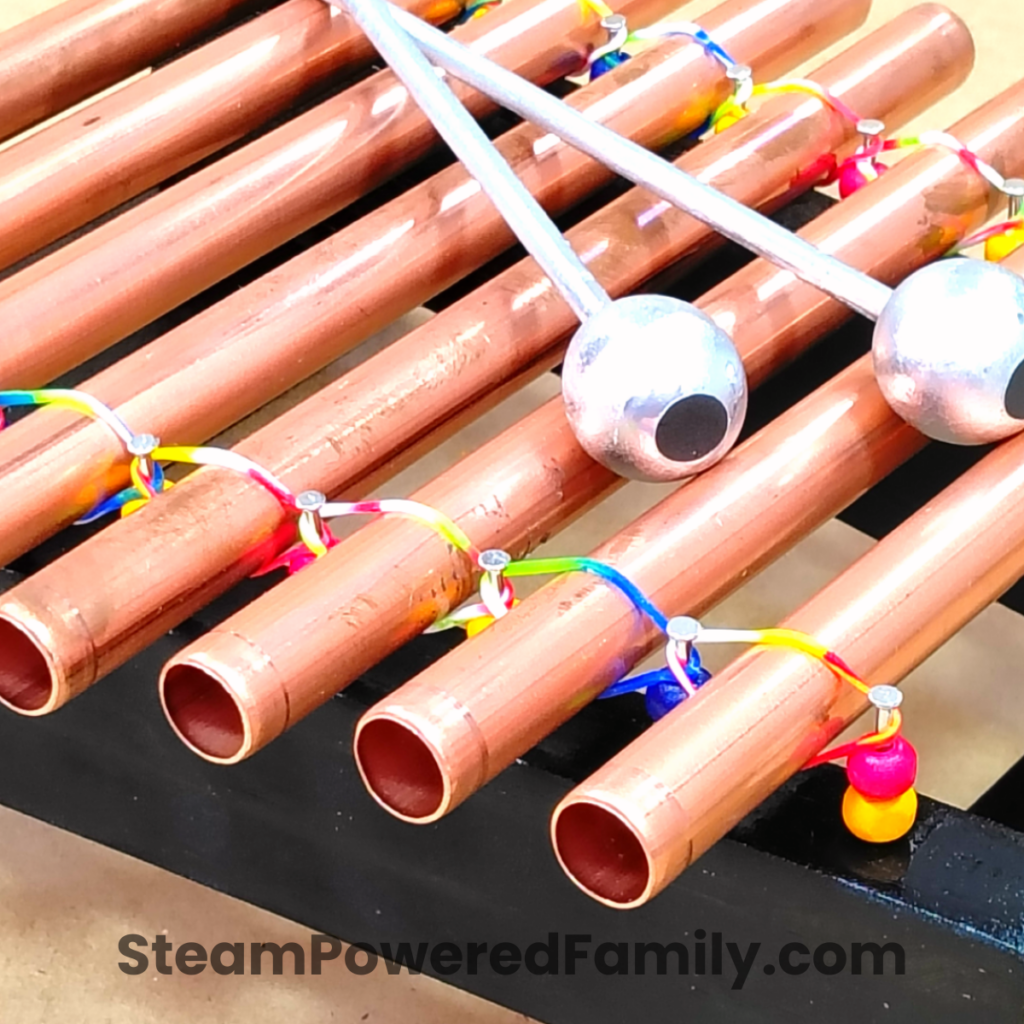
On a copper pipe, the nodes are usually about one-quarter of the way in from each end. That is why the string or wire holding the pipes should be placed near those spots instead of in the middle. If a pipe is held in the wrong place, the sound becomes dull because the vibration is blocked.
DIY Xylophone Video
Watch the full build and hear the xylophone in action before you get started, if you can’t see the video due to your settings, visit our YouTube channel.
DIY Xylophone Materials
Here is everything you will need to build your own DIY Xylophone.
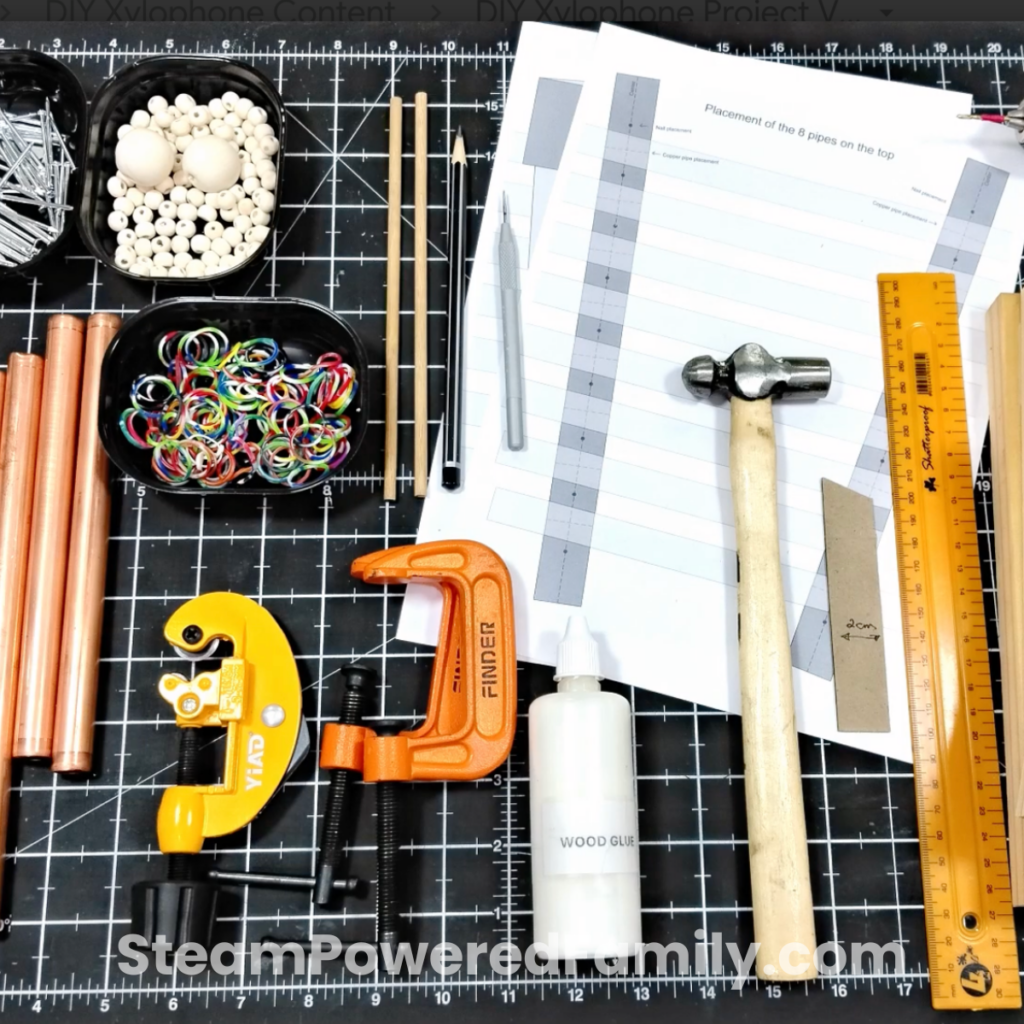
- 2 m length of copper tubing, cut into pieces (see step 1)
- Pack of 4 mm x 40 mm nails
- 40 small beads with holes large enough to fit the nails through
- 2 large round wooden beads with holes large enough to fit the dowel sticks
- Pack of small loom bands
- 2 dowel sticks, 5 mm diameter
- 1 m length of 44 mm x 22 mm pine, cut into pieces (see step 1)
- Fast-set wood glue
- Hammer
- Pencil
- Eraser
- Ruler
- Awl
- Sanding block
- Wood clamps
- Hacksaw or tube cutter
- Portable drill with a 3 mm drill bit
- Narrow masking tape
- Scrap cardboard
- Placement templates (printable, see below)
How to Build a DIY Xylophone
Before you begin, print out the two pages of placement templates. These templates will help you position everything correctly to get the perfect sound and tones.
Step 1: Cut the Wood and Pipes
First, cut the pine to these sizes for the base:
- 2 pieces at 25 cm long
- 1 piece at 18.5 cm
- 1 piece at 13 cm
Then cut all 8 copper tubes to these lengths:
- 26.5 cm
- 24.8 cm
- 23.3 cm
- 22.5 cm
- 21.3 cm
- 20.1 cm
- 19 cm
- 18.3 cm
Tip: Most hardware stores will cut the wood and copper tubing for you. If not, ask an adult to help cut all the pieces with a tube cutter.
- Use the sanding block (or a sanding machine) to sand all the pieces of wood smooth.
Step 2: Mark the Nail Placements
- Place the two long pieces of wood onto the template labeled “Placement of the 8 pipes on the top.”
- Using a pencil, make all the nail placement marks on the wood.
- Turn each piece of wood over so you can see the narrow 2 cm edge with your marks.
- To find the center line on the edge, make a mark at 1 cm intervals along the top and bottom of the wood, then join those marks.
- Copy the nail placement marks you made earlier onto the center line you just drew. Repeat on both pieces.
- Using the awl and the hammer, punch small starter holes into the wood at each mark.
Step 3: Drill the Holes
- Put the 3 mm drill bit into the drill. An adult should help here.
- Measure 1 cm from the end of the drill bit and mask it off with a small piece of masking tape. This prevents you from drilling too deep.
- Gently drill all the holes in both pieces of wood.
Step 4: Assemble the Base
- Using the placement template labeled “Placement of the two stands at the bottom,” position the two long strips with the holes facing downward.
- Place the two small pieces of pine on top, lining them up exactly as the template shows.
- When you are happy with the placement, remove the bottom piece, add glue to both sides, and press it back into place.
- Repeat for the top piece. Wipe away any excess glue.
- Leave the base to dry for 10 to 15 minutes. Use wood clamps if you have them.
Step 5: Make the Mallets
- Glue one large round wooden bead onto each of the dowel sticks.
- Set the mallets aside to dry.
Step 6: Decorate Your DIY Xylophone
This is the artist’s moment. Use paint, markers, washi tape, or anything else you like.
- Start with the base.
- Then decorate the small wooden beads.
- Finish with the two mallets.
Step 7: Install the Nails and Spacer Beads
Cut a small scrap of cardboard that is 2 cm tall by about 5 cm long. This will help you keep every nail the exact same height. Each nail must stick up exactly 2 cm above the wood.
- Place two small beads onto a nail.
- Use the hammer to drive the nail into one of the drilled holes on the base, stopping at 2 cm using your cardboard gauge.
- Repeat for every single hole until each one has a nail with two beads on it.
The small beads are critical. They prevent the copper tubes from touching the wood, which would muffle the sound.
Step 8: Add the Loom Bands
- Stretch one loom band between every pair of nails along each side of the base.
- When you are finished, you should have 8 loom bands on each side of the xylophone.
Tip: The rubber bands should not be tight. A tight band stops the pipes from vibrating and the sound goes muffled. I tried longer rubber bands first and they did not work. Orthodontic bands are perfect if you have braces and a few spares.
Step 9: Place the Copper Tubes
- Arrange the copper tubes on the table in order, from the largest tube on the left to the smallest on the right.
- Place the largest tube at the wide end of the stand first.
- Lift one side of the loom band, slide the tube gently through, and let it rest on the loom band on the other side.
- Repeat until all 8 tubes are in place, evenly spaced.
Now turn your DIY Xylophone to face you, with the largest tube at the top. Pick up a mallet, give the first pipe a tap, and listen. That clear, ringing note is the sound of physics working exactly the way it should.
Why the Tubes Need Space to Vibrate
A xylophone only sounds clear when the tubes are free to vibrate properly. If you hold a copper tube tightly in your hand and tap it, the sound becomes dull and quiet, because your hand stops some of the vibrations. The tube cannot ring clearly.
That is why the pipes in this project are never attached directly to the wooden frame.
Why Are There Beads on the Nails?
The beads act like tiny spacers. They lift the copper tubes slightly away from the wood so the pipes are not resting directly on the frame. This gives the tubes room to vibrate freely and produce a clearer sound.
Why Are Rubber Loom Bands Used?
The loom bands hold the pipes gently instead of tightly. They are:
- Soft and flexible.
- Not stretched too tight.
- Not doubled over.
This setup lets the tubes vibrate easily instead of being choked or stopped from moving.
Engineering Connection
Real instrument designers and engineers think carefully about all of these things. Where materials touch. How vibrations travel. How to reduce anything that blocks sound. Even tiny changes can shift the quality of the music. The same kind of careful design thinking shows up everywhere in physics, from musical instruments to Newton’s cradle, which is another great way to see energy transfer in action.
How Does a Water Jar Xylophone Compare?
If you want to take this DIY Xylophone idea further, try the same experiment with glass jars and water. A water jar xylophone works the same way, using vibrations and sound waves, but the amount of water in each jar is what changes the pitch.
When you tap a glass jar with a spoon or stick:
- The glass vibrates.
- The vibrations create sound waves in the air.
- Your ears hear the sound as a musical note.
How Does the Water Change the Pitch?
The amount of water inside the jar changes how fast the glass can vibrate.
- More water makes the vibrations slower, which creates a lower pitch.
- Less water lets the glass vibrate faster, which creates a higher pitch.
Think of the water as extra weight inside the jar. More weight means slower vibrations and a deeper sound. Less weight means faster vibrations and a higher sound.
Fun STEM Experiments to Try
Vibration Science Experiment
Try this quick experiment:
- Tap a long pipe gently.
- Then tap a short pipe.
- Place your finger lightly on the pipe right after striking it.
Can you feel it buzzing or shaking? That movement is vibration.
Now compare different materials:
- Metal pipes.
- Wooden craft sticks.
- Glass jars with water.
- Plastic bottles.
Which material makes the clearest sound? Which one rings the longest?
Pitch Experiment for Kids
Pitch means how high or low a sound is. Try this easy pitch test:
- Arrange your pipes or jars from largest to smallest.
- Strike each one and listen carefully.
Then ask:
- Which one sounds the deepest?
- Which one sounds the highest?
- What happens if you shorten a pipe?
- What happens if you add more water to a jar?
Troubleshooting Tips
If your DIY Xylophone is not sounding the way you expected, here are the most common fixes:
The notes sound muffled or dull. Check that the loom bands are loose, not stretched tight. The tighter the band, the more it dampens the vibration.
The pipes are touching the wood. Make sure each pipe is resting on the loom bands and on the spacer beads, not the bare wood. Even a tiny point of contact will kill the sound.
Two pipes sound the same. Re-measure their lengths. A 5 mm difference will absolutely produce different notes, so it is worth a recheck with the ruler.
The pipes roll out of place. The loom bands may be too loose, or you may need slightly thicker bands. Try orthodontic elastics for a tighter fit that still allows vibration.
Extension Activities
Once your DIY Xylophone is up and running, do not stop there. Try one of these next:
- Tune the xylophone to a simple musical scale.
- Compare wood, glass, metal, and plastic sound quality side by side.
- Use a sound meter app to measure the volume of each pipe.
- Write and perform a short song on the DIY Xylophone.
- Add a math layer by measuring each bar or water level and graphing the results.
- Build a recycled-material instrument band with the whole family or class.
If your kids are loving the build side of this, try giving them a popsicle stick catapult next. It uses the same simple-materials, big-payoff approach, and it stretches their engineering thinking in a new direction.
You can also pair this DIY Xylophone with some quick mini building challenges, which are perfect for filling out a STEM morning, classroom rotation, or rainy afternoon.
More Music STEM Activities
If your child caught the musical instrument bug, keep that momentum going with more homemade instruments to build and play.
Try our popsicle stick harmonica for another quick, fun way to explore sound and vibration with materials you already have at home.
Or build a DIY drum for kids, which is another fantastic way to teach vibration, sound waves, and the engineering of instruments.
Stack the three projects together and you have an instant homemade band, plus a complete sound and vibration STEM unit.
Final Thoughts
Building a DIY Xylophone turns a music lesson into a science experiment and a science experiment into music. It is hands-on, creative, and packed with real physics. Your kids will measure, build, troubleshoot, decorate, and then actually play their finished instrument, which is one of the most satisfying STEM payoffs around.
Have fun. Make some noise. And we at STEAM Powered Family hope your DIY Xylophone is the start of a whole homemade instrument collection.
Frequently Asked Questions
You can make a DIY xylophone by arranging materials of different sizes or fill levels and striking them to compare pitch. In this build, copper pipes of different lengths are mounted on a simple wooden frame so each pipe can vibrate freely and produce its own clear note.
A xylophone works because striking each bar or container creates vibrations that produce sound waves. Those sound waves travel through the air to your ears, where you hear them as musical notes.
Xylophone notes sound different because each material size, length, or fill level vibrates at a different frequency. Longer pipes vibrate more slowly and produce lower notes. Shorter pipes vibrate faster and produce higher notes.
Yes, building a xylophone combines science, technology, engineering, math, and music into one hands-on STEAM project. Kids learn about vibration, sound waves, pitch, design thinking, and measurement all at once.
Kids can use jars, bottles, wood pieces, metal pipes, craft sticks, old knives and forks, or even recycled materials to make a homemade xylophone. Each material vibrates differently, so the sound and tone will change with what you choose.