Build a Balloon Car
Do you think you could build a car powered by nothing but air? Have you ever blown up a balloon and then let it go? The air rapidly escapes from the balloon, making it zip all over the room! So today, let’s harness that energy and race some cars! In this fun Car STEM activity, you are going to turn materials you already have lying around your house into a toy car that is ready to race. Ready, set go!
BUILD A BALLOON POWERED CAR
Table of Contents
Disclaimer: This article may contain commission, paid partnerships, or affiliate links. We independently review everything we recommend. When you buy through our links, we may earn a commission from qualifying purchases.
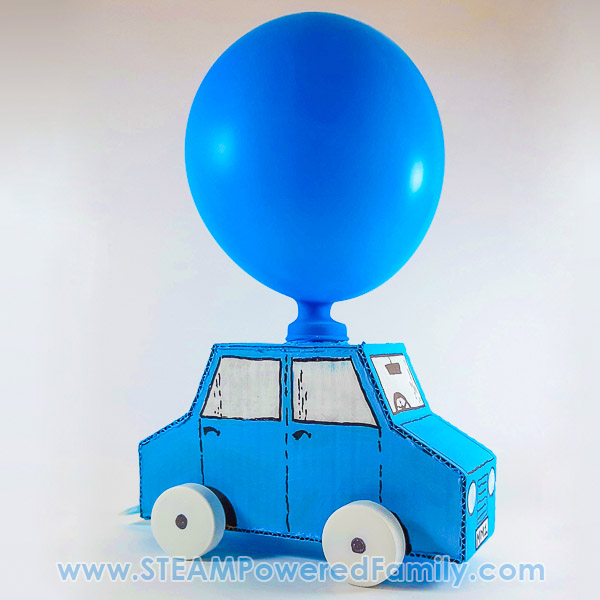
What is a Balloon Powered Car?
This little car is made from recycled materials and is propelled by a balloon. The principle behind the movement in this car is the same one used in real rockets and jets that shoot a high-speed stream of gases out the back of their engines, propelling the vehicle forward. In this project you will use this principle to build a toy car that is propelled forward by the stream of air escaping a balloon through straws as it deflates.
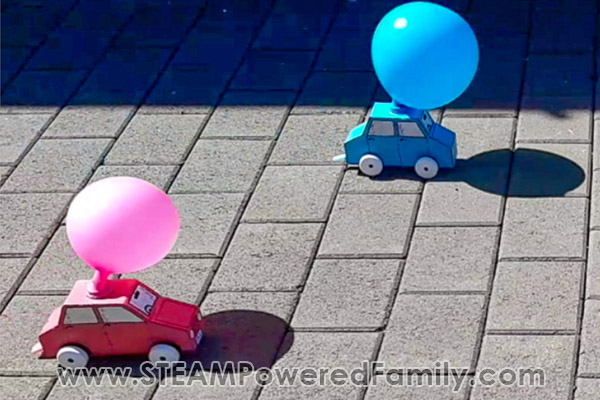
Get a friend and build two cars and race then against each other. Or turn this into a memorable and fun classroom STEM project. Who can build the fastest car?
This is an amazing way to have fun, practice the engineering design process and learn about the science behind the power of wind.
DIY Balloon Powered Car STEM Activity Video
Check out our video demonstrating how to make the balloon powered car. If you can’t see the video, please turn off your adblockers as it also blocks our video feed. You can also find this video on the STEAM Powered Family YouTube Channel.
How to Make a Balloon Powered Car
This project is best done by middle school students who can safely use sharp cutting tools and hot glue guns. Adult supervision is always required. Safety first!
Printable Template
The most important thing you require is our printable template for the Balloon Powered Car. This is available to all of our STEAM Powered Family mailing list members. Simply enter your email here to unlock the printable.
Materials & Tools
Thin, sturdy cardboard – cereal box, milk carton, or cardboard box from the recycle bin
Glue gun or contact adhesive
Ruler
Pencil or marker
Xacto or hobby knife*
Hole punch
Balloon
2 flexible straws (bendy)
1 straight straw
A wooden skewer
5 plastic bottle caps
4 pony beads
Tape
Scissors
* Hobby knives or Xacto Knives are very sharp. Only older, responsible students should use these and always under adult supervision. If you do this project with younger students, have an adult do all the sharp cutting.
Balloon Powered Car DIY Directions
Getting your pieces ready
Print, trace and cut out all the template pieces.
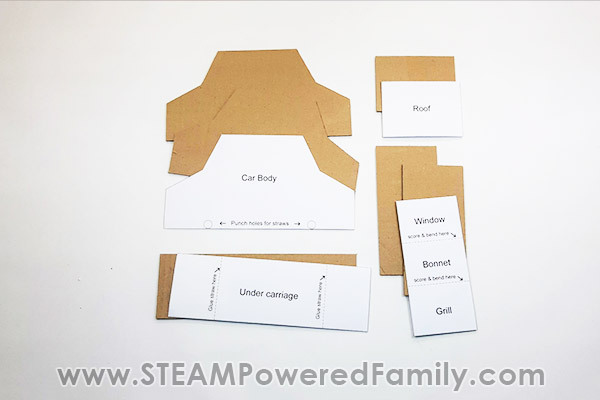
Copy all the markings (score lines and labels) on the template, to the relevant cardboard pieces.
Lightly score the fold lines on the “window, bonnet & grill” template. Do not cut all the way through the cardboard. Now gently fold the cardboard on all these lines. Mark the window section so you know which side is glued to the roof.
PRO TIPS!
If you are using a cereal box, use the tip of a ballpoint pen to score the cardboard.
If you have used a thicker cardboard, score with a hobby knife and ALWAYS fold the cardboard inward towards the side you have scored.
Preparing the roof for the straws
Trace the shape of the bottle top onto the roof, making sure that it is centered.
Make a smaller circle inside this, for the straws and cut it out.
Gluing the pieces together
Mark and punch the 4 holes for the straw axles on the bottom of the car body.
Glue the two “window, bonnet & grill” sections onto the roof, using either contact adhesive or a glue gun. Ensure that you are gluing the correct side to the roof.
Cut 2 straws for the axles (7cm long) and glue then onto the lines on the under carriage of the car.
Glue the sides of the car onto either side of the under carriage, over the straws.
On one end of the “window, bonnet, grill and roof” piece, cut a small hole, large enough for the two straws to fit through. This will be for the “exhaust” at the back of the car.
Glue this piece onto the body of the car, starting with the roof and working your way down on either side.
Let’s get the straws in place
Make two small holes with the tip of the glue gun into the bottle top for the two straws to fit snugly into. Fit the straws into the holes and glue in place.
Tape the end of the straws together and gently push the straws through the hole in the roof and out of the small hole you cut at the back of the car.
Glue the bottle top on the roof and the straws at the back in place, making sure that they are all secure and that there are no holes for air to escape from.
Put a piece of Cello tape around the straws at the back and cut them to a length of 2cm.
Cut the straws coming out of the bottle top to a length of 1cm.
It’s time to add the wheels of the car
Cut the wooden skewer into 2 pieces, each measuring 9cm. These are the axles.
Glue the pony beads into the center of all the bottle tops that you are using for wheels.
Glue the 2 axles into the pony beads of 2 wheels, making sure that they are straight.
Push the axle into the straw, and mark around the bottle tops. These are your wheel hubs. Color them in black with a marker.

PRO TIP! This would be the best time to paint or decorate your Balloon Powered Car and give your cars personalities. Use paint or markers to make your car stand out in the crowd!
Push both axles into the straws and glue the wheels onto the opposite sides.
Gently push the car back and forth, to see that the car moves easily in both directions.
The “Engine”
Now it’s time to give your car an engine so it can move! The balloon is what will provide the force to make your car race.
Get someone to help you stretch the balloon over the bottle cap on the roof. Take care that the top of the straws does not tear the balloon.
Your Balloon Powered Car is now ready to zoom!
How To Use A Balloon Car
When you are ready to race your balloon car, simply blow up the balloon through the straw. Place a finger over the end of the straw to prevent air escaping. You can also pinch the straws closed.
Then… ready, set, GO!
Let go of the straws and watch your balloon car zoom away!
STEM Inquiry Questions
But before you send your cars off racing, take a moment to ask some questions to help build critical thinking and scientific method skills.
Ask students, what do you think will happen when you put the car down and release your finger?
How far do you think your car will travel? And how far did it actually travel. (This is a great opportunity to include some measurements and math.)
Will the car move faster or slower if you change the amount of air you blow into the balloon?
Can you calculate the speed your balloon car travelled at? To do this, you will need a stop watch and a carefully measured distance. The mathematical formula for calculating speed is: Speed = Distance ÷ Time
Science Behind a Balloon Powered Car
It might not seem like it at first, but a simple balloon car is loaded with physics and engineering concepts!
Energy
When the balloon is inflated it stores the compressed air as potential energy. When you let the air out of the balloon, the potential energy is converted into kinetic energy; this is the energy of motion or thrust, which is why the car moves. Because the air is pushed out rapidly backwards, there is a reaction force that pushes the car forward. The more air in the balloon, the more kinetic energy and the faster or further your car will travel.
Force
Force and Thrust are a big part of the science behind powering our balloon car. One type of force students may not immediately think of is Frictional Force. Friction is the force that resists motion when the surface of one object comes in contact with the surface of another. The rougher the surface your car is racing on, the more frictional force it will encounter. Another example of this is when kids ride their bikes. Think about the difference between bike riding on a smooth road, versus riding on the grass. Which one has more frictional force and is therefore harder to make the bike move? Use this knowledge of frictional force to make your balloon car race the fastest and farthest!
Simple Machines
This balloon car design contains one of 6 Simple Machines, the wheel and axle. Simple machines can help make difficult tasks easier. They change the force needed to complete the difficult task. We use simple machines for many things everyday of our lives.
Newton’s Law
This experiment also demonstrates Newton’s Third Law of Motion. “For every action there is an equal and opposite reaction.” The air pushes back on the balloon and this pushes the car forwards.
Learn more about Newton’s Laws with our Balloon Rocket physics activity.
Extension Ideas
Get creative! Turn this into an engineering design project and try building your car with different materials.
For example:
What happens if you use a different material for the car body? For example a plastic bottle?
What happens if you use different diameter straws?
Can you use different materials for the wheels and axles?
Can you improve your car to make it go farther?
Try making a ramp to send your car up or down.
Measure the car’s speed using a stop watch or your phone. What variables can you change to make the car faster?
Troubleshooting
If your car does not work perfectly on the first try, check if its axles are not parallel or the wheels are wobbling. Too much friction can cause the wheels to get stuck. If this happens, the balloon will not be powerful enough to push the car forward. See the science section to learn about frictional force.
Test your car to make sure that the wheels spin freely. When you give it a push, the car must roll easily. If not, you might need to make some adjustments to your design. Ensure no air escapes the balloon, especially where it is glued to the straw in the middle of the bottle cap.
Have fun building and racing your very own balloon-powered car!
More Car Building Projects!
Build different types of cars and race them to see which power source is the best!

