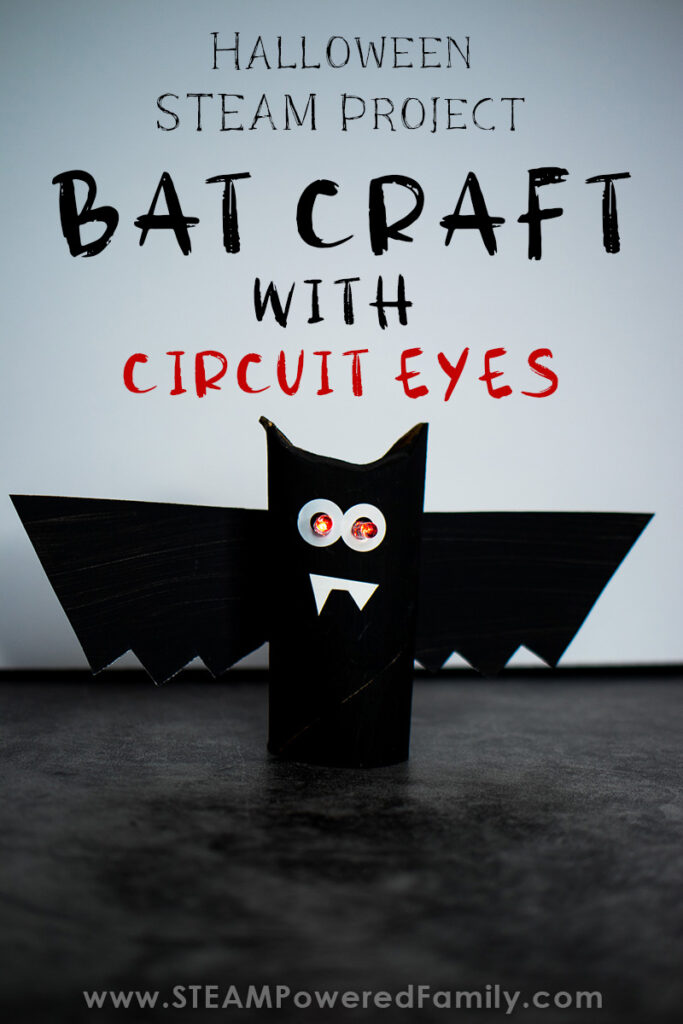
Bat Craft With STEM Circuit
Got kids who are fascinated by bats? These amazing creatures sometimes get a bad rap, but they are really incredible once you learn more about them. Halloween is the time of year when bats become really popular for crafting. So today we are learning more about bats and making a fun bat craft with a circuit STEM that lights up the eyes.
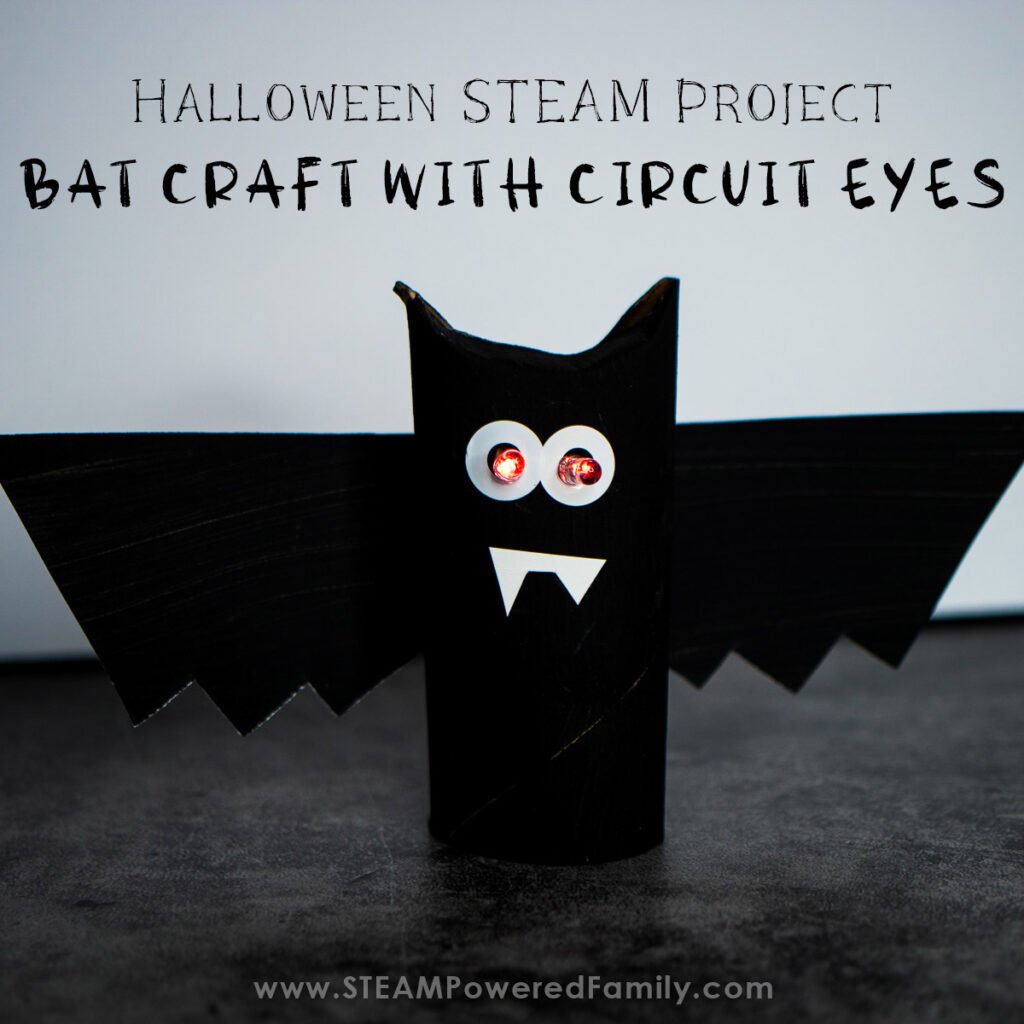
Easy Toilet Roll Bat with Light Up Eyes
Table of Contents
Disclaimer: This article may contain commission, paid partnerships, or affiliate links. We independently review everything we recommend. When you buy through our links, we may earn a commission from qualifying purchases.
Halloween is coming and every year we embrace that excitement and passion kids have for Halloween and use it to learn important STEM skills. One of the great things about STEM projects is that they can be incredible fun, while also providing wonderful learning experiences.
You might think after all these years of doing Halloween STEM activities that we would start to run out of ideas, but every year we have a list of exciting projects the kids want to tackle. This time we decided to take the simple toilet roll craft and electrify it!
We made a Mummy this way that turned out so cool, plus an Owl. Again super cool. So we decided to do another one, this time the amazing bat!
We start with a simple toilet roll bat craft, then build a special circuit to create eyes that light up.
Check out our video of this project. If you can’t see the video, please turn off your adblockers as they also block our video feed. You can also find this video on the STEAM Powered Family YouTube Channel.
But first, before we dig into this project let’s learn a bit about the amazing bat.
Bat Facts
- Most bats can fly at 97km/h (60mph), but the Mexican Free-Tailed Bat can fly at 160km/h (100mph) which makes it the fastest mammal on Earth!
- Bats are the only mammals capable of flying.
- Baby bats are called pups and most female bats only have one baby per year. Since they are mammals, this means they give birth to live babies that are fed from their mother’s milk.
- The largest bat in the world is the Flying Fox Bat of the South Pacific. It has a wingspan of up to 1.8 meters (6 feet). The world’s smallest bat is the Bumble Bee Bat of Thailand, which is smaller than a thumbnail and weighs less than a penny.
- Depending on the type of bat they may eat insects, fruit, seeds, pollen, birds, fish, frogs, lizards and even other bats. There are even a few types of bats that drink blood! There are 3 types of vampire bats that drink blood. They normally feed off cows, sheep and horses, and only drink about 2 teaspoons of blood a day.
- Some bats use echolocation to hunt insects. They emit inaudible, high pitched sounds and squeaks, usually 10-20 per second and listen for the echoes in order to locate insects.
- Bats can eat up to 1200 mosquitoes per hour. This is why we love bats!
- Some bats are pollinators, just like bees and butterflies. Fruits plants like bananas, avocados, and mangos, plus many flowers rely on bats for pollination, plus when bats eat certain plants they poop out the seeds helping to disperse them so new plants grow.
- Bats that are nocturnal and have something called eyeshine. Eyeshine is the light that we see reflected back from the bat’s tapetum lucidum (a membrane behind the bat’s retina). Light enters the eye, passes through the retina, strikes the reflective membrane, and is reflected back through the eye toward the light source.
Now we know how amazing bats are, let’s make our Bat Circuit Craft.
How to Make a Toilet Roll Bat Craft with Light Up Eyes
Materials and Supplies
Toilet paper rolls
Black craft paper (or paint your paper black)
Hole reinforcement stickers
Prewired 3V LED diodes (These are a game changer when it comes to circuit building with kids!)
Electrical Tape
Coin Battery – CR2032 3V
Clothespin
2″ Long Reach Hole Punch
White paint and paint brush
Glue
Scissors
Directions – Make a Toilet Roll Bat Craft
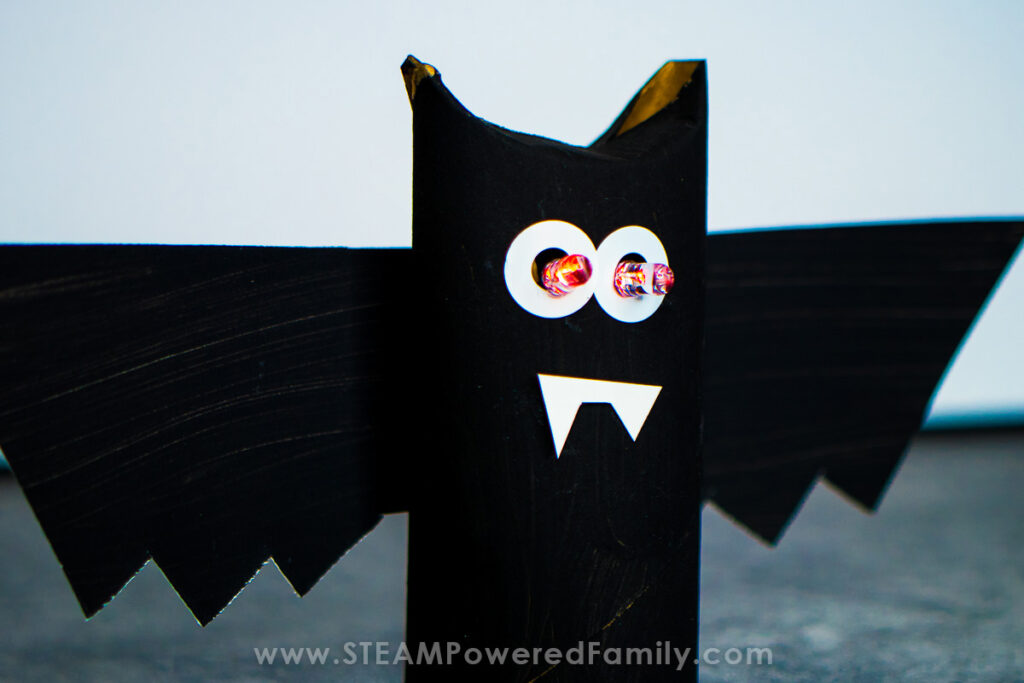
First, paint the toilet roll black and let it dry completely. I found it easiest if I placed my fingers inside the roll and held it like that while painting all around the outside.
Once it is complete dry, use a hole punch to make to eye holes. I like to use the 2″ long reach hole punches, it makes the eyes more logically placed and gives you enough room to fold down the top to make the “ears” of the bat. Leave about 1cm between the eyes. Place hole reinforcement stickers around the holes. These help secure the circuit LED’s in place.
Using your thumbs, place them on the front and back of the tube and gently fold inward so you leave two points for the ears. You can see this demonstrated in the video.
Now it is time to decorate the bat. This is where kids can get creative. Cut out wings. There are so many different bat wing shapes your kids can pick from. The easiest way to do this is to fold the paper in half and cut out the shape. This ensures both wings are identical. Glue the wings into place.
Kids can also cut out a mouth with teeth to glue into place.
Now it’s time to electrify these bats!
Building the Circuit
Of all the circuit projects we have done over the years, this type of circuit build is so simple. A great first circuit project to do with kids, or as part of a group. Plus, once they master this circuit build they can make so many cool things including Circuit Bugs, Circuit Flowers plus more Toilet Roll Circuits!
Test the Circuit
Always start by testing the LEDs and batteries. LED diodes and batteries can come from the manufacturer with defects. Make sure everything works before you start. This is also a great way for kids who are new to circuit building to start exploring how the circuit works.
To test the LED and battery, all you need to do is take the positive lead and place it on the positive side of the coin battery, and the negative lead to the negative side of the battery. Don’t worry about getting zapped, these are 3V batteries and will not zap you!
If your light doesn’t turn on, try turning the battery around in case you mixed up the positive and negative. If it still doesn’t work, try a different LED and/or a different battery.
Take note of which coloured lead is negative and which is positive. With the prewired LEDs each lead is colour coded which makes this whole process so easy.
Once you have tested everything and it is all working, it is time to build a circuit.
Wiring the Circuit
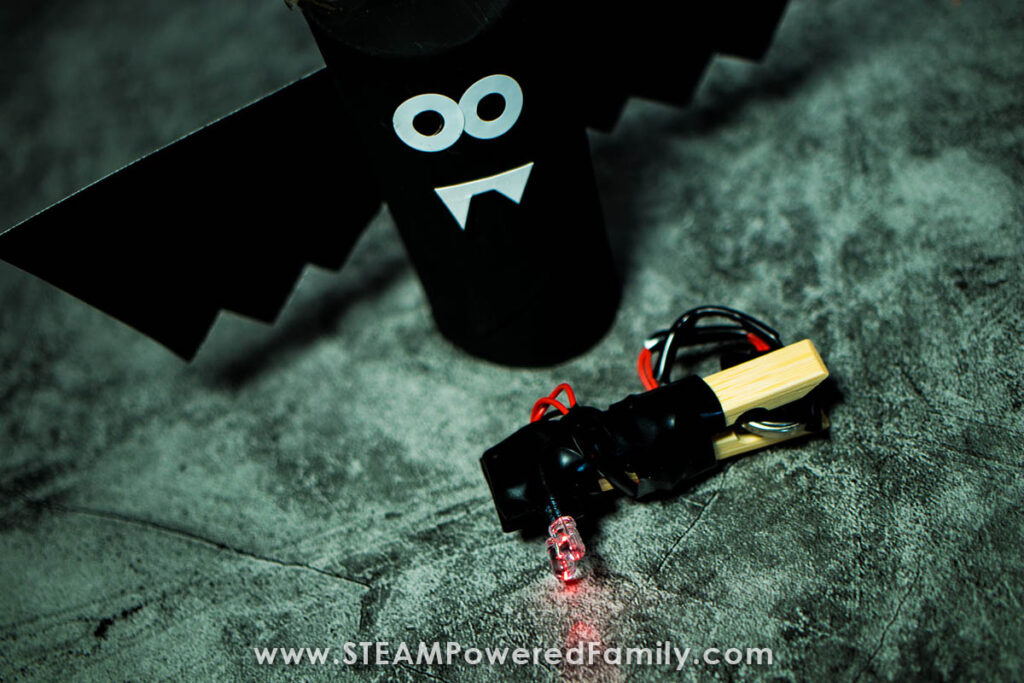
Place the clothespin so the part you squeeze together is up. This is going to be the top where the Bat’s eyes will attach. We picked red LED’s for our bat but you can use whatever colour you prefer.
Take an LED and place it pointing off the front of the clothespin. Tape the LED into place with electrical tape. Repeat with the other LED. To keep with the black bat theme, we ensured we used black electrical tape for our bats.
Now you will have quite a bit of wire leads and it is important to keep everything organized. Start by taking the two negative leads and tape them together with electrical tape. Do it near the lights and also near the ends of the leads to keep everything neatly together. Make sure the exposed wires at the end are nice and even.
Now repeat this with the positive leads.
Finally, Take all the leads and wrap them around the clothespin. Don’t do this too tightly. You don’t want to break any wires, plus you need to be able to still open and close the clothespin. Leave about 5 cm or 2 inches of leads so you have enough to play with when attaching the battery.
Using electrical tape secure everything into the place.
Now take the negative leads and place them on the negative side of the battery, repeat with the positive side. The lights should come on. If they don’t, make sure the wires are contacting the battery.
Pro Tip! If the light don’t come on, make sure the wires are all contacting the battery. If it still doesn’t work, check to see if any of the wire leads have broken.
Tape the leads to the battery.
Now open the clothespin and slide the battery inside being careful not to dislodge the wires. Close the clothespin onto the battery. This will help secure the connection.
It is important to have the ends of all the leads securely in contact with the battery. If they are not in solid contact with the battery the lights will either flicker or not stay on.
Assemble the Halloween Bat Circuit Craft
Now it is time to assemble our glowing eyed bat!
Simply slide the whole circuit inside the toilet roll tube. Then carefully push the LED’s through the eye holes.
If the LED’s don’t line up with the eye holes, you can move them slightly to make it fit together better. The reinforcement stickers around the eye holes help to hold the whole circuit in place. However, if you need to, you can add a bit of tape to secure things even more. This is especially helpful if kids will be taking their creations home.
Your Halloween Bat Craft with Circuit Eyes is now complete!
To turn it off, simply open the clothespin, pull the battery out, and remove the tape, then take the battery out.
These Halloween Bats make a fantastic decoration for a Halloween Party, a classroom, or as a Halloween STEM activity for kids. Don’t forget to name your bat!
Happy Halloween!