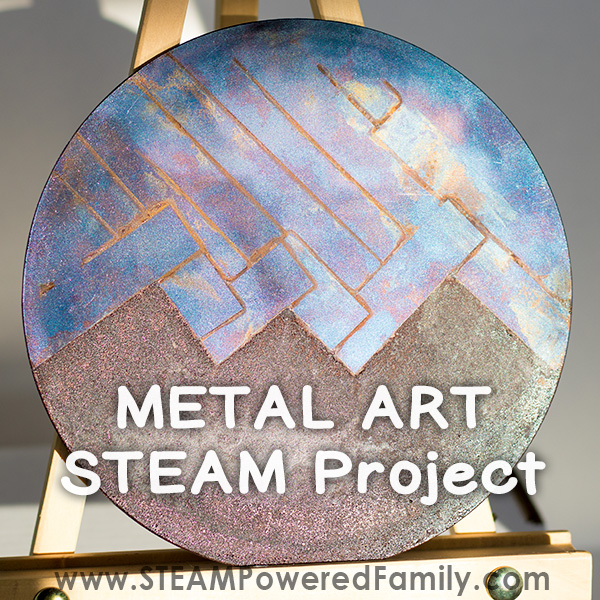
Metal Art STEAM Project – Science + Metal = Art!
We love creating metal art around here, it comes naturally when you are a blacksmith! The kids have been showing more and more interest in metal art, so I came up with a STEAM project that brings science, metal and art together into one activity the kids loved! Forget the paint, use science and chemistry to create amazing metal art pieces!
METAL ART STEAM PROJECT
Disclaimer: this post contains affiliate links
This project is another one of those where our mistakes turned our project into something a little different. Things really did not turn out the way I envisioned. But despite the original disappointment in the art presentation, I have to say I kind of love how they look. I also know how I would do things differently in the future. The best science experiments are those that teach valuable lessons, and we learned a lot from this project.
The science behind this project is also fascinating. It is a beautiful exploration into the phenomenon of oxidation. a process that has been used by blacksmiths for thousands of years in the working of their metal. And even though our art wasn’t quite how we wanted it, the science was all kinds of amazing!
A quick note, this is not a project for young children. We are working with acids and chemical reactions. Responsible adult supervision is a must.
METAL ART SUPPLIES
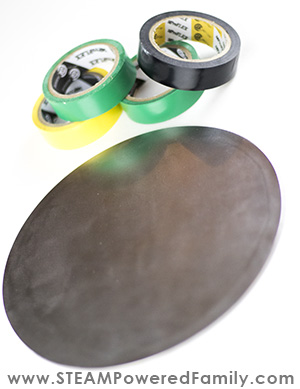
To do this project you will need some very basic supplies. The only thing you may not have kicking around is the scrap metal, but it turns out you can buy it quite easily. I just took ours from the scrap pile in the shop. However, if you do have some steel hanging around (make sure it is steel, not stainless steel, aluminum or some other metal), this is a great project for making something special from it.
Steel
Vinegar
Hydrogen peroxide
Salt
Rubbing acohol
Steel wool or Scotchbrite
Electrical tape
Plastic sheet (sheet covers would work great)
Spray bottle (misting)
Table covering/protection
Cookie sheet
Oven
Safety glasses
Protective Gloves
Spray clear coat
METAL ART – Prepping the metal
More than likely, even if you bought it new, your metal is going to need preparing. It may be a little greasy or even have a few surface rust spots that need removing (we want our OWN rust!).
The first step is to clean it up. Any surface rust or marks can be removed using steel wool or scotchbrite pads. Remove dust with a dry cloth (you don’t want to use any water).
Wipe it down with rubbing alcohol to remove any grease or bits on the metal.
METAL ART CREATING THE DESIGN
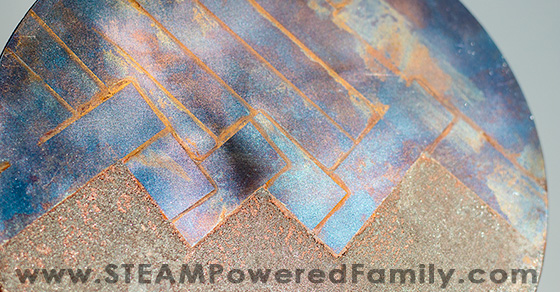
This is the stage where things went a little sideways on us. We used two techniques, electrical tape and nail polish. The nail polish was a complete fail. I don’t recommend it at all. The tape worked, but we ended up with some of the liquid leeching through even though we overlapped our tape. We learned a lot about how we would do this differently next time!
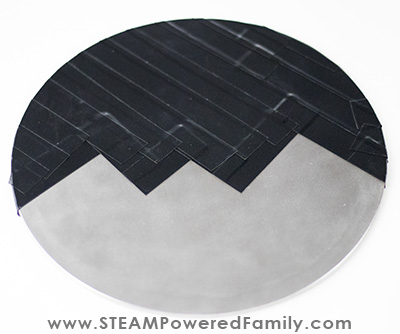
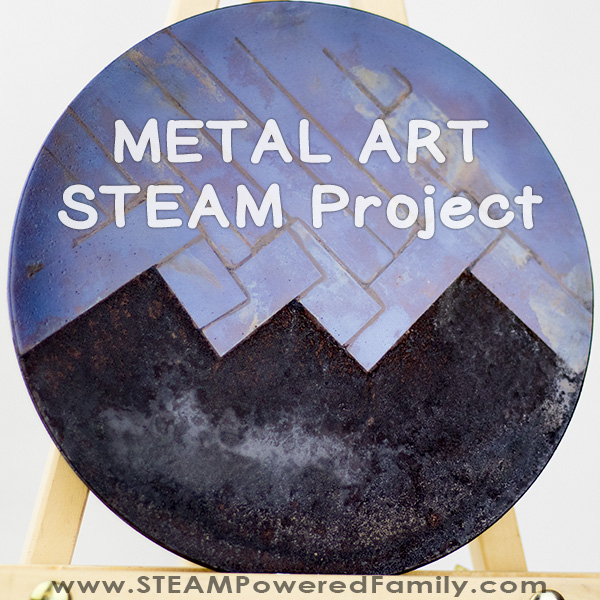
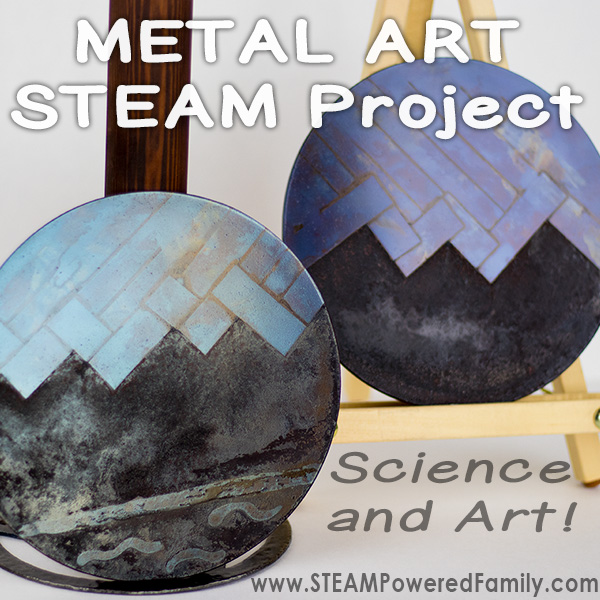
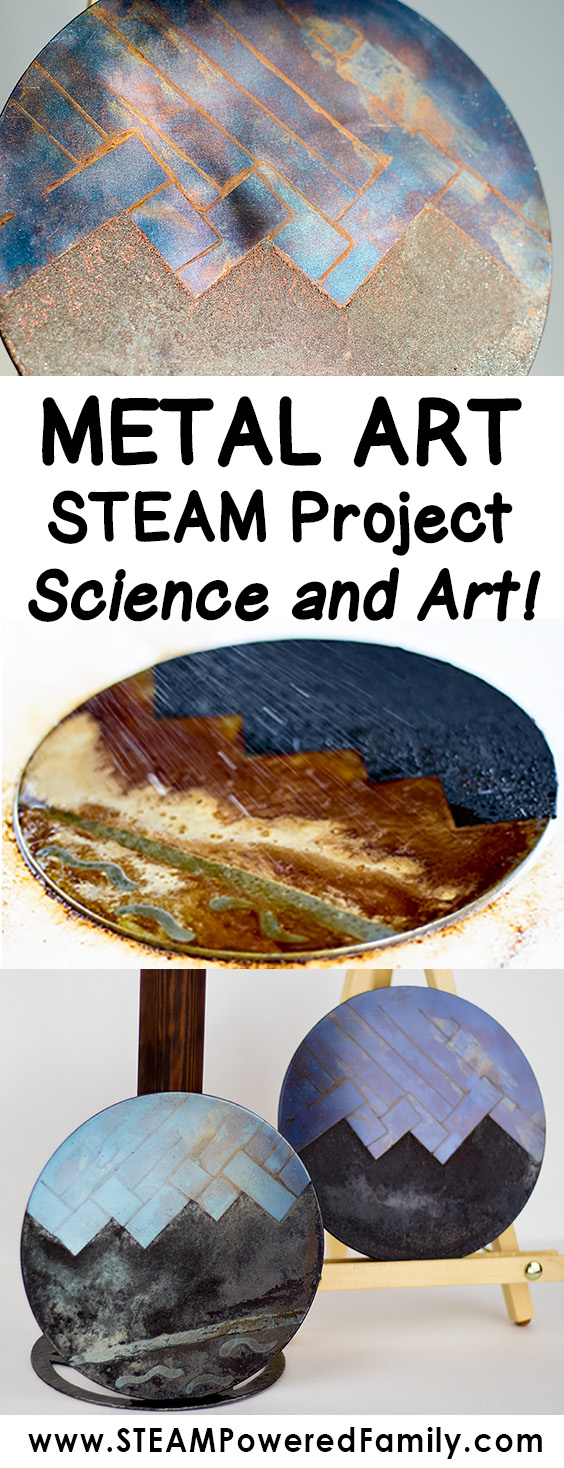
We went with a mountain design. Lately, we have been talking a lot about taking a vacation to the Rocky Mountains, so it was something that appealed to us rather than just doing a geometric pattern.
If you are doing a geometric pattern, just place your strips of tape to create your design. If you want to do something similar to our mountains and sky, where you have a wide swath of tape, you will need add an extra step.
For something like our mountain design, cut a piece of plastic in the shape you want. We wanted our mountains to be rusty, so what we should have done is cut a sheet of plastic in the shape of the sky part. Then we should have taped that plastic down on our metal. That would have eliminated the lines we developed in our sky.
Although now I see the final result I actually don’t mind the lines, but in the future, this is valuable information to know!
Once you have your design taped out, it is time for the good stuff… science!
METAL ART SCIENCE CHEMISTRY REACTION
In your spray bottle we are going to create our mixture. It is an acid, so an adult should do this and eye protection is a very good idea. You may also want to wear gloves.
Mix 4 oz of Hydrogen Peroxide + 0.5 oz of Vinegar + 0.75 teaspoon Salt. Shake well until the salt is all dissolved.
Prepare your space, this is going to be messy!! We put an old towel on our table, plus a sheet of thick card stock paper. Place your prepared metal in the middle.
Now mist over the entire surface with the mixture. You want to make sure you have really covered all the metal. So mist it well.
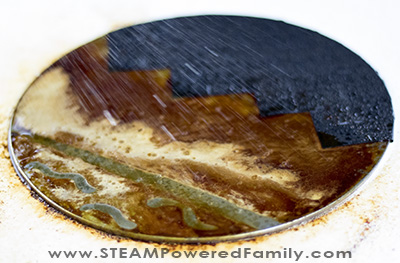
Now watch closely. You will see lots of little bubbles forming and the liquid will swirl and move with the reaction, you may also notice a little gas escaping if you are lucky.
Now let it dry without touching anything. This could take a couple of hours.
METAL ART AFTER THE RUST PREPARE FOR TEMPERING
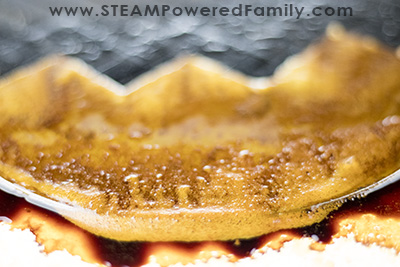
Once it is dry, you will want to very carefully remove the tape (and plastic if you used it). Be VERY careful with the rusty side. We are only creating surface rust and it will come off if you rub it too hard with your hand. Even brushing over it lightly will remove some of your rust. Depending on how thick you want your rust effect, you will want to be very careful with this stage.
Once the tape is removed, you can clean the shiny side with rubbing alcohol again if needed. Now we are ready for tempering!
METAL ART TEMPER COLORING
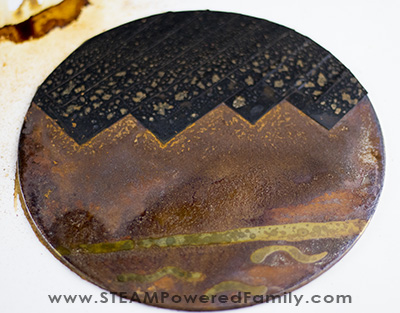
Tempering is a process used in preparing metal for various uses, but it also is a natural way to use heat to change the colour of metal. It is called the temper rainbow. As the temperatures increase, the colour of the metal moves through the rainbow of colours. It starts at straw, then into bronze, purples and finally blues. If you let it go too far it will go back to silver.
For the purples and blues we had to set our oven to 480 degrees. Your oven temperature may need to be set differently. 5 degrees can make a big difference in this process, so watch closely.
Don’t forget what we learned with candy science, altitude can also make a big difference when dealing with temperatures!
As always, adult supervision is required when using an oven. Ensure you keep everyone safe.
Set your metal art on a cookie sheet and place it in the oven. The process will take about 2 hours, but as I said, watch closely. You should see your metal start with a light golden straw colour. Then it will darken into some bronze shades. From there you move into purples and finally blues.
Do not let it stay in the heat once you hit blues! If it goes back to silver you can’t temper your piece again.
Once your metal is the colour you want (I love the purple-blues!), take it out of the oven. It is going to be REALLY hot. Do not touch it. Let it cool completely (this could take over an hour).
To finish the piece, spray with a clear coat to give it a protective finish.
Display your science art proudly!
THE SCIENCE BEHIND THIS STEAM METAL ART PROJECT
The creation of rust on our metal is a process called oxidation. Oxidation happens naturally to steel in the environment but in our experiment we are speeding up the process with our acid mixture.
The main component in steel is iron. Iron will oxidize easily when exposed to moisture or acids and hydrogen gas will be released during the chemical reaction. Remember, I said to watch closely for that gas release! The mixture we created is an old blacksmithing trick that has been used for generations to create a quick rust patina on pieces.
Tempering is a slightly different reaction and another old blacksmithing tool. Blacksmiths have been using temper colours since the 11th or 12th century BC, as they are a reliable way for the smith to know the temperature of the metal they are working. When a blacksmith is working, knowing the temperature of the metal is very important. The temper rainbow is far more important to a blacksmith than the rainbows in the sky!
Temper colours are created once again through an oxidation process, but this time oxidation is caused by heat instead of chemicals. A thin layer of iron oxide is created as we slowly heat the metal and as light passes through the thin transparent layer we see colours. These colours change as the thickness of this layer changes during the heating process. It is a phenomenon known as thin-film interference.
So all of our art in this process was created through the powers of oxidation! How cool is that?
MORE FROM STEAM POWERED FAMILY