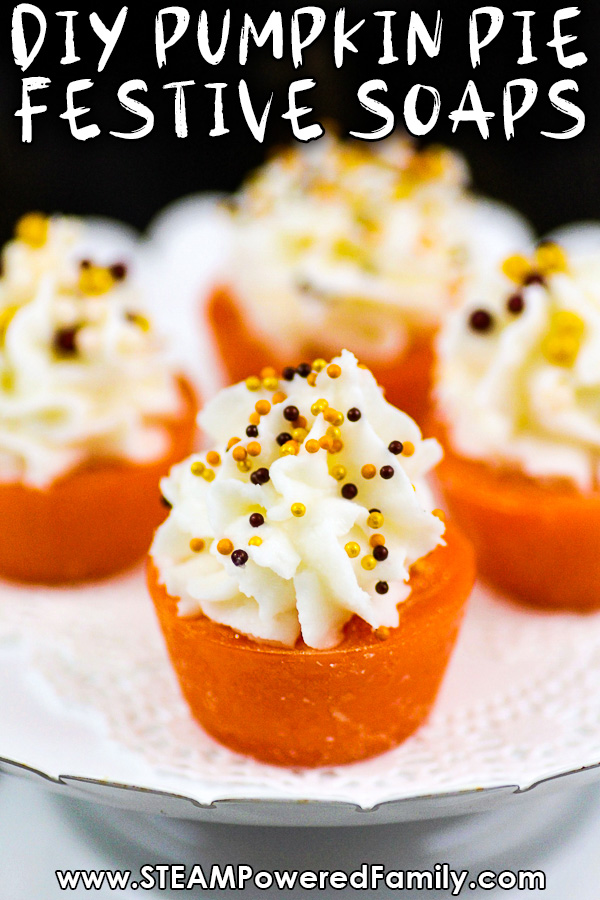
Pumpkin Pie Cupcake Soaps – Perfect for The Holidays
The holiday season is upon us and with it, everything pumpkin and celebrations! During the holidays I am always looking for fun little projects we can do. Soap making has become a popular project for us. And this time I think we created something really special! Pumpkin Pie Festive Soaps!
Festive Holiday Soap Recipe
Table of Contents

Disclaimer: This article may contain commission, paid partnerships, or affiliate links. We independently review everything we recommend. When you buy through our links, we may earn a commission from qualifying purchases.
Often when I am looking for project ideas it is to celebrate something special. During the fall and early winter there are so many celebrations across cultures and around the world. In North America this time of year is definitely associated with pumpkins. So it is only natural that pumpkins were an inspiration for our latest creation.
There are lots of reasons why we love Soap Making for the holidays:
- It is a zero waste project, making it environmentally friendly. Win for us, win for the environment!
- Soap and washing hands is especially important at this time of year, when sick bugs are running rampant. What better way to encourage hand washing than to provide fun, festive soaps!
- Guests are around and we love to make a big impression. These soaps are small and make perfect guest soaps.
- We often need little gifts, hostess gifts and more at this time of year. Everyone will love getting these cute little soaps as a gift.
- Kids love making soap creations! It is a wonderful process that can be done by a wide range of ages and abilities. Just ensure younger children are adequately supervised.
Do I have you convinced? Then let’s make some pumpkin pie soaps, complete with whipped topping! But of course!
Pumpkin Pie Festive Soap Recipe
This recipe recipe will make 12 mini pumpkin pie soaps. It is done in two stages. First we make the soap bases. Then we make the whipped topping.
Supplies for Soap Base
1/2 pound of clear suspension melt and pour soap cut into cubes (each cube is approximately 1 ounce)**
1 teaspoon of Argan Oil
1 teaspoon pumpkin pie scented oil
2 – 3 drops Orange soap dye
Orange cosmetic biodegradable glitter*
Mini muffin silicone pan
Spray bottle filled with rubbing alcohol
Microwave
Bowl
Mixing spoon
*A NOTE ON GLITTER – Glitter has become very controversial due to the negative impacts on the environment, but I know many of you still love a little sparkle in your projects! When it comes to glitter, I believe it is always optional. None of my projects require it. But if you decide you do want a little sparkle and shine in your creations, I highly recommend using a biodegradeable glitter. There are lots of fantastic options available.
**Suspension soap is a bit thicker when melted compared to regular melt and pour soaps. This allows glitter, jojoba beads, etc. to be suspended within the soap mixture as opposed to falling to the bottom as it will with regular melt and pour soaps. You do not have to use this soap if you don’t have it. Just double up on the regular melt and pour soap base.
Directions for Making Soap Base
Add 1/2 pound of the melt and pour soap to a microwavable bowl or measuring cup. Make sure it is cut up into cubes. Melt it in the microwave 30 seconds at a time. Be sure to stir after each 30 second run before starting the next one. Repeat until completely melted.
Add argan oil, scented oil and 1-2 drops of color. Mix well. I like to add a good quality, skin oil to help with moisturizing. Especially at this time of year, dry hands are no joke! Having a soothing, moisturizing oil added to the soaps can really help with the health of your skin.
Spray the soap mold with the rubbing alcohol to prevent bubbles on the bottom of the soap. A couple of quick squirts is enough.
Now carefully pour the soap mixture into the mold cavities. Spray the top of mixture with rubbing alcohol to prevent bubbles forming on the top of the soap.
Allow it to harden for at least 3 hours or until completely firm. Once it is set, gently pop it from the mold.
We are now ready for our whipped topping!
Supplies for Whipped Soap Topping
3/4 cup whipped soap base
1 tablespoon glycerin
1/2 tsp pumpkin pie scented oil
1 tsp of Argan Oil
1 tbsp corn starch
1/4 cup white melt and pour soap base
Piping kit
1 large mixing bowl
Hand mixer
Spoon
Spatula
Creating the Whipped Soap Topping
Every great pie comes with a dollop of whipped cream on top, and our soaps are no different. Now we are going to make a whipped soap topping for our soaps. It will look amazing but it still a soap, perfect for getting clean!
Note, you need to work quickly with whipped soap topping. So make sure you have all your supplies ready and you have read and understood all the instructions before you start.
Add whipped soap base, scented oil, argan oil and glycerin to a mixing bowl. Mix for 1 minute.
Gently fold cornstarch into the mixture using a spatula.
In the microwave melt a 1/4 cup of white soap base, then add it to the mixture.
Using the mixer, mix until it forms peaks, like when you make a meringue. If your frosting is not stiff enough, add a bit more cornstarch and mix in. Repeat until the mixture is firm.
Add the soap frosting mix to a piping bag.
Spray the top of your pumpkin soap base with rubbing alcohol. This will help your whipped soap adhere to the base.
Pipe frosting onto your soap. You must work quickly as the frosting will begin to harden after about 5 minutes.
Let set up completely for about an hour. They are now ready to use, gift and share with the world!
Happy Soap Making!
MORE SOAP MAKING PROJECTS FOR KIDS

Pumpkin Pie Soap Making
Soap making has become a popular project for us. And this time I think we created something really special! Pumpkin Pie Festive Soaps!
Supplies
Soap Base
- 1/2 lb clear suspension melt and pour soap
- 1 tsp Argan Oil
- 1 tsp pumpkin pie scented oil
- 2-3 drops orange soap dye
- 1 tsp Orange cosmetic biodegradable glitter
Whipped Topping
- 3/4 cup whipped soap base
- 1 tbsp glycerin
- 1/2 tsp pumpkin pie scented oil
- 1 tsp Argan Oil
- 1 tbsp corn starch
- 1/4 cup white melt and pour soap base
Instructions
Soap Base
-
Add 1/2 pound of the melt and pour soap to a microwavable bowl or measuring cup. Make sure it is cut up into cubes. Melt it in the microwave 30 seconds at a time. Be sure to stir after each 30 second run before starting the next one. Repeat until completely melted.
-
Add argan oil, scented oil and 1-2 drops of color. Mix well. I like to add a good quality, skin oil to help with moisturizing. Especially at this time of year, dry hands are no joke! Having a soothing, moisturizing oil added to the soaps can really help with the health of your skin.
-
Spray the soap mold with the rubbing alcohol to prevent bubbles on the bottom of the soap. A couple of quick squirts is enough.
-
Now carefully pour the soap mixture into the mold cavities. Spray the top of mixture with rubbing alcohol to prevent bubbles forming on the top of the soap.
-
Allow it to harden for at least 3 hours or until completely firm. Once it is set, gently pop it from the mold.
Whipped Topping
-
Add whipped soap base, scented oil, argan oil and glycerin to a mixing bowl. Mix for 1 minute.
-
Gently fold cornstarch into the mixture using a spatula.
-
In the microwave melt a 1/4 cup of white soap base, then add it to the mixture.
-
Using the mixer, mix until it forms peaks, like when you make a meringue. If your frosting is not stiff enough, add a bit more cornstarch and mix in. Repeat until the mixture is firm.
-
Add the soap frosting mix to a piping bag.
-
Spray the top of your pumpkin soap base with rubbing alcohol. This will help your whipped soap adhere to the base.
-
Pipe frosting onto your soap. You must work quickly as the frosting will begin to harden after about 5 minutes.
-
Let set up completely for about an hour.