Last Day of School STEM Activity: Make a Classroom Time Capsule
Looking for a meaningful last day of school STEM activity? This classroom time capsule project is the perfect way to wrap up the school year, combining creativity, reflection, and a little bit of science magic.
Instead of another worksheet or movie day, students get to capture who they are right now, make predictions about the future, and engineer a capsule that protects their memories over time. It is hands-on, thoughtful, and just the right mix of fun and learning for those high-energy final days of the school year.
Because the last day of school shouldn’t just be about finishing. It should be about remembering.
What Is a Time Capsule?
Table of Contents

Disclaimer: This article may contain commission, paid partnerships, or affiliate links. We independently review everything we recommend. When you buy through our links, we may earn a commission from qualifying purchases.
A time capsule is a collection of items and messages that are sealed away and stored to be opened in the future. Think of it as a snapshot of life right now, carefully packaged for a future version of yourself to rediscover.
For students, a time capsule becomes something very personal and special. It captures:
- Their current interests and favorites
- Their thoughts, feelings, and friendships
- Their hopes and predictions for the future
When the capsule is finally opened, it creates a powerful moment of reflection. How much has changed? What stayed the same? It is the kind of activity students remember for years.
This project is designed for middle school students (around age 12), but it can be easily adapted for younger learners by having them draw instead of write, or by simplifying the reflection prompts.
Why a Time Capsule Is a Great STEM Project
At first glance, this activity might look like a creative craft. But it is packed with meaningful STEM learning woven right into the fun.
Students will:
- Observe and record the present (scientific observation)
- Predict future changes (critical thinking)
- Explore how materials respond to moisture, air, and time (materials science)
- Design and build a protective container (engineering)
This project also supports social-emotional learning by encouraging reflection, goal setting, and self-awareness. And best of all? It does not feel like “work” to students. That is the secret sauce of a great end-of-year lesson.
Materials Needed for a Classroom Time Capsule
Here is everything you will need to build and seal a student time capsule. Most of these materials are easy to source at a hardware store or online.
For the Capsule:
- 30 cm length of 50mm PVC pipe (wide enough to hold folded papers)
- 2 PVC end caps
- Ziplock bags or plastic bags in various sizes (to protect the contents)
- 4.5 cm wide PVC tape or duct tape
- PVC glue (to permanently seal the end caps)
- Optional: silica gel packets (like the ones found in vitamin bottles) to absorb any residual moisture
We chose a waterproof PVC pipe so student memories stay safe, dry, and protected underground.
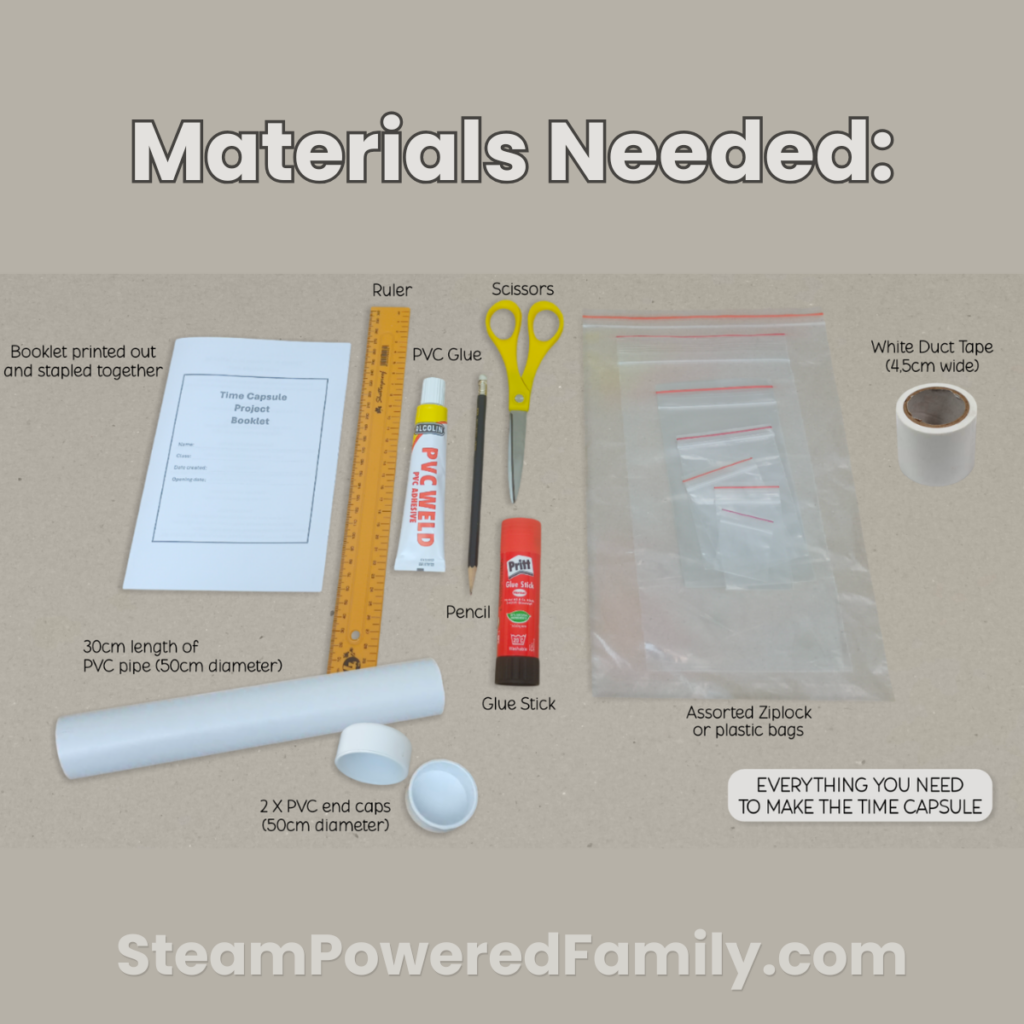
For Student Content:
- Printed time capsule booklet (one per student)
- Pens, pencils, and crayons
- Glue sticks
- Photos, drawings, small keepsakes, and anything else students want to include
Safety Note
PVC glue and cutting tools should always be handled by an adult or under adult supervision. Make sure to work in a well-ventilated area when gluing the end caps, and use hand-safe tools when sawing PVC pipe to size.
Printing the Time Capsule Booklet
A little prep work before class will save you time once the lesson gets going. Here is how to get the booklet ready:
- Print page 1 (printing instructions) for the teacher only
- Print page 2 (capsule label and letter to future self template) for each student
- Print pages 3 through 6 (the booklet template) and staple them together for each student
Do not change the orientation of the “upside-down” pages unless your printer is not printing them correctly. They are set up that way on purpose, so the booklet folds and reads properly.
How to Create a Student Time Capsule
This activity works beautifully when split across 3 or 4 class lessons. Break it up in whatever way fits your schedule best. Every section of the lesson is also covered in the accompanying PowerPoint presentation.
Lesson 1: Introducing the Time Capsule
In this first lesson, students will:
- Discuss what a time capsule is
- Decide what they want to include in their capsule
- Write their name and class on the front of their booklet (dates will be added in Lesson 2)
Use this first lesson to spark discussion and get students excited about the project. Show them slide 10 of the PowerPoint presentation for inspiration. A student capsule might include:
- A selfie, a family photo, and a photo with a group of friends
- A drawing of their current life
- A letter to their future self
- A small keepsake, such as a ticket stub or piece of jewelry
- An artwork they are proud of
- An award they have received
Remind students that their capsule does not need to be perfect. It just needs to be meaningful. Let them know every item they plan to include must be brought to school for the next lesson.
Lesson 2: Writing a Letter to Your Future Self
Imagine opening a letter you wrote to yourself 5 or 10 years ago. That is exactly what makes this lesson so special.
Start by discussing with your students why letters to the future are so powerful, and why capturing who they are today really matters.
Step 1: Reflect on the Present
Go through the reflection prompts on Page 1 together. Students can use the back of their booklet (the Notes section) to jot down what stands out to them.
If they need a little extra inspiration, share the example letter to future self on slide 11 of the PowerPoint presentation. Then have students write their own letter. This step captures a snapshot of their current world.
Step 2: Make Predictions (Pages 2 and 3)
Now it is time to think like a future scientist. First, have students decide on a date when the capsule will be opened. It might be 5, 10, or even 15 years in the future.
Students will then answer the prediction prompts on pages 2 and 3. This step introduces prediction, a key scientific skill. How will the world look different in 10 years? Where will I be? What will I be doing? This is where imagination meets critical thinking.
Lesson 3: Protecting and Storing the Capsule
For this lesson, students will bring in all the items they have chosen for their time capsule.
Step 1: What Is Going Inside, and How Will You Protect It? (Pages 5 and 6)
This is where the materials science really shines. Use these discussion prompts:
- What is the difference between storing a capsule indoors vs. outdoors?
- How do moisture, air, and temperature affect different materials?
- Why can paper and photos be damaged by moisture and air?
- What are the best ways to protect each item?
- What do you predict will happen to certain items when the capsule is opened years from now?
This is also a natural moment to talk about real-world engineering problems. How do museums protect ancient documents? How do archaeologists preserve artifacts? Kids love these connections.
Step 2: Decorate the Capsule Label
Have students decorate the label from the template and stick it securely onto their PVC pipe capsule.
Step 3: Choose a Storage Location (Page 4)
Discuss the different places where a capsule could be stored, and how temperature and moisture might affect the items inside. Students will then draw their chosen storage spot on Page 4 of the booklet.
Remind the class: “We are protecting our memories from water, air, and damage so they can last into the future.”
Step 4: When and How to Open Your Time Capsule
Help students choose a meaningful future moment to open their capsule, such as:
- In 5, 10, or 15 years
- At graduation
- At the end of a school phase (such as moving from elementary to middle school)
Record the creation date and the opening date clearly on both the front of the booklet and the capsule label. The booklet holds all the important information about the capsule, so remind students to store it somewhere safe.
When the day finally arrives, opening the capsule becomes a powerful reflection experience. Students get to see their past selves in a whole new way.
Storing the Time Capsules
Students can store their capsules wherever they choose, or follow one of the two methods below. They will draw their chosen storage spot on Page 4 of their booklet.
In our project, we decided to bury the time capsule in a plant pot, wrapped in a plastic bag, and placed it in the garden.
Why We Chose PVC Pipe
We picked a PVC pipe with end caps for several practical reasons:
- It has a long lifespan (100+ years underground when properly sealed)
- It is inexpensive and easy to find
- It can be sealed into a watertight, airtight environment
- Unlike steel or iron, PVC does not rust, corrode, or degrade over time when exposed to soil, groundwater, or chemicals
- PVC end caps can be permanently glued with PVC glue, creating a complete moisture and insect barrier
If you are using silica gel packets, pop them inside the PVC pipe before sealing to absorb any leftover moisture.
Two Ways to Hide or Bury a Time Capsule
Option 1: The Living Memory Pot
Turn the capsule into a growing display.
- Add a layer of soil to an empty plant pot
- Place the sealed PVC capsule into the pot
- Cover the capsule completely with soil
- Plant a small succulent or cactus on top
- Add decorative stones to the surface
- Place a larger rock on top with a message such as “See you in 2036”
This creates a beautiful, living display that represents growth over time.
Option 2: Bury It in a Garden Bed
- Dig a hole deep enough to completely bury your capsule
- Place the sealed PVC capsule vertically or horizontally in the hole, depending on how you dug it
- Cover the capsule completely with soil
- Place a larger rock on top as a marker, with a message such as “See you in 2036”
That way, students will always know exactly where to find it when the opening day arrives.
STEM Connections in This Activity
This project naturally weaves together multiple STEM concepts:
Scientific Observation: Recording current life and environment
Change Over Time: Comparing the present to the future
Materials Science: Understanding preservation and decay
Engineering Design: Creating a protective container
Environmental Awareness: Considering how temperature and moisture affect materials
Extension Ideas
Want to take this project even further? Try one of these creative extensions:
- Create a digital time capsule using videos or slideshows
- Incorporate data charts predicting future trends
- Compare capsules opened from past years (great for a school-wide tradition)
- Add environmental observations such as temperature and moisture readings
- Turn the activity into a yearly classroom tradition so each group of students can look back on their predictions
- Try these simple no-prep pipe cleaner activities
Final Thoughts on the Last Day of School Time Capsule
The last day of school is one of those special moments. A mix of excitement, nostalgia, and change. This time capsule activity gives students a chance to pause, reflect, and capture exactly who they are right now, while also building real STEM skills along the way.
Whether you run it as a single class project or turn it into a school-wide tradition, this is the kind of lesson that sticks with students for years to come.
These DIY School Carnival Games are a great last week of school edition if you’re looking for more fun.
This activity is designed for middle school students around age 12, but it can be easily adapted for younger students by simplifying the reflection prompts and having them draw instead of write.
Time capsules can be sealed for as little as one year or as long as 10 to 15 years. Choose a meaningful opening date that fits your students’ educational journey, such as graduation or the end of a school phase.
Avoid food, liquids, batteries, and anything organic that can decompose or attract moisture. Stick with paper items, photos, and small non-perishable keepsakes that preserve well over time.
PVC pipe does not rust or corrode the way metal does, so it can safely protect contents for 100+ years when properly sealed underground.
Carefully saw off one of the end caps or cut the pipe with a hand saw. Always do this in a safe location with adult supervision.
Yes! It is a perfect low-stress, high-engagement project for the final days of the school year. It keeps students focused on something meaningful while celebrating how much they have grown.