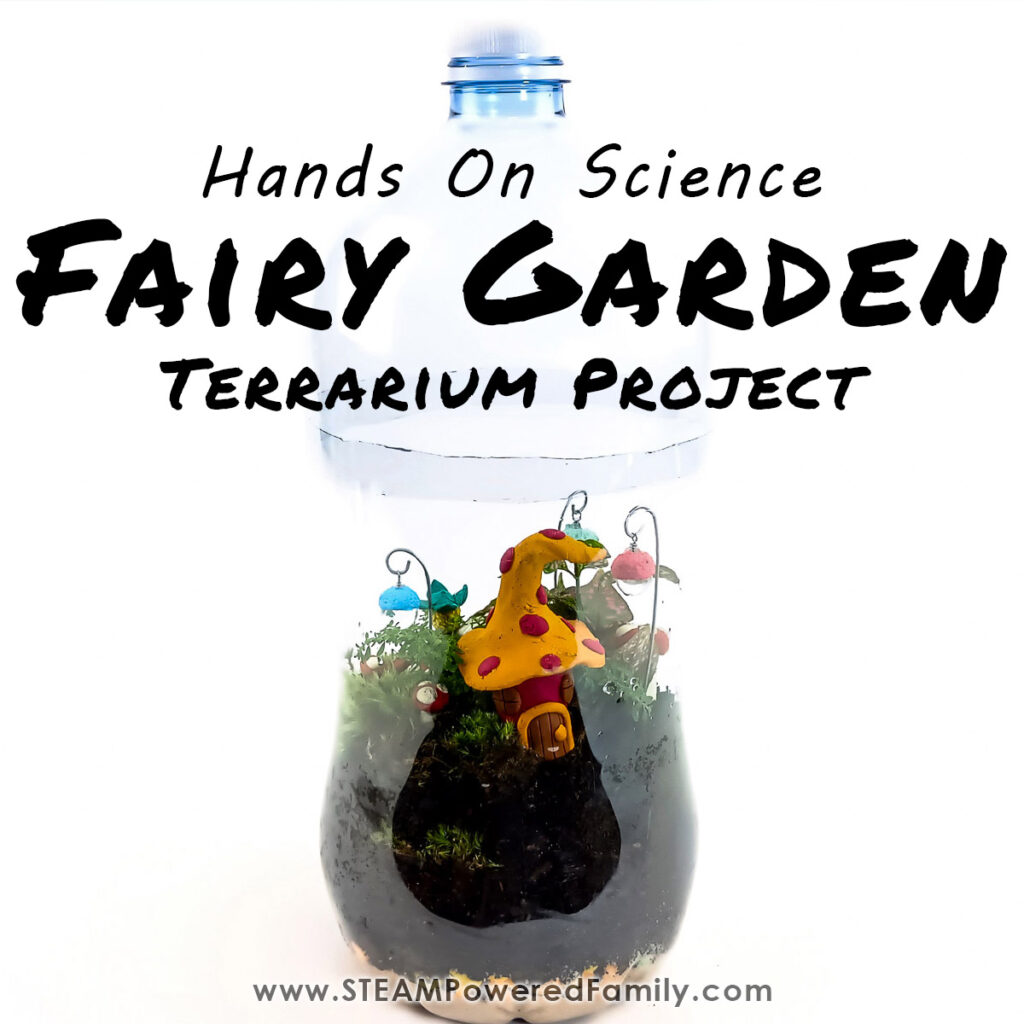
Magical Fairy Garden Terrarium Project
Today we are building a magical little world that has some powerful science lessons. In this project we are creating a Fairy Garden Terrarium. Homemade terrariums are a fantastic way to learn about plants, biology, the water cycle, ecosystems and more. This is a wonderful project to do year round to bring the magic of nature into a special miniature garden terrarium made by your kids.
How to Make a Terrarium with Kids
Table of Contents
Disclaimer: This article may contain commission, paid partnerships, or affiliate links. We independently review everything we recommend. When you buy through our links, we may earn a commission from qualifying purchases.
Have you ever heard of a terrarium? It’s like a little magical world inside a clear container. Do you know how we have an aquarium for fish? Well, a terrarium is like an aquarium, but instead of water and fish, it’s a unique home for plants!
Imagine having your very own garden inside a glass or plastic container. It’s like having a mini-forest or a tiny garden that you can hold in your hands. The container is transparent so that you can see everything inside. The container can be closed or open.
The Science of a Terrarium
A terrarium is a special place where plants can live and grow. It’s almost like their own little world. We create this unique environment using a container, some small pebbles, soil, activated charcoal, and small plants, especially for terrariums. The charcoal keeps the Terrarium fresh, and the pebbles allow the plants’ roots to drain. We can also add decorations like small figurines and other accessories, depending on the theme chosen, to make it extra special.
The container keeps the plants safe and warm, just like our homes protect us. It’s like a house for the plants. The plants get sunlight through the transparent container to make food. They also need water, just like we do.
The cool thing about a terrarium is that it creates its water cycle! Do you know how we have rain and clouds? Well, inside the Terrarium, the water evaporates from the plants and soil, then condenses on the walls of the container. It’s like having rain and clouds right inside the Terrarium! This water then returns to the plants and soil so they can use it again.
Taking care of a terrarium is like being a plant scientist. We can watch the plants grow and change over time. We can learn about how they need light and water to survive.
It’s a fun and hands-on way to learn about nature, evaporation, condensation, precipitation (also known as the water cycle), and ecosystems.
Learn more about the Water Cycle with this activity.
The Terrarium you will make in this activity is a closed terrarium. It has a lid that remains closed. Terrariums can also be open. In other words, they do not have a cover.
So, let’s get on with this exciting project and make our own Magical Fairy Garden Terrarium!
How to Make a Magical Fairy Garden Terrarium
Materials & Tools for the Terrarium
Scissors
Hobby knife
Small coloured pebbles, crystals or gravel
A plastic bottle (pop bottles, water bottles, even ornament spheres can all work well!)
Large spoon
Play sand or colored sand
Potting soil
Activated charcoal
Moss (also known as Sheet Mosses)
A Spray bottle for watering your Terrarium
Two to three different Terrarium plants (the size of your bottle and plants will determine how many plants you will need. I bought three but only used two). See below for ideas on different plants you can use.
Fairy accessories and decorations for your terrarium. These can be store bought or we have directions on how to make your own terrarium accessories.
Magical Fairy Garden Terrarium STEM DIY Activity Video
Watch our video tutorial demonstrating how to make a Fairy Garden Terrarium. You can also find this video with closed captioning available on the STEAM Powered Family YouTube Channel.
Making the Terrarium
Getting the bottle ready
Get a plastic bottle, pebbles, sand, activated charcoal, potting soil, moss, a spoon, and the plants you bought. I chose a (large) 5-liter plastic bottle.
Using a permanent marker, make a mark three-quarters up from the bottom of the bottle (20cm for my big bottle).
Turn the bottle sideways and make a line around the bottle. Cut the bottle in two on this line. (This is the same way we prepared the bottle for our homemade Rain Gauge!)
On most plastic bottles, there are lines or indents. Choose a line that already exists and use it as your cutting line to make it easier. Cut the bottle into two pieces using a hobby knife or scissors.
You may need the help of an adult as the hobby knife is very sharp!
When placing the top of the bottle back onto the bottom, you need to squeeze it gently to get it to fit.
Take the cap or lid off the bottle to do this as it allows air into the bottle, making this easier to do.
Wash and hand dry both pieces of the bottle well.
Let’s make a garden in the bottle
First, pour a thin layer of play sand into the bottom of the container. You can use play sand, or for an extra magical touch use colored sand.
Place a layer of whatever pebbles you have onto the sand. The pebbles should cover the sand completely. Another magical alternative would be to use glass pebbles or crystals. These bottom two layers are your drainage layers.
Sprinkle a layer of activated charcoal. This helps prevent mould from forming.
Next, fill the bottle with potting soil to at least halfway up the bottle.
The soil does not have to be level. You can make a little hill. Be creative! This is your very own little ecosystem you are creating.
Make holes for your plants and gently push them into the soil.
PRO TIP! Struggling to get the plants out of their pots? Gently squeeze the flowerpot to get the plant out. You don’t want to destroy the root system!
Ensure that the plants are not touching the sides of the bottle.
Using the moss, cover all the soil in the Terrarium. Gently push the moss into the soil.
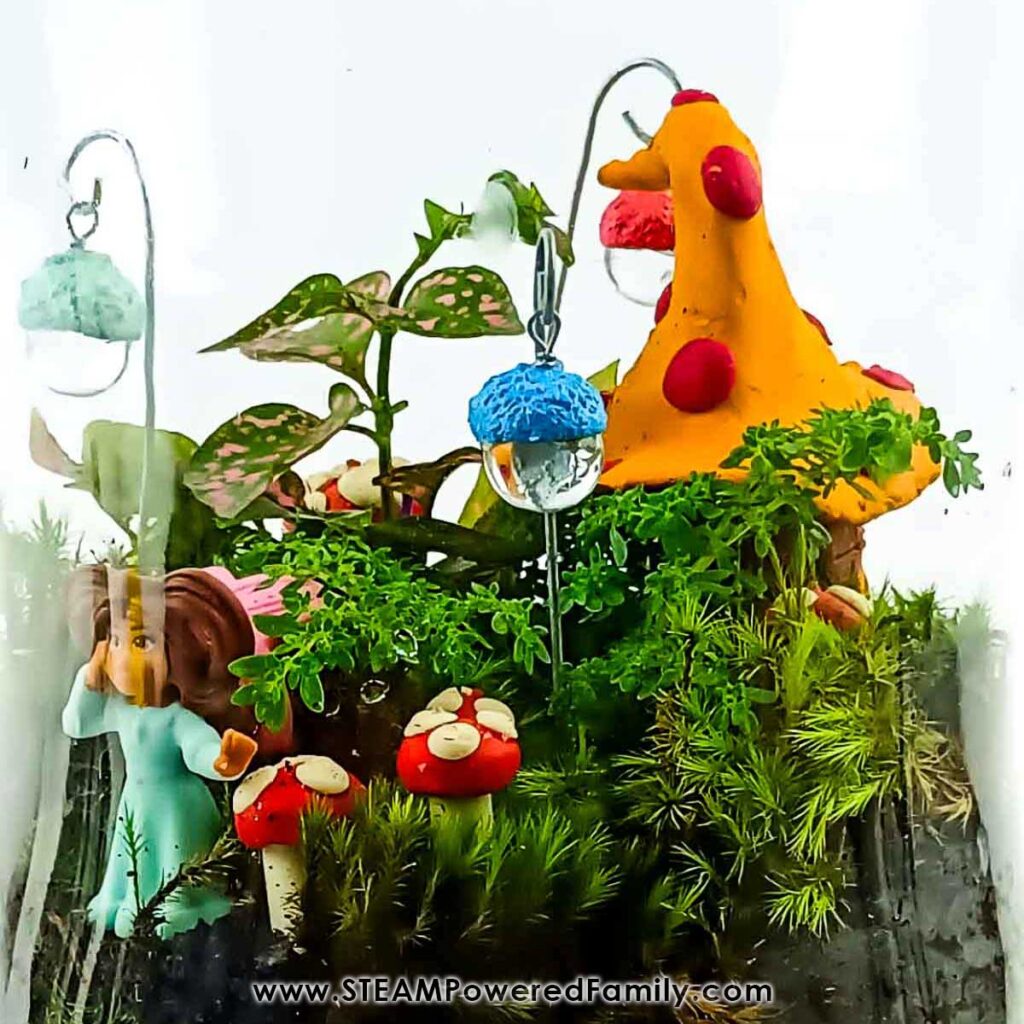
Terrarium Ideas for Finishing
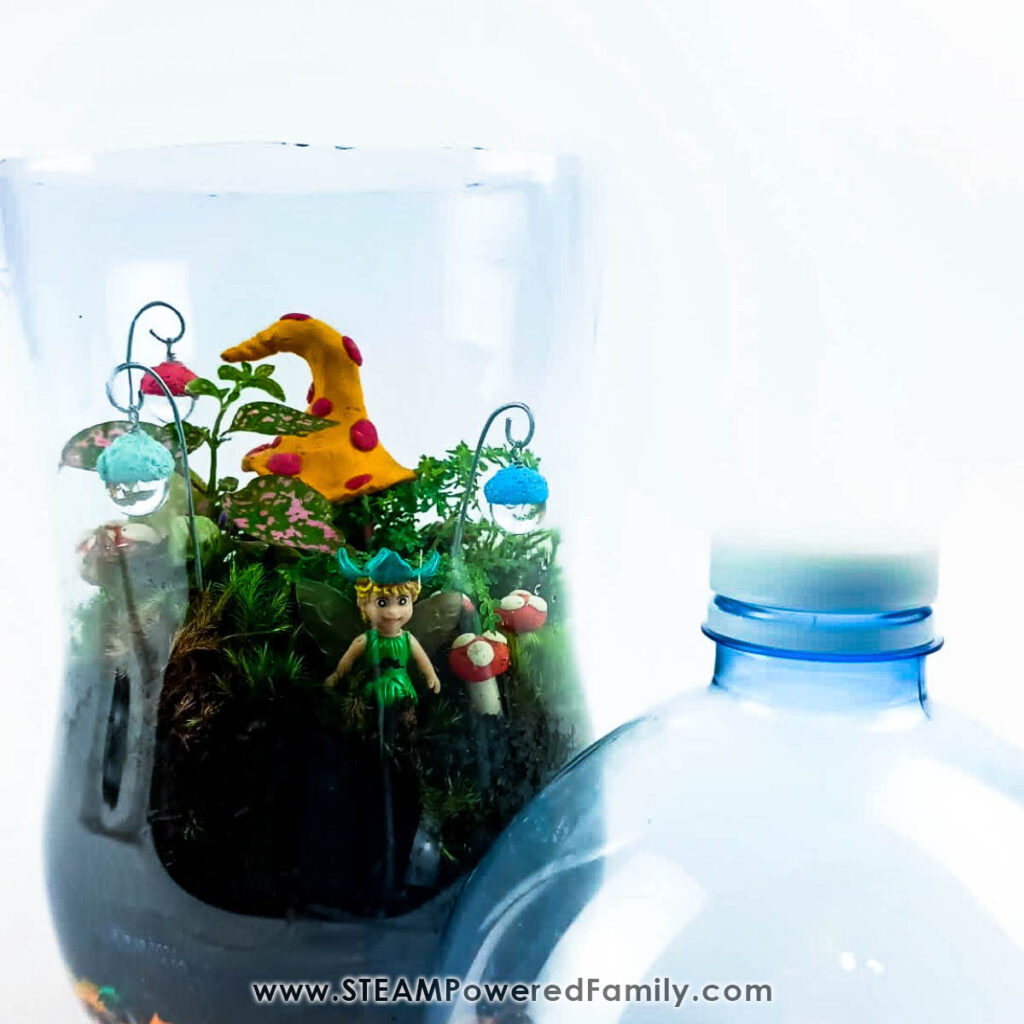
Get all your accessories and decorations together and place them wherever you want in the Terrarium. You can use little figurines, Lego creations, or anything else you want to decorate your terrarium. Just make sure it will hold up to being in the soil and in a damp ecosystem.
If you don’t have any accessories get creative and make your own! See the next section for how to make your own decorative terrarium accessories.
Making the Fairy Garden Accessories
If you don’t want to make your own accessories, skip this step and go right to assembling your terrarium. Instead of making your own terrarium décor, you can use little figurines, Lego creations, or anything else you want to decorate your terrarium. Just make sure it will hold up to being in the soil and in a damp ecosystem.
Materials and Supplies
Thick wire
Thin wire
Marbles
Pliers
Plasticized modelling clay or any modelling clay that can be baked (in any colours)*
Craft knife
*IMPORTANT NOTES: Do not use air-dry clay or play dough as the moisture in the Terrarium will cause the clay to get mouldy! If you use modelling clay that requires baking, ensure you bake your creations following the package directions before adding them to your terrarium.
Making the Garden Lights
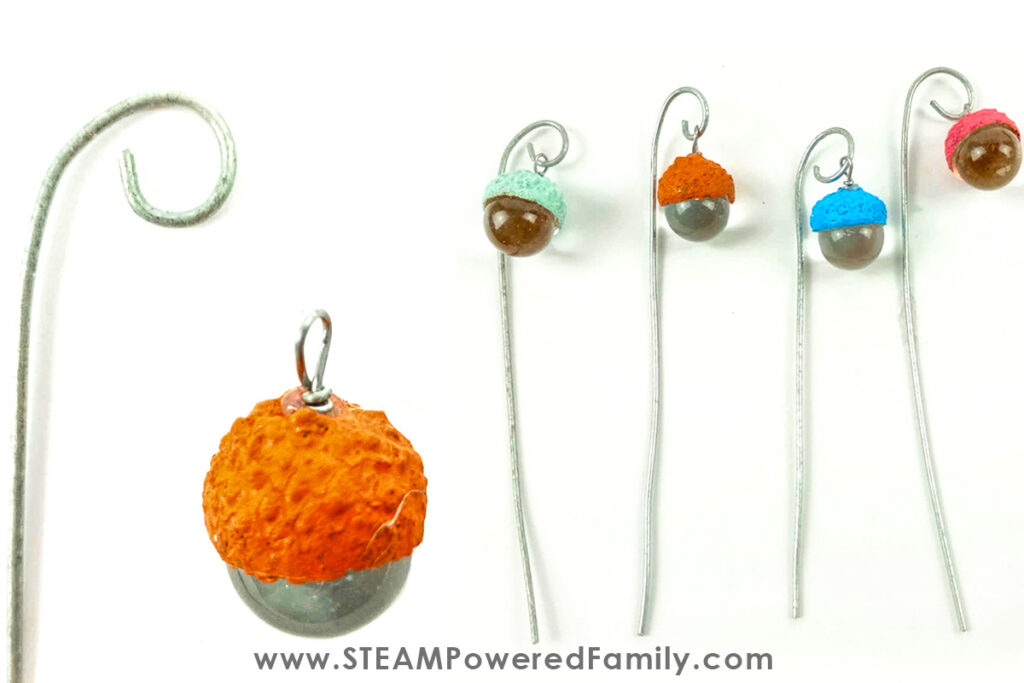
- Cut a piece of thick wire 15cm in length.
- Bend the top of the wire with a pliers into a loop (as shown in the picture). This is the stand that will hold up the fairy lights.
- Cut a piece of thin wire 15cm in length.
- Make a loop that will fit over the hook on the stand.
- Using the clay, place a thick layer over the top of the marble and texture it to look like an acorn. Or, if you have acorns in your area, you can use the acorn caps from your tree and glue them into place.
- Press the thin wire loop into the top of the acorn so you can hang it on the stand.
How to Make Fairy Mushrooms
- Cut a piece of thick wire 10cm in length.
- Roll sausages of clay in different sizes for the stems (as shown in the picture).
- Make a few balls of clay in different sizes for the mushroom tops.
- Push each ball flat (not too thin) and shape over a marble.
- Roll tiny little balls for the dots. Push each ball flat and place onto the tops.
- Push the stem into the underside of the mushroom.
- Push the wire through the stem and the top.
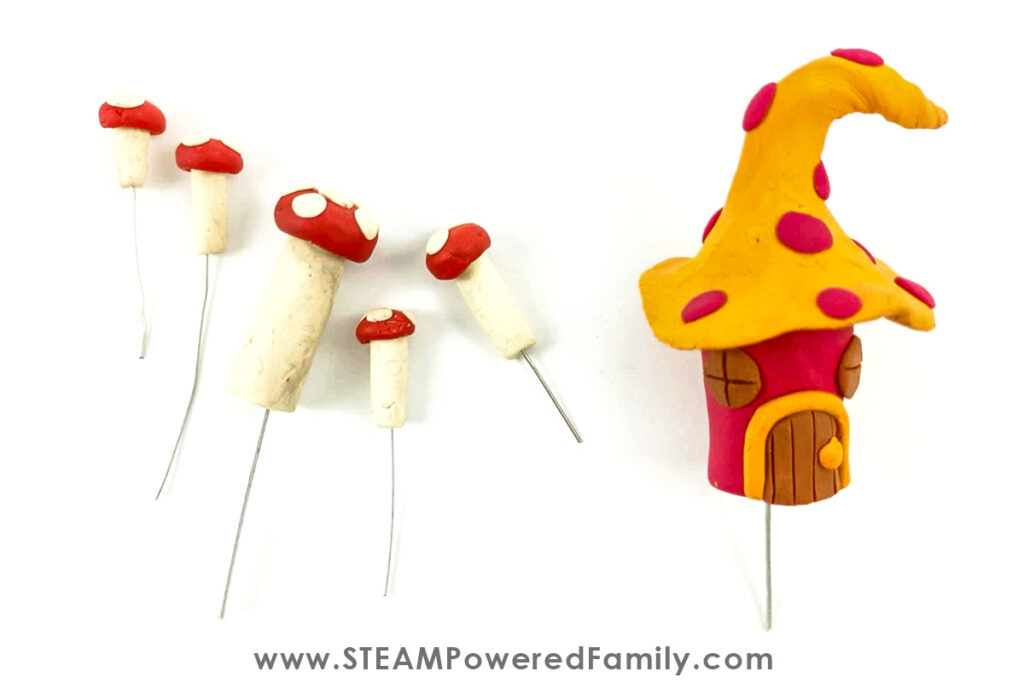
Making the Fairy House
- Using any colours of clay, roll a thick sausage about 2.5cm in diameter and 5 cm high.
- Roll a ball of clay the size of a table tennis ball. Shape the ball into an egg and pull the top up to make the curly bit on the end.
- Using your fingers, push a hole inwards, as wide as the sausage you just made.
- Shape the edges into waves all the way around.
- Roll tiny little balls for the dots, the windows and the door handle. Push each ball flat and place onto the rooftop. Keep the other dots aside.
- Join the sausage to the roof.
- Stick two dots onto the sausage for windows and using a sharp object, make a cross in the clay.
- Now cut a door shape and using a sharp object, make a lines in the clay for a wood finish.
- Roll a thin sausage to make a door frame and put it around the door.
- Add a small door handle from the small balls you flattened and place it on the door.
- Push a piece of thick wire that is a length of about 15cm up through the sausage and into the roof.
This is a great way for creative and artist kids to really put their own personal touch on this project.
Caring for your Terrarium
Get your spray bottle and fill it with water. Always water your Terrarium with the spray bottle. Never pour water into the bottle, as too much water will kill the plants.
If your Terrarium has a lid, keep the container uncovered until the leaves are completely dry, then close it.
Make sure you place your terrarium fairy garden in a well-lit area indoors.
Keep it away from direct sunlight and heaters because they will get too hot and dry out. Indirect light is best.
Watering Tips for a Terrarium
The amount of water you give the plants is slightly different for different plants. Always check the soil for moisture before watering.
If you decide to make open Terrariums, where they have an open top with no lid, water the plants as they need with a spray bottle. It will require more watering than a terrarium that is closed and creating it’s own water cycle..
Terrariums with a closed lid may not need watering for several months as the plants will recycle the moisture.
If the soil in your closed Terrarium looks dry or you notice the plants starting to wilt, water them with a mist spray, wait for the leaves to dry, then close the lid again.
You’ll know that the Terrarium contains the right amount of water if the sides and top are misty with water droplets in bright light.
If there is no moisture along the sides, then you need to add some more water.
If the sides are very wet with condensation and it is hard to see the plants, then there’s too much water and high humidity in your closed container terrarium. Remove the top for a few hours and allow some excess moisture to evaporate.
Have fun tending to your miniature fairy world terrarium and watching it grow!
What Terrarium Plants Are Best?
When choosing plants for a terrarium, it’s important to consider plant types that are tough, easy to care for, and suitable for the enclosed environment of a terrarium. Here are some plant options that you can use for terrariums:
African violet
Artillery Fern
False Aralia
Jade Plant
Miniature Peperomia
Nerve Plant
Oxalis
Pink Polka Dot Plant
Prayer Plant
Button Ferns
Mini Peace Lilies
Small Philodendrons
Spider Plant
Strawberry Begonia
Swedish Ivy
Succulents and Cactus Plants (Some succulents can be suitable for terrariums as they are low-maintenance and can tolerate dry conditions, however they need special soil.)
You can also try growing plants from seeds and cuttings. A cutting is a piece cut from a fully grown plant. Not all plants allow for cuttings.
Tips on Selecting Plants for your Terrarium
Some things to consider when selecting your plants:
- Open and closed terrariums require different types of plants.
- Choosing plants with similar light and moisture requirements is important to ensure they survive together in the Terrarium.
- Always research the specific care needs of the plants they choose, including watering, light levels, and potential growth patterns.
- You may need to trim the leaves of some of the plants you have chosen as they should not touch the sides of the container, as this causes water to always sit on the leaves.
Remember, part of the joy of creating a terrarium is experimenting and observing how different plants grow and interact within the enclosed environment.
More Terrarium Ideas and Themes
We made a Fairy Garden Terrarium, but why not let your kids stretch those creativity skills and come up with a DIY terrarium idea that they love. Their inventive ideas may surprise you!
Here are some ideas for inspiration.
Dinosaur Terrarium
Step into the prehistoric era by adding small toy dinosaurs, rocks, and dinosaur-themed decorations. Choose plants with interesting textures and shapes to create a Jurassic landscape within the Terrarium.
Desert Terrarium
Explore the beauty of desert plants by including succulents and cacti in the Terrarium. Kids can decorate with sand, small rocks, and desert-themed figurines to mimic the arid environment.
Beach Terrarium
Bring a beachy vibe to the Terrarium by incorporating tiny seashells, pebbles, and decorative sand. Choose plants that resemble beach grass or coastal flowers to create a miniature seaside landscape.
Tropical Rainforest Terrarium
Think about the diverse ecosystem of tropical rainforests. Use vibrant and leafy plants like ferns, bromeliads, mosses, and small animal figurines like monkeys or toucans.
Starry Night Terrarium
Create a nighttime-themed terrarium with dark-colored sand or soil as the base. Add glow-in-the-dark stars and accessories. Choose plants with dark-coloured leaves to enhance the nighttime atmosphere.
Colorful Terrarium
Explore your creativity by selecting plants with different colors and textures. Mix and match vibrant flowers and foliage with different colours and decorative elements to create a bright and fun terrarium.
Insect Terrarium
Combine nature and education by focusing on insects and their habitats. You can include small sticks, leaves, and hollow logs to create hiding spots for toy insects. Choose plants that attract butterflies or ladybugs to encourage interactions with these fascinating creatures.
Final Tip: Remember to choose appropriate plants for your selected themes and provide them with the necessary care and soils to ensure they stay healthy. If you are not sure about which plants you can and can’t use, Google it or go to your nearest nursery or greenhouse and ask them for help. They will love helping teach your kids about plants!
Extension Ideas
Get a piece of paper and observe and document daily changes within your terrariums. This way, you will learn about the water cycle, plant growth, and the importance of a balanced ecosystem. Always ask questions, make observations, and discuss your findings with your family, classmates, or even your teacher.
If you are done with your terrarium, don’t throw out that bottle! Flip the lid around and you have a Rain Gauge and can continue using that bottle for even more learning.
Love Fairies? Make a beautiful Fairy Worry Jar.
This activity is fun and creative and teaches kids about different ecosystems and the importance of caring for living things in their very first terrarium.