Easter Crafts for Kids with Circuits
Level up your Easter crafts! This year skip the standard Easter craft ideas, and build something that sparkles! This year, make your Easter Craft a STEM Craft by building a paper circuit that lights up an Easter Bunny Globe. This circuit craft makes an amazing alternative to the standard Easter Basket project. Plus it is filled with Easter Eggs candy, for a yummy treat, making this a wonderful Easter Craft idea for kids to keep for themselves or as a special Easter gift.
Easter Bunny Crafts that Light up!
Table of Contents

Disclaimer: This article may contain commission, paid partnerships, or affiliate links. We independently review everything we recommend. When you buy through our links, we may earn a commission from qualifying purchases.
Add a Paper Circuit to an Easter Jar to Electrify Your Project!
Every year we look for unique DIY Easter crafts we can do with the kids. So many of the projects are a little too simple, a little too boring, and lack the excitement we want from our projects. When we craft we love to add concepts from our STEM projects and turn them into STEAM projects. So this year we created an Easter craft with a STEM twist that is perfect for older kids.
How did we do it? We created a STEM craft that incorporates circuits to light up your Easter! This creation is perfect as a table centerpiece, as a special keepsake for students, or as a special gift for kids to give someone they love.
Adding electronics to a craft is a fun way to take it to the next level. Your project can really shine when lights are added! Learning how to make a paper circuit is easy and a fantastic classroom project. Students learn the basics of electricity and how circuits work.
Building paper circuits helps upper elementary students apply STEAM concepts in a fun way. In addition to being educational, they bring crafts to life and create that WOW factor that so many older kids and teens crave. Designing and building this project helps students learn how to think outside the box and strengthen “perseverance muscles” and critical thinking skills.
How To Make STEM Easter Crafts with Easy Circuit Project
This Easter Craft is perfect for older kids, teens and adults.
Tools, Supplies, and Equipment
Easter Wood Cutouts – this could be craft eggs, little bunnies, carrots, sheep, etc.
Plastic Fillable Ball
Clear Mason Jars 16oz
Copper Tape (¼ inch, must be conductive)
Coin Cell Batteries
5mm LED Lights
Pencil
Scissors
Drill
Hole punch
Decorative Easter ribbon
Decorative string or yarn
Paper
Clear Tape
Jelly beans or Easter egg candies
Easter grass or make your own by shredding tissue paper
Liquid glue or Mod Podge
Paintbrush
Craft knife
Assorted Paint pens or markers
Directions
First, I highly recommend watching the video. It makes it so much easier to follow all the steps to ensure success. If you can’t see the video, your system settings are blocking our feed. Instead hop over to the STEAM Powered Family YouTube Channel to watch.
Preparation
Using paint markers, color four miniature wooden ornaments. Another alternative, if you are feeling adventurous, would be to make your own figurines out of salt dough or bioplastics like milk plastic.
Cut enough Easter grass (¼ – ½ inch size) to cover the top of the lid. You want to make enough to form a type of wreath or nest around the center.
Building the Paper Circuit – Part 1
Trace around the perimeter of the jar’s lid with a pencil onto an 8.5 x 11-inch sheet of paper to make a template. Fold the paper in half (hamburger style). Cut out the two circles. Trim the paper circle that goes on the underside of the lid to get a proper fit.
Attach one circle to the top of the lid using liquid glue and a paintbrush. Repeat for the circle that attaches to the underside of the lid. Set aside to dry.
When the lid is completely dry, drill a hole approximately 1 inch from the perimeter of the lid’s top. This should be done by an adult and may require an assistant to hold the lid steady.
Pro Tip for Teachers! If you are doing this project as a class, you can predrill the holes in the lids. Then have students cut out the circles, glue them on, then use a small stick to poke holes through the paper in line with the predrilled holes.
Building the Paper Circuit – Part 2
Determine which side of the battery is positive and which is negative. Look for the symbols on the battery.
Check the LED to see which leg is longer. The longer leg is “positive” – mark it with a permanent marker to remember which side is which.
Cut 3 2-inch strips of ¼ inch copper tape. On the paper circle on the underside of the lid, place half of one copper strip from #1 to #2, leaving the second half unattached to anything for now.
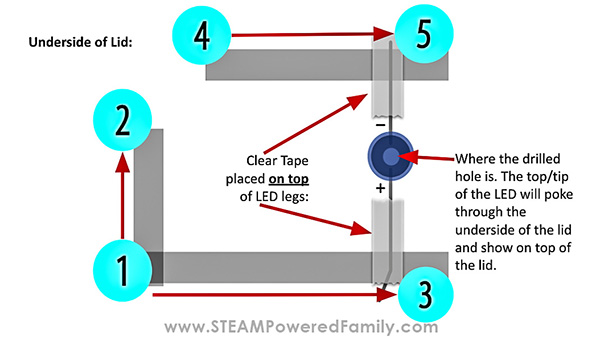
Place a second piece of copper tape from #1 to #3.
Place the third piece of copper tape from #4 to #5.
Maintaining the positive and negative positions of the LED legs as shown, invert the LED so that its head pokes halfway through the top of the lid.
Before permanently placing the LED through the top side of the lid, add hot glue to insulate the legs from the metal lid, helping to ensure the LED lights up. If the LED legs touch the metal, it will break the circuit and the LED will not light up.
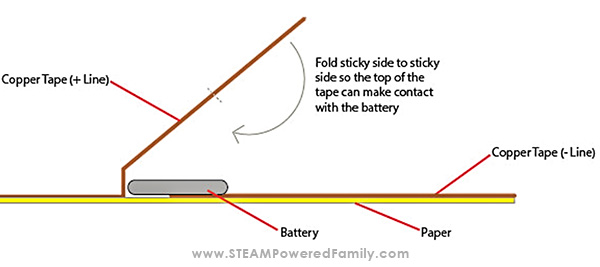
With 2 pieces of clear tape, attach the battery onto the designated spot.
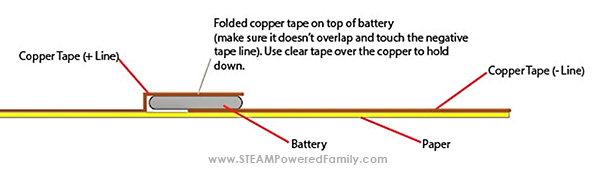
BEFORE attaching the remaining half of the copper tape onto the top of the battery, fold about ¼ inch of copper tape under, sticky side to sticky side as shown.
Making the Lid
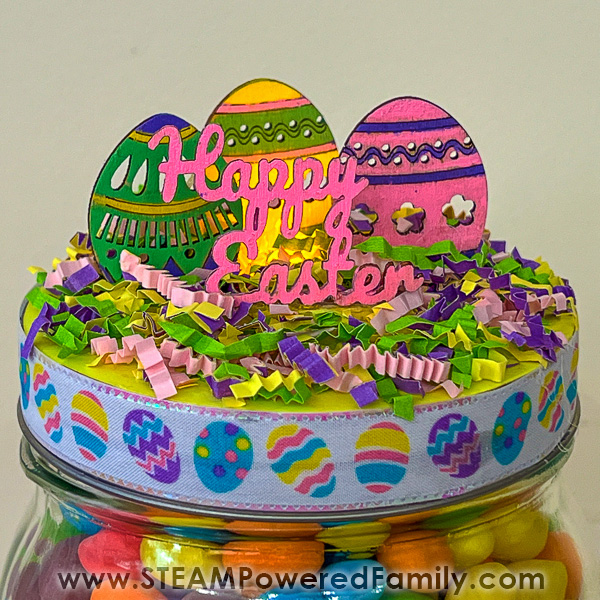
Apply a dot of hot glue onto the side of the lid. Attach the Easter decoration ribbon. Add a second dot of hot glue once the ribbon is wrapped all the way around the lid.
Attach each wooden ornament to the top of the lid with hot glue. The bottoms of the ornaments can be trimmed with scissors to provide a greater surface area for the glue to adhere to.
Finishing Touches on Candy Jar
Apply liquid glue/Mod Podge to the top of the lid with a paintbrush. Immediately add the shredded Easter grass to the lid top. Press firmly in place.
Insert 2 4-inch lengths of string into the holder on the side of the ornament globe.
Apply hot glue to the backs of the wooden ornaments.
Caution: Carefully press string into the hot glue with the opposite end of the paintbrush or other readily available tool to avoid burning yourself.
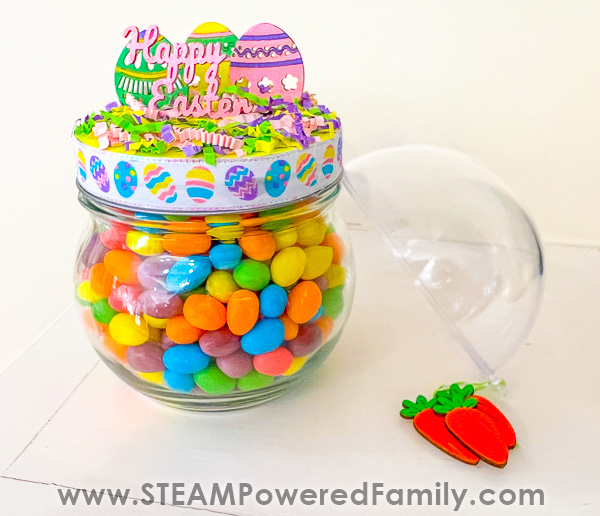
Fill the jar with jelly beans, attach the lid, and then place the plastic dome on top of the lid. The dome should overlap the lid by about ¼”.
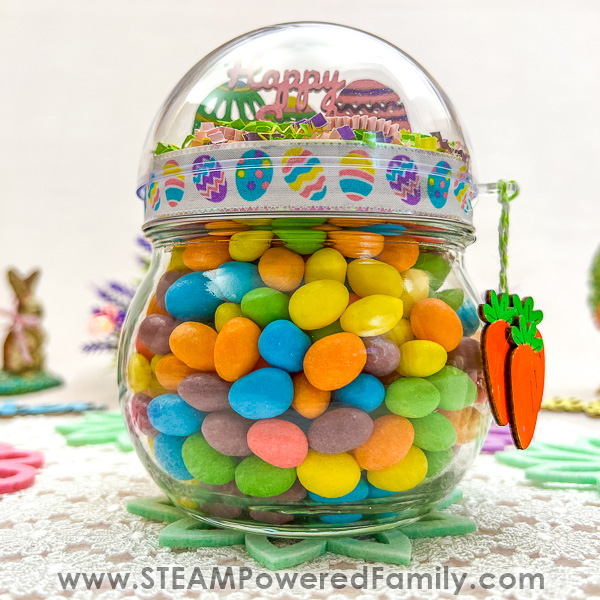
Your Easter Craft is now perfect for your Easter table as a special décor piece that people can interact with, and your kids can proudly show off around the dinner table. Don’t forget to dim the lights to see it lit up!
The Science of Circuits
Electricity is a form of energy. Electrical energy flows through a conductor, such as copper conductive tape. A conductor is an object that allows electricity to flow through it.
A battery is one type of energy source. There’s chemical energy inside of a battery that can be turned into electrical energy.
An LED light bulb takes electrical energy and turns it into light energy. The legs of an LED are wires. Wire is a conductor of electricity through which electricity can flow through. An insulator, such as hot glue, does not allow the flow of electricity through it. Another example of an insulator is plastic.
To get electricity to light a bulb, it must flow around a complete path or circuit. The battery provides the power (energy) and pushes an electric current along the conductive copper tape, LED wires, and through the bulb, lighting it up. If an electric circuit is broken, the current stops flowing and the light goes out. In paper circuits, the path can be broken, for example, if the copper conductive tape has not adhered flatly to the paper, (flatten wrinkled foil by rubbing and pressing down on it with your finger), the LED legs are not in contact with the conductive tape, or the LED is in reverse. In this case, flip your battery over to reverse the + and – terminals.
Troubleshooting Tips
Ensure the battery is connected by ensuring the copper tape tab is touching the battery’s contact surface.
Be sure to press firmly on the intersection of two pieces of copper tape. When overlapping the conductive tape, use a large area of overlap to increase the strength of the connection
Ensure there are no “cracks” in the copper tape that’s been placed onto the paper.
Ensure the legs of the LED are not in contact with the metal of the lid. This will interrupt the circuit.
Conductive tape is one of the easiest ways to get started creating a paper circuit. Peel off the paper backing and press down where you want your circuit to go!
Have a blast creating your special, light up, Easter crafts this year!
MORE STEM PROJECTS