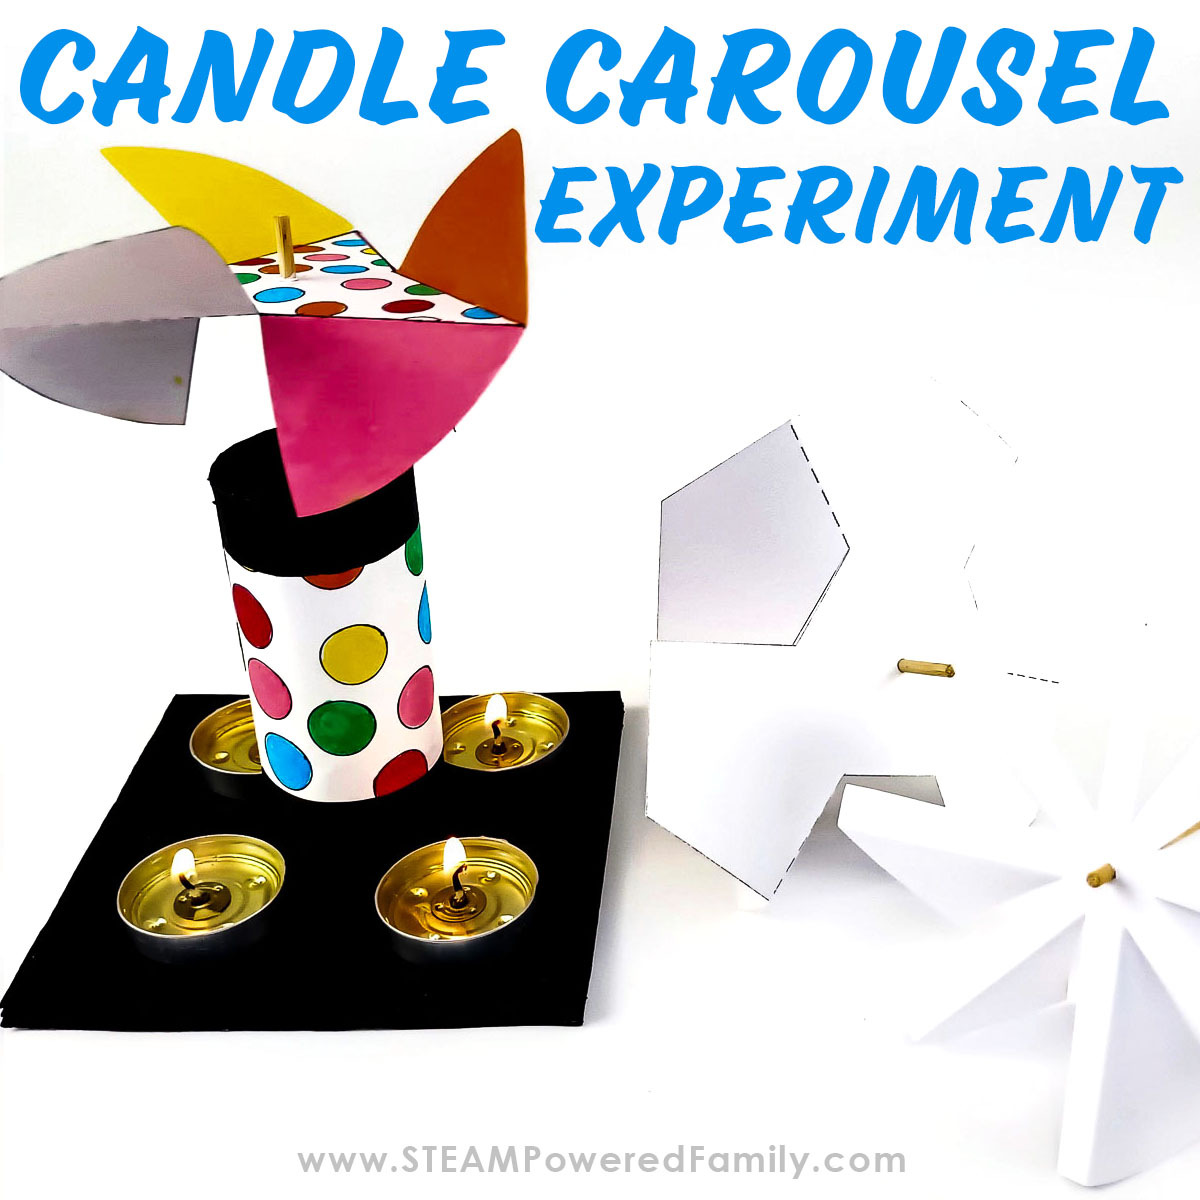
Candle Carousel Experiment
The Carousel is a popular amusement park ride that has been enjoyed by many generations. The rides are quite simple, you chose your favorite animal or horse, climb up on its back, and enjoyed the thrill of moving up and down while the carousel turned around in a circular motion. In this experiment, we are building a Candle Carousel using simple materials. We will explore the science of aerodynamics, thermodynamics and physics as we learn how candles can make a paper rotor spin around, just like the carousel at the amusement park.
Candle Carousel Science Experiment
Disclaimer: This article may contain commission or affiliate links. As an Amazon Influencer I earn from qualifying purchases.
Not seeing our videos? Turn off any adblockers to ensure our video feed can be seen. Or visit our YouTube channel to see if the video has been uploaded there. We are slowly uploading our archives. Thanks!
History of the Candle Carousel
First, let’s look at where the Candle Carousel originated.
It originated in the early 18th century in a famous mining town in Germany called Erzgebirge. At first, the Candle Carousel provided light in the depths of the very dark mines. As the years progressed, it became a traditional Christmas decoration in many households, not only in Germany but all over the world.
How Does a Candle Carousel Work?
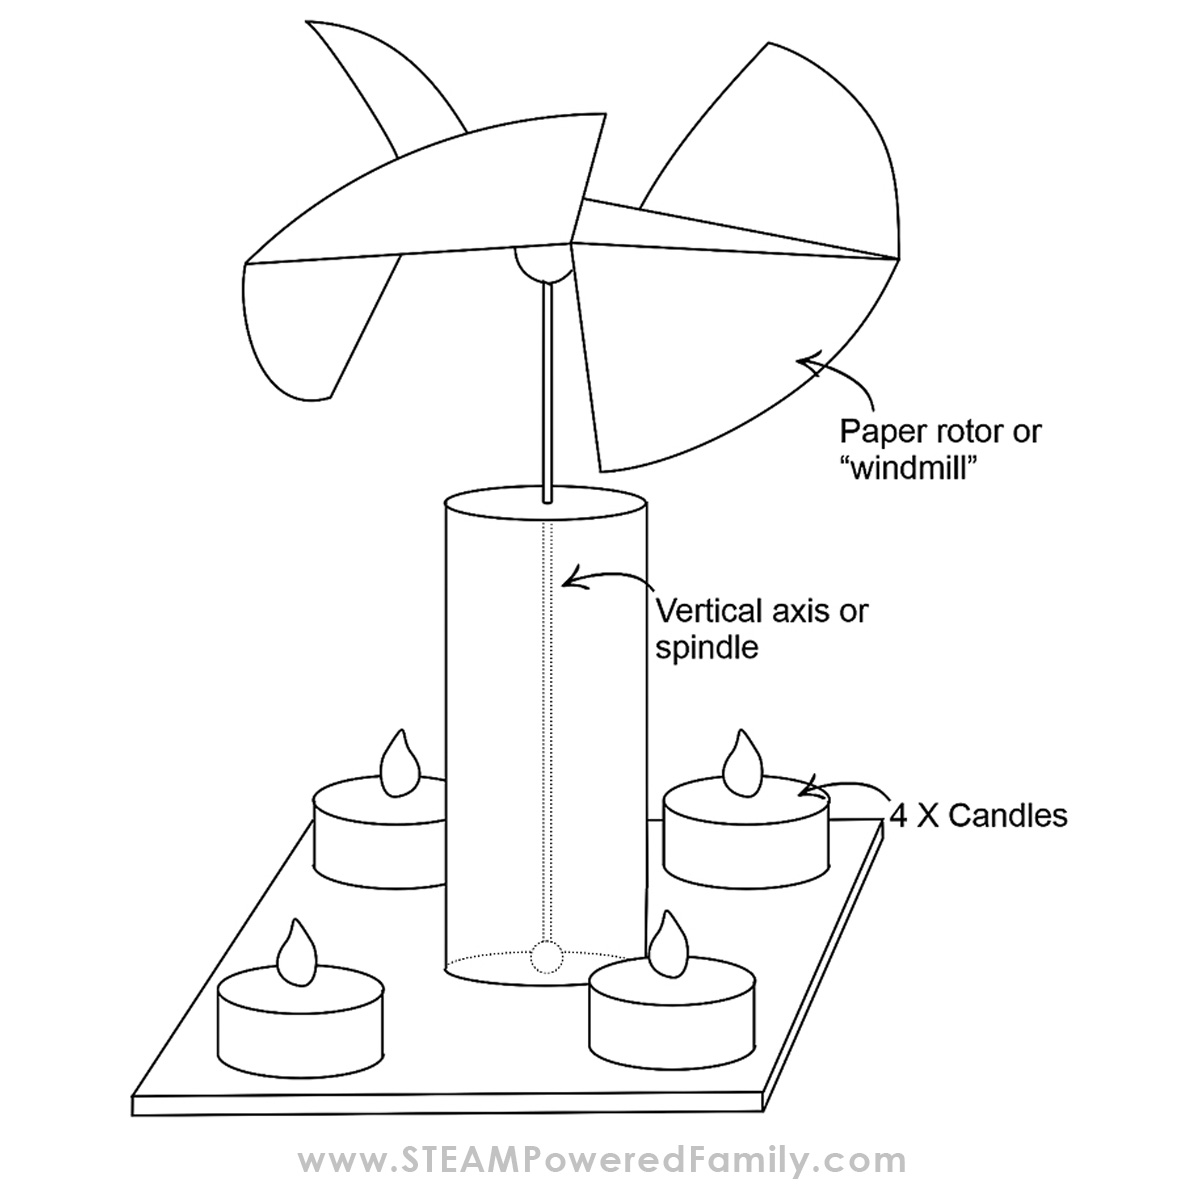
In this experiment, a paper rotor or blade sits on top of a vertical axis or spindle attached to a base on which candles can be strategically placed. The rotor can also be made of tin foil instead of paper if you prefer.
As the candles are lit, they create heat, causing the surrounding air to warm then rise. The paper rotor on the spindle catches this warm air as it moves and which causes it to spin.

Wind works in the same way. As warmer air in an area rises, cooler air rushes in to take its place. The movement of air is what we experience as wind as wind. This is known as wind power or wind energy.
Candle Carousel vs Wind Turbine
We use this energy to create electricity in a wind turbine. Wind turbine blades are designed aerodynamically, which means that scientific concepts like energy, force, lift, and drag all come together to make the turbine work effectively.
Dive into a Wind Turbine lesson with our printable lesson pack available in the STEAM Powered Family shop.
How does this all work?
Energy – The cool wind is the energy.
Force – As the air always moves, it pushes against the turbine blades.
Lift – This force causes the blades to spin or rotate, creating wind currents.
Drag – When the air pushes up against the blades, it is known as drag. Drag tries to slow the rotation down.
Force, lift, and drag all need to work together for the blades to rotate.
Applying the Science Principles to a Candle Carousel
When a candle is lit, it creates heat energy. This energy causes all the air around it to heat up and expand. As the air becomes warmer, it rises and creates wind currents. These wind currents then push against the paper rotor (force), causing the rotor to turn sideways (lift). Remember that hot air is always in motion.
Now we know the science, let’s build a simple Candle Carousel project and see these cool science principles come to life!
DIY Candle Carousel Tutorial Video
Do you enjoy watching tutorial videos? Sometimes watching the process is easier than reading the step by step instructions, so we have offered both options for this project! Watch the tutorial video below. If you can’t see the video, your adblockers or firewall are blocking our video feed. But don’t worry, you can also catch it on the STEAM Powered Family YouTube Channel where it also comes with closed captioning for those that need it.
How to Make a Candle Carousel
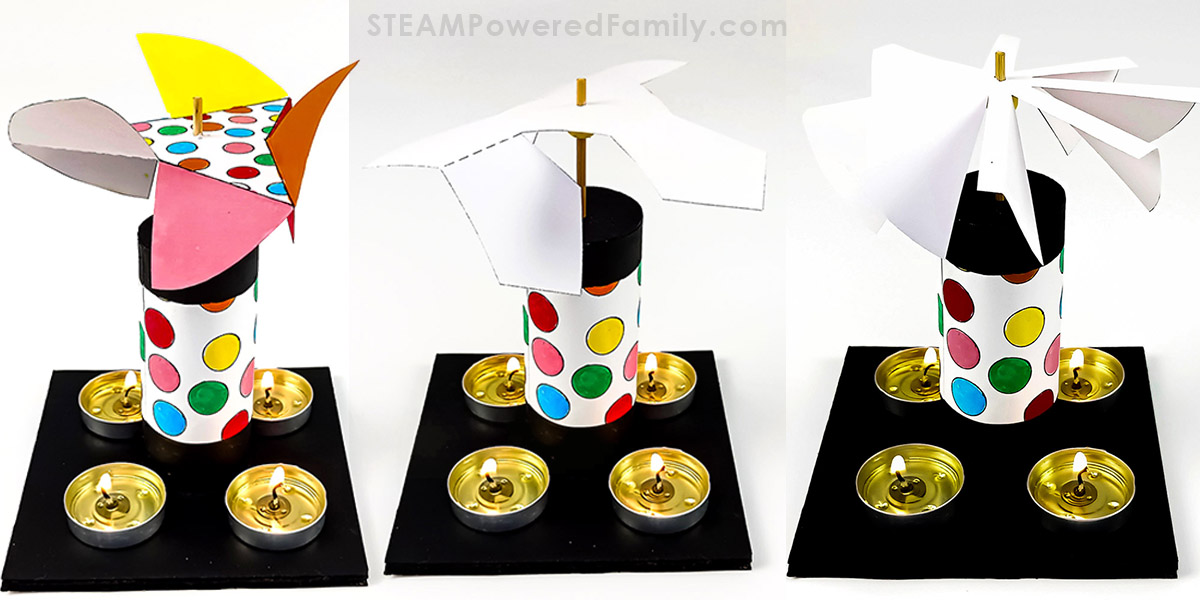
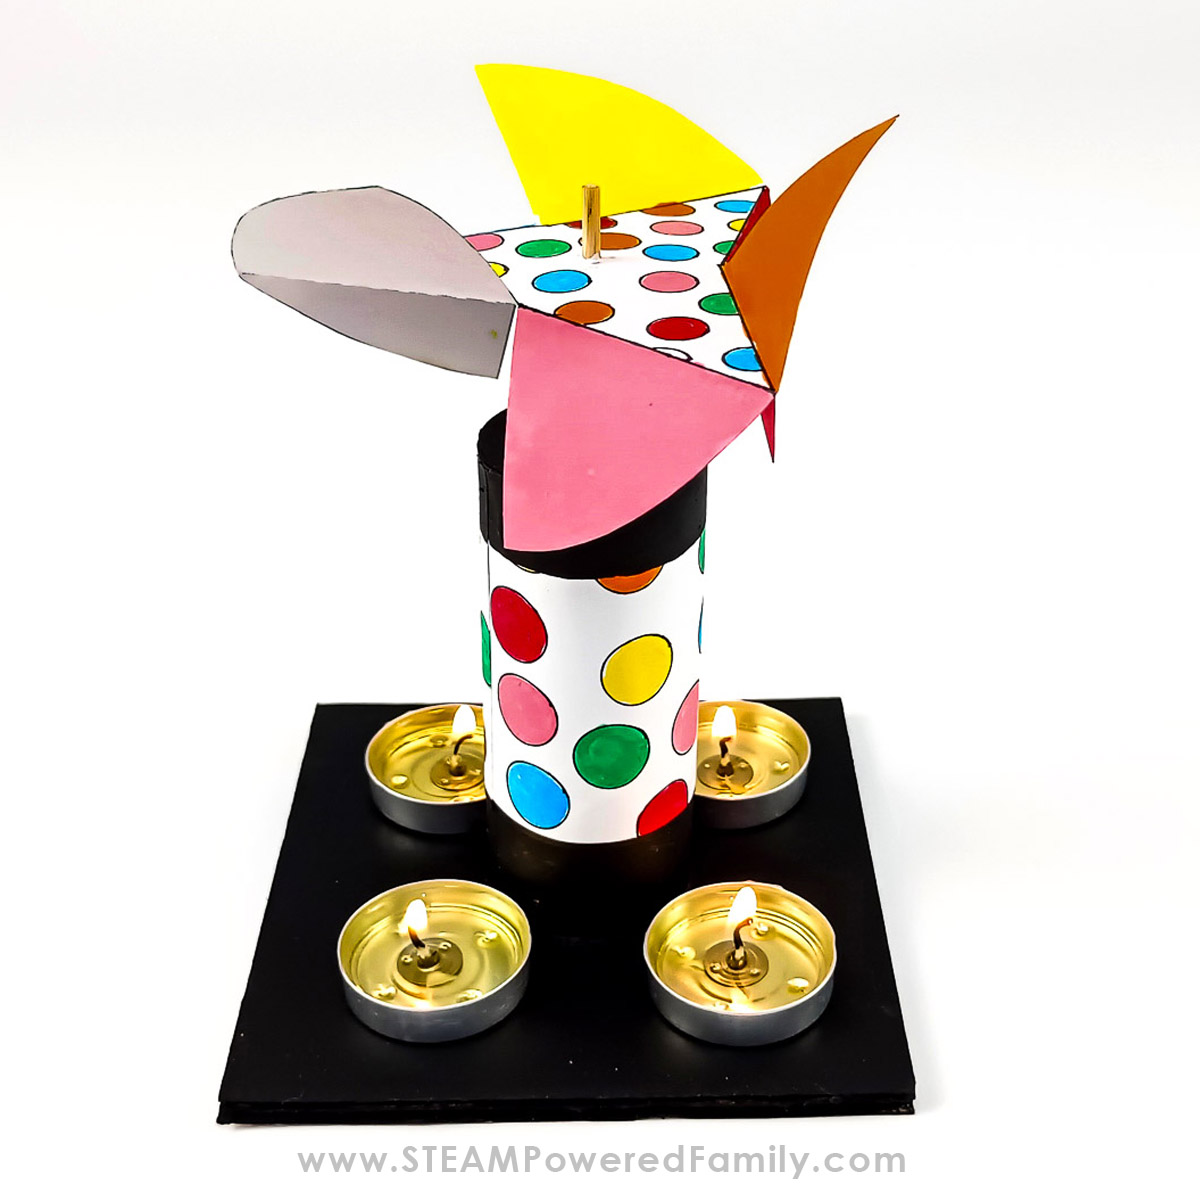
Here is an image of the Candle Carousel design we are building. We will actually be making 3 different types of rotor blades to see which design works the best. Making this a great project for the Science Fair.
Materials & Tools
Corrugated cardboard for the base
Empty cereal box or thick cardboard
4 tealight candles and a lighter
Glue gun
Glue stick or clear acid-free adhesive
Blu Tack
Ruler
Pencil or marker
Box cutter
Scissors
Thin wooden skewer
A toilet roll tube
4 small beads
Plastic push pin
Sandpaper
Markers (for decorating your Carousel)
Screw or a scoring tool
Plus you will want the printable templates. Simply enter your email into the form to unlock the templates and join the STEAM Powered Family mailing list, where you will get access to even more educational resources.
Step by Step Instructions
Getting your pieces ready
Print out all three “windmill” or rotor templates on cardstock. If you do not have cardstock,
print the templates on printer paper, cut them out, and stick them onto another blank sheet of printer paper to make it thicker and sturdier.
Cut out all the solid lines and then use the screw or a scoring tool to score all the dotted lines.
Use a pushpin to make a small hole in the center of the wooden skewer.
Fold the rotor blades on the dotted lines, starting with the first one folded upward, the next downward, the next upward, and so on.
Cut a piece of corrugated cardboard that measures 12X12 cm square.
With a pencil and ruler, make a line from one corner to the other and then from the other corner to the other to find the middle of the square.
Gently push the wooden skewer’s pointed side into the cardboard’s first layer. Do not go all the way through to the other side!
Gluing it all together
Sand one side of a wooden bead slightly flat and glue it over the small hole you just made with the pushpin.
Push the wooden skewer through the bead and rest it in the hole to ensure that it is over the hole.
Place the toilet roll onto a corner of the cereal box and trace the end to make a “lid” for it.
Find the center of the “lid,” make a mark, and use the push pin to make a hole in the center.
Then, gently push the pointy tip of the wooden skewer into the hole to make it bigger.
Now, glue the “lid” onto the toilet roll.
When dry, gently push the wooden skewer through the hole at the top and put the pointed end into the bead.
Hold the toilet roll down with one hand and trace around the bottom of it. To find the correct position, make a small pencil mark on the toilet roll and down onto the base. This will help match the base to the toilet roll when you glue the two together.
Getting the spindle or axis together
Cut a wooden skewer 15cm in length from the pointed tip. To do this, you can use a box cutter or scissors. Using the box cutter, gently roll the skewer back and forth while gently cutting into the wood. You want to make a line around to make it easy to snap the skewer into two pieces.
Safety Tip! Remember to keep your fingers away from the blade and not use a lot of pressure when cutting.
Place the skewer into the lid’s hole. It should be able to turn easily. If necessary, use the tip of a pencil to gently make the hole bigger.
This would be a great time to decorate all your pieces!
Repeat the same process of cutting, scoring, decorating, and bending the blades of the other two rotors.
Remember to cut all the solid lines and score on the dotted lines.
How to bend the blades of the “windmill” rotors
Bend all the blades downward on the dotted lines.
Generally speaking, bending all the blades at an angle of 45 degrees is best, but you might need to adjust the angle of each blade while experimenting.
Here is what the rotor blades look like once folded.
Experimenting and watching the magic happen
Push the wooden skewer through the rotor, leaving about 1,5cm from the top. Sticking out.
Roll a small piece of Blu Tack into a sausage and wrap it around the skewer, ensuring it is touching the underside of the rotor.
I used another small bead to hold everything in place.
Remember, the candles make heat, and the Blue Tack will get soft, so the bead holds it together.
Gently lower the rotor and skewer into the toilet roll. Make sure it rests in the bead and hole you made at the beginning of the project and spins easily.
Place one tea candle in each corner of the base, under the blades, and check that all the blades are at the same angle, top and bottom.
Using the Candle Carousel
SAFETY NOTE:
A responsible adult needs to be present at all times when candles are lit. Ensure the candles are placed a safe distance from all paper and cardboard. Have a cup of water or wet cloth close by in case of an accident. Always practice fire safety!
Pro Tip! Before lighting the candle, ensure windows are closed and there is no draught near the experiment.
Light all the tea candles and watch the magic as the heat from the candles rises!
If your rotor is not spinning, move the candles around until it starts to move.
It takes time to get it going, so don’t lose hope and give up immediately.
Test the other two rotors you made and decide which one works best. Make sure to blow out the candles when changing the rotors, then relight the candles.
Student Questions
This project will lead to lots of great discussion and learning opportunities. Here are some questions you can use to prompt students.
What do you think is making the rotors turn?
Do all of the rotors work well?
Is the shape or angle of the blades important?
Which angle on each rotor worked best?
Is the height of the rotor important? Try moving it up or down to see the difference.
Did you try fewer or more candles, and what difference did it make?
Try moving the candles to one side of the carousel. What difference did this make and why?
Does the position of the candles make a difference to the speed of the rotor?
Can you make a rotor with a different shape that will spin faster than the ones you tested?
Use a stopwatch to time how many rotations your candle carousel makes in one minute.
How do you think friction would affect your experiment?
Do you think bigger candles would change the outcome of this experiment?
I hope you enjoyed making your candle carousel and now understand that aerodynamics plays an important role in its efficient operation.
Another fun STEM Project is to build a windmill with your kids!