Binary Code Game STEM Project
Have you ever wondered how computers understand and display text? Computers use a special language called Binary Code. It is an important part of computers and technology. Exploring binary code and coding for kids can be a fun adventure that helps you understand how computers talk to each other and how they make amazing things happen! This game can be played by grades 3 and up, and the STEM build is fantastic for middle grade students to learn STEM Skills, including coding and engineering.
DIY Binary Code Game – Gamify Learning!
Table of Contents
Disclaimer: This article may contain commission, paid partnerships, or affiliate links. We independently review everything we recommend. When you buy through our links, we may earn a commission from qualifying purchases.
What is a Binary Code?
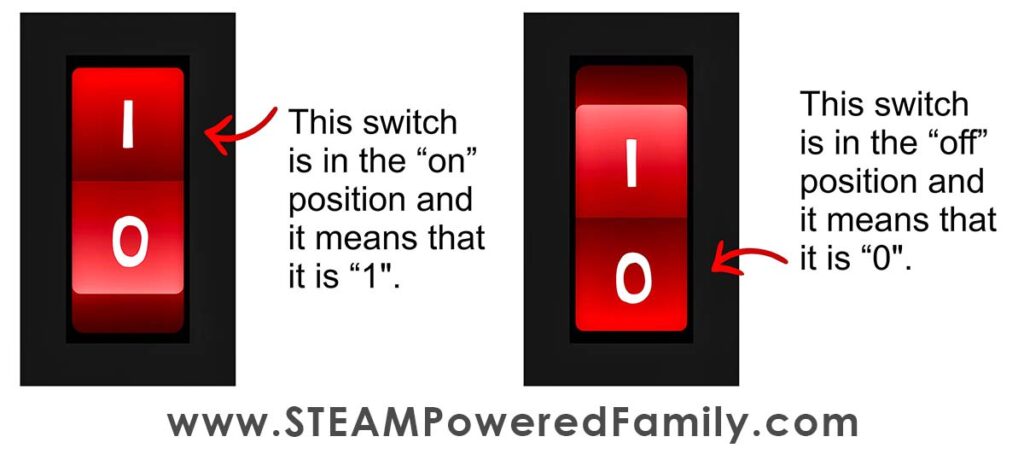
Binary code is like a bunch of light switches. Each switch can be on or off, like any light switch. In binary code, on is represented by “1,” and off is represented by “0”. This picture can help explain what I mean.
Although computers are relatively new inventions, the concept of binary code dates back thousands of years. Ancient Chinese and Indian mathematicians used binary-like systems for calculations as early as the 9th century. How cool is that?
Binary code is essential to the inner workings of computers and, although we can’t see it, it is present in many aspects of our daily lives. Exploring binary code can be a fascinating journey into the heart of computer science and digital communication. So let’s dig in!
Binary Numbers
Binary code can be used to represent numbers. Here are the binary codes for the numbers 1 to 10:
1 ~ 0001
2 ~ 0010
3 ~ 0011
4 ~ 0100
5 ~ 0101
6 ~ 0110
7 ~ 0111
8 ~ 1000
9 ~ 1001
10 ~ 1010
Binary Alphabet
Did you know that binary code can also represent the letters of the alphabet?
Our regular alphabet has different letters like A, B, C, and so on. In binary code, each letter is represented by a unique combination of 0s and 1s.
Let’s take the letter “A” as an example. In binary, the letter “A” is represented by the pattern 01000001. Each 0 or 1 in the pattern is like a switch, where 0 means “off” and 1 means “on.” When the computer sees this pattern, it should show the letter “A” on the screen.
The letter “B” is represented by the pattern 01000010. It’s a different pattern from “A” but still made up of 0s and 1s. The computer understands this pattern and shows the letter “B” when it sees it.
This special binary code for letters is called ASCII. It’s like a secret codebook that tells the computer which pattern represents each letter. ASCII stands for American Standard Code for Information Interchange. It also allows computers to represent numbers and symbols using binary patterns.
So, just like binary code represents numbers using 0s and 1s, it also represents letters using the same idea.
Words in Binary Code
Let’s look at how some words are written in binary code.
My name is Merle, and this is how my name is written in binary code:
M: 01001101 e: 01100101 r: 01110010 l: 01101100 e: 01100101
The words “I love you” would look like this:
I: 01001001 (space): 00100000 l: 01001100 o: 01001111 v: 1010110 e: 010001019 (space): 00100000 Y: 01011001 o: 01001111 u: 01010101
The sheet below is a Binary Code Alphabet Reference:
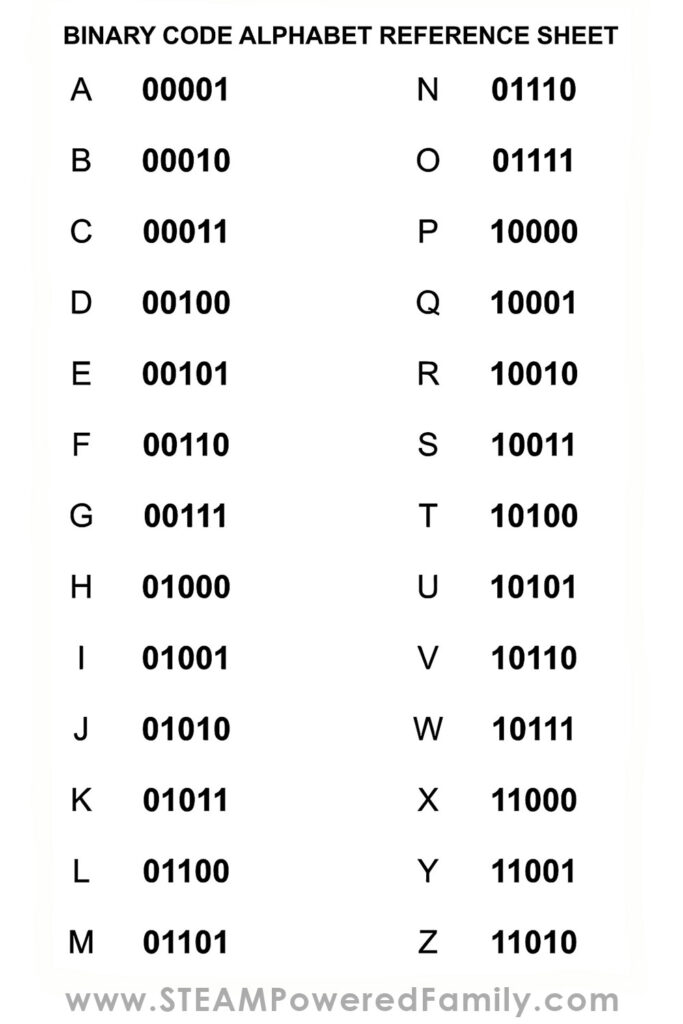
Using this sheet, see if you can write your name or a short message to someone in binary code.
Generally, binary code for words is seen in a pattern of 8 digits called an 8-string binary code, but in this project, you will use 5-string binary code. So, all the codes have a pattern of 5 digits.
So, what is the difference?
The words are the same in both strings, but the main difference is the length of the secret messages they can represent. The 5-string code has shorter messages with 5 symbols, while the 8-string code has longer messages with 8 symbols.
Think of it like having two secret codes: one is shorter, and the other is longer. The shorter code can represent simpler messages, while the longer code can represent more complex messages. Learn more here.
Bits and Bytes
Binary code is organized into units called bits (binary digits). A bit is the smallest unit of information and can represent either a 0 or a 1. Eight bits together form a byte, the basic unit for storing and processing data in computers.
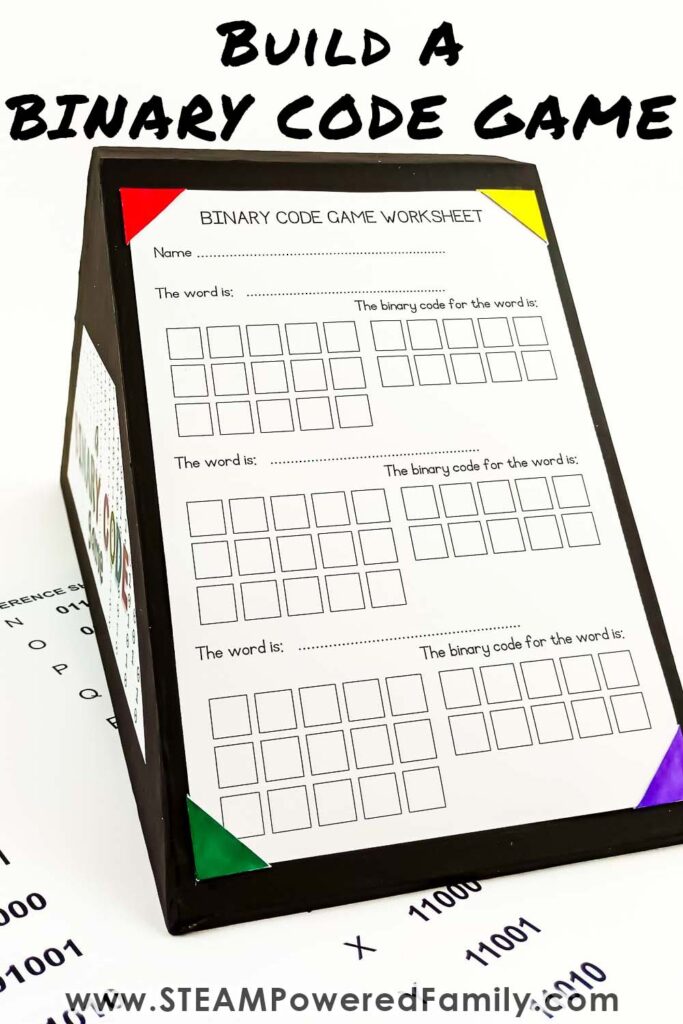
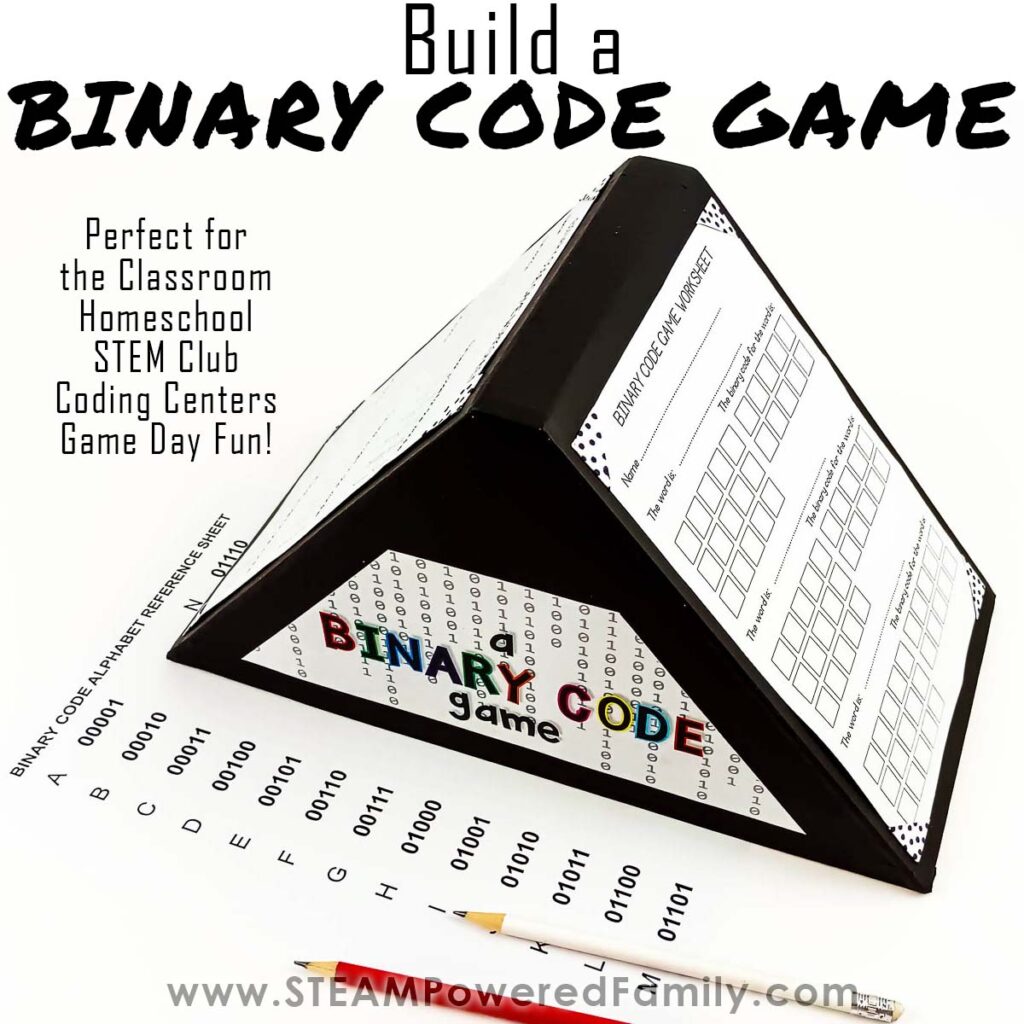
BUILD A BINARY CODE GAME
Before we start testing our binary code knowledge, let’s build a fun binary code game. This is a great way to practice those coding skills, and would make a fantastic classroom resource center activity.
NOTE: We have turned this into an engineering and coding challenge so we can tap into more pillars of STEM education. However, you can use the printable games without the engineering build if you wish to simplify this coding game.
Binary Code Game Tutorial Video
Watch the video of us building this project. If you can’t see the video, it may be that your adblocker or firewall is blocking the feed. You can also find this video on the STEAM Powered Family YouTube Channel.
Materials & Tools
Printable (includes templates , worksheets and question & answer sheets – See below to access the printable)
Sheet of thin (2mm thick) Cardboard (a large sturdy box is perfect)
Sheet of cardstock (any color)
Sand
Brown paper tape or masking tape
Double-sided tape or School glue
Glue stick
Hobby knife with cutting board
Scissors
Pencil
Ruler
Glue gun
Some paint and a paintbrush
The Printable Templates are available to STEAM Powered Family mailing list members. Simply enter your email to unlock the printable. This printable includes the templates for building the game, a binary code reference sheet, and many, many pages of game play questions with answer keys.
You can use the game play questions without the STEM build if you wish!
IMPORTANT SAFETY NOTE
When using a hobby knife or glue gun, ensure adult supervision is provided at all times, or have an adult do this step for younger students.
Binary Code Game DIY Directions
Print, trace, and cut out all the template pieces from your cardboard. You can do this with a hobby knife on a cutting board, or with scissors.
Pay close attention to the instructions on the printable. The outlines for most of the cuts require that you trace half, flip, then continue tracing to get the full shape penciled out before cutting.
NOTE:
If your cardboard is thicker than 2mm, you may need to adjust the size of some of the pieces, Make sure the base is at least 2mm longer than the sides, as the top pieces must be glued to the base. Test the fit of all of your pieces before gluing into place.
For the best results, use a glue gun for assembly. If you don’t have a glue gun or feel it would be a better fit for your students, you can use white glue. The results will just be a little less sturdy.
Start by gluing the two side pieces onto the base. If you are struggling, it can help to have a helping hand during the gluing process and have the kids work in teams. Or you can use a small weight to hold the box down. Just don’t forget to remove the weight after gluing on the first side, as you cannot get it out of the box once you glue the second side!
Next, glue the two top pieces onto each side of the base.
Fill the base of the box with some sand. I used about 2 or 3 cups of sand. The sand helps to weigh the box down which helps it stay in place while the kids are using the game. This is optional!
Use brown paper tape or masking tape to seal all the joins. This is very important or the sand will leak out of the box.
Complete the box by gluing the thin piece of cardboard across the top and sealing that piece with some brown paper tape or newspaper.
The game box is now complete.
Making Worksheet Holders
Next we need a way to hold the worksheets in place. We made little paper corner holders that work perfectly for sliding the worksheets into place on the game.
Cut two 1.5cm wide strips of any colored cardstock.
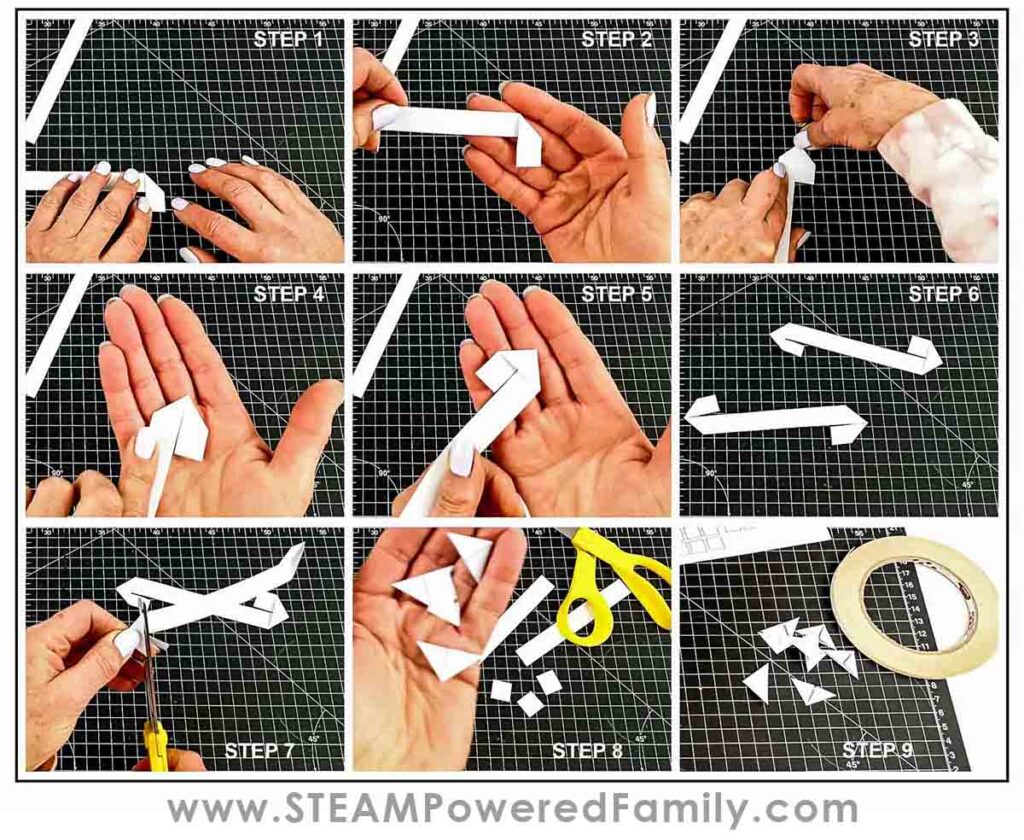
Now we get to do a little origami to create the corner holders.
Steps 1 & 2: Fold the right end of the strip downwards, vertically.
Steps 3 & 4: Fold the other side downward vertically so that the two sides meet in the middle.
Step 5: Turn it over. You should see a triangle with two longer legs sticking out.
Step 6: Repeat Steps 1- 4 on the other end of the strip and the second strip.
Steps 7 & 8: Cut off the long legs. You should have four corners.
Step 9: Use the leftovers of the two strips to make another four corners. If you don’t have enough, just cut more 1.5cm strips. You should have eight corners in total.
Here is a visual of the steps, or take a look at the video to watch me make them.
I used white cardstock and colored them in with felt tip pens. You can also use colored cardstock or leave them white.
Finishing Touches
Paint your game box. You can use any colors you want or even let your kids get creative and turn it into an art project, taking this from a STEM Project (Science, Technology, Engineering and Math) to a STEAM Project (Science, Technology, Engineering, Arts and Math).
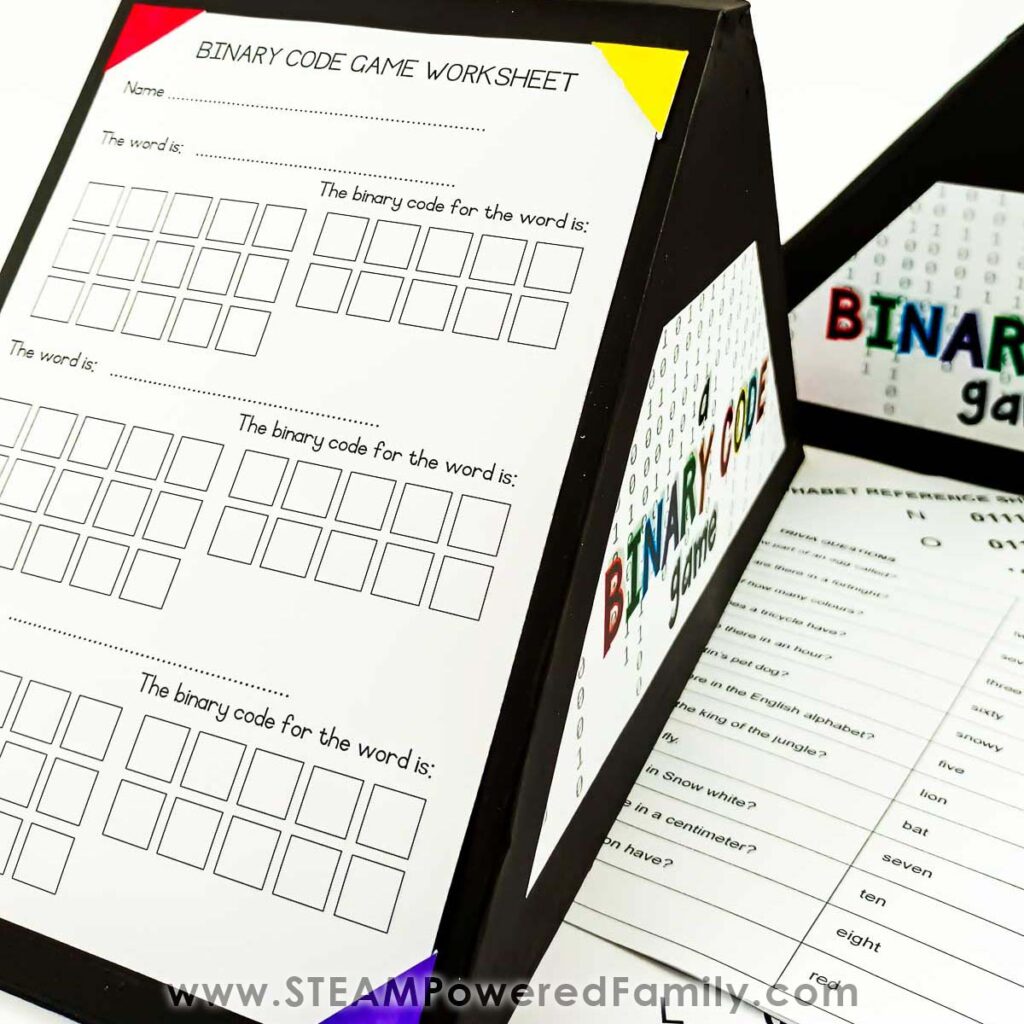
Print out the Binary Code Game Worksheet and cut it into two pieces on the dotted line shown.
Place it onto one side of the box, making sure it is in the middle, and mark, with a pencil, all four corners lightly. These are the placement marks for all the worksheet corners.
Do the same on the other side. To ensure perfect symmetry (and work in a bit of math), use a ruler and take measurements to ensure the pieces are perfectly centered on the game board.
Attached the worksheet holder corners using double-sided tape or glue.
Start by sticking the top left corner down first.
Slip the corner of a worksheet into this worksheet holder. Now, place the second worksheet holder onto the top right-hand corner, and stick it down in place.
Keep the worksheet in place and repeat the process with the two bottom photo corners. Sometimes it is helpful to have a helping hand with this step.
Using the worksheet as you stick the worksheet corners down ensures that the worksheet lies flat on the game box.
Repeat the steps above to stick the worksheet holder corners on the other side.
The last step is totally optional, but if you want your game to look like ours, print and cut out the game logos and stick them on either side of the box. Or make your own finishing designs.
Here is the finished game!
Playing the Binary Code Game
From the printable template, print out the Binary Code Alphabet Reference Sheet and the Trivia questions and answer sheet.
You will need 3 people to play the game. Two competitors and a host who works the timer (if required) and checks the answers.
There are lots of different ways you can play this Binary Code Game.
One way would be to have the host call out the questions and see who can come up with the correct answer and write it in binary code correctly the first.
Another way would be to set a timer and give each competitor a list of questions with the answers removed. Set the timer for a certain period, 5 to 10 minutes for example. Then see who can come up with the most correct answers in the allotted time.
For single person play, set the timer and see how many you can get correct in a specific time.
If you have a specific theme you would like to use, there is a blank question and answer sheet to add more trivia questions to your game. Ensure you work out all the binary code answers so your host has an answer key.
This game can be used in the classroom, for a coding center, during indoor recess, STEM days, STEM/Coding camp, or played for fun at home.
More Binary Code Projects
Now you have played our Game, let’s explore some other ways we can have fun while learning Binary Code! Check out our Binary Code Resource that includes classroom printables and hands on project ideas for learning Binary Code. Including, making Binary Code Bracelets, Binary Code Jokes, Binary Code Scavenger Hunt, and a Printable Decoding Challenge.
Always have fun and embrace the joy in learning and growing!