Growing Halloween Crystals
We love growing crystals and one of our favourite things to do is make our own sparkling decorations for the holidays and infuse them with wonderful scents. So this week we made scented Halloween crystals. Not only is this a beautiful crystal growing project with a spooking twist, but they make beautiful smelling Halloween decor!

Disclaimer: This article may contain commission or affiliate links. As an Amazon Influencer I earn from qualifying purchases.
Not seeing our videos? Turn off any adblockers to ensure our video feed can be seen. Or visit our YouTube channel to see if the video has been uploaded there. We are slowly uploading our archives. Thanks!
When we first did this project, we made our Halloween Crystals using Borax, however, as we have learned more about Borax and after advisories were issued by our government stating we should not use it, we have replaced it with Alum Powder in our crystal growing project. Since some of our readers still prefer to use Borax, we have kept the information on borax in this article. We suggest you read up on Borax and decide for yourself.
Spooky Crystal Making Supplies
Pipe cleaners
String, wire or fishing line
Mason jars or bowls (big enough to hold your creations without them touching each other or the sides/bottom)
Chop stick or skewer or pencil (long enough to sit comfortably across the top of your jar or bowl)
Pure Alum Powder or Borax
Hot water
Measuring cup and spoon
Spoon for stirring
Essential oils (optional)
Essential oil diffuser (optional)
White glue and paint brush – needed if using alum
How to Make Halloween Crystals
Watch the video tutorial here. If you can’t see the video it is being blocked by your firewall or adblocker, you can also find it on the STEAM Powered Family YouTube Channel with closed captioning.
SAFETY NOTE: Use caution when working with borax. In some places borax is banned. If you use borax, always be cautious and read up on how to use it safely. I recommend using a face mask, gloves and other protective equipment while doing this experiment with borax. It should only be done with older children who can work responsibly with the materials. Alternatively, you can use Pure Alum Powder or Salt to grow crystals too.
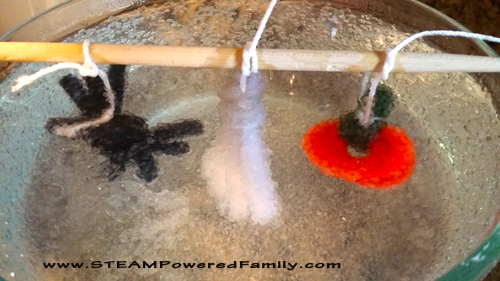
Make the Pipe Cleaner Halloween Shapes
For our designs we decided on a spider and a pumpkin. We worked with the pipe cleaners to create the shapes we wanted and made larger ones and smaller ones so we would have a variety.
The Spider
For the spider we took 4 black pipe cleaners and folded them in half, then pinched the middle to raise it and create the body. Then we spread out the 8 ends to position them like legs. You can leave them long, or fold them in half to make shorter legs. We preferred shorter and found it fit better in our jar.
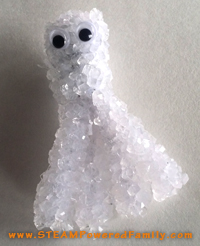
The Pumpkin
For the pumpkin we used four orange pipe cleaners and one green pipe cleaner. Fold the four orange pipe cleaners loosely in half. Then gather the ends and twist them together. Flare out the base to create the pumpkin shape. Finally, use the green pipe cleaner to wrap around the twisted ends.
Your pumpkins and spiders are done!
Tie fishing line, wire or string around each one, ensuring you leave a loop that will fit over the chopstick. We prefer to use fishing line because the crystals will often grow on the string/wire/line and with fishing line once you trim it, you can no longer see it.
Seeding for Alum Crystals
If you are growing crystals using Alum powder, you will need to use a paint brush and brush a little bit of white glue over your pipe cleaner creations, then sprinkle on some alum powder. This is called seeding and helps the alum crystals start forming. You only need to do this step for Alum crystals.
Preparing the Super Saturated Solution
Once the spooky creations are ready, it is time for the magical super saturated solution.
SAFTEY NOTE: We are working with very hot water, always ensure responsible adult supervision or have an adult only do this step.
The Ratio
For every cup of water add 3 tablespoons of Borax or Alum Powder. You want the water deep enough that you can suspend your creation without it touching the sides or bottom of the container. Measure the water in your container, then transfer it to a kettle or a pot on the stove.
Ask your kids to do some math to calculate how much borax or Alum powder you need. Remember, 3 tablespoons for each cup of water.
Heat the water in the kettle, or on the stove. If you are using a kettle, transfer it to your jar once boiled and stir in your powder, adding a bit at at time until it is all dissolved.
If you are doing it on the stove, heat the water to a boil, then reduce it to a simmer before adding the borax. Again, add it slowly until it is all dissolved.
Crystal Growing Time
Set the jar or bowl in a place where it will not be disturbed and preferably in a warm spot (see the science for why!). Then carefully place the chopstick across the top so the creation is suspended completely in the solution. Leave it for 6 to 24 hours. Check on it to see how it is doing and feel free to pull it whenever you think it is done.
After the time is up remove the crystals from the solution and set them to dry on a cloth or plate.
Adding Scent
Now is the time to add scent! Set the drying Halloween crystals beside a running essential oil diffuser. This was how I accidentally made our scented crystals the first time. The crystals do an amazing job of absorbing the scents. You can also put a couple of drops of essential oil directly on to the crystals.
For this batch I didn’t have any pumpkin scents so I used orange, a favourite in our house.
The crystals smell amazing and the smell lasts a really long time. My last batch still smelled incredible after a month.
Clean Up
When you are done growing your crystals your jar or bowl will have a lot of crystal formations inside it. Rinse it continuously under hot water for a few minutes and the crystals will break up and dissolve.
Protecting Your Crystals
To protect your crystals you can coat them with clear nail polish or a clear coat spray. This will help seal the crystals so they don’t disintegrate if exposed to any moisture. We don’t find this necessary as it is very dry where we live, but if you live in a humid climate, this step will really help the longevity of your crystals.
Crystal Science
So what exactly is going on here? Sedimentation and crystallization.
Mixing the Borax or Alum into the hot water creates a suspension which is large solid particles suspended in fluid that settle out over time. The hot water helps to suspend more particles and keep them suspended longer. Why? When water is heated the molecules in the water move apart creating more space for the powder molecules to suspend.
When sedimentation begins (the particles start to settle out) they crystallize on all the different surfaces including the container and your pipe cleaner creations. With Alum Crystals, they love to grow on themselves, so that is why we seed during an Alum Crystal growing experiment. After a few hours of crystals forming on crystals you end up with your beautiful creations.
The Secret to Really Big Crystals
When doing this project you may notice your Halloween crystals are not very big. Check out the different in crystal sizes between our spider and our pumpkin.
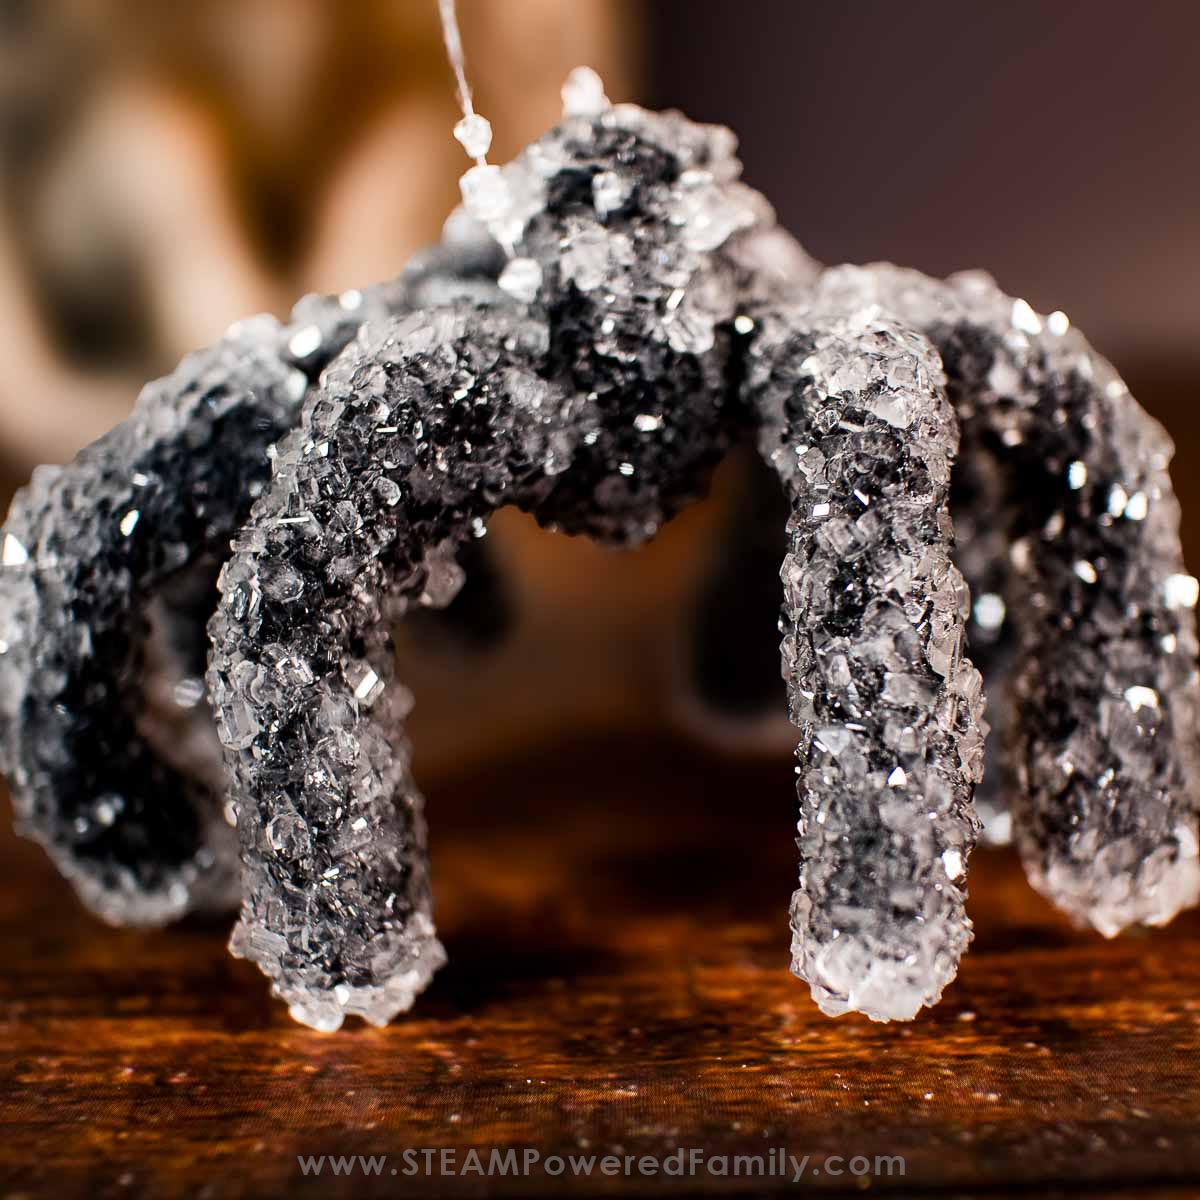
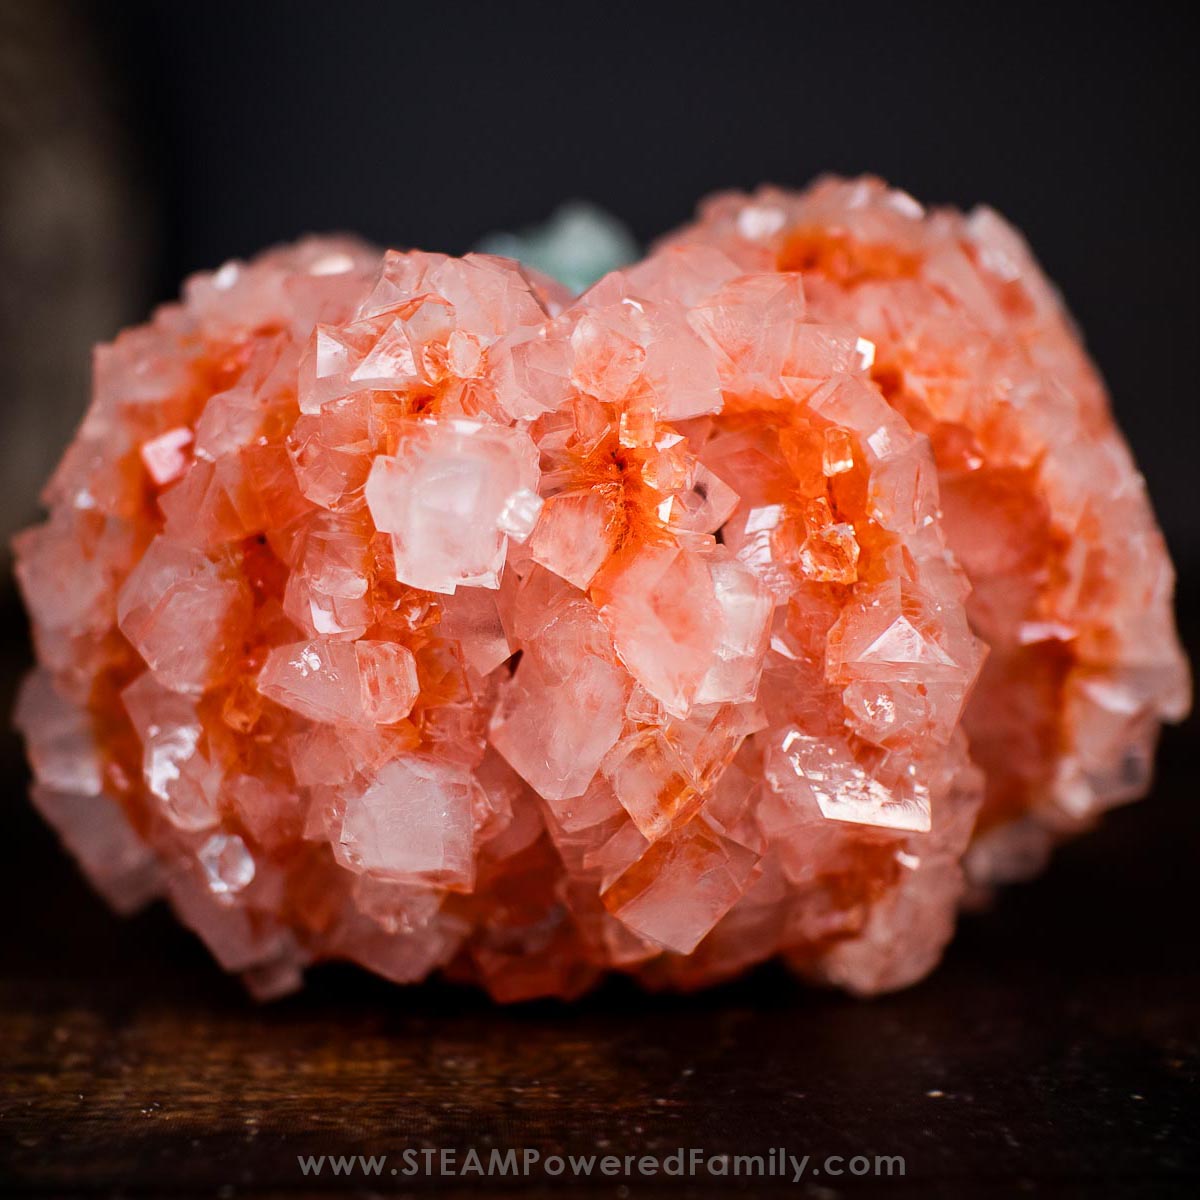
What caused this difference? A tea towel.
Yes, I know it sounds strange, but the only difference was that the pumpkin was in a jar that I covered with a tea towel which allowed it to keep the heat longer and take much longer to cool. The more you can slow the cooling process the bigger your crystals will become. You can get really, really big crystals this way!
Learn more about the secret to growing really big crystals with this experiment.
Pro Tip! This would be a fantastic Science Fair Project idea.
Borax Free Crystal Growing
If you don’t want to use borax to make Halloween Crystals, don’t worry, there are lots of other options! Working with Borax should only be done with proper protective gear and if you understand how to do it safely. Alum powder is a great alternative, however you must make sure you have pure Alum powder. You can learn more about working with Alum in our Geode Science Experiment.
Another option is to make Salt Crystals. Salt crystals are done the same way as we did with Alum or Borax. However, the crystals will not grow as big or look as fancy. I find the best way to make salt crystals is to make flat creations, lay them in a tray, then barely cover them with a super saturated salt solution. As the water evaporates, you will get crystals forming.
Or, make sugar crystals. We have made these delicious crystals a few times when we made edible geodes and rock candy!
Have fun growing your own spooky crystal creations.