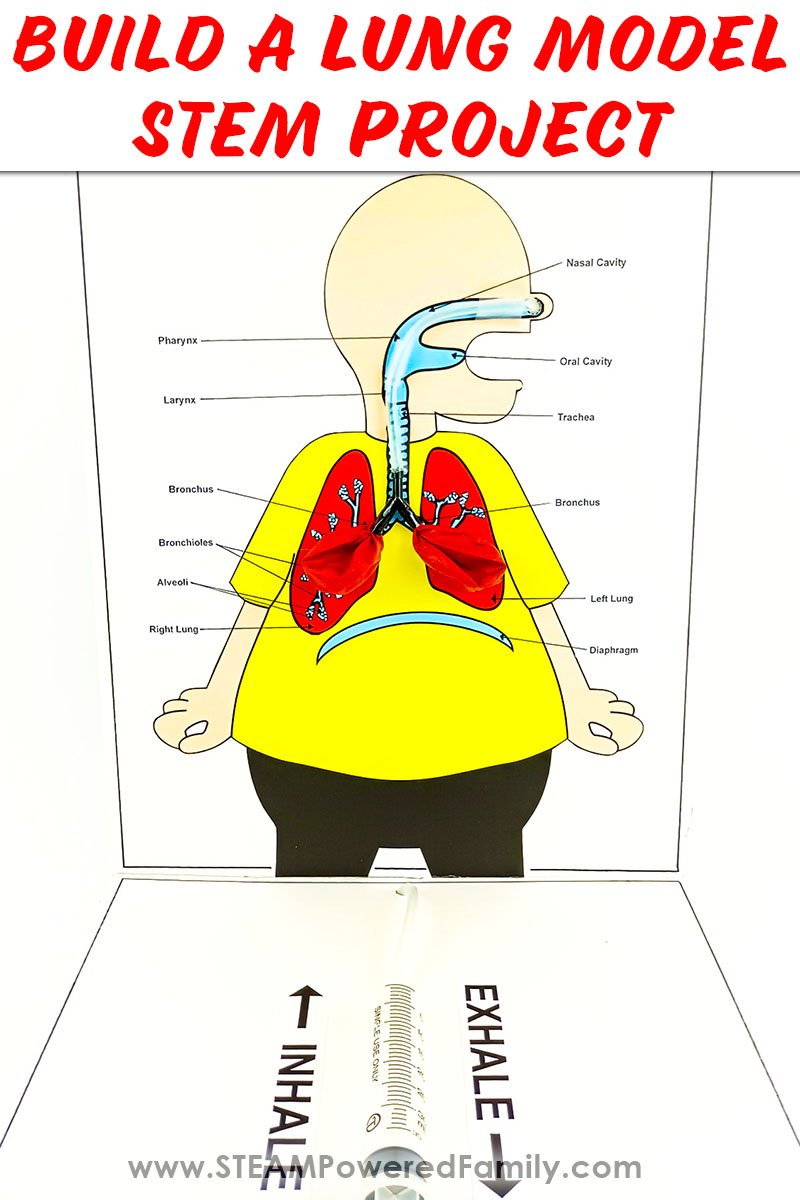
Build a Lung Model
What happens when we blow up a balloon? As you blow, the air from your mouth fills the balloon, inflating it. When you let it go, the air leaves the balloon, and the balloon deflates. A very similar process takes place inside our bodies too. In this interesting project, you will learn about the human respiratory system and build a lung model that demonstrates how the lungs work. This is a fantastic project for biology class or as a science fair project.
BUILD A BALLOON LUNG MODEL
Disclaimer: This article may contain commission or affiliate links. As an Amazon Influencer I earn from qualifying purchases.
Not seeing our videos? Turn off any adblockers to ensure our video feed can be seen. Or visit our YouTube channel to see if the video has been uploaded there. We are slowly uploading our archives. Thanks!
How does the Human Respiratory System work?
The body is made up of many different organs. A few of these organs are used in the process of respiration or breathing. These organs make up the human respiratory system.
The respiration process takes place in the lungs. Inhalation is the process of taking in air and this air provides oxygen to our body. Exhalation is the process of breathing the air out of our bodies. This air leaves our bodies as carbon dioxide. The process of inhalation and exhalation together is known as breathing.
Let’s look closely at the parts of the respiratory system and how it works.
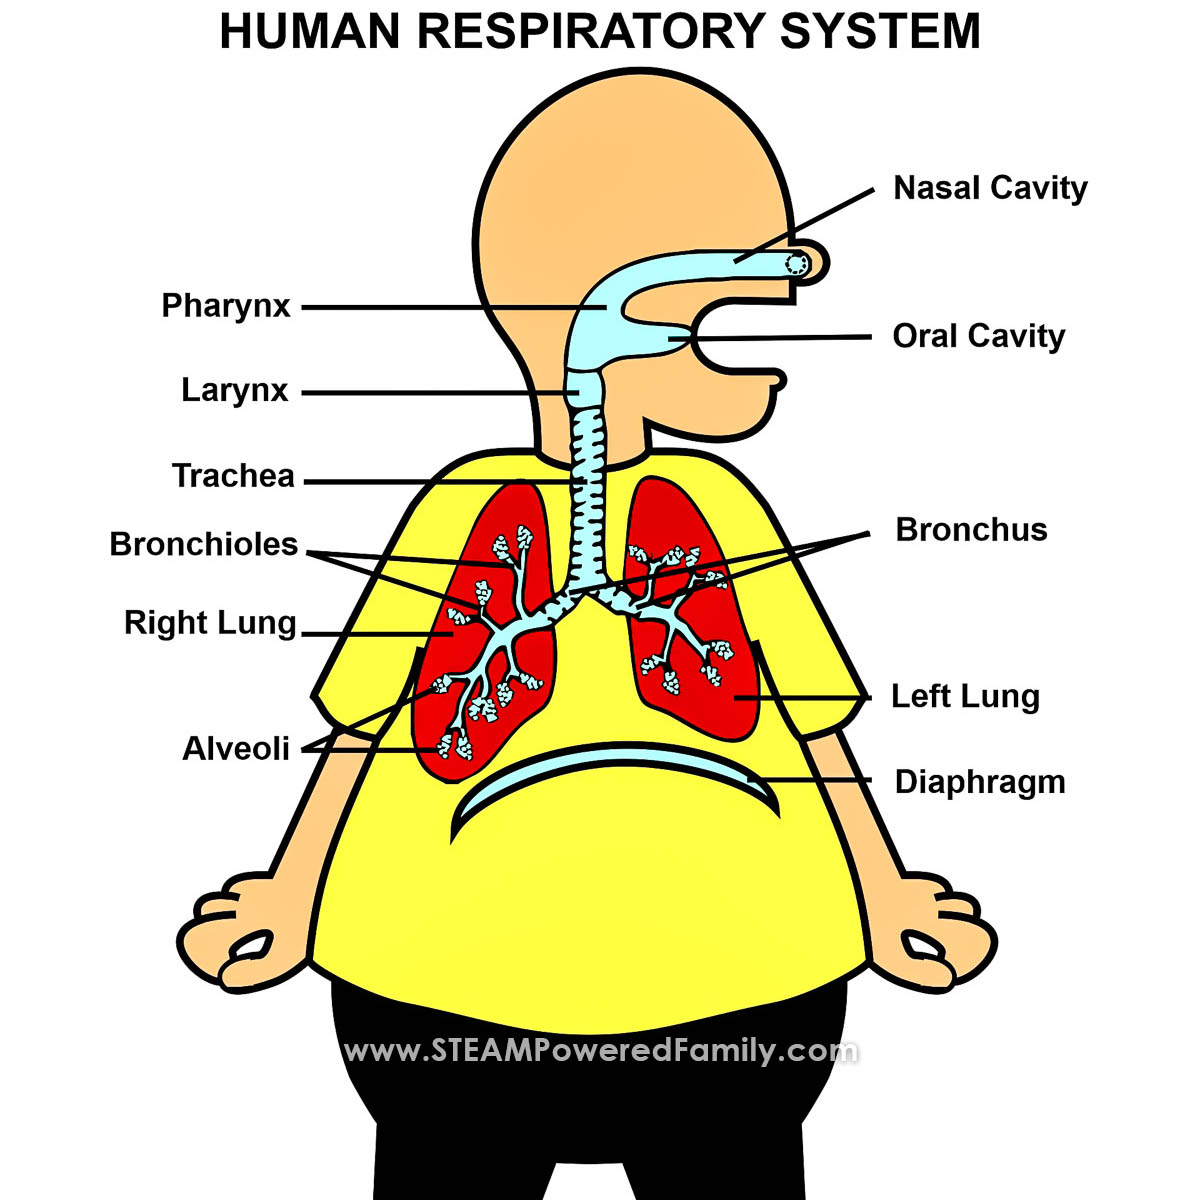
The nose and the mouth
The nose and mouth are lined with mucous membranes that keep the nose and mouth moist. These membranes help make the inhaled air moist and warm.
When we breathe in, the air enters our body through the nostrils and moves through the nasal cavity and travels down the pharynx which is at the back of the nasal cavity and then down into larynx.
Traveling to the lungs
The pharynx regulates the passage of the air from the nasal cavity to the lungs during the breathing process.
The larynx is situated between the pharynx and the trachea and is approximately 13cm/5 inch long. It is also known as the voice box because it regulates the pitch and volume of your voice via vocal folds.
The air then travels down the trachea, which is a long tube also known as the windpipe. It is also approximately 13cm/5 inch long.
Lungs
The air makes its way down to the lungs through the two bronchi or bronchial passages, which connect the trachea to the lungs. Bronchial tubes are lined with mucus and cilia, which are like tiny hairs, together they filter the air of things like dust before it enters the lungs.
The two bronchi, branch off into smaller bronchioles, which almost resemble a tree-like structure. At the ends of the bronchioles are bunches of tiny air sacs called alveoli. Carbon dioxide from the body is stored in the capillaries of the alveoli. It is here that the air we breathe in, is exchanged with the carbon dioxide. When we breathe out the carbon dioxide travels back up the respiratory system and out of the mouth or nose.
The two lungs are not identical. The left lung is smaller and has two lobes while the right one has three lobes.
The muscles of respiration
Muscles of respiration allow us to inhale and exhale and the main muscles in the system are the diaphragm and the muscles of the rib cage.
The diaphragm is a strong muscle at the bottom of the thorax. The diaphragm contracts or squeezes in and moves up when we breathe out and moves down when we breathe in, helping our body inhale and exhale.
You can feel your diaphragm at work. Simply place a hand on your stomach and breathe in deeply. You should feel your stomach expand. This expansion is from your diaphragm working.
DIY Balloon Lung Model STEM Activity Video
Watch the video of this project to see how it is done. If you can’t see this video, please turn off your adblockers as they also block our video feed. You can also find this video on the STEAM Powered Family YouTube Channel.
How to make a Balloon Lung Model
Materials & Tools
Thin cardboard – a recycled box is perfect
Glue gun
Glue stick
Super Glue
Ruler
Pencil
Hobby knife
Two medium sized balloons
Fish tank “Y” connector or two bendable straws
1m/39inch length of clear fish tank or medical tubing
35ml/cc Syringe
Wooden skewer
Scissors
Clear tape
Sealing tape
Optional – If you don’t want to draw your own person and labels, you can get the templates to make your project look exactly like ours by joining the STEAM Powered Family mailing list. Simply enter your email into this form to unlock the printables.
Balloon Lung Model Directions
Getting your pieces ready
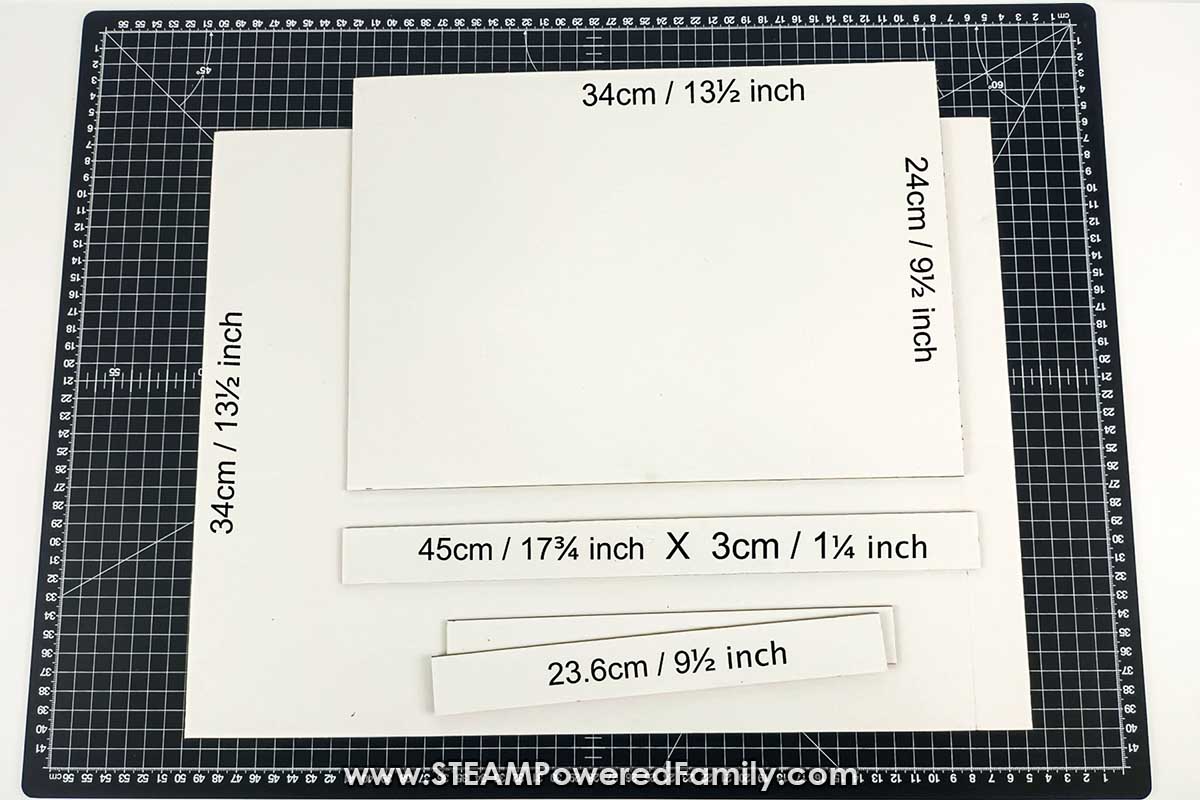
Cut out all the pieces of cardboard as shown in the diagram below.
If you are using our templates, print, cut out and join the template pieces you choose to work with (either black & white or color). Or you can draw your own person if not using our templates.
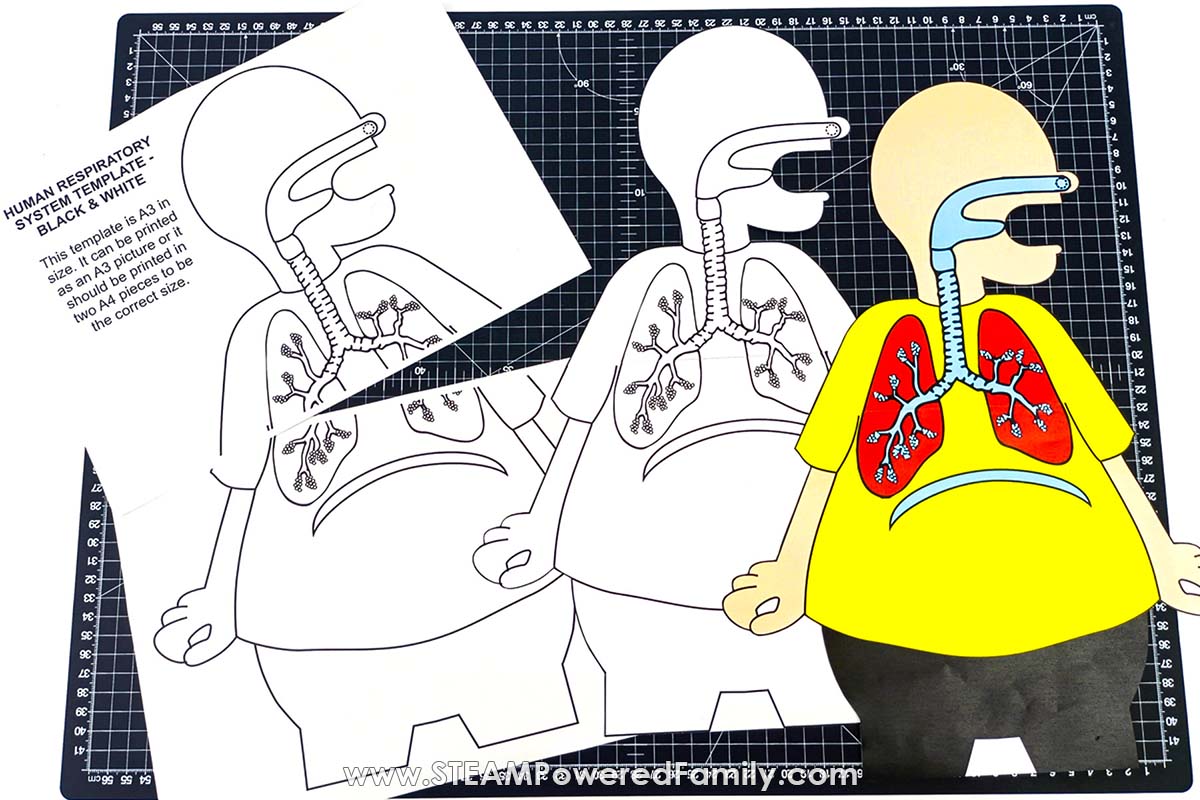
A Note on Paper Sizes
The templates are A3 in size which is close the tabloid size paper in North America. They can be printed as a single A3 picture if your printer is able to do that or you can print 2 X A4 pieces which are joined, to be the correct size for the project. A4 paper is approximately 8.5×11, the standard paper size in North America.
Preparing all the cardboard pieces
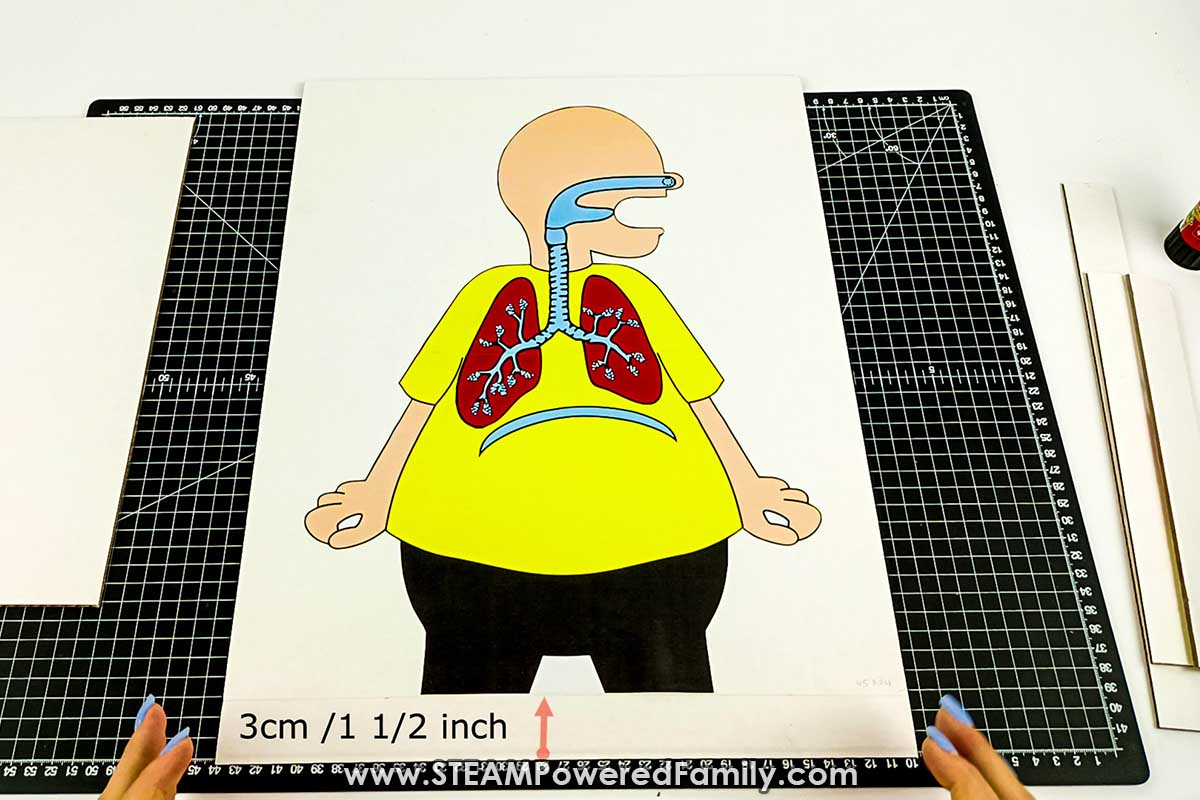
Measure 3cm/1½ inches up from the bottom of the short side of the largest piece of cardboard and make a line across. You will glue the bottom of body on this line.
Using the glue gun, join the three thin strips of cardboard onto the underside of the smaller piece of cardboard, leaving one of the longest sides open. This is the base of the project where the syringe will be glued to.
Ensure appropriate adult supervision as the glue gun is very hot!
Join this base onto the bottom of the large cardboard where you drew a 3cm/1½ inch line from the bottom.
Adding all the other pieces to the lung model
Gather the syringe, balloons, insulation tape, the tube of Super Glue, the length of tubing, the “Y” connector (or straws), and a wooden skewer together.
Make a hole with the wooden skewer in the circle marked on the nose and then using a pencil, make the hole large enough to easily fit the tubing through it.
Do the same thing on the middle of the base, towards the back for the tubing to reach the syringe.
Cut about 2.5cm/1 inch off the neck of the two balloons.
Using a tiny drop of Super Glue, glue the balloon end onto the “Y” connector and tape in place using the insulation tape to create a seal. Do this with the other balloon as well. These will be placed inside the lungs.
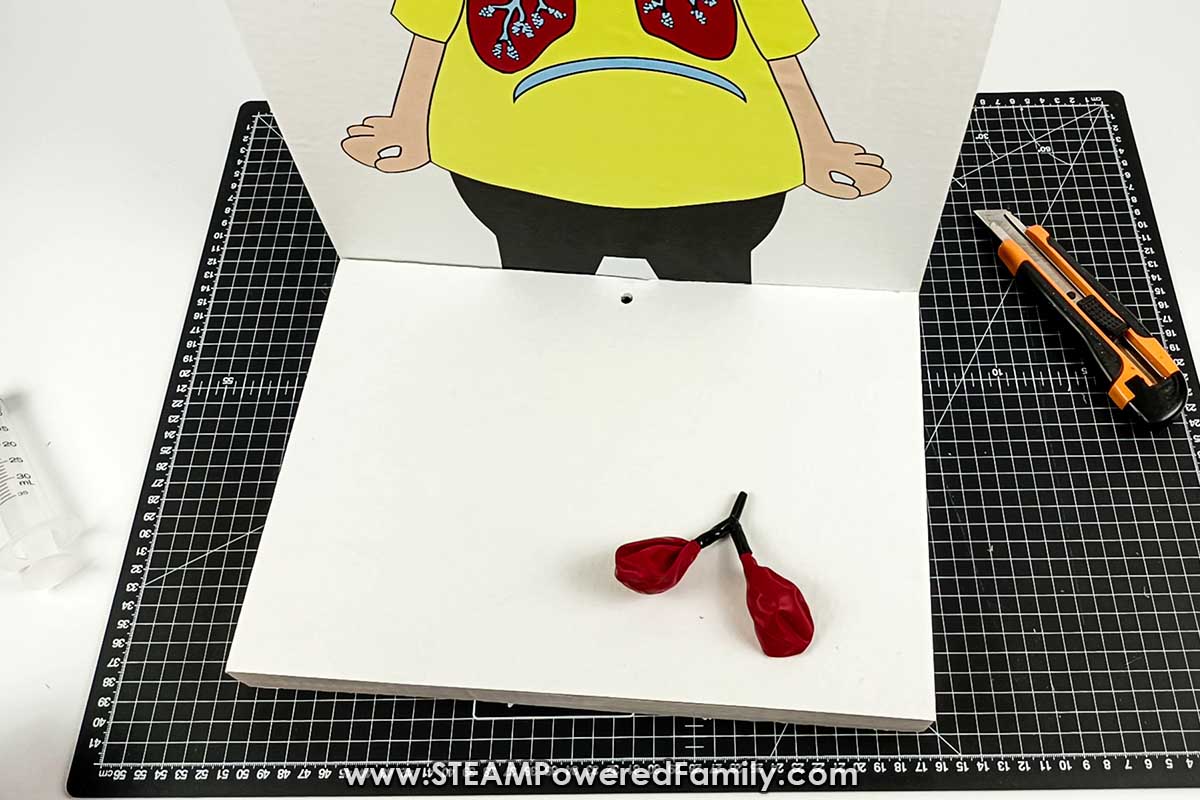
Join one end of the tubing onto the Y-connector and begin by gluing the Y-connector and the tubing all the way up to the hole in the nose, with the glue gun, a little bit at a time.
Tip – Use Straws instead of Y-connector
An alternative way of building the Bronchus if you don’t have a Y-connector is to use straws. You can also use clay or playdough to create the seals.

Test the Lungs
Blow through the Y-connector to see that the balloons are inflating and deflating. This movement of the balloon mimics the way the lungs work. If the balloons are not inflating and deflating, check that the tubing is not blocked, especially where you have threaded it through any of the holes.
Glue the balloons to either side of the lungs with a few drops of Super Glue.
You can use small strips of tape to hold the tubing down.
Run the Tubing
Carefully thread the other end of the tubing through the hole in the nose, to the back of the model.
Make another hole at the very bottom of the back of the model with the wooden skewer and pencil and thread the tubing through this new hole and up the hole (you made earlier) in the base, to the front of the model.
Find the middle of the base and glue the syringe down, with the glue gun, making sure that the plunger of the syringe can move in and out of the body of the syringe freely.
Pull the plunger outwards to the opening of the syringe and join the tubing onto the syringe, cutting off the excess tubing.
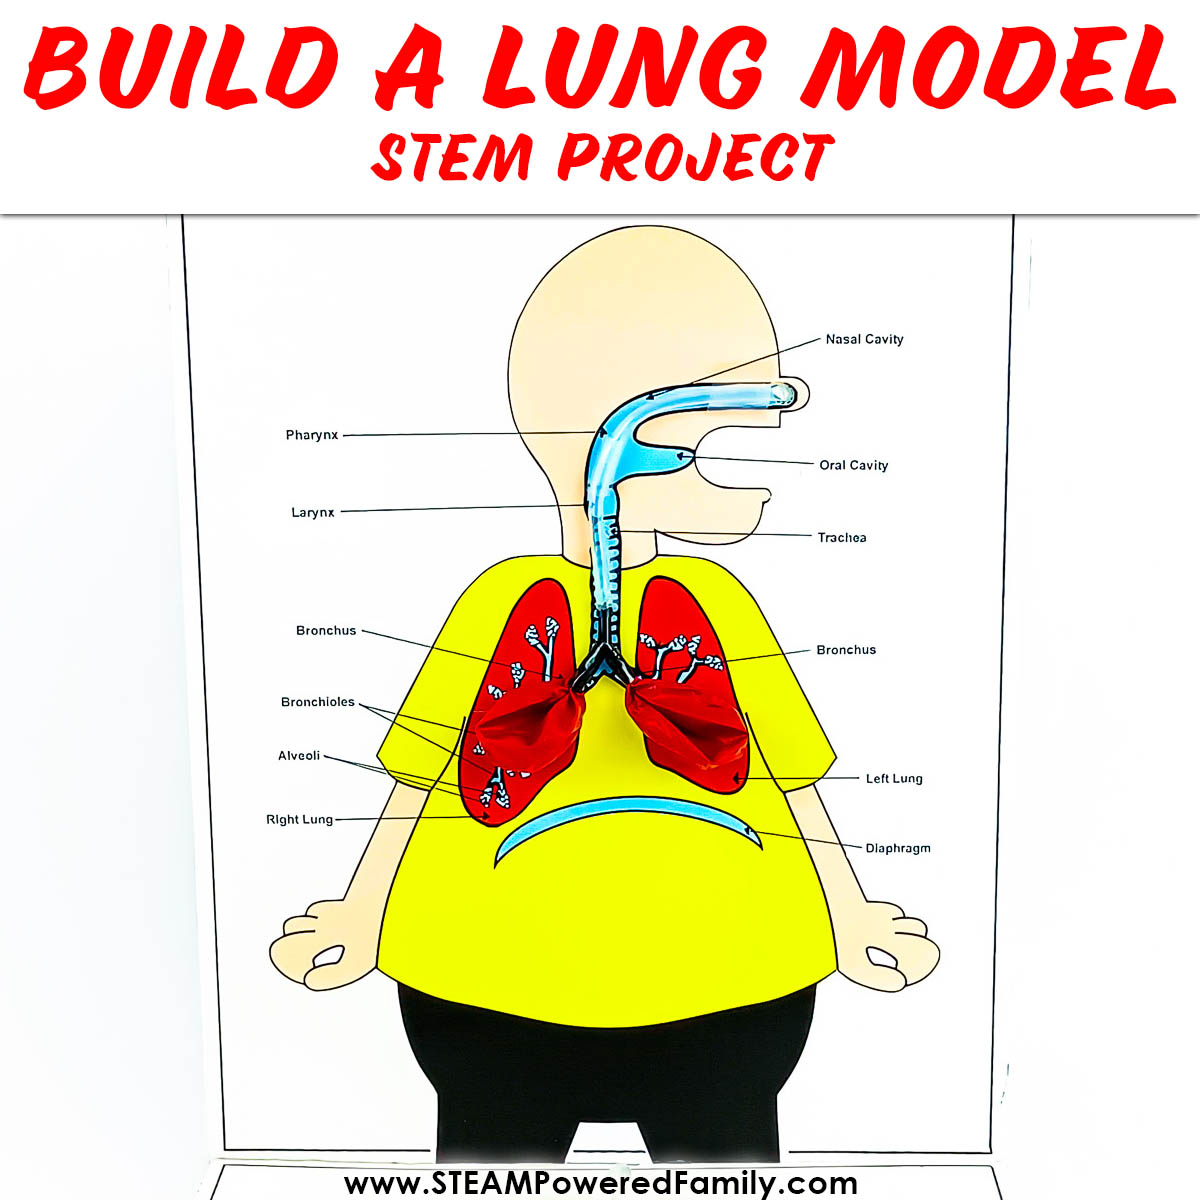
Label the Lung Model
Add all the labels onto the front of your model as shown below:
Your Human Respiratory System Model is ready to show off!
This is a fantastic project idea for the science fair or as part of a biology unit study to really show your understanding of the human respiratory system.
Respiratory System Unit Study Printable
Building a lung model is a fantastic way to learn how the human respiratory system works. For a printable unit study to go with this project, check out the STEAM Powered Family Shop.
Have fun learning about the human respiratory system and the lungs!