Reaction Time Test Project
Inspired by the always fun Whack-A-Mole games at arcades and festivals, today we are testing reaction time! First, we are going to explore reaction time with our students while doing a simple Ruler Drop Reaction Time Test. This is a great way to explore how reaction time works. Next, we are taking things up a notch by building our very own reaction time test machine inspired by the whack-a-mole style games!
REACTION TIME TEST – Game Engineering Project
Table of Contents
Disclaimer: This article may contain commission, paid partnerships, or affiliate links. We independently review everything we recommend. When you buy through our links, we may earn a commission from qualifying purchases.
What is Reaction Time?
Reaction time is how long it takes for you to respond to something after you see it, hear a tap, or feel it. It’s like when you play a game of tag and you need to move quickly to avoid being tagged by your friend.
Or imagine you are playing a ball game and your friend suddenly throws a ball at you. Your eyes see the ball coming towards you. This is the input of information. Your brain quickly processes that information and thinks “ball coming at me!”. Then, your brain sends a signal to your muscles in your hands and arms to move and can catch the ball. The time it takes from when you see the ball to when you catch it is your reaction time.
Reaction Time Varies
Different people have different reaction times. Some people may react very quickly and catch the ball easily, while others may take a little longer to react. Factors like how fast your brain processes information, how focused you are, and how quickly your muscles respond all factor into how good you are at catching the ball. Some people may have quicker reflexes as well.
Even for one person, their reaction time changes throughout the day and across different days. Many things can affect reaction time from how tired you are, whether you are hungry, if you are focused, and even if you are feeling sick.
Reaction time is important in many activities, like sports, where you need to react quickly or make fast decisions. It’s also important for everyday situations like crossing the road safely, reacting to sudden changes in your environment, or playing video games.
Like any skill, with practice, you can improve your reaction time! Practicing activities that require quick reactions, like playing catch or reaction-based games, can help you improve. Today we have some cool tests you can do to test your reaction time. Practice them over and over to see how much you can improve your own time!
Ruler Drop Reaction Time Test
How do you measure how long it takes to catch a ruler dropped from a specific height?
Well, there is a quick, no prep test using a ruler to do precisely that.
For this test you will need two people and a ruler. That’s it!
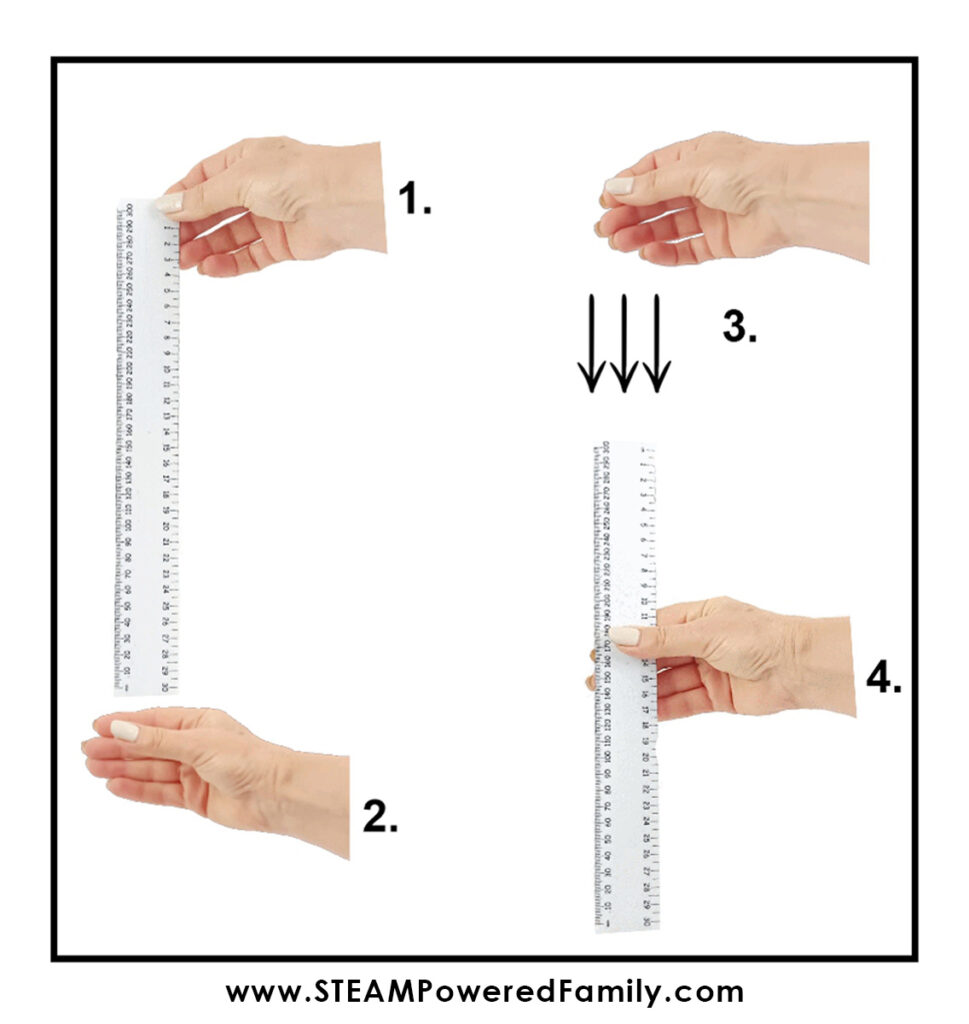
Have the tester stand with their arm outstretched, holding the ruler at the highest measurement.
Now have the subject, this is the person whose reaction time we are testing, put their index finger and thumb on either side of the ruler at the bottom. Ensure they are not touching the ruler, just holding their finger and thumb loosely at the bottom.
Have the tester drop the ruler and the subject closes their finger and thumb as quickly as possible.
Record the measurement on the ruler. Then repeat 3 times for each subject.
Make sure you write down the results! Then do a little math to find the average for each subject.
The person with the fastest reaction time, is the one who caught it the quickest. Which means they have the lowest measurement. This is because the faster the ruler was caught, the less of the ruler passed through their finger and thumb.
How Does The Ruler Test Work?
When the ruler is dropped, our eyes perceive the event and send a signal to the brain, which in turn sends a message to the muscles in the arm and hand to catch the ruler. These signals travel very quickly, and your reaction time depends on how long it takes these messages to travel between your eye, brain and hand.
A Bigger Reaction Time Test
Now we have done the ruler test, let’s try something bigger! This project is a fantastic idea for the science fair and will have everyone coming to check out and try their reaction time with your project!
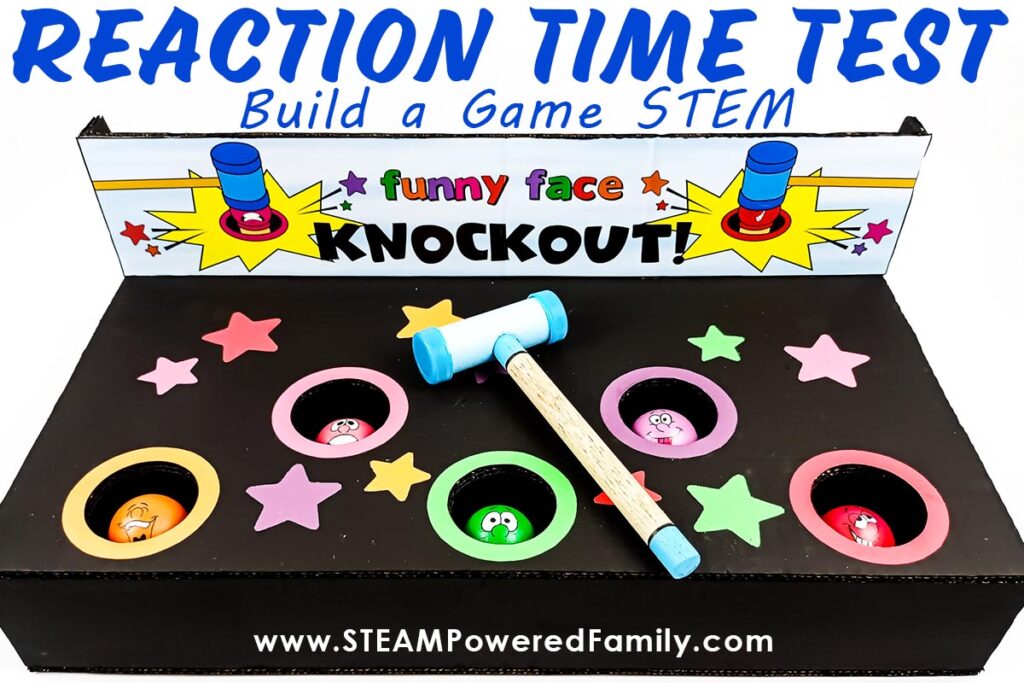
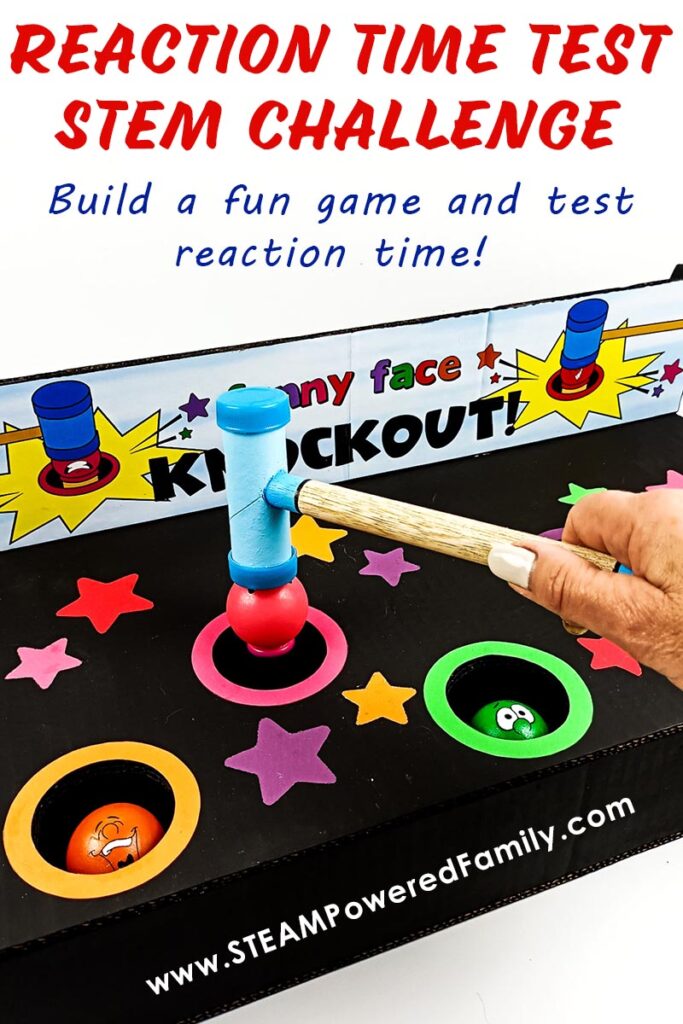
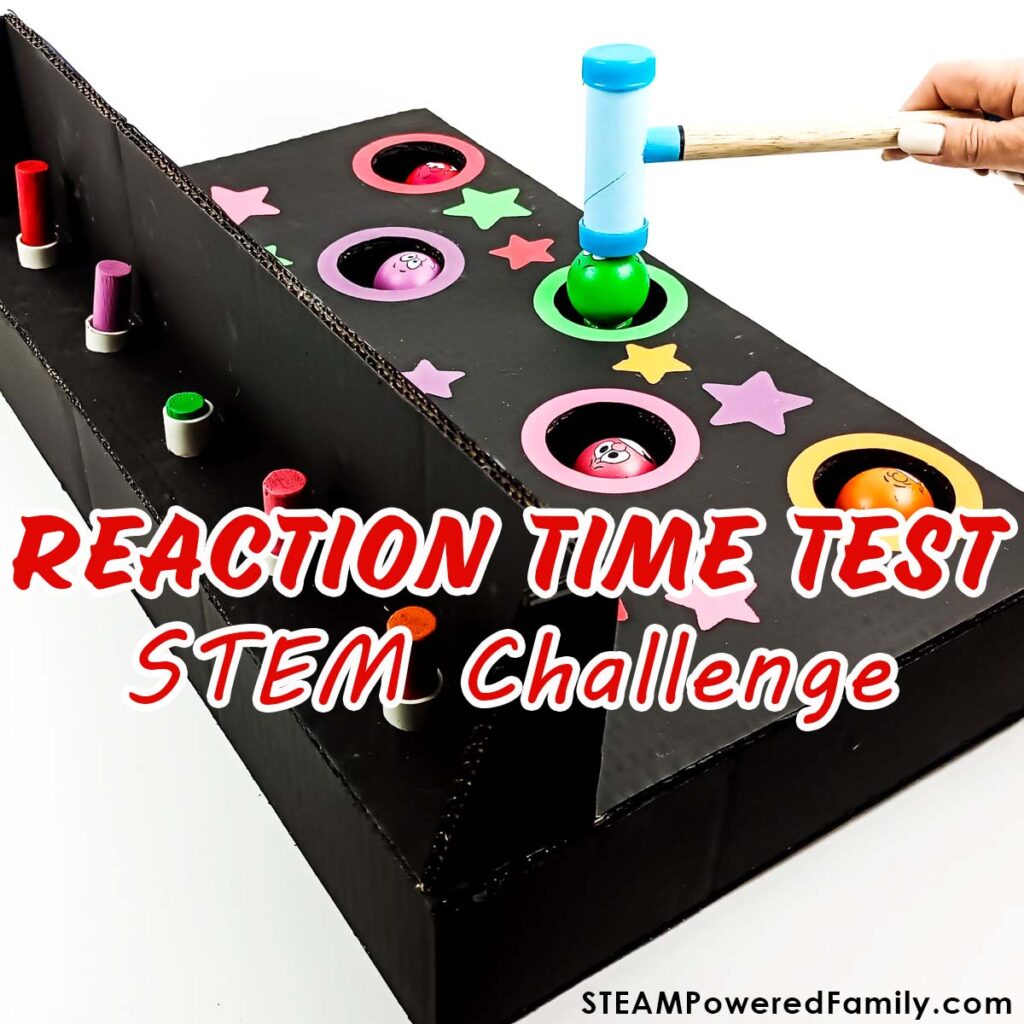
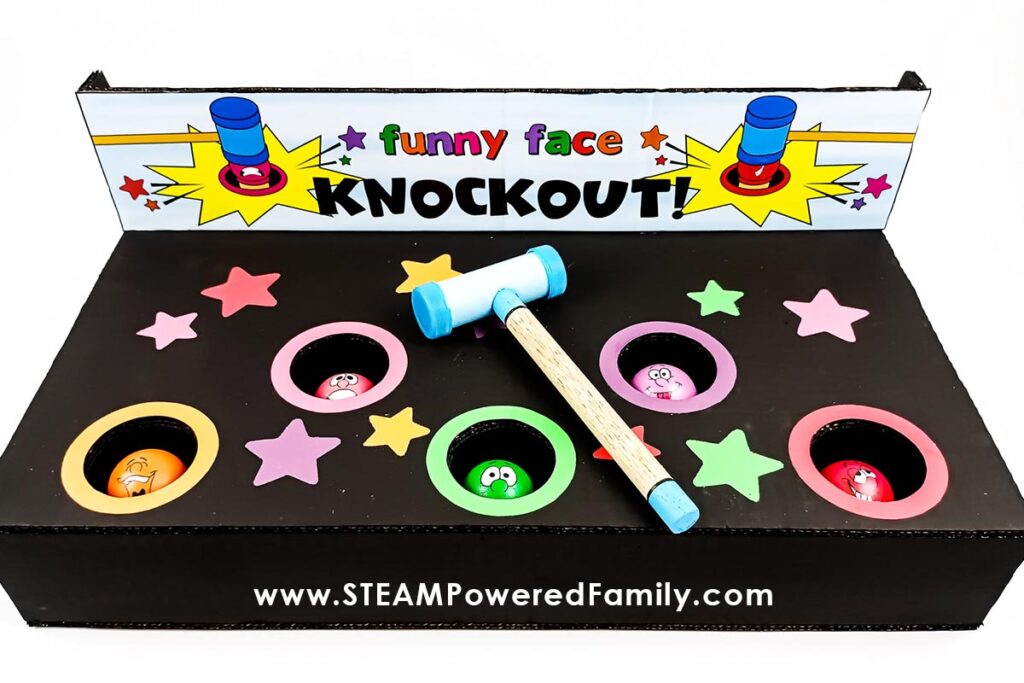
We will show you how to build a game called Funny Face Knockout, a fun way to measure your reaction times. This game is similar to the popular game called Whack-a-Mole that you find at fairs and festivals.
This is a great project to do for a middle grade or high school STEM or Science Fair.
So, get ready to challenge all your friends, members of your family and even your teachers to a fun reaction time test using your very own Funny Face Knockout game!
DIY Reaction Time Test STEM Activity Video
This is a really fun STEM build project that has a lot of steps. Each step is more opportunities for learning math, physics, engineering and more! The best way to set yourself up for success with this game engineering challenge is to watch the video tutorial. If you can not see the video tutorial, please go and watch it on the STEAM Powered Family YouTube Channel in high definition.
How to make a Reaction Time Knockout Game
Materials & Tools
Double-wall cardboard – a large old cardboard box
Glue gun
Glue stick
Ruler
Pencil or marker
Hobby knife
Small Exacto knife
Drinking straw
Thick wooden skewer
2 bottle tops (from a 2 L bottle)
5 X 8mm nuts
Side/wire cutter
Scotch tape
16mm dowel stick
Cardboard tube for the hammer
6 wine bottle corks
A short length of 20mm PVC pipe
10 wood tongue depressors or jumbo craft sticks
5 ping pong balls
5 Colored wooden rings
Blu Tack
Some colored paper for decorations
Printable Templates
Plus you will need the templates. Simply enter your email here to join the STEAM Powered Family mailing list and unlock the templates.
Directions
Getting your pieces ready
Print out all the template pages.
PRO TIP! There are many steps to follow in the video, so don’t rush, and most important is to test everything you do before gluing anything down permanently. The success of this game depends on the specific placement of all the working pieces!
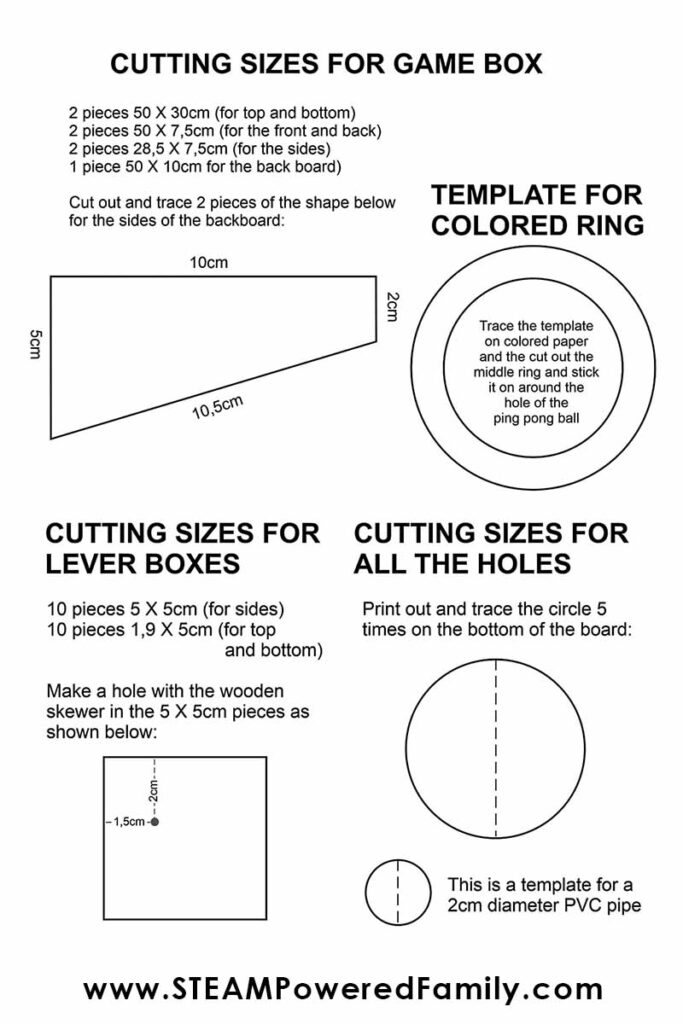
Begin with the template page “CUTTING SIZES FOR GAME BOX.”
Cut all the pieces shown on this page below:
Preparing the top and bottom boards
Using the template page with the heading “TOP BOARD MEASUREMENT LINES AND PLACEMENT OF HOLES” and a marker or pencil, make all the necessary placement lines and trace all the holes you need cut out.
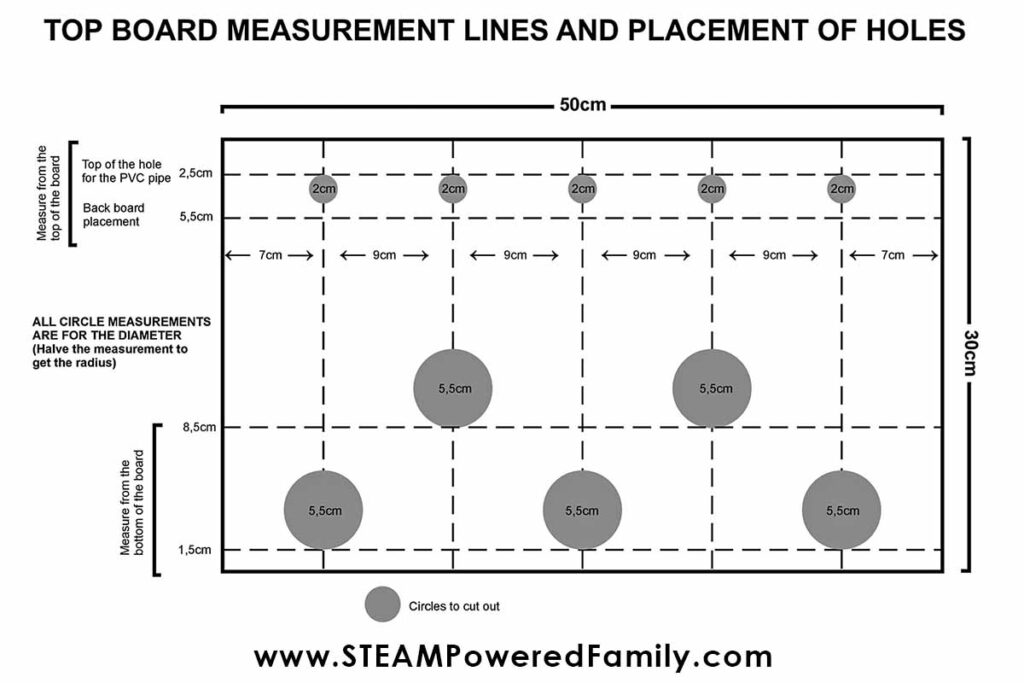
Do not try and cut out the holes in one go. Use the small Exacto knife and make light cuts all the way around. Turn the board upside down and cut through to the front; the pieces should pop out.
Remember that the knife is very sharp. Keep your fingers away from the blade, or ask an adult for help!
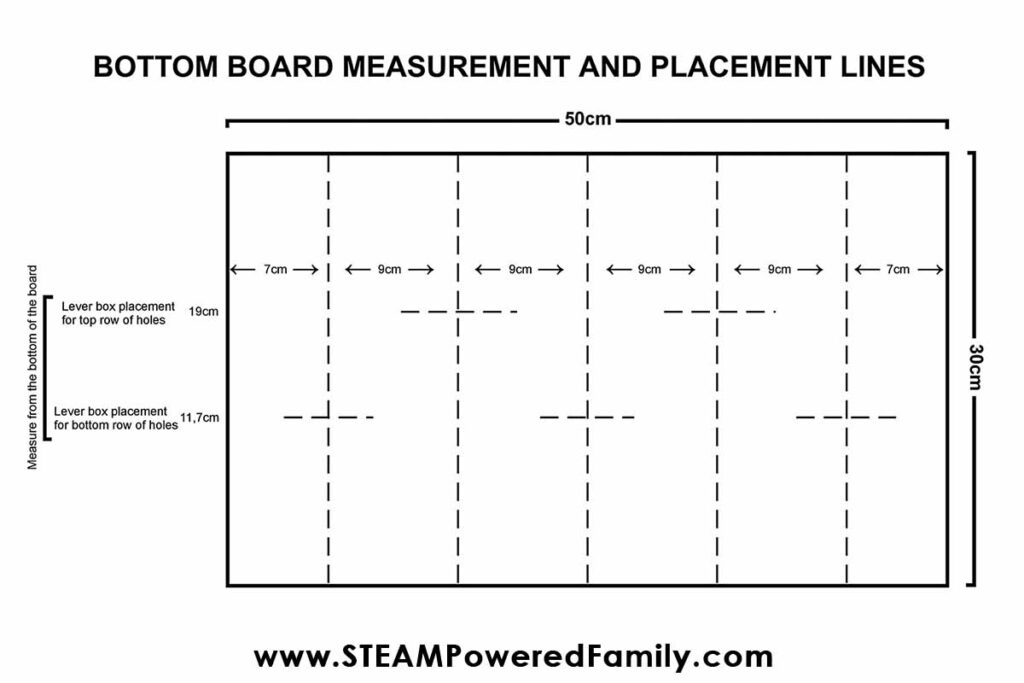
The next step is to use the template page with the heading “BOTTOM BOARD MEASUREMENT AND PLACEMENT LINES” and a marker or pencil to make all the necessary placement lines on the bottom board.
Putting it Together
It’s now time to start putting everything together!
Using the glue gun, glue all four sides onto the bottom board.
Making the lever boxes
Using the first page of the templates, use the diagram showing the skewer placement and make a mark on all the pieces for the skewer to go through.
Put two side pieces together and gently push the skewer through both parts. Do this for the other four sets.
Now glue two of the 1,9 X 5cm pieces onto one of the sides and then glue the other side piece onto the top of the whole thing. Do this for the other four sets.
They should look like this:
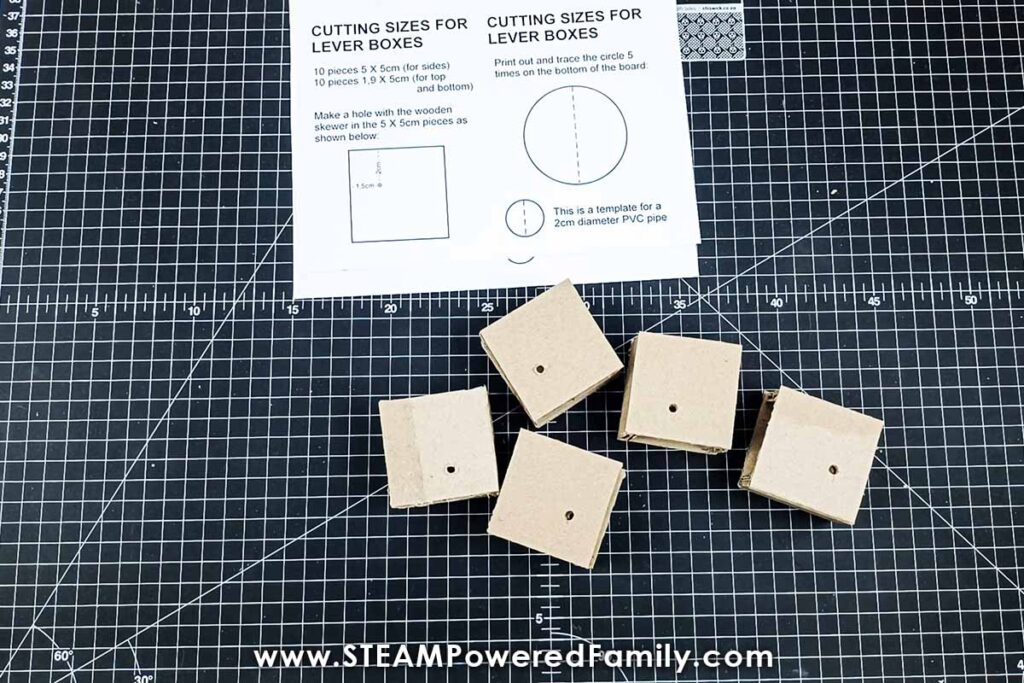
Push the wooden skewers through each one to check that the holes are in the correct place.
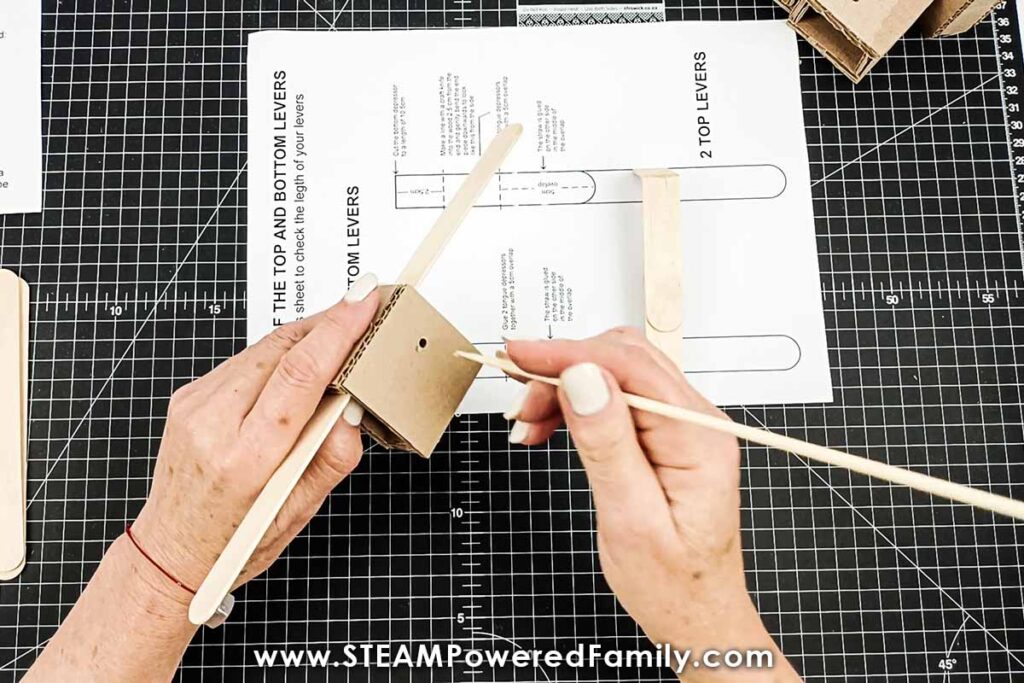
Making the levers
There are three long levers and two shorter levers.
Get the following pieces together: tongue depressors, the straw, the five nuts and the lever boxes.
Using the template page with the heading “Sizes of the top and bottom levers,” you will glue the tongue depressors together to complete the lever boxes.
Place the end of the straw onto the width of a tongue depressor and make five measurement marks. Cut the five pieces and put them aside.
Place the template in front of you and turn it sideways.
Starting with the longer levers, place a depressor on top of the diagram at the bottom of the lever, moving it slightly so you can see the measurements on the page.
Make a mark where the top depressor must be glued down, and glue the two pieces together. Do this for another lever, but this will be a short lever.
Begin by cutting the bottom depressor to 10,5cm and making a pencil line 2,5cm down from the cut edge.
Make a few gentle cuts using the hobby knife, not through the depressor. Gently bend the depressor downwards.
Use the template to check the angle of this bend. Put hot glue on both sides of the bend to hold it in place.
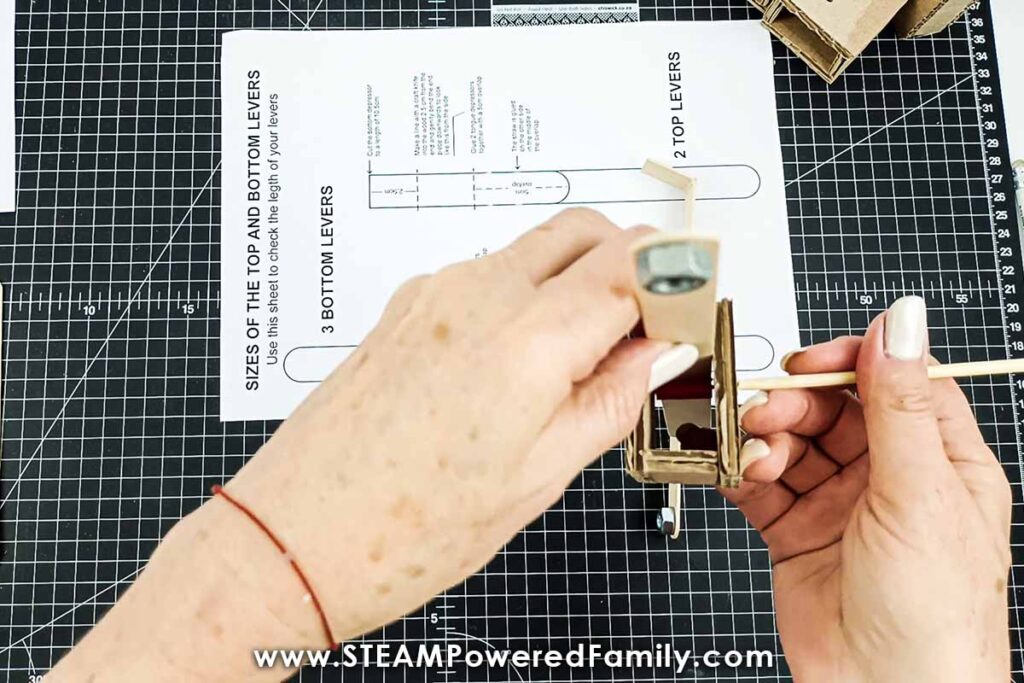
Gluing the straws and nuts onto the levers
Take turns placing each lever onto the diagram and marking the position of the straw on the underside of both levers. Then, glue the straws onto each lever securely.
Glue a nut onto the bottom end of each of the levers you have just made.
Finishing off the two levers
Insert the longer lever, with both the nut (positioned in the front) and the straw on the underside, into one of the lever boxes.
Ensure that the hole on the lever box is towards the top back of the lever box, then push the skewer through the box and the straw to the other side.
Glue in place on one side.
Cut off the excess skewer using the side cutters and glue that side in place.
Do the same thing with the shorter lever and another lever box.
Repeat the process to make another short and two long lever boxes.
Gluing the lever boxes into the main box
Place each of the levers in its correct place in the game box. Make pencil marks on the levers to mark the middle positions.
PRO TIPS!
This part of the construction involves all the critical testing before the final gluing.
You must ensure that everything is placed in its exact place and that each lever works smoothly!
Use the template as a reference. That way, you cannot go wrong.
When you are satisfied with the positioning, glue each lever box to the game box.
Getting the ping pong balls ready for the game
Cut eight pieces of cork to a measurement of 2cm each with a hobby knife. Five are for the ping pong balls, and 3 are for under the long levers.
The hobby knife is very sharp. You may need the help of an adult to do this.
Glue the colored rings onto the corks. The corks are decorative. If you do not have these rings, leave them out.
Now glue the ping pong balls onto each cork on top of the rings.
Paint the ping pong balls and give them funny faces using the template or creating your own.
Placing the ping pong balls onto the levers
Use some Blu Tack to place the ping pong balls onto the levers for testing.
Place the top lid onto the game box, and using the PVC pipe or a pencil, push the levers down through the small top holes to check that the ping pong balls jump up and down smoothly.
Make any adjustments now.
Remove the Blu Tack and glue the balls down with the glue gun.
Repeat the test with the PVC pipe or pencil to ensure everything is working correctly.
Finishing the game box
Cut five pieces of PVC pipe to a length of 3,5cm each.
Cut five pieces of the wooden dowel to a length of 7cm each.
You may need the help of an adult to cut both items. You can use a PVC cutter for the PVC and a saw for the wooden dowel.
Place the PVC pieces into their holes at the top of the board.
Next, place the whole board onto the bottom of the game and do your testing again before gluing the PVC pieces into place.
Place the three 2cm corks under each of the long levers up against the back wall of the box, close the top and test each of the levers again to see if each ping pong ball jumps out correctly.
You may have to cut the corks shorter if necessary.
When you are satisfied with the movement of everything, glue the three corks down and glue the five PVC pieces in place on the underside of the lid.
Test everything for the last time, as it’s time to paint the game and close it permanently.
Remember that adjustments are not possible once the lid is on!
Decorate and Finishing Touches
Paint all the surfaces of the inside of the box and all the corks black.
Paint the top of the lid black too.
It makes it look neater at the end. You cannot see the levers when it is painted black.
Using the glue gun, finally glue the lid onto the box.
Paint the rest of the box on the outside black as well.
Making the backboard
Paint the edges and sides of the backboard pieces black. Do not paint the front; you will glue the sign onto this piece.
Print out the two pages of the graphic.
Cut out where shown and glue the two pieces together. Use a piece of Cello tape on the back of the graphic.
Cut the whole graphic out and use a glue stick, glue it to the front of the backboard.
Glue the two sides of the backboard onto the back.
Make a pencil line 5,5cm from the back of the top of the game for the backboard and glue it down.
Decorating the top of the game
Using the circle template, trace and cut out the colored rings and stick them around the openings of the ping pong balls.
You can do the same thing with the stars.
The final step is to paint and glue the five wooden dowels into place through the PVC pieces.
PRO TIP! Put glue on the end of the dowel, hold the ping pong ball down with one hand and glue the dowel stick in place with the other hand. This method will help the ping pong ball will pop out effectively.
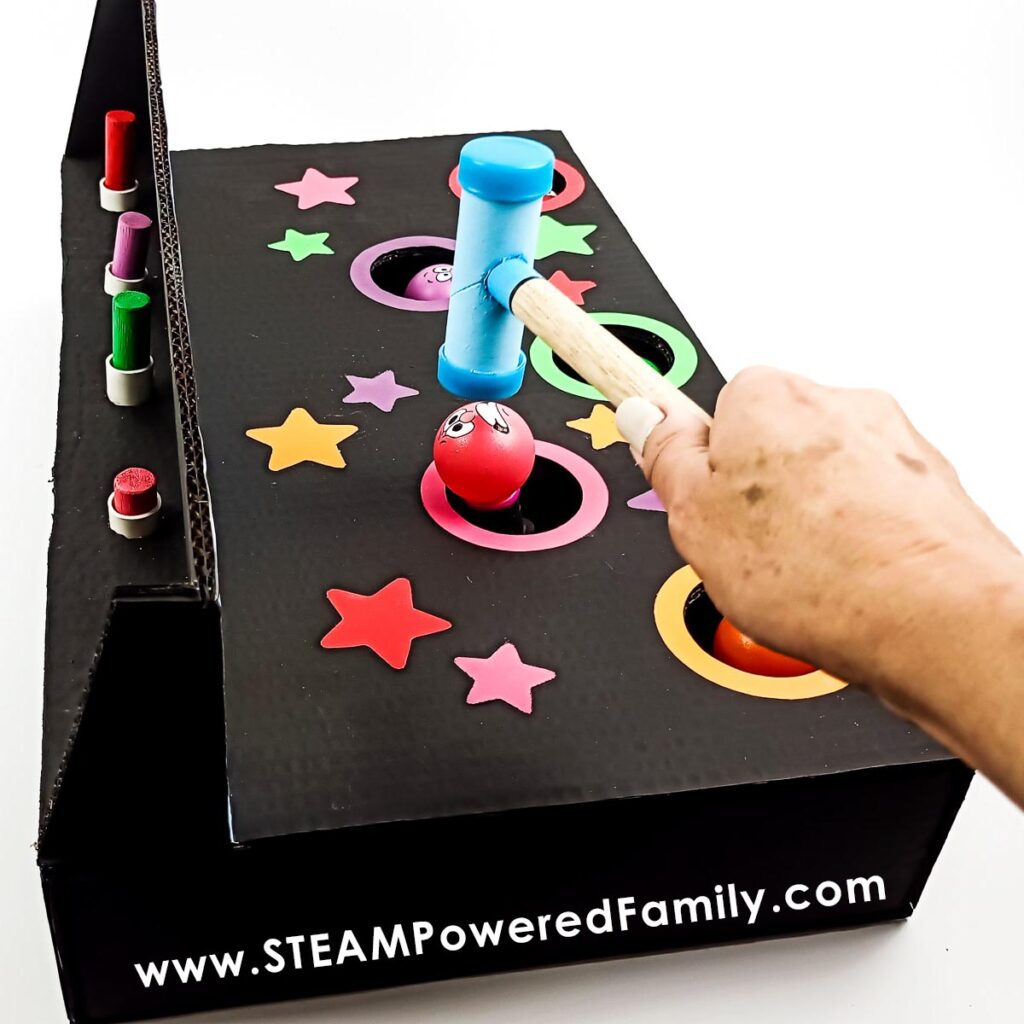
Making the hammer
Cut the thin cardboard tube to a length of 8cm and glue a bottle cap on either end.
Cut a piece of wooden dowel to 20cm for the handle.
Make a hole in the tube for the dowel and glue the dowel in place.
Alternatives for the hammer: You can use toilet roll inners for the head of the hammer. Cut the rolls open and roll them up together until they are thick enough to fit into the bottle caps. You can also use rolled-up kitchen towel inners, a chopstick or any other stick for the handle. Be innovative!
Paint and decorate the hammer.
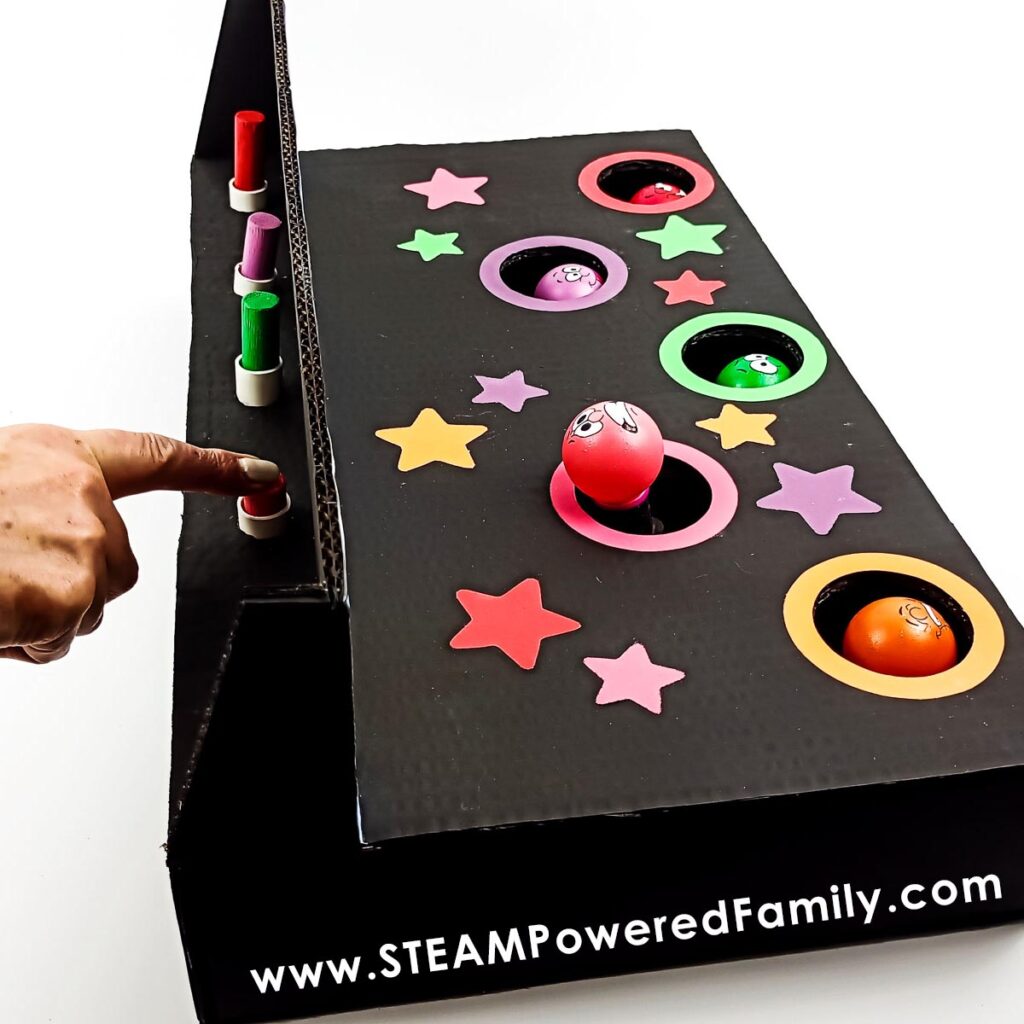
YOUR REACTION TIME TEST GAME IS READY TO PLAY!
How to Play
This game will require 3 people, one to trigger the faces to pop up, the subject (person being tested) and a timer/score keeper.
Place the game in the middle of the table. The tester goes behind the game and places their fingers on the triggers. The subject (person being tested) is on the other side of the table, facing the game with the hammer in their hand.
The timer/score keeper sets a time, of 30 seconds on a stop watch, and has a pencil and paper ready to go where they will tally all the times the person successfully hammers down the happy face.
On GO:
- the score keeper starts the stop watch and starts counting hits,
- the tester starts popping up the faces in random order,
- the subject starts whacking down the faces as fast as they can.
At the end of the 30 seconds tally up how many times the person hit the faces back down. The more times they were able to do this, the better their reaction time.
Remember, with practice reaction time improves!
Get your family and friends together and see who can knock down the highest number of funny faces in this fun Reaction Time Game! This also makes a fantastic STEM or Science Fair Project.
FAQS
No need to refer to any statistics for this one. And that’s because it’s all relative to the person. A healthy reaction time will vary per person; people do say that .25 seconds is a typical reaction time for anything visual.
It could. If you’re trying to catch someone off guard to see how long a reaction takes, giving them a hint could save them time because it gives them an idea of what to prepare for or where to look.