

How to Make a Stop Motion Animation: Autumn Leaf Fall STEAM Activity
Summer is winding down, and the trees are putting on a show — yellows, oranges, reds, and browns popping up everywhere before the leaves finally let go. It’s the perfect time to head outside with a bag, collect some of those fallen beauties, and turn them into something magical. In this fall STEAM lesson, we’re going to learn how to make a stop motion animation of leaves falling from the trees, using a free app and just a few simple supplies. Along the way, we’ll dig into the science of why leaves change colour in the first place — because great animation is even better when you understand what you’re animating.
This activity is designed for elementary students aged 7–11 and fits into a 45–60 minute class with a little preparation.
Why Do Leaves Change Colour and Fall from Trees?
Table of Contents
Disclaimer: This article may contain commission, paid partnerships, or affiliate links. We independently review everything we recommend. When you buy through our links, we may earn a commission from qualifying purchases.
Before we pick up the camera, let’s take a quick look at the science behind all those stunning autumn colours — because understanding what’s happening in the real world makes the animation feel that much more meaningful.
Evergreen vs. Deciduous Trees
There are two types of trees: evergreen and deciduous. Evergreen trees stay green through all four seasons. Deciduous trees, on the other hand, change colour in the fall and shed their leaves just before winter. They do this to conserve water and energy so they can survive the cold months. Their branches stay bare through winter, and fresh leaves return in spring.
The Science of Chlorophyll and Photosynthesis
During spring and summer, the leaves of deciduous trees work like tiny food factories. They use sunlight and water to make energy for the tree through a process called photosynthesis. Inside every leaf is a green pigment called chlorophyll, which captures sunlight and converts it into sugars — and releases oxygen into the air as a bonus.
In autumn, the days shorten and the sunlight weakens. Chlorophyll breaks down, the green colour fades away, and the hidden yellows and oranges finally get their chance to shine. Some trees actually produce brand new red and purple colours in autumn. That happens when sugary sap gets trapped inside the leaves, turning them a vivid red or burgundy.
When spring returns with warm sun and fresh water, the tree uses its stored energy to grow a whole new set of bright green leaves and the cycle starts again.
What You Need to Make Your Stop Motion Animation
Here’s everything you’ll need before you get started:
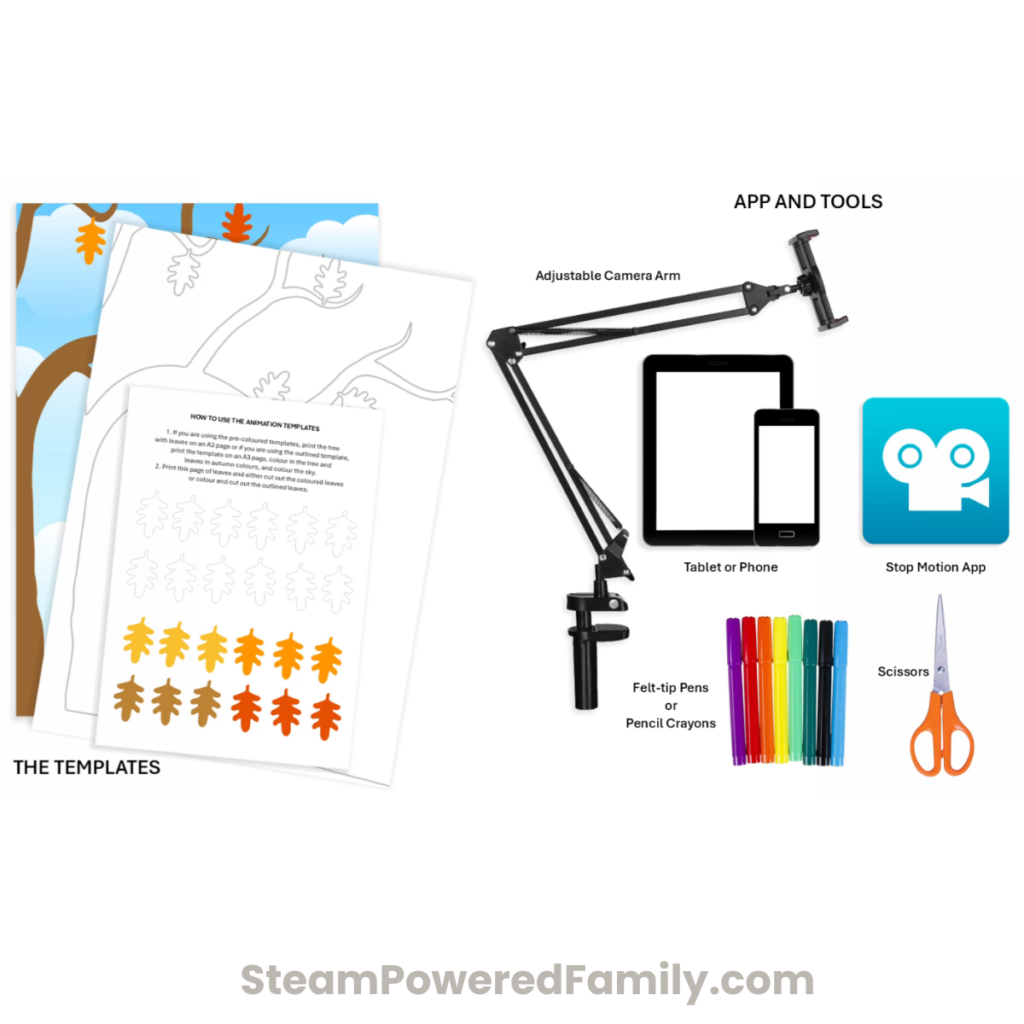
Templates: All templates come in A4 and A3 sizes. Students can draw their own pictures or use the ready-made coloured or uncoloured tree and leaf templates. Print leaf templates on cardstock and the tree background on regular copy paper.
Device: A smartphone or tablet.
Stand: A small tripod, an adjustable camera arm, or a heavy book propped on the edge of a table to keep the phone perfectly still. This matters more than most people think — even a small wobble between shots can make the animation look shaky.
App: Stop Motion Studio (free). You can download it for all devices at stopmotionstudio.com/try.html.
Lighting: A lamp, torch, or a well-lit room. Consistent lighting between shots makes a big difference to the final result.
Other supplies: Scissors for cutting out leaves, plus felt-tip pens or coloured pencils for decorating.
Understanding How Animation Works: Frames and Frame Rate
Here’s the core concept behind all stop motion animation: you take a photo, move your object slightly, take another photo, and repeat. Each photo is called a frame. When you play all those frames back quickly in sequence, the brain sees it as movement.
The number of frames shown per second is called the frame rate, usually written as fps (frames per second). The more frames you have, the smoother the animation looks. For a beginner stop motion project, most students shoot 10–15 frames per second, and 12 fps is a great starting point.
Students use paper cut-out leaves (or clay, or small toys) and move them in tiny increments between each shot, snapping a photo of each tiny move.
How to Calculate Your Frames
Once students understand frame rate, a little math comes in handy:
Total Frames = Total seconds of video × Frames per second
So if a scene is 5 seconds long and you’re shooting at 12 fps: 5 × 12 = 60 total photos
That’s a great calculation exercise to do with students before they start shooting.
Choosing Your Animation Speed
Slow (8 fps): Works well for simple, choppy, or looping movements. Good for a first attempt.
Medium (12 fps): The standard starting point for hand-drawn or cut-out style animation. This is sometimes called drawing “on twos,” where each image is held for two frames of film.
Fast (24 fps): Creates very smooth, cinematic movement. More work, but impressive results.
Step-by-Step: Making Your Autumn Leaf Animation
This video may be used as a visual example so that the students get the hang of how the video is done. Let them try it on their own or watch and follow along. If you cannot see the video, visit our YouTube Channel here.
Preparing Your Pieces
- Decide whether students will use A4 or A3 pages, and whether they’ll use the ready-made templates or design their own.
- Print leaf templates on cardstock and the tree background on copy paper.
- Have students colour and cut out their leaves.
Setting Up Your Device
- Download Stop Motion Studio from stopmotionstudio.com/try.html.
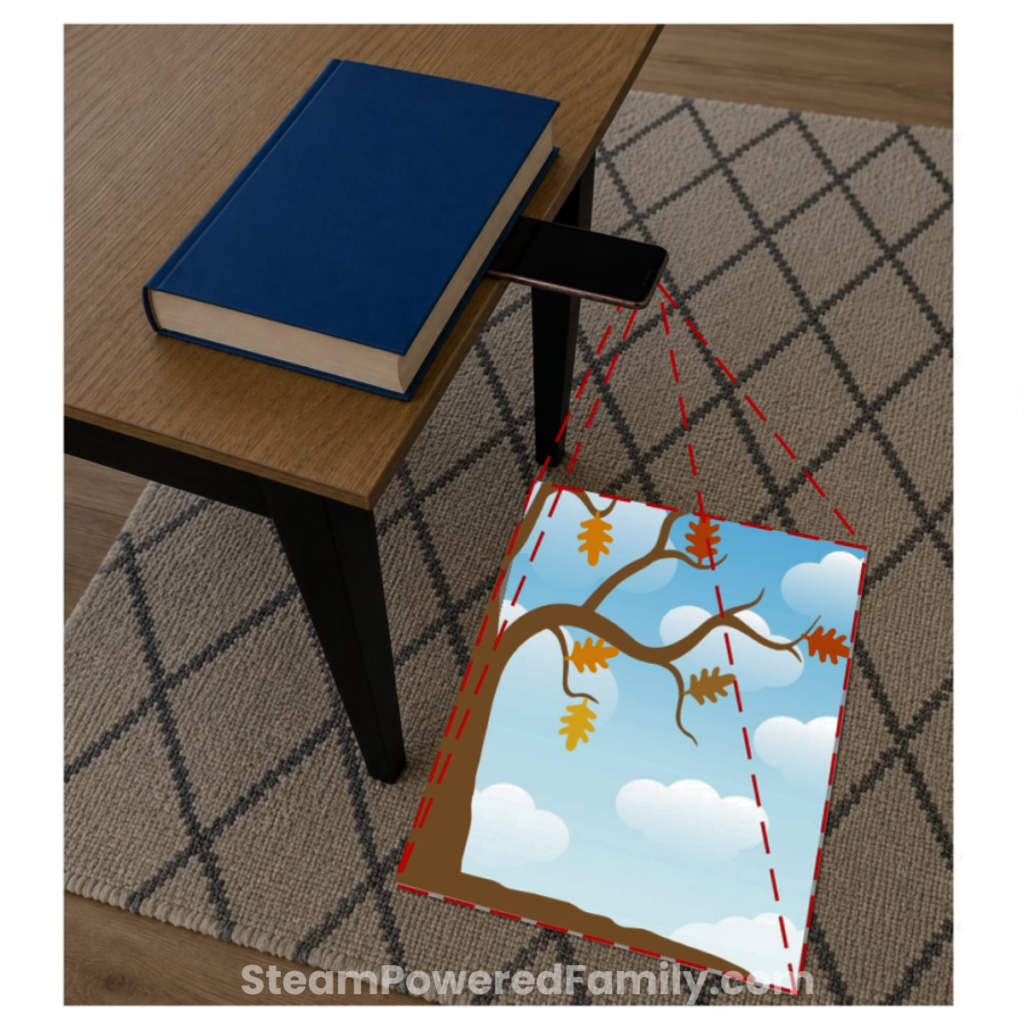
- Mount the device on a tripod, adjustable arm, or the edge of a table. If you don’t have a tripod, lay the phone face-down on the edge of the table with a heavy book on top to hold it steady. The camera should face downward over the paper.
- Place the background paper on the table directly under the device (or on the floor if working with a larger layout). Check that the full scene is in frame and the lighting is even.
Tip: Test the lighting before students start shooting. Shadows that shift between frames are one of the most common problems in beginner stop motion projects.
Making the Animation
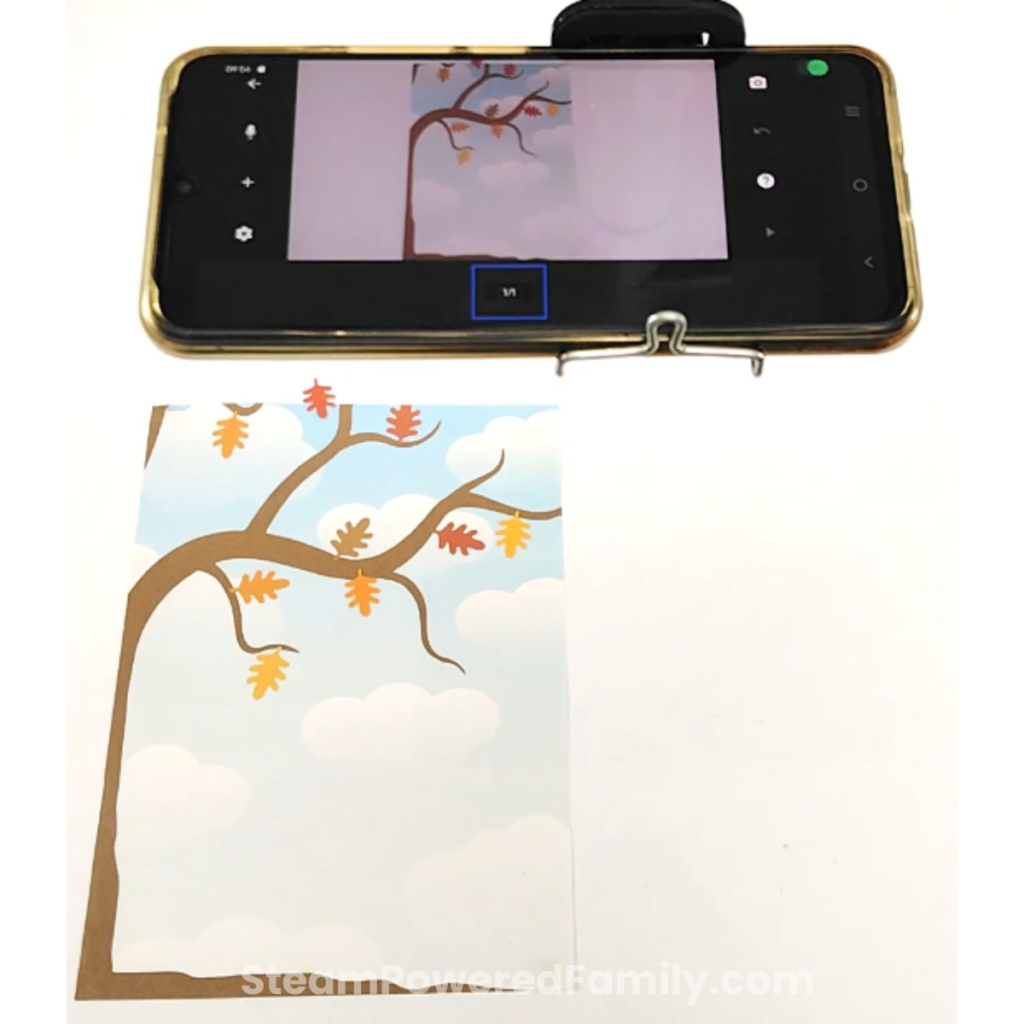
- Open Stop Motion Studio and tap the + button to create a New Movie.
- Familiarise yourself with the app layout: find the shutter button, the play button, the photo counter, and the frames-per-second setting.
- Look for the Onion Skin slider — this is a key feature that shows a faint ghost of your previous frame overlaid on the live camera view. It helps students see exactly how much they’ve moved each leaf between shots.
- Place the leaves in their starting position at the top of the tree. Take your first photo.
- Move each leaf a tiny amount in the direction you want it to fall. Take another photo. Repeat.
- Press play regularly to check progress.
- Double-tap the photo counter to open the Edit menu, where you can delete, copy, or rearrange individual frames.
- When the animation is complete, tap the animation button on the main screen to play, export, share, or rename your movie.
The video included with this lesson shows the Stop Motion Studio app in action, walking through exactly where each setting lives and how the onion skin feature works in practice.
Why Stop Motion Is Great for STEAM Learning
Stop motion animation is one of those rare activities that genuinely earns its place in every subject area.
This activity aligns with elementary science standards covering plant life cycles, seasonal changes, and observation skills. The math comes in through counting, multiplication, elapsed time, sequencing, and simple rate calculations. Technology outcomes include digital media creation and responsible device use. Literacy connects through scientific vocabulary, procedural writing, and reflection. Art is woven throughout the animation design and visual storytelling process.
But beyond the curriculum boxes, what students really get from this is a sense of how asking “how does a ball bounce?” or “how do leaves fall?” can be answered by showing the answer on screen. That’s a powerful shift in thinking. For more stop motion fun once the leaves are finished, check out how to make a digital Christmas card using stop motion — a great project to carry this skill into the holiday season.
Classroom Discussion and Exploration Prompts
Use these to push the learning further after the animation is complete:
- Why don’t evergreen trees lose all their leaves?
- How would the animation look if you took fewer photos?
- What happens when leaves move too far between pictures?
- Why do different tree species have different coloured leaves?
- How does stop motion create the illusion of movement?
- What challenges did you run into while making your movie?
- How could you improve your animation if you made it again?
Extension Ideas
- Compare different tree species and their autumn leaves.
- Measure animation speed by experimenting with different frame rates and comparing the results.
- Create an entire autumn story using stop motion, with narration explaining the leaf biology.
- Compare deciduous and evergreen trees in your school grounds or neighbourhood.
- Turn the finished animation into a digital class presentation.
- Create a time-lapse of real leaf fall and compare it side by side with the stop motion version.
Ready to Get Animating?
There’s something genuinely satisfying about watching a collection of paper leaves tumble down a drawn tree — especially knowing your students shot every single frame themselves. Give it a try, and don’t worry if the first attempt is a little wobbly. That’s part of the process. We’d love to see what your class creates!
Frequently Asked Questions
Stop motion animation is a filmmaking technique where you create the illusion of movement by photographing objects or characters in small, incremental positions and playing those photos back in rapid sequence. Each individual photo is called a frame. The faster those frames play back, the smoother the movement appears on screen. Cut-out paper shapes, clay figures, and small toys are all common materials for beginner stop motion projects.
Most beginner stop motion projects use 10–15 photos for each second of video. A good starting point is 12 frames per second (fps). So a 5-second animation at 12 fps requires 60 individual photos. Fewer frames per second creates a choppier look; more frames creates smoother, more fluid movement.
Stop Motion Studio is one of the most popular free apps for kids and classrooms. It works on both iOS and Android devices, has a simple interface, and includes helpful features like the onion skin overlay (which shows a ghost of your previous frame so students can see exactly how far to move objects). You can download it free at stopmotionstudio.com/try.html.
This autumn leaf stop motion project is designed for elementary students aged 7–11. Younger students in the 7–8 range may need more adult help setting up the device and app, while students aged 9–11 can work more independently. With the right preparation, the full activity fits into a 45–60 minute class period.
Yes, with preparation it fits comfortably into a 45–60 minute lesson. The key is printing and cutting out the templates beforehand, downloading the app before class, and doing a quick test shot to confirm the lighting and camera position. If time is tight, skip the colouring step and use the pre-coloured templates instead.