

How to Make a DIY Pringles Can Lamp: A STEM Engineering Project for Kids
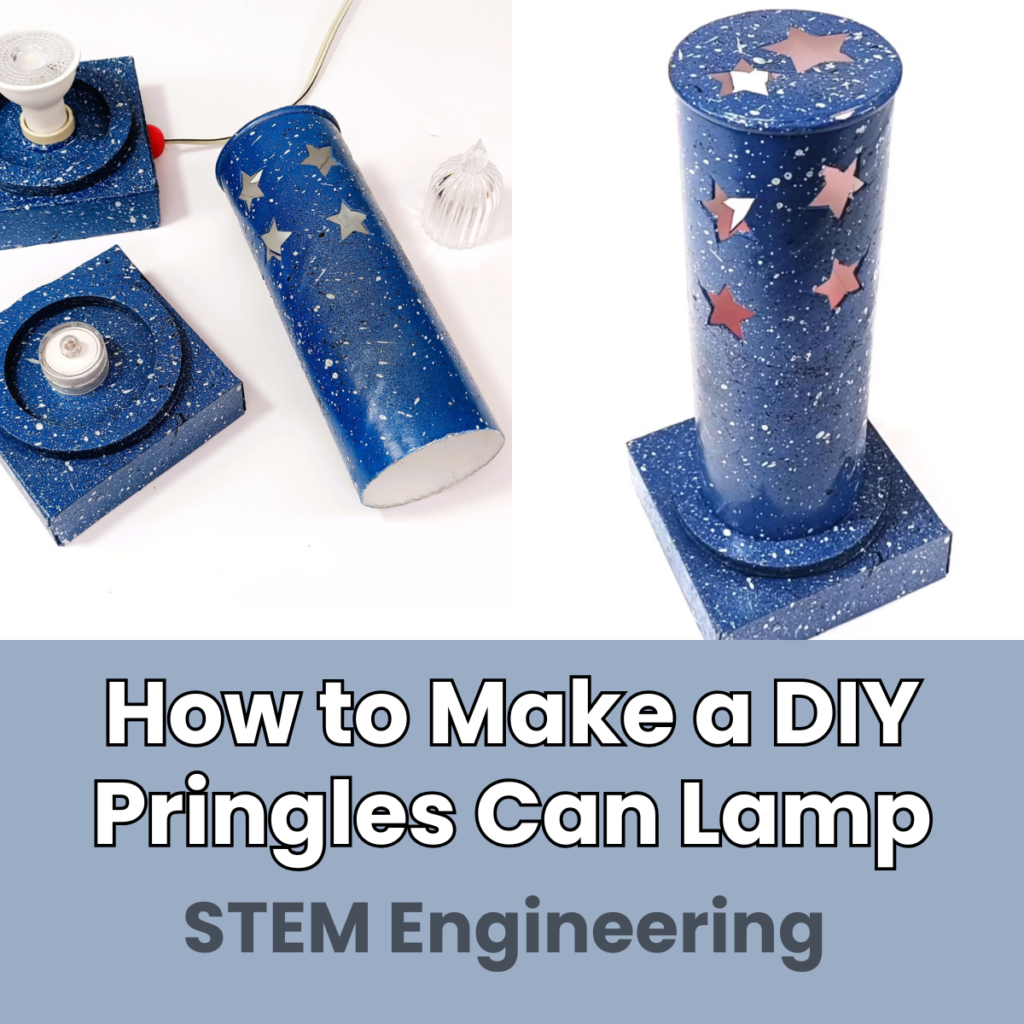
Have you ever looked at an empty Pringles can and wondered if it could become something useful? In this exciting STEM maker project, you’ll transform a recycled Pringles can into a beautiful decorative lamp that projects geometric patterns onto nearby walls and ceilings.
As light shines through the cut-out shapes, you’ll discover how light travels, reflects, and creates shadows. By experimenting with different geometric patterns, lighting options, and diffuser materials, you’ll learn how design choices can dramatically affect the result.
This project combines engineering, product design, geometry, electricity, circuits, and creativity. Along the way, you’ll follow the Engineering Design Process by designing, building, testing, and improving your lamp. In fact, engineers rarely get the perfect design on the first try! During testing, you can compare different LEDs, interior colours, and diffuser materials to discover which combination creates the brightest and most interesting light patterns.
One of the most surprising discoveries during testing was that a white interior produced brighter and clearer projections than a black interior. This is because white reflects light while black absorbs it. Small changes like these can make a huge difference to the final design.
For an even softer glow, translucent materials such as tracing paper or wax paper can be placed behind the cut-outs. These materials diffuse the light, creating a different lighting effect and giving learners another opportunity to investigate how light behaves.
This project is also a fantastic example of upcycling. Instead of throwing away an empty container, you’ll repurpose it into a functional decorative object while developing valuable STEM, maker, and problem-solving skills.
The Science Behind Your DIY Pringles Can Lamp
Table of Contents
Disclaimer: This article may contain commission, paid partnerships, or affiliate links. We independently review everything we recommend. When you buy through our links, we may earn a commission from qualifying purchases.
Before you grab your tools, gather your materials, and turn an ordinary Pringles can into something magical, let’s learn what electricity and circuits are and how it all works.
What Is a Simple Circuit?
What Is Electricity?
You use electricity every day, when you switch on a light or use a torch to find your way in the dark.
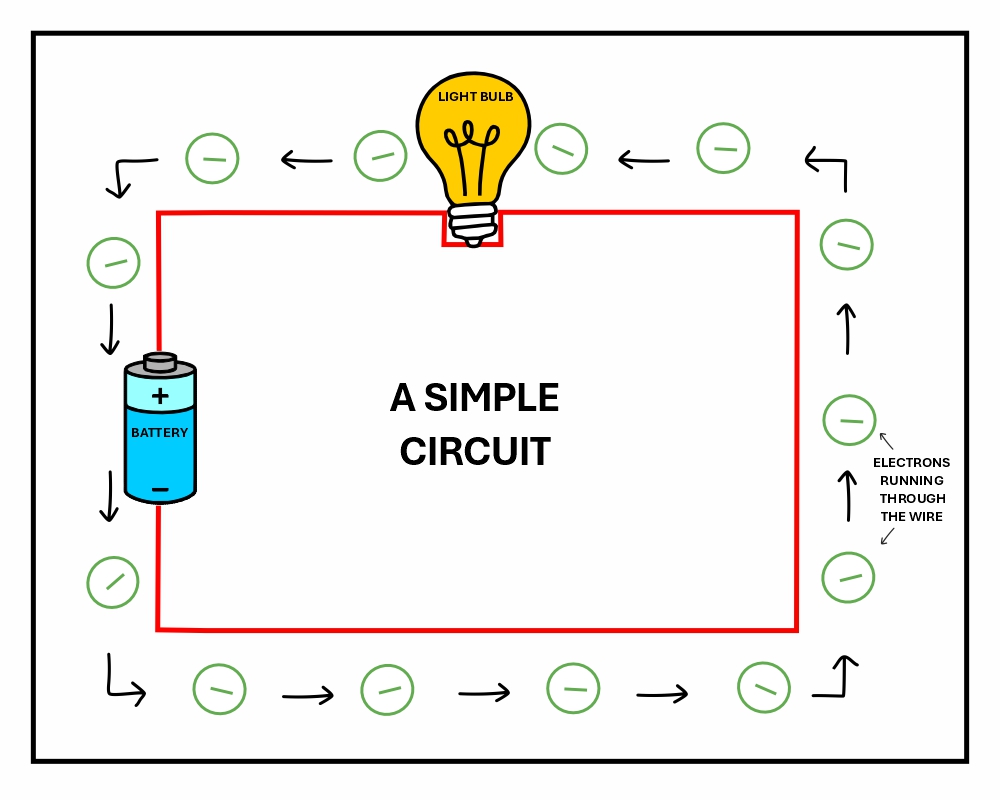
Electricity is made of tiny particles called electrons. These electrons move around in a wire, and when they move, they create energy that powers things.
How Does Electricity Flow Through a Circuit?
Electricity needs a path to travel through, called a circuit. Think of a simple torch: a battery connects to a light bulb using two wires, forming a loop.
The battery pushes electrons out, and around that loop, and as they travel, the electrons power the light.
One important rule: the loop must be complete. If a wire breaks or gets disconnected, the electrons can’t flow, and the light goes off.
What Is a Switch and How Does It Work?
A switch is just a way to break the loop on purpose. Flick it off, the loop breaks, light goes out. Flick it on, the loop closes, light comes on.
That’s all a circuit is: a closed path that electricity flows through!
This project includes an LED powered by a plug that is plugged into a wall, and the other is a simple LED light, powered by coin cell batteries.
You can watch the whole video first to decide which lamp you would like to make, or watch the video and follow each step to make and test both lamps.
It is time to make some magic!
DIY Pringles Can Lamp Video
Watch the full build before you get started, if you can’t see the video due to your settings, visit our YouTube channel.
How to Make a DIY Pringles Can Lamp: Step-by-Step Build Guide
Materials and Tools You Will Need
- The Templates
- Scrap postage box cardboard
- Drill with a 6 mm drill bit
- Wood Glue
- Glue gun
- Craft knife
- X-Acto knife
- Scissors
- Empty Pringles can
- Wire Stripper
- 1/2 Round wooden bead (optional)
- Pencil
- Small & medium star screwdrivers
- Small pliers
- Pack of Sticky glue dots or double-sided tape
- Ruler
- Can of matt white spray paint
- Material to decorate your lamp
Different Types of LEDs and Hardware to Use
- 6.5W LED spotlight bulb and a lamp holder
- Fairy Lights with coin cell batteries
- Different sizes of small LEDs that use coin cell batteries (try to find ones that change colour)
- Tracing paper or wax paper to diffuse the light
- 1M length of 2-core wire
- Plug
- Strip wire connectors
LET’S BUILD!
Step 1: Prepare All the Pieces
Print out both pages of the templates on cardstock, not paper, as you need to trace the shapes onto the lamp and the base.
NOTE: Please check all the measurements of your Pringles can, as your Pringles can might be different to the one used in the video and adjust the sizes of all the pieces, so it will work correctly.
Start with the template for the stars first.
Cut everything out as indicated.
Then move on to the other page and cut the template for the base out.
Place the template onto a piece of scrap cardboard, trace around the shape you just cut out, and
Do not forget to mark the score lines and the centre dot for the hole of the LED.
Using a ruler and something to score the cardboard, make the score lines. I used a wooden skewer, you can also use an old pen that has no ink in it, the point of a pair of scissors, an awl or even an old nail.
Now we are going to trace and cut 6 circles for the base. This is where you need to check the diameter of your Pringles can. Will your can fit into the inner circle snugly? If not, redraw the inner circle to the correct measurements.
Put the inner circle aside for later. Check if it will fit on the top of your Pringles can. If not, cut one that will cover the top of the can.
Use the X-Acto knife to cut, and remember that the blade is very sharp, so keep your fingers out of the way of the blade and don’t try to cut through the cardboard in one pass. SLOW AND STEADY ALWAYS WINS THE RACE!!!!
Using some scissors, cut out the rectangle with the stars and then use the X-Acto knife to cut out all the stars.
Tape the template about 1.5 cm down from the top lip of the can.
Use a pencil to trace all the stars. Do the same for the two stars on the circle for the top of the can.
Now use the X-Acto knife to cut out all the stars on the can and on the circle for the top. Make small cuts from the point of the star to the middle or from the middle to the point, turning the can as you go.
Use the X-Acto knife again to cut the metal base off the bottom of the can. Place the knife into the can about 3 – 4mm from the bottom. You will feel it when you are in the correct place.
As you are cutting, keep the knife against the metal, and you cannot go skew that way!
Using the wood glue, stick the circle with the 2 stars onto the top of the can.
NOTE: Remember to always put whatever you are working on to let the glue dry for about 5 minutes.
When the glue is dry, take your can outside and spray the inside (and/or outside) of the can with the matt white spray paint. You can use acrylic paint, but spray paint is a whole lot easier.
The inside of the tube must be white, as white does not absorb the LED light and gives a cleaner, more defined pattern on the ceiling or the wall.
While the paint is drying, let us glue the 6 rings you cut out earlier, using wood glue.
Remember to put something heavy on top of the stack while it is drying. I have heavy paper weights.
While this is drying, let’s make the base of the lamp.
In the video, I have made 2 different bases, one that is wired with a plug to the wall and another for any simple coin cell-powered LED. Maybe watch both and decide which one you want to make, or just do both.
If you are doing both, you will need two of all the cardboard pieces, so pause the video and get cutting!
When the rings are dry, please check that the Pringles tube fits snugly into the stack of 6 rings.
How to Build the Wired Base for Your DIY Pringles Can Lamp
Trace the circle of the lamp holder onto the base template you cut earlier and cut out that hole with the X-Acto knife.
Turn the cardboard with the scored lines to the inside and gently push the lamp holder into the hole so that the two wires are on the inside of the base. The lamp holder should only stick out about 2- 3 mm on the inside of the base.
Use the glue gun to glue it into place on both the top and the bottom sides.
Get a 1/2 round bead and drill a hole for the wires to get through. This is just to make the hole on the side of the base neater. If you don’t have one, it is ok.
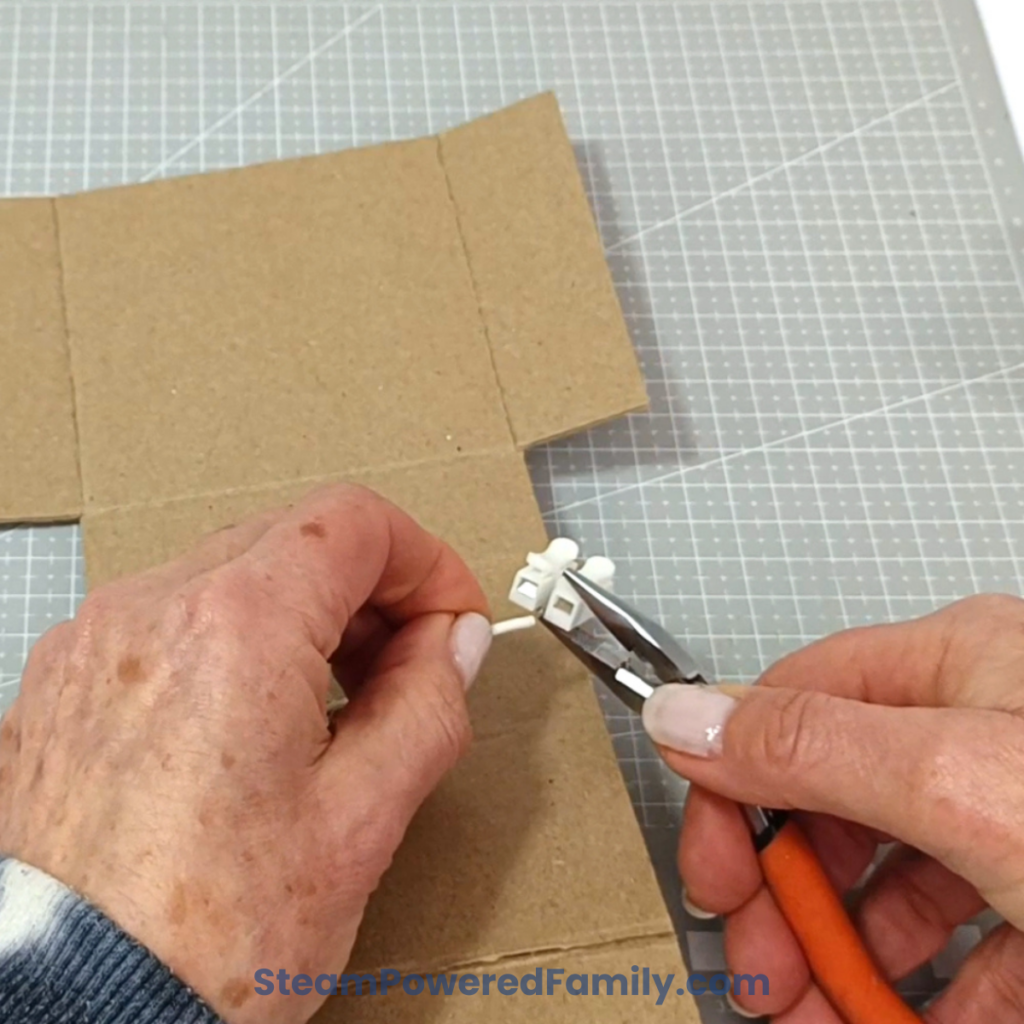
Using a small pair of pliers, gently press one of the ends of the wire connector.
Can you see that when you press it makes a space for the wire to fit into?
Place the ends of the wires on the lamp holder into their own hole on the connector.
Now, using the X-Acto knife, separate the two sides of the 1m wire.
Use the wire stripper to expose the copper wire inside the plastic cover of the wire. Always remember to twist the ends of the bare wire…it makes it easy to join or thread into the connectors.
Put each wire into its own hole on the connector. Both wires should be connected to the first wires you pushed into the connectors.
Use a ruler to find the middle of one of the sides of the base and make a hole with the end of the pencil for the wire to fit through.
Thread the other end of the wire through the hole, from the inside to the outside and then the 1/2 round bead, if you have one.
Fold the top of the box toward you so you can see the lamp holder, and put a line of glue from the glue gun onto the edge of the flap and stick it to the bottom of the base.
Now close each side of the box by putting glue onto the three sides and gluing it closed. Repeat this on the other side.
Use the glue gun to stick the bead to the side of the base.
How to Wire the Plug for Your DIY Pringles Can Lamp
Use the X-Acto knife to separate the two sides of the wire.
Use the wire stripper to remove the plastic from each end as you did before. Remove a little more plastic from each end, as you will be folding the bare wire in half, making it double. This gives a better connection to the plug.
Twist the ends of the bare wire.
Open the two screws on the outside of the plug with a screwdriver. My plug has star-shaped screws; yours might have a flat head, so ensure that you have the correct screwdriver.
My plug has 3 places to put the wires, but we are not using the top one (earth), only the two on the sides (live & neutral). My wire does not have colours, so I can put the wires onto either side of the plug.
Many wires have a blue, a brown and a yellow/green wire.
The yellow/green wire is called “earth” and goes to the top.
The blue wire goes to the left (the word blue has an “l”, so it helps us to remember that it goes to the left or to the side of the plug that has an “N” for neutral).
The brown wire goes to the right (the word brown has an “r”, so it helps us to remember that it goes to the right or to the side of the plug that has an “L” for live).
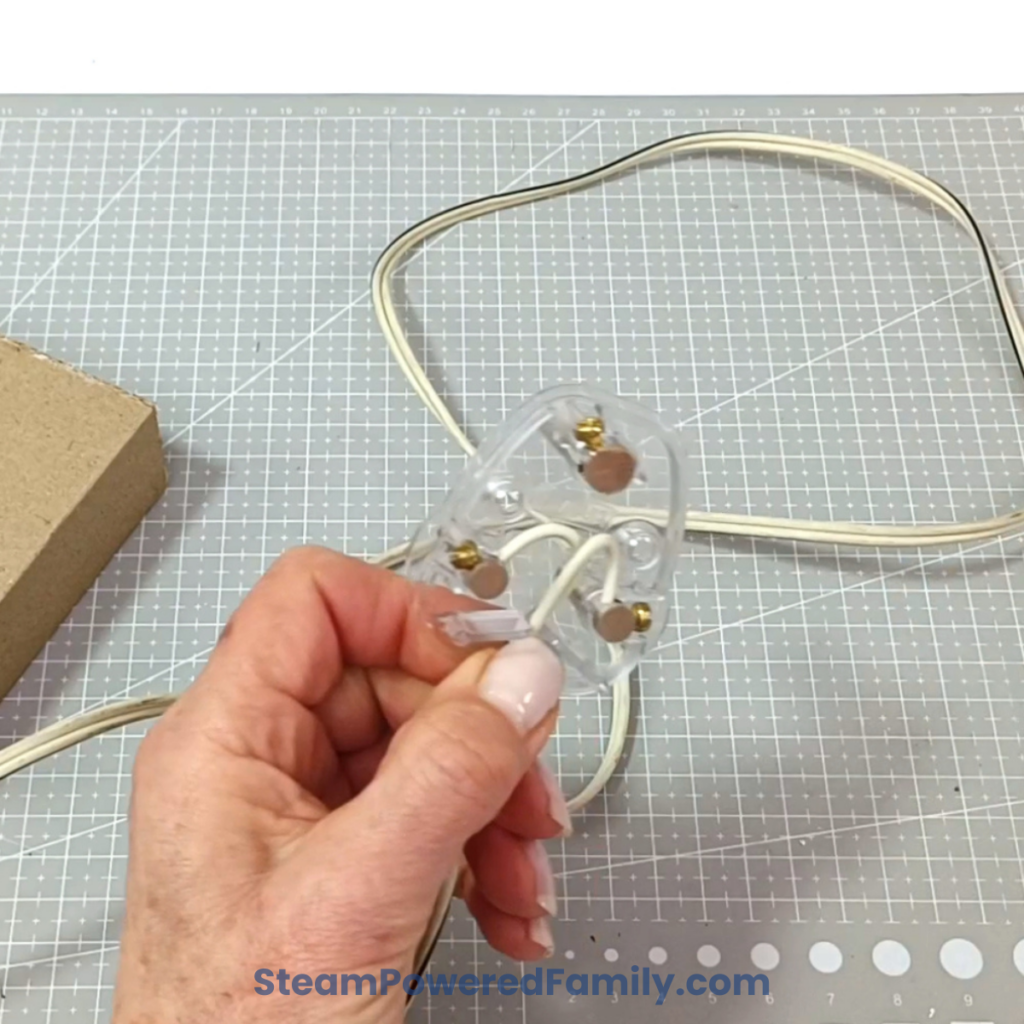
Once the plug is open, gently open the two screws on the left and right of the plug. DO NOT REMOVE THEM COMPLETELY!
Just open them enough to allow the wire to go through.
Bend the bare wire on one side in half, thread it through the hole and holding it in place, tighten the screw.
Repeat this step on the other side.
Check that each wire is tightly screwed down by gently tugging on each wire.
Now close the plug and put the 2 screws in.
Gently push the two legs of the LED globe into the holder and turn the globe (either to the left or right) to tighten it in place.
YOU ARE NOW READY TO TEST THE WIRING YOU HAVE JUST DONE! YAY!
Plug the plug into the wall and watch your LED globe turn on!
Well done, if it is working, remove the globe to complete building the lamp. If it doesn’t work, there is a wire that is loose. Rewind the video and watch it step by step again.
NOTE: Remember to unplug the plug from the wall before you start rewiring again!
Glue the stack of 6 rings you glued together earlier onto the middle of the top of the base and leave it to dry with something heavy on it.
When it is dry, put the LED in, place the Pringles can into the rings, to see that it all fits and plug the plug into the wall and watch the magic!
You won’t see much in the light. It will look way better at night next to your bed!
How to Build the Coin Cell Battery Base for Your DIY Pringles Can Lamp
Let’s make the second base.
The whole thing is the same as the first base, but without the hole for the LED globe & lamp holder, the wire or the connectors. This one is way simpler, but really effective!
Glue the first flap down, then the two sides and finally the 6 rings on the top for the Pringles can.
Don’t forget to wait for the glue to dry!
The LED I chose for this is powered by 2 X coin cell batteries, and it changes colour on its own.
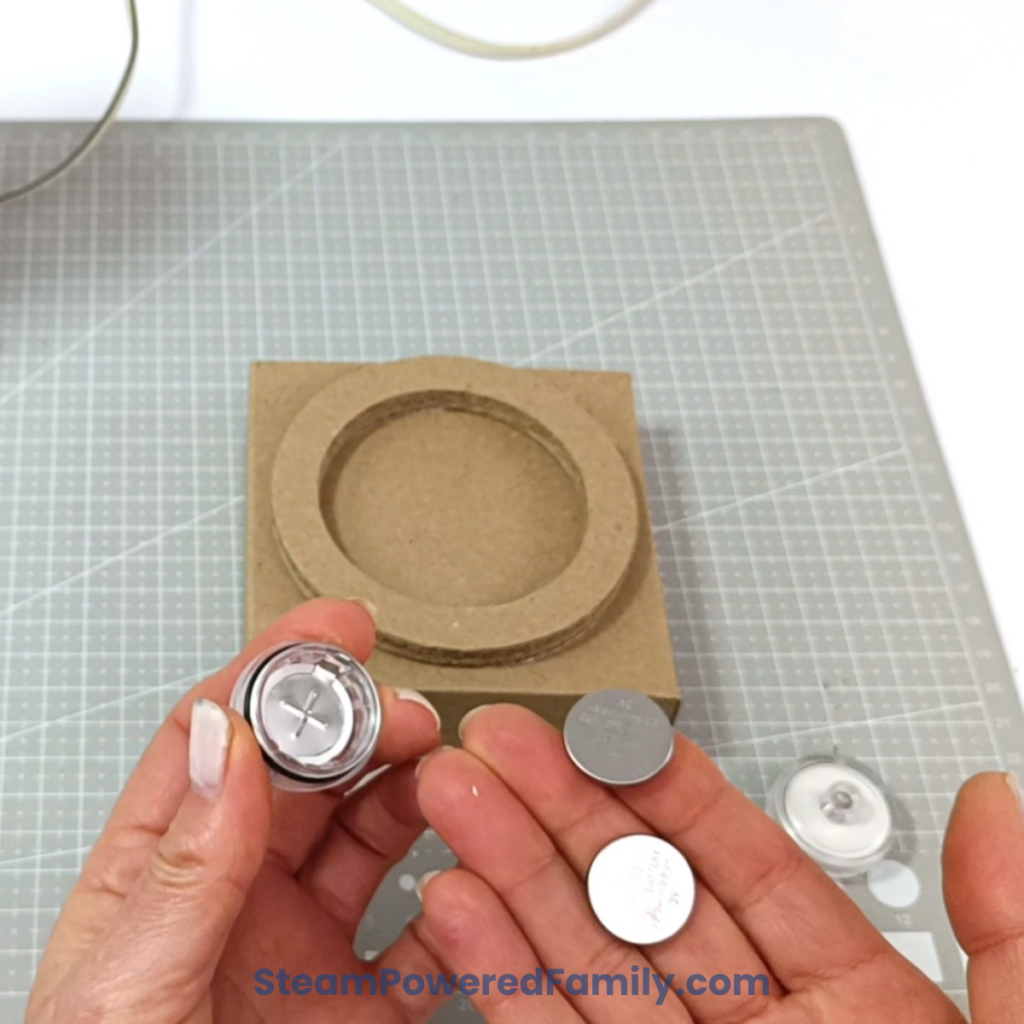
There is always a piece of plastic inside the LED to save the batteries so that they work for longer, so don’t forget to remove the plastic and replace it when you are not using the lamp.
I used 2 X sticky glue dots, one on each side of the bottom of the LED, to hold it in place. These are easily removable, so you can try different kinds of coin cell battery LEDs in your lamp. They just need to fit into the Pringles can.
Close the LED properly so that the light comes on. Use the Pringles can you made and gently push it into the stack of 6 rings and watch the magic! Once again, it will look way better at night next to your bed.
How to Paint and Decorate Your DIY Pringles Can Lamp
This is the time for you to paint and decorate your lamp.
Please do not paint the inside. This must be white!
You can use any medium you choose. I used spray paint as it was much easier.
I rolled a piece of scrap cardstock up, pushed it inside the can and then some paper towels right up to the top, to prevent the spray from getting inside the can.
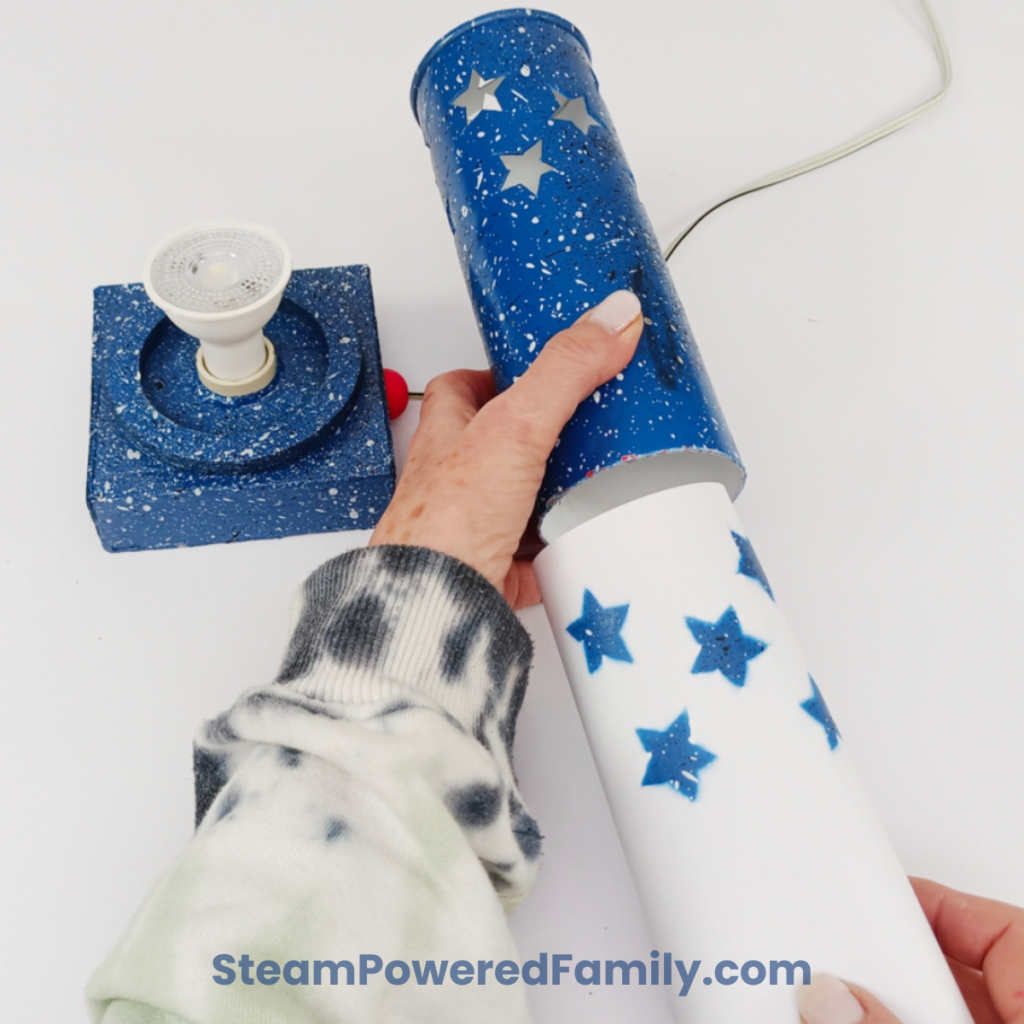
How to Use Tracing Paper or Wax Paper to Diffuse the Light
I did tell you to get some tracing paper or wax paper. The purpose of this is to diffuse the light from the LED. This means that because the paper is translucent, it scatters the light rays emitted from the lamp instead of letting them pass straight through and removes dark shadows and softens the glow of the light.
I preferred the lamp without the tracing paper/wax paper. The colours and shapes were much more noticeable and sharper, but you need to test this to see the difference.
Just roll the tracing paper up and slide it into the can to see the difference. Ensure that the paper is not doubled in thickness.
Testing Different LEDs, Interior Colours, and Diffuser Materials
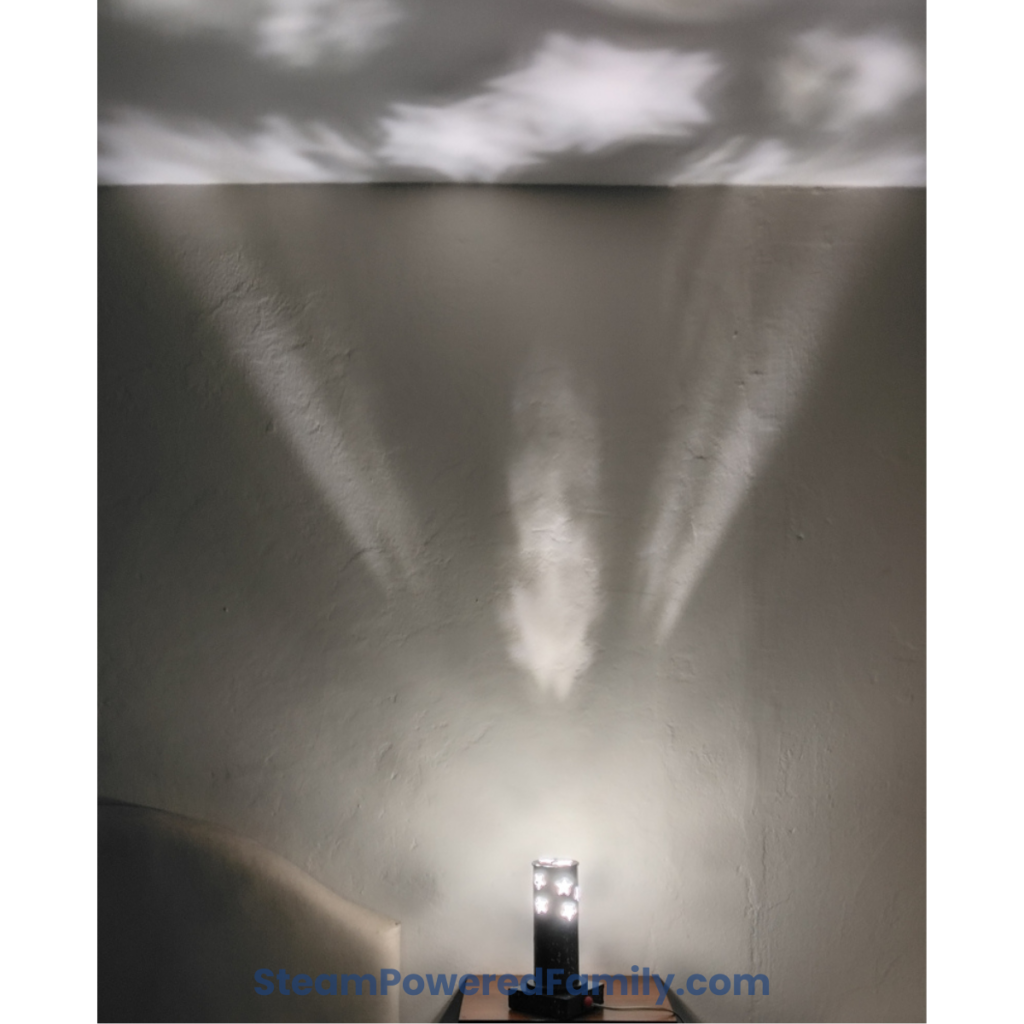
See the different lights and patterns the 3 different LEDs produced at the end of the video. The patterns even reached the ceiling!
During testing, several different LEDs, interior colours, and diffuser materials were compared. A white interior produced brighter projections because it reflected more light than a black interior. A colour-changing LED created the most dramatic lighting effects and projected colourful patterns onto nearby walls and ceilings.
Safety Notes for Your DIY Pringles Can Lamp Project
Always use cool-running LED lights, LED tea lights, or battery-powered fairy lights. Traditional bulbs can become hot and may damage the lamp or create a fire hazard.
Adult supervision is recommended when cutting shapes into the can, using craft knives, or assembling electrical components.
STEM Connections in This DIY Pringles Can Lamp Project
This project explores several STEM disciplines:
Engineering Design: Planning, prototyping, testing, and improving a working product.
Light and Optics: Investigating how light travels through openings and translucent materials.
Electricity and Circuits: Understanding how LEDs, batteries, and simple circuits provide illumination.
Product Design: Creating a lamp that is both attractive and functional.
Geometry and Patterns: Designing symmetrical and repeating cut-out shapes.
Sustainability: Repurposing waste materials into something useful.
Learning Outcomes From the DIY Pringles Can Lamp Project
By completing this project, learners will:
- Design and create a functional lamp from recycled materials.
- Explore how light travels through openings and translucent materials.
- Investigate the effects of geometric patterns on light projection.
- Apply engineering design principles to improve stability and appearance.
- Understand basic electrical concepts when using LED lighting.
- Develop creative problem-solving and prototyping skills.
- Evaluate how recycled materials can be repurposed into useful products.
Frequently Asked Questions About the DIY Pringles Can Lamp
Cut decorative patterns into the can and add LED lights or fairy lights inside.
Yes, when using cool-running LEDs rather than heat-producing bulbs.
Students learn engineering, design, optics, geometry, and sustainability concepts.
Yes, with adult supervision during cutting and assembly steps.
LEDs produce very little heat and are safer for craft projects.
Tracing paper, vellum, tissue paper, or frosted plastic work well.
Different shapes and spacing change how light spreads and creates shadows.
It repurposes a discarded container into a functional decorative object.