Earthquake STEM Challenge
In this Earthquake STEM challenge students will work in teams to learn more about Earthquakes and then build a shake table and seismograph. Using these tools, students will be structural engineers as they design buildings that can withstand the movement of earthquakes. This hands on Earthquake activity is a fantastic way to explore the science and engineering in the study of earthquakes.
EARTHQUAKE STEM Challenge and Unit Study
Table of Contents
Disclaimer: This article may contain commission, paid partnerships, or affiliate links. We independently review everything we recommend. When you buy through our links, we may earn a commission from qualifying purchases.
Have you ever felt the ground you are standing on or your house shake and wonder what that was? It could be an earthquake. Earthquakes happen all the time, but most of them are so small that we can’t feel them, and they don’t cause any damage.
Earthquake STEM Project Video Tutorial
Check out the video of this Earthquake STEM project. If you can’t see the video tutorial, try turning off your adblockers as they also block our video feed. You can also find this Earthquake Project Video Tutorial on the STEAM Powered Family YouTube Channel.
Now before we start building, let’s learn about Earthquakes!
What is an Earthquake? The Science
What causes Earthquakes?
Earthquakes are caused by the shaking, rolling or a sudden shock of the Earth’s surface.
The Earth’s surface is like a jigsaw puzzle. It is not one single piece of land but approximately 20 pieces of a puzzle that constantly move very slowly. That is why you don’t feel every move they make.
Each of one those puzzle pieces are called Tectonic Plates. These plates make up the earth’s crust which is the earth’s outermost layer. They float on fluid and are always moving because they are not locked in place. As the plates move, they cause pressure and tension by touching each other.
When these plates hit bump or slide past another plate, an earthquake is caused! The surface where these plates slip is called the Fault. This happens all the time, but we don’t feel these earthquakes, as most of the time they are too small to reach us. When they are very strong, that they can be felt over 1 000 miles/1 609 km away.
The place where the earthquake starts is called the Hypocenter and the place where it occurs on the Earth’s surface is called the Epicenter.
Where do Earthquakes occur?
Millions of people all over the world, live in earthquake-prone areas. There is an area of land called The Ring of Fire around the rim of the Pacific Ocean where 90% of all earthquakes take place.
Three Types of Earthquakes
Convergent boundary – this happens when one plate is forced over another plate during an earthquake and this causes a Thrust Fault. Many hills and mountains have been formed this way.
Divergent boundary – This happens when the plates have drifted away from each other. This forms a Rift Zone. This is where new ocean floors to develop.
Transform fault – This happens when the plates slip by each other, and this is also called Strike-Slip.
How is an Earthquake Measured?
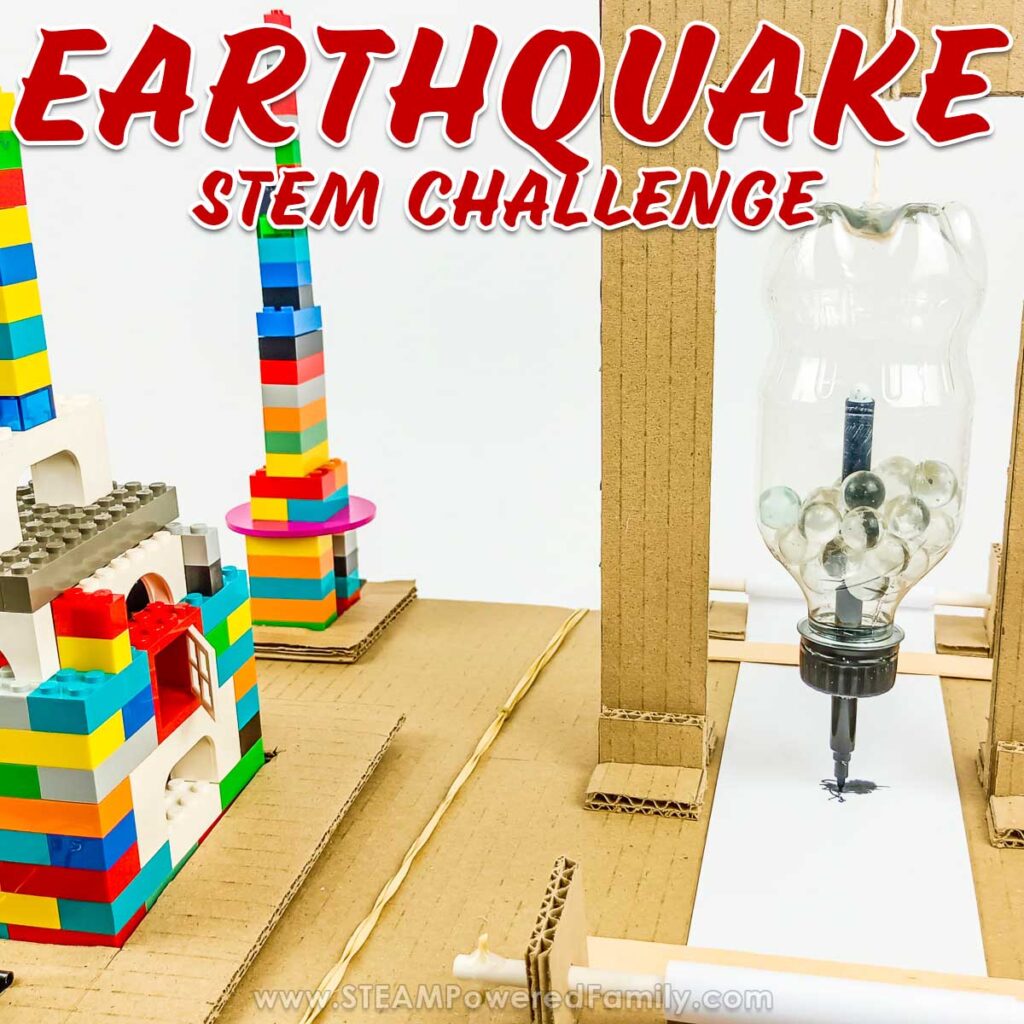
A seismograph is a tool used by scientists to measure the movement of the ground in an earthquake. This movement is called seismic waves. Seismographs are also used to detect earthquakes, volcanoes, and large explosions very far away. They are very sensitive to the earth’s movement.
The seismograph you will build is an old-fashioned tool that makes use of a marker to record the movements made by the shaker table on a strip of paper. Seismographs today, are rigid structures that record the motion of the earth using electrical signals.
Earthquake Scale
A Richter Scale measures the magnitude or strength of an earthquake by how much energy the earthquake releases. A 1.5 reading is the smallest earthquake one can feel. A 4.5 reading is an earthquake causing slight damage and an 8.5 or 9 reading is a devastating earthquake.
Fun facts about Earthquakes
The Tokyo Sky Tree is the tallest tower in the world. It is 634m/2,080 ft tall. It was built right in the middle of an earthquake zone. When the engineers and architects designed the building, they had to use the latest anti-earthquake technology. They had to ensure that the tower stood on a triangular, pyramid shaped base. They also had to use dampers, which are giant shock absorbers that could act as a cushion for this very tall tower to protect it during any earthquakes. Their designing genius prevented the tower from a 9.0 magnitude earthquake in 2011, while it was still being built. Nothing was damaged and no workers were hurt during this very powerful earthquake.
The San Andreas Fault in California is one of the most famous because it is very active and runs most of the length of the state. They have many earthquakes in California.
Earthquakes are the most dangerous of all the natural disasters. They come with little or no warning sometimes and can cause extreme damage and geological events such as landslides, tidal waves, or volcanic eruptions.
Earthquake Activity for Students
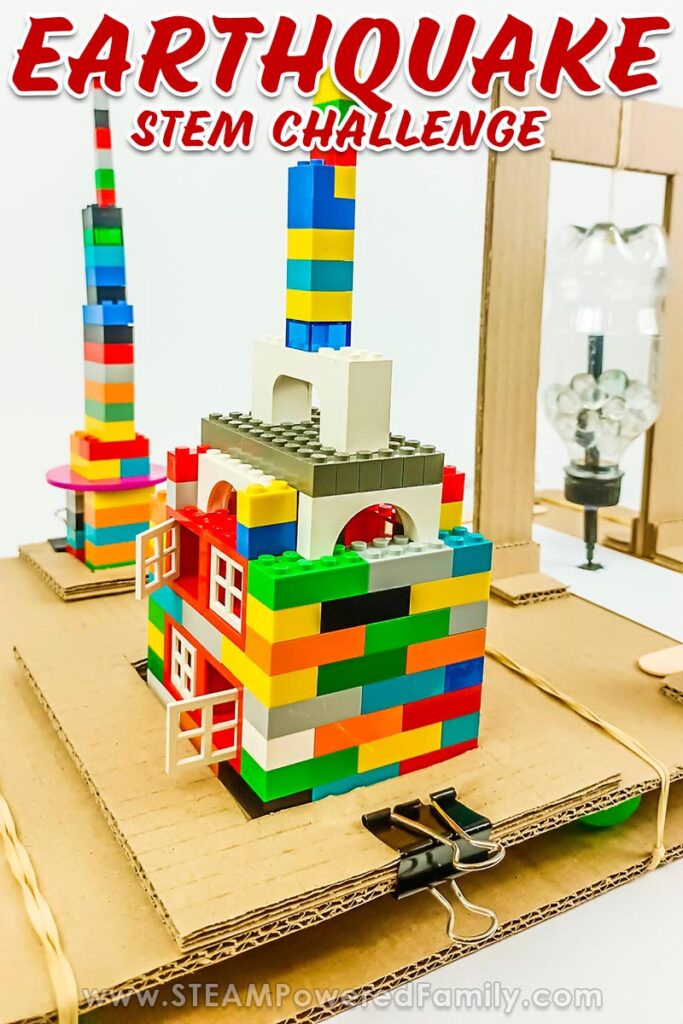
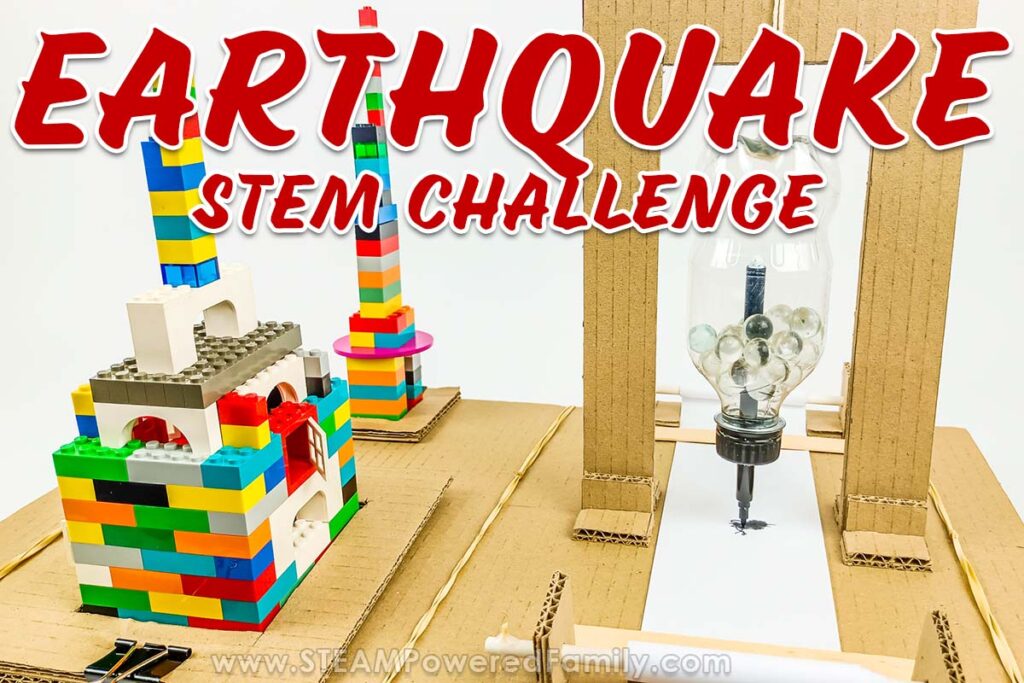
In this exciting Earthquake STEM project, you are going to build a small Shake Table, which will simulate an earthquake. Giant tables like this are built to help engineers design and build better earthquake-proof buildings.
You will also design, build and test two (or more) structures that you think can withstand the forces of an earthquake and you will build a seismograph.
Pro Tip! This is an intermediate level engineering STEM build with many steps. I highly recommend watching the tutorial video of this project from start to finish. You can find the video at the top of this article, or on our YouTube Channel.
How to Make a Seismograph
Let’s start by making a seismograph!
Materials & Tools
Piece of cardboard box
Marbles
Two straws
String
Scissors
Small plastic bottle
White printer paper cut into strips measuring 7.5cm/3 inch wide each or a roll of white paper Wooden toothpicks
Drill or a soldering iron (to make holes in bottle)
Thumbtack
Cello tape
Plus you will need the printable template for cutting the cardboard. This is available to STEAM Powered Family mailing list members. Simply enter your email to unlock the printable.
Directions
Cut out all the pieces that you see on the printable template and trace them onto the carboard box and cut them out.

Glue the four of the small pieces of cardboard onto the front and back of the bottom of the legs of the frame.
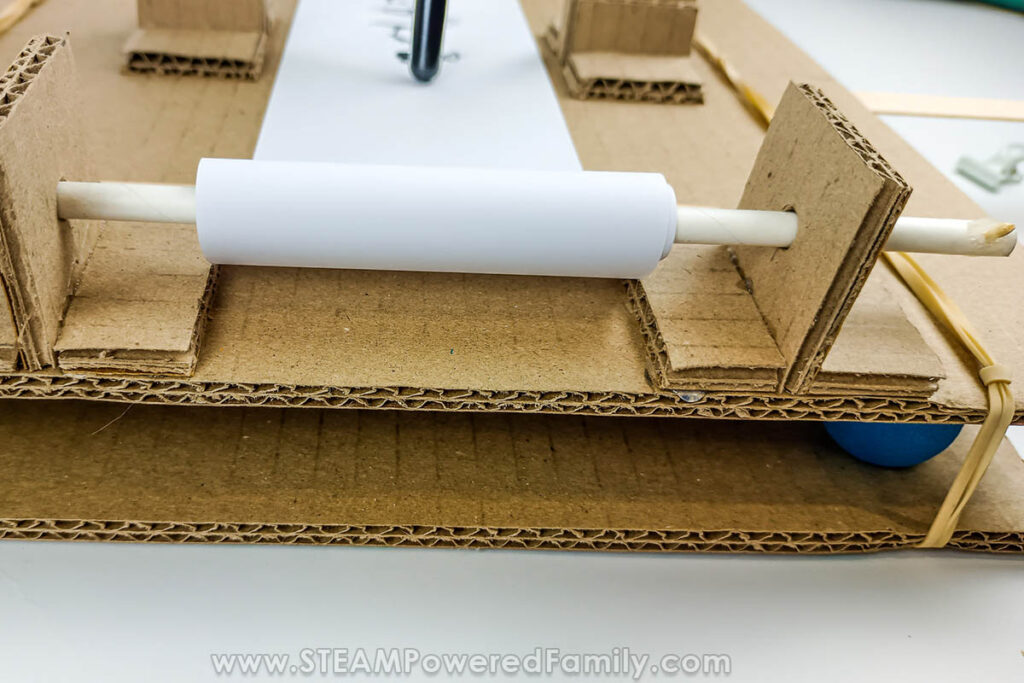
Make holes, using the tip of a pencil, in the middle of the squares for the paper roll stands. Ensure that the straws slide through the holes easily.
Glue the little feet onto these squares.
Push the straw through the two stands. This will hold the paper for the seismograph.
The end of both straws should have a toothpick on the ends. These will act as a handle. Cut the toothpicks off and glue in place with the glue gun (you will do the other three at a later stage).
Prepare the bottle
Using a drill or a soldering iron, make a hole in the bottle top, large enough for the felt tip pen to fit through.
Pro Tip! Ask an adult to help with the drill and when using the glue gun or soldering iron as they are very hot.
Using the soldering iron make a tiny hole on the underside of the plastic bottle. This is where the string will go.
Thread the string from the underside of the bottle out the other side and make a big knot to prevent the string from coming out of the bottle.
Use a glue gun to glue the string at the top of the bottle just to secure it in place.
Glue the felt-tip pen into the hole of the bottle top just above the lid of the pen.
Fill the bottom of the bottle with marbles or coins. This acts as a weight to keep the pen steady.
Add extra pieces of cardboard onto the bottom of the frame so that the frame stands securely.
Put a little hot glue onto the end of the string attached to the bottle to make it easier to thread it through the cardboard.
You will glue the bottle onto the frame when the shake table is done so let’s get started with making the shake table.
How to Build a Shake Table
Materials & Tools
Two large pieces of cardboard – Recycled boxes work great!
Craft knife
Ruler
Twelve large rubber bands
Three paper clips
Three large craft sticks (tongue depressors)
Two binder clips
Glue gun
Scissors
Six small rubber balls
Lego (to make model buildings) (see below for alternative ideas if you don’t have Lego)
Directions
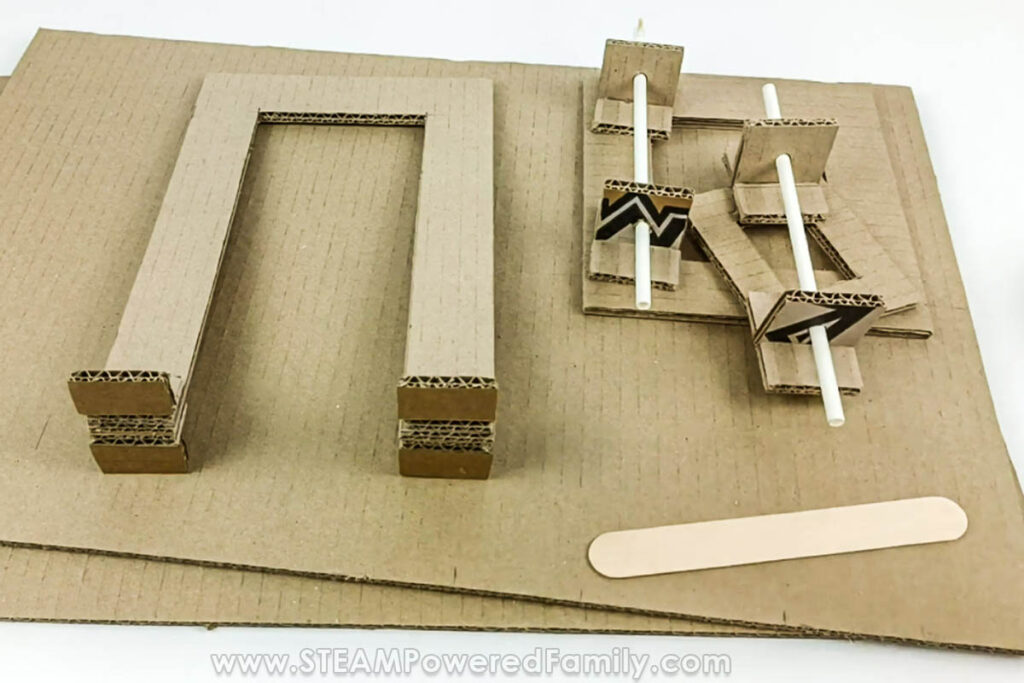
Build the Shake Table Base
Cut two pieces of cardboard 50 cm/19½ inches X 32 centimetres/ 12½ inches.
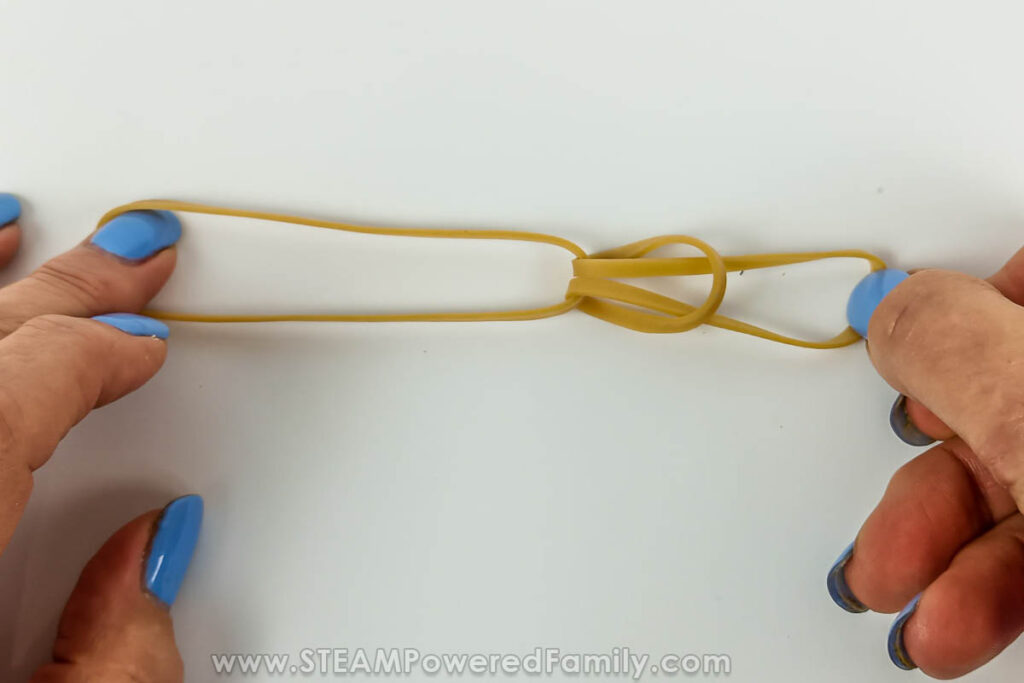
Get four of the rubber bands and one paper clip. Join the four elastics together and lastly slip both ends on to the paperclip.
Make another three bands like this with the rest of the rubber bands.
Get all the pieces of the seismograph that you made at the beginning.
Making the Paper Roll
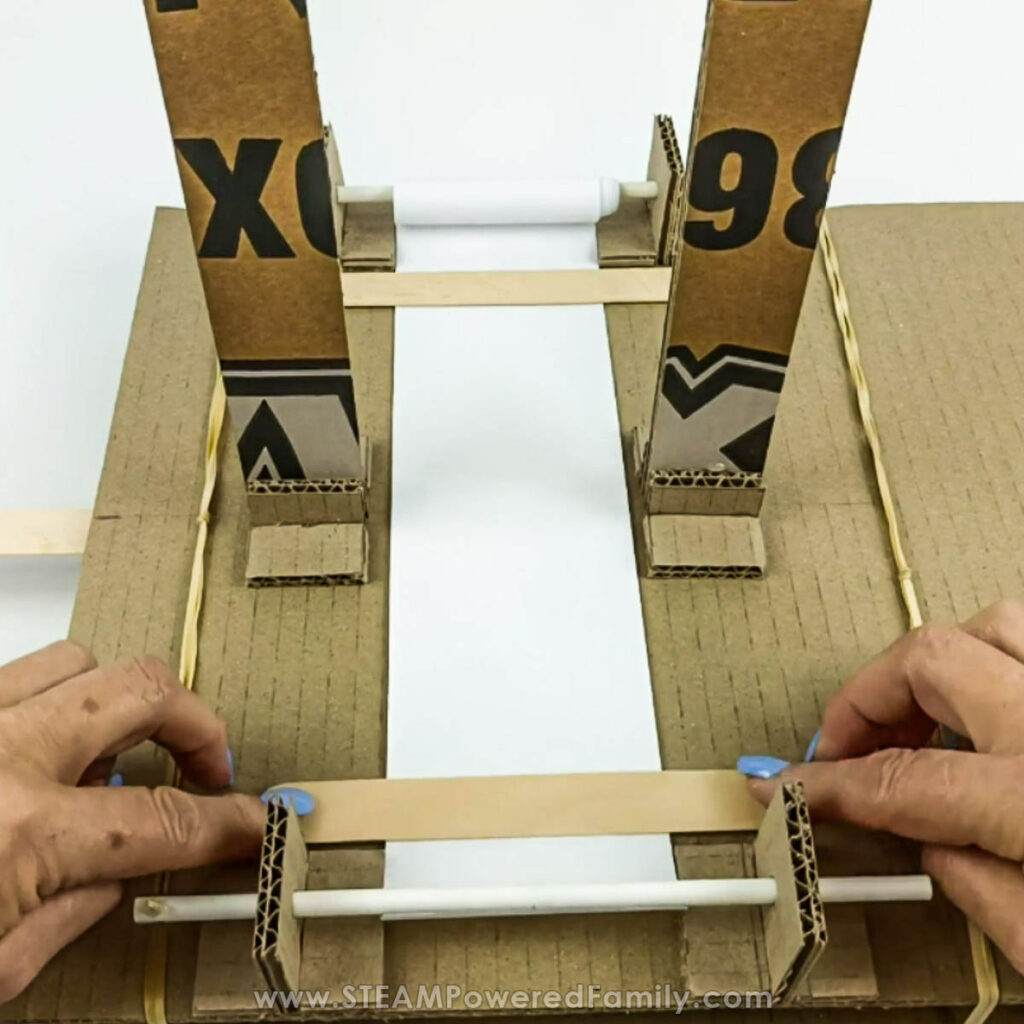
Using the glue gun, glue the frame of the seismograph 5cm/2 inch in from the short edge and in the middle of the long edge.
Glue the legs of the paper holder in line with the legs of the frame and on the edge of the long side of the base.
Lay a strip of paper down the middle, under the frame and between the legs of the paper holder to make sure that the paper is straight.
Do this without the straw in place.
Repeat the steps for the paper holder on the opposite side.
Now put the straws back in through the holes.
Make a pencil mark in the middle of the short side near to the frame of the seismograph and glue the large lollipop stick on the underside of the cardboard where you made the pencil mark. This will be the handle that you hold onto to make your earthquake move.
Remove the straws and make a pencil mark in the middle of the two straws.
Cut a long length of paper off the paper roll or simply cut strips of white printer paper (7.5cm/3 inch wide) and join them together with sticky tape or glue.
Make a pencil mark in the middle, on the beginning and the end of the paper strip.
Put the one straw into it place and using a strip of sticky tape, stick the one end of the paper strip onto the straw and roll the whole strip of paper onto it.
Turn the base around and repeat the process on the other side.
Build the Shake Base
Place the other large cardboard sheet underneath this one.
Get the elastics that you made earlier and place one in the middle of the two boards and one on either end.
Place a rubber ball between the two sheets of cardboard, in line with the elastics. Do this on the opposite side as well.
With the glue gun, glue the other two craft sticks over each side of the paper strip, just in front of the paper stands with the straws.
IMPORTANT PRO TIP! Do not glue them flat. Put a blob of glue on either side of the stick and gently drop it into place. The paper must be able to slide easily underneath these sticks.
Using a push pin make a hole all the way through the end of the straw and insert a toothpick into the hole. Do this on all ends of the straws. Trim the toothpicks with a side cutters and glue them in place.
Find the middle of the top of the frame where the bottle will hang. Thread the string upwards through to the top of the frame.
Remove the lid of the felt pen and work out how high the bottle needs to be so that the tip of the pen is just touching the paper. Glue the string in place.
Test to see that the paper moves freely underneath the tip of the pen.
Don’t forget to replace the lid of the pen. You don’t want the pen to dry out before you start your fun experiment!
Structural Engineering Challenge
It’s time to build your two structures to test your earthquake project.
You may use LEGO, wooden blocks, toothpicks with marshmallows, it’s entirely up to you. Make sure that the structures you build are completely different heights and shapes. One of the evaluations you can do as part of your STEM investigation is to determine the most shake resistant structure.
Build Lego Buildings
First, build your Lego Building Structures. You can build these however you wish, but make sure you have two different designs so you can compare the results. I suggest making at least one a nice tall structure, like you see in big cities.
Cut bases for Lego Building Structures
You will need to cut cardboard bases to go under your Lego structures to stabilize them during your simulated earthquake. Cut out a cardboard piece that is approximately an inch to 2 inches bigger than the base of your structure all the way around. Then cut a hold in the middle that just fits around the base of your structure.
Place your cardboard bases and structures on top of your earthquake experiment and use bulldog clips to keep the cardboard base in place.
Now time to shake things up! The earthquake experiment is ready to test!
Earthquake Experiments
Now everything is ready, it is time to do the experiments. Shake the table by moving it side to side while another team member slowly moves the paper through the seismograph to get the reading. Watch what happens to the buildings and compare it to the seismograph results to determine the earthquake resistance of the building designs.
Alternative simple materials you could try using for this project:
Cardboard tubes or large springs instead of bouncy balls for the shake table.
Wooden skewers or toothpicks with marshmallows, playdough, or blue tack.
Wooden building bricks.
Straws and paperclips.
Engineering Design Process
Part of this Earthquake STEM challenge is to design buildings that can handle the movement of the shake table.
STEM professionals use the engineering design process as steps to help solve real-world problems. Have your students work in a team to define the problem, discuss solutions, design, build, test, and improve a prototype of your solution for the best earthquake resistant buildings, just like structural engineers do in the real world. One of the most important steps of the engineering design process is to reflect and redesign. If your students notice their Lego buildings are falling during the earthquakes, brainstorm ways to improve the design. Use the engineering design process steps to guide your exploration and discovery of better design strategies. Can your students come up with an earthquake-proof structure design?
Here are some guiding questions you can use with your students.
While testing the structures on the shake table, ask these questions:
Did your structure fall over?
Possible Solution: Your base could be too small. Make it wider. Large bases provide greater stability.
Did your structure collapse?
Possible Solution: The shapes you have used could be wrong. Remember that all three sides of a triangle carry the same amount of weight, so consider changing the square shapes you have used into triangles, by making cross braces, which go from one corner of the square to the other.
Extension Ideas
What did testing help you understand about how you constructed your structure? Can you think of a different way to build your structures to make them more stable during an Earthquake?
What are the strengths of your design?
What are the weaknesses of your design?
Would you feel safe in your structure in an earthquake?
Have you used the correct materials to build your structure?
I hope you had fun building and doing this experiment!