DIY Chladni Plate Experiment
We have all heard sound, but has anyone ever seen it? Sound is all around us, but we rarely stop to think about what it really is. Every time you speak, play an instrument, clap your hands, or hear raindrops falling, invisible vibrations move through the air and into your ears. But what if students could actually see sound waves in action? In this hands-on DIY Chladni Plate experiment, students will build a simple sound art visualizer to explore how vibrations create visible patterns. This powerful STEM activity transforms abstract physics concepts like frequency, resonance, and sound waves into something students can see and touch.

Disclaimer: This article may contain commission, paid partnerships, or affiliate links. We independently review everything we recommend. When you buy through our links, we may earn a commission from qualifying purchases.
What Is a Chladni Plate?
Table of Contents
A Chladni Plate experiment is a classic physics demonstration that shows how sound vibrations create patterns. In the 1700s, Ernst Chladni, known as “the father of acoustics,” discovered that when sand is placed on a vibrating plate, it moves into symmetrical patterns called Chladni figures. These patterns form at nodes which are areas where the surface is not vibrating.
He realized that this magical plate allowed people to see sound. He put fine sand onto a metal or glass plate, and when he stroked his violin bow along the edge of the plate, the sand on the plate made different symmetrical patterns, depending on how much or how little the plate vibrated.
How This Sound Visualization Experiment Works
This project is about sound being an energy that moves particles of air, water, and solids, which create vibrations. Frequency is the speed of these vibrations, which is responsible for the pitch of sound. High frequencies create higher pitches and are measured in Hertz. Every object vibrates, and when vibrations all have the same rhythm, it has what we call resonance. An example of resonance in nature is when the wind blows; it creates resonance in the trees, making them all sway in the same way, like they are dancing.
Sound is energy that travels in waves. These waves cause materials to vibrate. When vibrations happen at different speeds (called frequency), they create different patterns.
- Frequency is measured in Hertz (Hz)
- Higher frequency = higher pitch
- Lower frequency = lower pitch
- When vibrations align, we call this resonance
This hands-on project works brilliantly for ages 8–14, but with simple adaptations, it can stretch into a deeper STEM sound experiment for older learners, science fairs, or cross-curricular STEAM projects.
Making a Chladni Plate or a Sound Art Visualizer
It’s time to build a simple version of the Chladni Plate, using materials that are found in your home or even at school.
Materials for Your DIY Chladni Plate
- Postage tube (8cm tall) or plastic/glass container
- Small Bluetooth speaker (must fit inside container)
- iPad, iPhone, or Android device
- Tone generator app (there are lots of free apps available)
- Salt (works best), sugar, flour, or glitter
- Cling wrap / Saran wrap or a balloon
- 2 rubber bands
- Scissors, ruler, pencil
- Craft knife (adult use only)
- Small strip of cardboard (to prevent salt falling off)
Safety Considerations
Adult supervision is required when using craft knives or scissors. Keep small materials like salt and glitter away from very young children. Do not play high-frequency tones at loud volumes to protect hearing. Keep sound levels moderate.
Directions
Watch this experiment in action in the video below, if you can’t see the video due to your settings, visit our YouTube channel.
Cut and stretch a piece of Cling/Saran wrap over the top of the tube and use a rubber band to hold it in place.
Gently pull the side of the wrap to ensure that it is flat and tight.
If you are using a balloon, cut the head of the balloon off and stretch it over the top of the tube or vessel.
Wrap the cardboard or paper around the tube and use the other rubber band to keep it in place. It should be about 1cm higher than the edge of the tube.
Place the tube over the Bluetooth speaker.
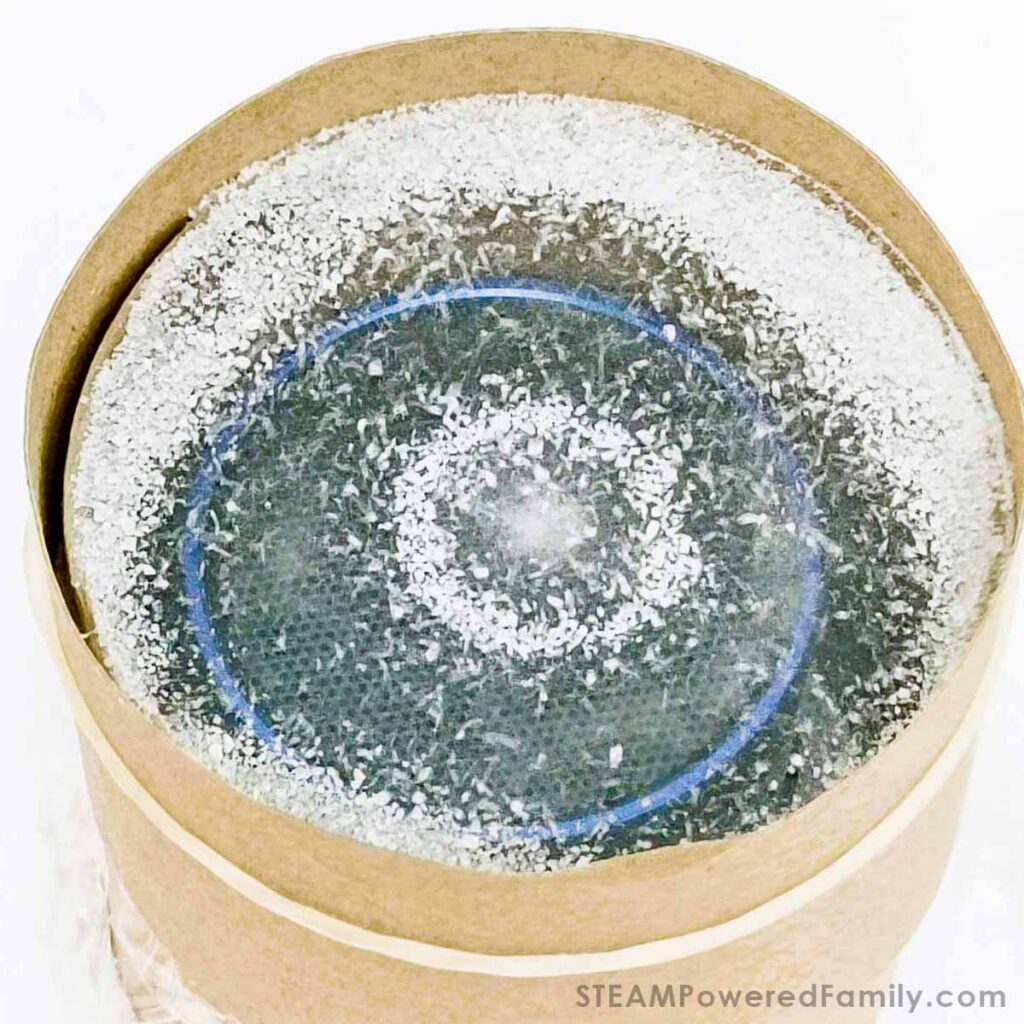
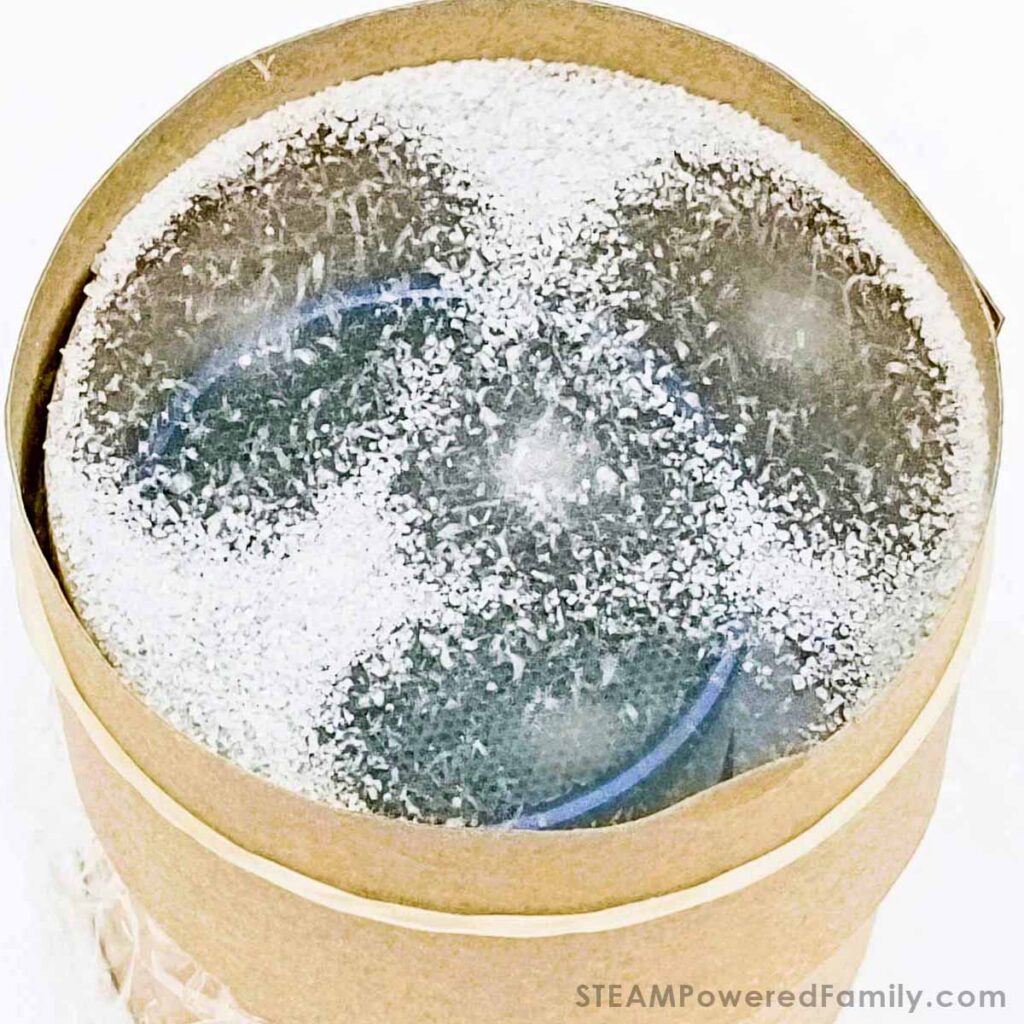
Sprinkle a little bit of salt onto the Cling Wrap or the balloon. I initially realized that I had put too much salt onto the surface, so it did not work as it was supposed to! I changed the amount of salt, and it was amazing!
Open the tone generator app on your device and get ready to be amazed!!!
I started at 210Hz and slowly moved to higher frequencies, and watched the magical patterns happen.
Frequently Asked Questions About the Chladni Plate Experiment
It demonstrates how sound waves create vibration patterns, helping students visualize frequency and resonance.
The salt gathers at nodes, where there is no vibration.
Many patterns begin forming between 200 Hz and 1,000 Hz, depending on materials.
Yes, but single-frequency tones create clearer patterns than complex music.
Normally, sound waves are invisible. By attaching the Cling Wrap or the balloon to the tube above the speaker and sprinkling a little bit of the salt on top, the grains bounce into specific places where there are no vibrations. These places are called nodes.
Low frequencies create simpler patterns (fewer nodes), while higher frequencies create more interesting shapes.
Each frequency causes the Cling Wrap or balloon to resonate differently, reshaping where the nodes appear.
Resonance happens when vibrations cause all the grains of salt to dance around equally, creating patterns that appear sharper and clearer.
Learning Outcomes
Science: Demonstrates energy transfer, properties of matter, and wave behavior.
Technology: Uses a tone generator app and a device.
Art: Creates Chladni-inspired geometric patterns, students can sketch, video or photograph results.
Math: Connects frequency (Hz) with symmetry and shapes.
Plus:
- Explain how sound travels as vibrations.
- Describe how frequency affects pitch.
- Identify nodes and resonance.
- Observe how energy transfer creates visible patterns.
- Connect science concepts to art and symmetry.
- Students walk away not only with better knowledge of sound, but with the excitement of watching invisible energy, now made visible.
Assessment Ideas
- Have students explain why patterns change at different frequencies.
- Ask students to define resonance in their own words.
- Require labeled diagrams showing nodes.
- Older students: graph frequency vs. pattern complexity.
Discussion & Exploration
Use the following questions to encourage your learners to push the experiment a little further:
- What differences do you see between low and high frequencies?
- Which material (salt, sugar, glitter, or flour) shows patterns most clearly? Why?
- Can you predict at which frequency a new pattern will appear?
- Do you think a balloon might produce different shapes compared to Cling Wrap? Give it a try and find out.
Encourage the students to record their observations in journals, take photos, or create art pieces inspired by the patterns. For younger students, focus on the amazing patterns and the idea that sound is vibration. For older learners, dig into resonance, nodes, and even the math behind wave behavior.
Classroom Extensions
Science fair project: Compare how different vessels, like a metal can, a cardboard tube, a glass or plastic cup, can affect the clarity of patterns. Compare the differences between the Cling Wrap and balloon affect the patterns too.
Music connection: Match frequencies to musical notes and explore how instruments resonate. Play songs like Do-a-deer and other songs the students know to see the patterns made, or they can work in pairs and hold the tube above their mouths and use different voice tones to see what happens to the salt.
History link: Introduce Ernst Chladni, the German scientist who first discovered these sound patterns in the 1700s, earning the nickname “the father of acoustics.”
Art project: Use colored sand or glitter and photograph results to create sound-inspired art, or simply draw or paint the patterns made by the different frequencies in different colours.
Math extension: Measure symmetry, count nodes, and connect to ratios or geometry.
Adapting this project for different age groups
Ages 8–10: Keep the children’s focus on the excitement of watching patterns form. Keep your explanations simple: “Sound makes things shake. Shaking makes patterns.” Encourage them to describe what they see.
Ages 11–14: Introduce vocabulary—frequency, resonance, nodes—and guide them in predicting outcomes.
Sound surrounds us every day. With this project, you and your students get to stop, listen, and finally see the music hidden in the air!