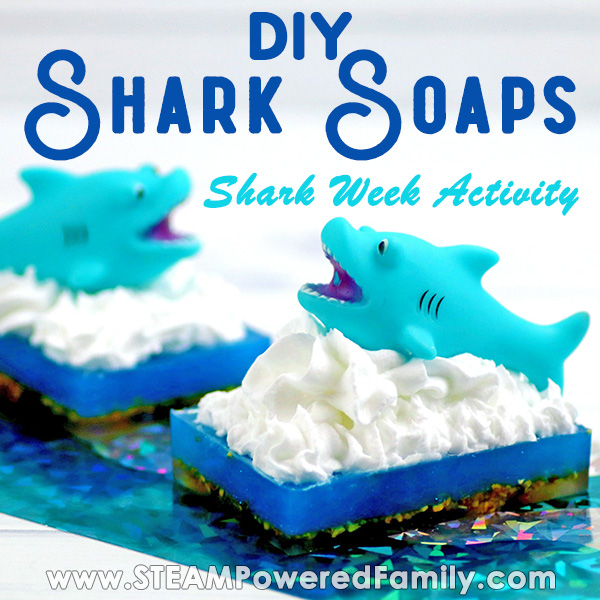
Shark Week Activity – DIY Shark Soap Project
Shark week is July 28 to Aug 4, celebrate with this fun and adorable squirting shark soap making project. Older kids will love making these fun and silly soaps. Soap making is the ultimate craft project as kids learn valuable skills, produce incredible creations, and it is a zero waste project! Ready for shark week? Let’s make Shark Soaps!
SHARK WEEK SOAP MAKING PROJECT
Table of Contents
Disclaimer: This article may contain commission, paid partnerships, or affiliate links. We independently review everything we recommend. When you buy through our links, we may earn a commission from qualifying purchases.
My kids are obsessed with marine biology. There is something absolutely fascinating about this mysterious underwater world and the incredible creatures leaving in those depths.
Every year, when Shark Week rolls around my kids get so excited. I always find my PVR filled with a variety of shows exploring the world of Sharks and marine life. It makes me happy to see them watching these shows and learning. It’s always exciting when kids find their passions!
Not sure if it is like this everywhere, but most of July we have various Shark activities going on. I just saw an advertisement for SharkFest! July definitely seems to be the time for celebrating everything shark.
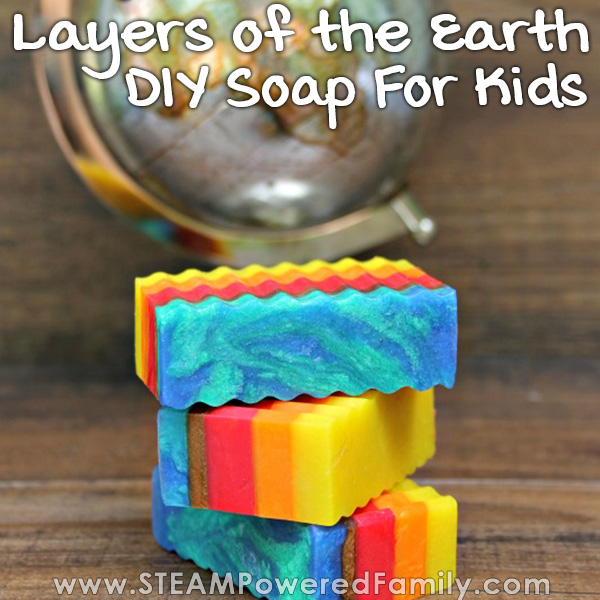
Last year we made a wonderful Layers of the Ocean soap.
This year I wanted to take our shark love to a new level by doing some hands on projects. Summertime is often a slow time for our schooling, but I still love to bring in some fun projects to keep my kids on their toes and doing something interesting. Soap making, especially something as cool as these shark soaps, is a great way to get kids busy creating.
Plus they get to keep the shark as a fun, squirty bath toy!

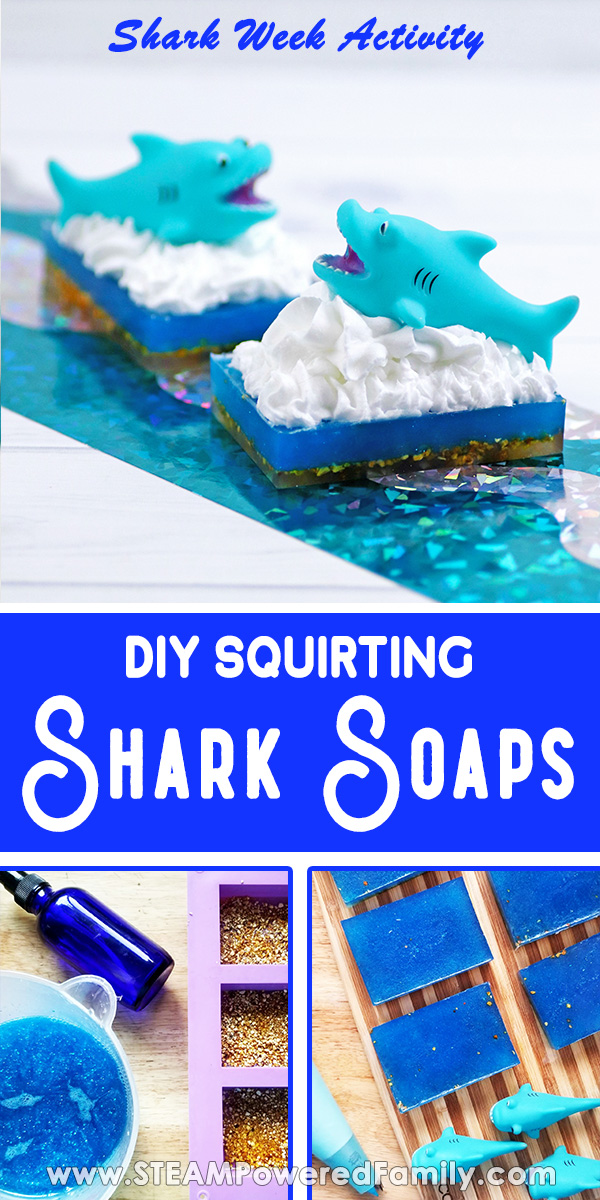
Squirting Shark Soap Supplies
This recipe will make 6, 4-ounce layered soap bars with approximately 1.5 ounces of whipped soap topping.
1 pound + 1/4 cup of clear melt and pour soap cut into cubes
2 teaspoons scented oil
1 tsp Blue mica soap dye
1 tablespoon of blue biodegradable glitter (optional)
2 tablespoons dried orange peel
1 cup whipped soap base
2 tablespoons liquid vegetable glycerin
1 tablespoon cornstarch
Rectangle silicone soap mold
Small rubber squirting sharks
Spray bottle of rubbing alcohol
1 microwave safe measuring cup
Reusable piping bag
Large frosting tip
Mixer
*A NOTE ON GLITTER – Glitter has become very controversial due to the negative impacts on the environment, but I know many of you still love a little sparkle in your projects! When it comes to glitter, I believe it is always optional. None of my projects require it. But if you decide you do want a little sparkle and shine in your creations, I highly recommend using a biodegradeable glitter. There are lots of fantastic options available.
DIY SHARK SOAP DIRECTIONS
Make the Deep ocean layer
Add 1/4 pound of the clear melt and pour soap to a measuring cup. Melt in the microwave in 30 second bursts, stirring and repeating until completely melted. Mix in the dried orange peel.
Spray the molds with rubbing alcohol to prevent bubbles forming, then pour the orange peel soap mixture evenly into each of the 6 cavities. Spray the top of the soap with rubbing alcohol. Let it dry for at least 30 minutes or until completely hardened.
Make the Blue Ocean layer
Add remainder of the clear melt and pour soap (1 pound) to a measuring cup. Melt in the microwave in 30 second bursts, stirring and repeating until completely melted. Set aside a 1/4 cup of the soap. Mix in the barrier reef scented oil, blue mica and blue cosmetic glitter.
Spray the top of the orange peel soap layer with the rubbing alcohol to prevent bubbles and to help the layers adhere to one another. Pour the soap mixture into your mold, evenly into each of the cavities. Spray top of mixture with rubbing alcohol to prevent bubbles on the top of the soap. Allow it to harden for at least 3 hours or until completely firm.
Carefully remove the soaps from the mold. Set out on your work surface. I like to cover the area with parchment paper or wax paper while working.
Creating the white caps waves with whipped soap
Making and using the whipped soap topping required that you work quickly. Have everything laid out and ready to ensure you are able to work efficiently.
Start by adding whipped soap base and glycerin to a mixing bowl for your mixer. A mixer is best, but in a pinch you can use a hand mixer. Mix for 1 minute.
Fold cornstarch into the mixture to avoid it dusting up when you use the mixer. Add the remaining 1/4 cup of melted clear soap base to the mixture. Mix again for 1 minute.
Continue to beat the soap until the mixture forms peaks, like when you make a meringue. If your frosting is not stiff enough, add a bit more cornstarch and mix in. Repeat until the mixture is fairly stiff.
Add the whipped frosting to your piping bag. Spray the soaps with rubbing alcohol. Now pipe frosting onto your soap is wave like patterns. You must work quickly as the frosting will begin to harden after about 5 minutes.
Place your sharks
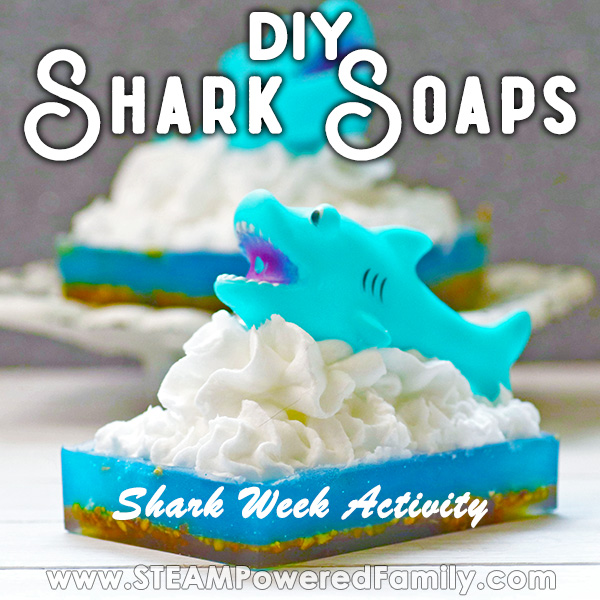
As soon as the whipped soap topping is added, place your shark in the waves.
The kids will LOVE these soaps! And the sharks squirt water when you squeeze them!
Are you ready for Shark Week?
Beach Code Breakers Printable
Continue the beach theme with these Code Breaker printables. Crack the code and reveal summer beach themed art. These printables are available to all STEAM Powered Family members. Simply enter your email to unlock the printable. You will get this and many other activity ideas, resources and more. Unsubscribe anytime.
MORE FUN SOAP AND BATH BOMB MAKING PROJECTS
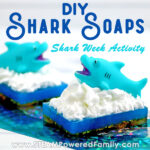
DIY Shark Soaps
Create adorable soaps that look like sharks cresting out of the waves of the ocean.
Supplies
- 1.25 lbs clear melt and pour soap Cut into cubes
- 2 tsp barrier reef scented oil
- 1 tsp blue mica soap dye
- 1 tbsp biodegradeable cosmetic glitter optional
- 2 tbsp dried orange peel
- 1 cup whipped soap base
- 2 tbsp liquid vegetable glycerin
- 1 tbsp cornstarch
Instructions
-
Add 1/4 pound of the clear melt and pour soap to a measuring cup. Melt in the microwave in 30 second bursts, stirring and repeating until completely melted. Mix in the dried orange peel.
-
Spray the molds with rubbing alcohol to prevent bubbles forming, then pour the orange peel soap mixture evenly into each of the 6 cavities. Spray the top of the soap with rubbing alcohol. Let it dry for at least 30 minutes or until completely hardened.
-
Add remainder of the clear melt and pour soap (1 pound) to a measuring cup. Melt in the microwave in 30 second bursts, stirring and repeating until completely melted. Set aside a 1/4 cup of the soap. Mix in the barrier reef scented oil, blue mica and blue cosmetic glitter.
-
Spray the top of the orange peel soap layer with the rubbing alcohol to prevent bubbles and to help the layers adhere to one another. Pour the soap mixture into your mold, evenly into each of the cavities. Spray top of mixture with rubbing alcohol to prevent bubbles on the top of the soap. Allow it to harden for at least 3 hours or until completely firm.
-
Carefully remove the soaps from the mold. Set out on your work surface. I like to cover the area with parchment paper or wax paper while working.
-
Making and using the whipped soap topping required that you work quickly. Have everything laid out and ready to ensure you are able to work efficiently. Start by adding whipped soap base and glycerin to a mixing bowl for your mixer. A mixer is best, but in a pinch you can use a hand mixer. Mix for 1 minute.
-
Fold cornstarch into the mixture to avoid it dusting up when you use the mixer. Add the remaining 1/4 cup of melted clear soap base to the mixture. Mix again for 1 minute.
-
Continue to beat the soap until the mixture forms peaks, like when you make a meringue. If your frosting is not stiff enough, add a bit more cornstarch and mix in. Repeat until the mixture is fairly stiff.
-
Add the whipped frosting to your piping bag. Spray the soaps with rubbing alcohol. Now pipe frosting onto your soap is wave like patterns. You must work quickly as the frosting will begin to harden after about 5 minutes.
-
As soon as the whipped soap topping is added, place your shark in the waves. Let sit for 30 minutes. Store in an airtight container until ready to use.