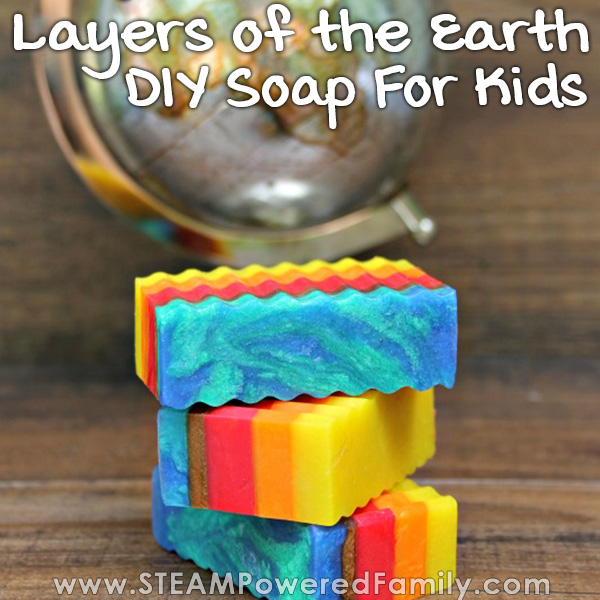
Gorgeous Layers of the Earth DIY Soap Project
Learning the layers of the Earth just may be one of the most interesting, and beautiful, projects we have done. Turning our Earth Science lesson into a soap making project, well that was just brilliant! The results speak for themselves, so gorgeous! The process is not hard, but it takes time, which allows for lots of great conversations and learning about our special planet. Kids are especially interested in learning what is under their feet!
LAYERS OF THE EARTH SOAP PROJECT FOR KIDS
Table of Contents
Disclaimer: This article may contain commission, paid partnerships, or affiliate links. We independently review everything we recommend. When you buy through our links, we may earn a commission from qualifying purchases.
We really enjoy making soap. It’s a great medium for kids to work in when making crafts. I’m a bit of a minimalist. I like things we create to have a purpose. Yes, there is always the purpose of learning and knowledge with our educational projects, but often the resulting piece has no purpose after the process is finished.
And what do we do with all those crafts and projects our kids lovingly built? Too often it ends up in the landfill.
I really have a hard time with that.
Yes I want my kids to create and learn and be hands on. But I also don’t want to be wasteful and create more landfill that causes even more damage to our precious Earth.
When studying the Earth I feel even more strongly that our hands on learning projects should not be wasteful and have a purpose and use. Creating consumable projects is the perfect way to to achieve this.
That’s why I LOVE these Layers of the Earth soaps sooooo much! Not only are they fun and easy to make, but the results are stunning!
DIY Layered Earth Soap Bars Supplies and Tools
1 1/2-pounds melt and pour clear glycerin soap
10-20 drops each of Fennel, Oregano, Clary Sage and Thyme essential oils (we went with Earthy scents, but feel free to use what works best for you!)
Yellow, Orange, Red, Blue and Green mica powder color
Brown mica powder color
Rectangle soap mold
Spray bottle of rubbing alcohol
3 medium sized microwave safe bowls
Microwave
Stirring and measuring spoons
Watch the video featuring all the steps
If you can’t see the video, please turn off your adblockers. They also block our video feed.
DIRECTIONS
Making this soap is quite simple, but it does have a number of steps. Thankfully, many of the steps are simply repeating the previous step with new colours and scents. This makes it a GREAT group project so everyone gets a chance to try each job.
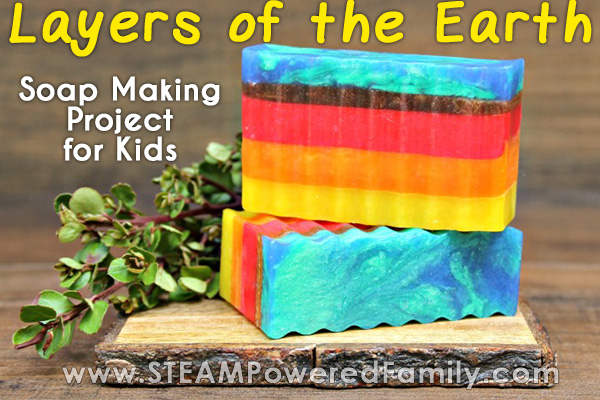
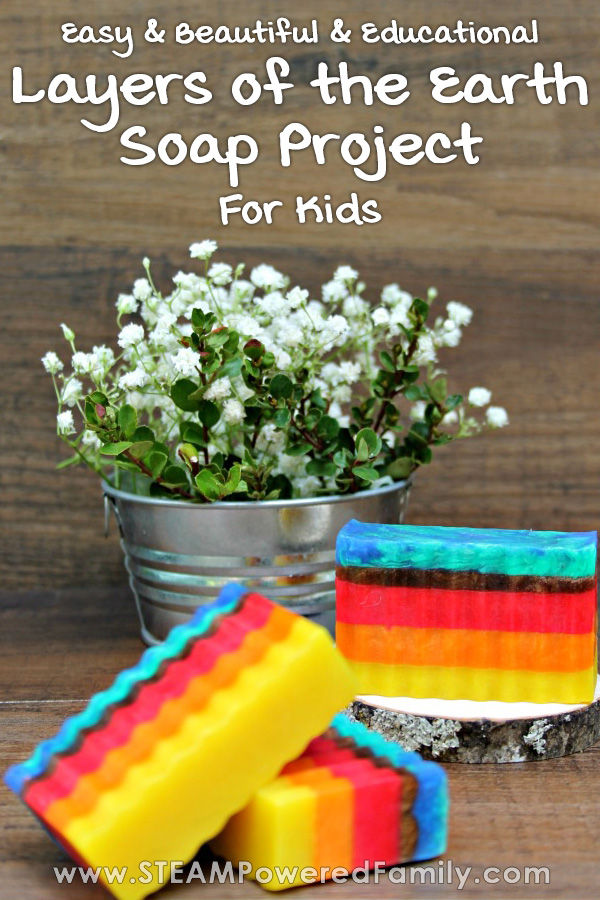
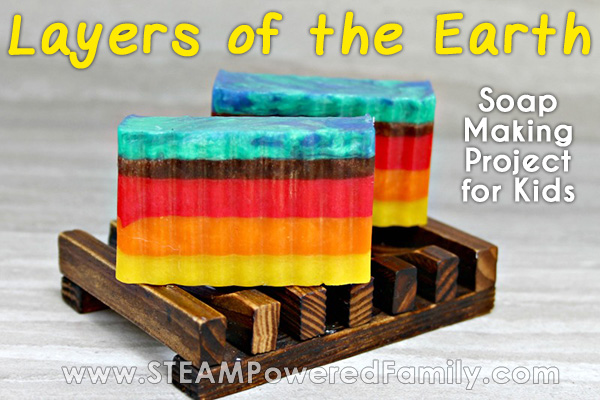
Before we start it is important to understand the big picture. The Earth has a number of layers and we can use colour to represent those layers. In our soap we are using: Yellow for the Inner Core, Orange for the Outer Core, Red for the Lower Mantle, Brown for the Upper Mantle and a Blue/Green blend for the Crust.
First Step – Creating the Inner Core
Add 8-10 cubes of the clear soap base to one microwave safe bowl. Melt in 30 second intervals, stirring after each until it is completely melted. Add yellow mica powder and Fennel essential oil to the bowl once it it liquefied and mix well but gently. You don’t want to create a lot of bubbles.
Spray the bottom of the mold with rubbing alcohol. Now carefully pour the yellow soap mixture into mold. Spray the top of the liquid soap with rubbing alcohol to prevent bubbles.
Allow this first layer to harden for at least 30 minutes.
Pro Tip! You know you can pour the next layer if you blow on the soap and it doesn’t ripple.

Second Step – Creating the Outer Core
Add 8-10 cubes of the clear soap base to one microwave safe bowl. Melt base in intervals, stirring regularly until completely melted. Add orange mica powder and Oregano essential oil to bowl. Thoroughly mix color and essential oil into soap mixture.
Spray the yellow soap layer with rubbing alcohol. Be liberal, but don’t go overboard! This helps the layers adhere to one another. Pour the orange soap mixture into mold. Spray with rubbing alcohol to prevent bubbles. Allow to harden at least 30 minutes.
Third Step – Creating the Lower Mantle
Melt 8-10 cubes of the clear soap base. Add red mica powder to bowl and Clary Sage essential oil to bowl. Mix well.
Spray the orange soap layer with rubbing alcohol. Pour the red soap mixture into mold on top of the orange layer. Now, spray the red soap layer with rubbing alcohol to prevent bubbles.
Allow to harden.

Fourth Step – Creating the Upper Mantle
This layer is going to be thinner. Add only 6-8 cubes of the clear soap base to one microwave safe bowl. Melt in 30 second intervals, stirring after each until it is completely melted. Add brown mica powder to bowl. This layer has no essential oil, but feel free to add to your recipe if you like. Thoroughly mix color and soap mixture.
Spray the red soap layer with rubbing alcohol. Remember to be liberal, but not to go overboard! Pour the brown soap mixture into mold. Then spray the brown soap layer with rubbing alcohol to prevent bubbles.
Allow to harden at least 30 minutes.
Fifth Step – Creating the Crust
This step is a little different since we are using two colours!
Add 8-10 cubes of the clear soap base to one microwave safe bowl. Melt in 30 second intervals, stirring after each until it is completely melted. Add Thyme essential oil and mix.
Now separate the mixture into two bowls. Add blue mica powder to one bowl and green to the other. Mix each thoroughly.
Spray the brown soap layer with rubbing alcohol.
Now, pour the blue and then the green soap mixture into mold (think of creating little patterns as you pour). Using a chopstick or butter knife, gently swirl green and blue colors together. Don’t mix too much or they will muddle together. Spray mixed blue/green soap layer with rubbing alcohol to prevent bubbles.
Allow to set overnight.
Sixth Step – Cutting To Reveal The Layers and Create Soap Bars
When you are ready to cut your soap, you can use the tools that comes with the rectangle loaf mold I used, or you can use a large, sharp knife.
The gorgeous colours of your layers of the Earth soap will be revealed!
Store in an airtight container until ready to use.
If you do this as a group or class, once you slice the soap bars, simply slip one in a zip lock bag so the kids can take their soaps home and tell everyone about the layers of the Earth!
Want to get creative? You can use any soap mold you wish. Get creative and have fun! Just remember you will need to adjust the amount of soaps to fit the size of your mold.
Layers of the Earth Printable
Enjoy this Layers of the Earth printable creating a lapbook. A great addition to this fun soap making activity. Simply enter your email to unlock the printable.
Earth Day
This project is a brilliant project for Earth Day. Not only will kids learn about the Earth, but it is a no waste activity that also encourages proper handwashing.
Have a great time learning about our home, Earth!

MORE INNOVATIVE LEARNING IDEAS