Glow Salt Circuit - STEM Activity
This easy electrical circuit activity for kids is a hit! Create a simple glowing salt circuit that lights an LED. Fantastic STEAM activity for elementary.
Supplies
- 1 Protective covering for table surface
- 1 sheet Construction paper or Card stock
- Table Salt
- 1 Paper Clips
- 2 Alligator Clips
- 1 AA Battery Pack
- 1 LED light bulb
- 1 Bottle Glow in the Dark Glue
- Markers optional
- Scissors
Instructions
-
Start by preparing your surface by covering it with a sheet of paper, tray or plastic sheet.
-
Test your LED and make sure it works.
-
Cut a sheet of construction paper in half. Place it with about 2 cm between the sheets.
-
Draw your design first with markers or just free hand it with the glue bottle. Ensure the design is divided in two, with half on each sheet, and termination points at the top and bottom where the circuit will complete. At all four end points make the glue a little extra thick.
-
Place the two paperclips on both of the bottom middle end points. Make sure it settles nicely into the glue.
-
Now attach your battery pack using alligator clips. Pay attention to your positive and negative ends.
-
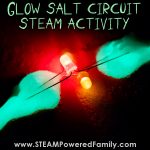
Place the LED light bulb. Stretch the pin legs out so it is doing “the splits” then gently place so it crosses the top middle end points and each leg is nicely set in the glue.
-
Now to power up our circuit! Sprinkle the glue liberally with salt. If it doesn’t immediately light the bulb, no worries. Take your glue bottle and add another layer of glue to thicken up your glue lines. Then sprinkle with salt again. Repeat until the bulb lights up!
-
See the original article for more tips and troubleshooting strategies if your circuit doesn't work.
-
Turn off the lights to enjoy the full effect of your glow salt circuit!