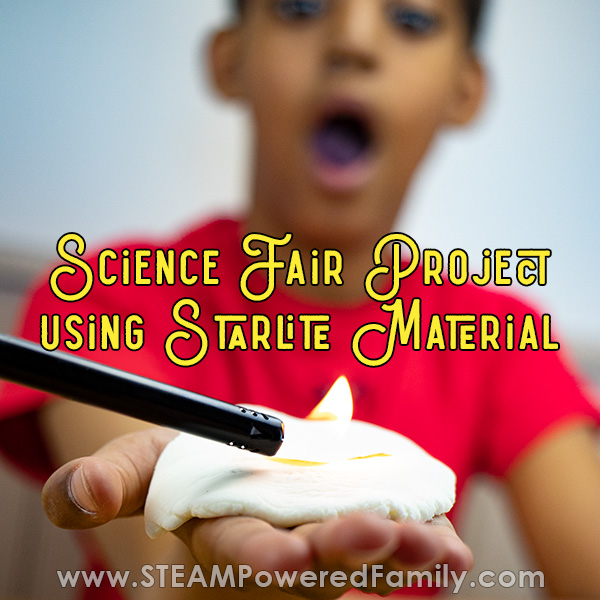
Starlite Material Experiments On Heat Transfer and Thermal Insulation
Have you heard about Starlite? It’s this material that is shrouded in a lot of mystery and bizarre history, but the substance itself is incredibly cool. Imagine being able to hold your finger over an open flame, set a lit match on your hand, protect an egg from being cooked or even hold a blow torch to your palm without burning yourself. It’s possible with Starlite. So what is this mystery Starlite? It’s made with items in you likely already have if you have done other experiments with us. Which makes this project ultra cool.
STARLITE SCIENCE FAIR PROJECT FOR MIDDLE GRADE
Disclaimer: This article may contain commission or affiliate links. As an Amazon Influencer I earn from qualifying purchases.
Not seeing our videos? Turn off any adblockers to ensure our video feed can be seen. Or visit our YouTube channel to see if the video has been uploaded there. We are slowly uploading our archives. Thanks!
Experiments with fire – Safety First
Ok, so before we get going I need to say a few, very obvious, things.
This as a fantastic science fair project for grade 7 and higher. That means we are talking about teenagers, not children doing these experiments. Teachers could also do this as more of a demonstration. Either way a responsible adult needs to be supervising at all times.
Yes, we are working with lit candles and lighters. Always use precautions. Never, ever let a child do this unsupervised. In fact this is NOT an experiment for children. I recommend it for teens.
Ensure you have all safety measures in place including working in an area without flammable materials, safety glasses, lab coat, and having a fire extinguisher on hand.
Also, be smart. Don’t do this with kids who are not old enough to be around open flame safely or have too much fear or special needs to be safe around fire. I’ve provided tips on how this can be done as a demonstration by the teacher or responsible adult.
Please ensure you use common sense at all times and never, ever leave kids and teens unattended when using any type of fire.
So in a nutshell, be safe, use common sense, and be smart!
Now, onto the science!
The Science of Heat Transfer
The Second Law of Thermodynamics states that heat will always move from a hot object to a cooler one. Heat transfer is the movement of thermal energy as it transfers from one object to another or between an object and it’s surroundings. For example from the flame to a hand that is held too close or an egg set over the flame.
But what happens when that thermal energy transfer is interrupted? Are there materials that can inhibit the transfer of heat. Even extreme heat?
Imagine the implications for a moment of a material that could stop heat transfer. That could inhibit the spread of even intense heat that would normally cause fires to start or spread. That could protect people or objects from severe heat and fire. Just imagine.
Consider the problems this could solve. Here is a great starting point for coming up with your big question for your science fair project.
What is Starlite Material?
So I know you are wondering, what the heck is Starlite? Well no one actually knows for sure.
There is a long history behind this material and lots of mystery. It was created by a hairdresser many, many years go but he refused to release the recipe. He died, never having shared his recipe. Yet this material was shown to withstand incredible heat.
Recently a vlogger came up with his own version of Starlite and shared the recipe. It was so simple.
Cornstarch
Baking Soda
Elmer’s PVA Glue (yup the same special glue we need for slime!)
Yup, that’s it.
I know, now you are thinking, isn’t this similar to the Cornstarch Slime we made recently? Yup! That cornstarch slime was the result of us testing this recipe and coming up with new ideas! See how this whole scientific investigation thing can spin off into so many cool discoveries and experiments?
So to see Starlite react the way it does to intense heat, when it is made from such simple ingredients is incredible. I knew we had to give it a try. And I needed to find a way to explore the properties of this material in a more kid safe and appropriate way.
DIY Starlite Material Recipe
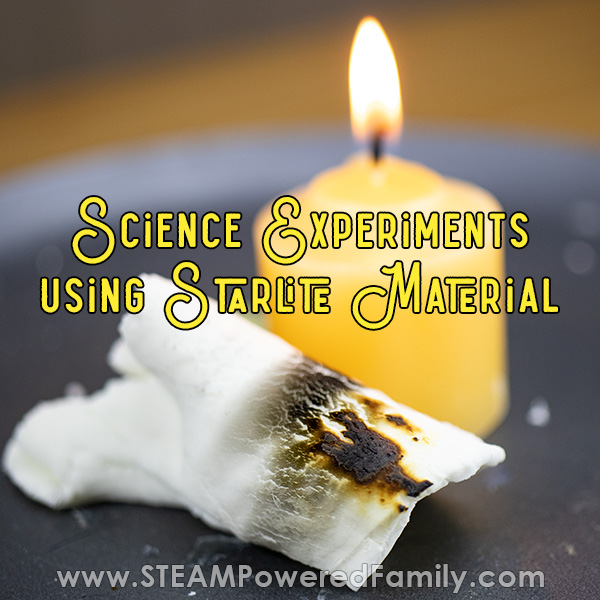
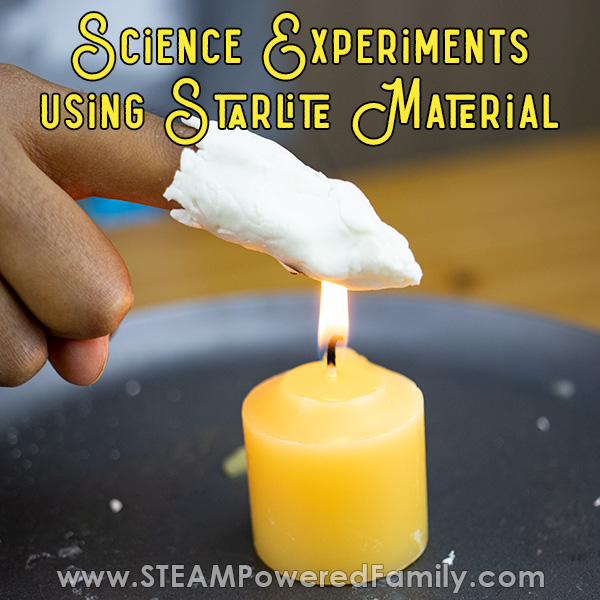
First up I needed to see if I could make Starlite that actually worked. The video I watched was pretty vague on the recipe. It took a few trial and error batches (and a fair bit of frustration) but finally I had a putty like result. It was time to test it. I wrapped some around my finger and nervously waved it over a lit candle. Then I held my finger still. It incredibly worked! It was amazing!
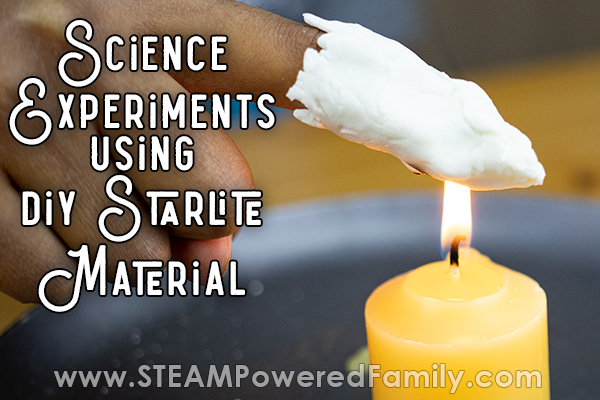
My finger stayed cool as the Starlite blackened and “burned” on the outside.
What was also incredibly interesting, was that the burned surface cooled almost instantly. So even the outside could be touched after removing it from the flame.
Success!! We had our recipe.
How to make Starlite Material
- Cornstarch
Add 10 teaspoons of cornstarch to a bowl.
- Baking Soda
Add one teaspoon of baking soda. Mix.
- Glue
Use our usual Elmer’s PVA glue that we use all the time for making slime. Add 4 teaspoons. Mix with the spoon. Then start working it with your hands until you get a nice putty consistency. This will take a couple of minutes of kneading.
- Troubleshooting
Work the Starlite with your hands for about 5 minutes. If it is still sticky, add a light powdering of cornstarch. If it is too dry and cracking, add 1/2 teaspoon of glue.
Science Experiments with Starlite Material
After some brainstorming, we came up with a three different experiments to do with Starlite to demonstrate it’s thermal insulating properties in an appropriate way for middle grades and older.
- STARLITE Fire Finger Test
- Fire Hand Starlite Experiment
- Egg Over Fire – Starlite Experiment
PRO TIP!!
You will want to use Starlight right away. We found that as it dried out it was prone to developing cracks if you tried to manipulate it. Those cracks allowed the heat through. In general we found we had about 30 minutes to complete our experiments before the Starlite became too dry. One option if you need it to last longer is to shape the Starlite and allow it dry completely, but then be very cautious not to manipulate it or move it in anyway, as it will crack. If you are using a flat disc, the option of letting it dry out can work well. But in our experience a fresh batch is best… with one exception. Read on to find out more!
Starlite Material Fire Finger Experiment
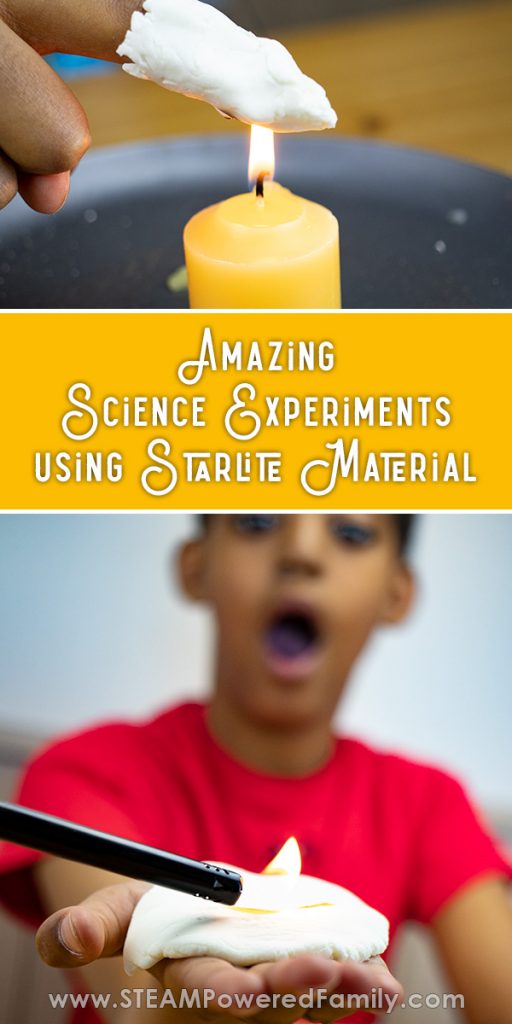
Our first experiment seemed pretty simple. I lit a candle and showed the kids how I couldn’t hold my finger over the candle, but once I wrapped some Starlite around my finger and was able to hold my finger over the open flame.
Once they saw, they were eager to test it out themselves!
The only issue we ran into was the cracking of Starlite as it dried and we struggled to wrap it around their fingers, and transfer it between different sized fingers, without cracking. We found it best to make fresh batches before each test to avoid the cracking issue. But that took a lot of time. So we brainstormed another experiment that didn’t involve moving the Starlite once it was formed.
Starlite Temperature Insulting Experiment
Next we wanted to try something that removed the risk of cracking and would allow multiple people to try the thermal insulating properties of Starlite. Something that would work well in a classroom.
We engineered a stand that could be used for this experiment and the egg experiment next. It was a simple construction using an old wire coat hanger. We simply bent it so it had a stable base and then came up and created a small platform. If you have a proper lab set up, you likely have beaker stands that will work perfectly.
We set a candle on the base. Then we made a fresh batch of Starlite and flattened it into a disc. We had an issue with Starlite sagging during our experiment, so I would recommend leaving it to harden and stiffen up a bit. Even just 10 minutes should really help.
Now set the disc on the platform of your stand, light the candle and see if you can hold your hand over the Starlite. Do you feel heat? What if you remove the Starlite. Can you still hold your hand in the same spot?
Now take out a digital thermometer and take readings from the top and bottom of the Starlite disc. What do you notice? Make sure to record your results! These are your measurable results.
Check out the video we made of us doing this experiment.
Egg Over Fire Starlite Thermal Protection Experiment
Next we wanted to see how we could do this experiment as part of a demonstration.
We thought an egg demonstration would be perfect, but to be a proper science fair project we needed to have a variable that changed, while we kept other variables constant. We determined our egg, candle (including distance to candle), and time over the candle would be our constants. Our variable would be either with Starlite or without. However some research turned up an issue.
We learned that an egg over fire will explode. We really didn’t need exploding eggs! See why it is so important to do your research first?
Some research and brainstorming gave us two solutions. One was to make a hole in the top of the egg. We had experience doing this for our Crystal Egg Geodes. So that was super easy.
The second was to crack the egg into a fire safe beaker and place the beaker over the candle.
We did both experiments. Because SCIENCE IS AWESOME!
Egg Over Fire
So we made holes in two eggs (you can use a drill or something pointy like a pin or knife to poke a hole in the top), coated one with Starlite and left the other plain. We placed them over the candle flame for 3 minutes each.
It was fun watching the plain one as the insides actually boiled and bubbled out of the hole.
The one with Starlite did nothing. It was actually kind of boring, except for the burning and expanding of the Starlite.
To really see what was happening though we needed to crack open the eggs. The one with nothing was actually cooking inside! While the one with Starlite on it was raw.
Check out this video showing the whole science experiment!
Cooking an Egg Over Fire
Next we cracked eggs into fire safe, lab beakers. These are beakers that can be used over a Bunsen burner. Make sure you are using appropriate containers that can withstand open flame. If you have a proper lab set up, you will have the appropriate materials. You can even use a Bunsen burner as your heat source.
We coated one beaker with Starlite and left the other with nothing. We placed them over our candles and let them sit for 2 minutes. Again the one with nothing started cooking, while the one with Starlite on the container stayed cool and raw.
I got some video of this one too!
These egg experiments were a great way to demonstrate heat transfer, and lack of heat transfer with Starlite.
So why does it work?
The Science Behind Starlite Materials and Heat Transfer
Based on our research and observations, we noted that the surface of the Starlite would burn and turn black, it would also bubble up. We learned that this was a carbon foam which is incredibly insulating and does not retain heat. Which is why you can touch even the burned surface almost instantly after removing it from the flame.
You can learn more about Starlite from these resources: The BBC did a documentary, and here is the link to the original video where we got the inspiration for our recipe.
MORE FUN SCIENCE