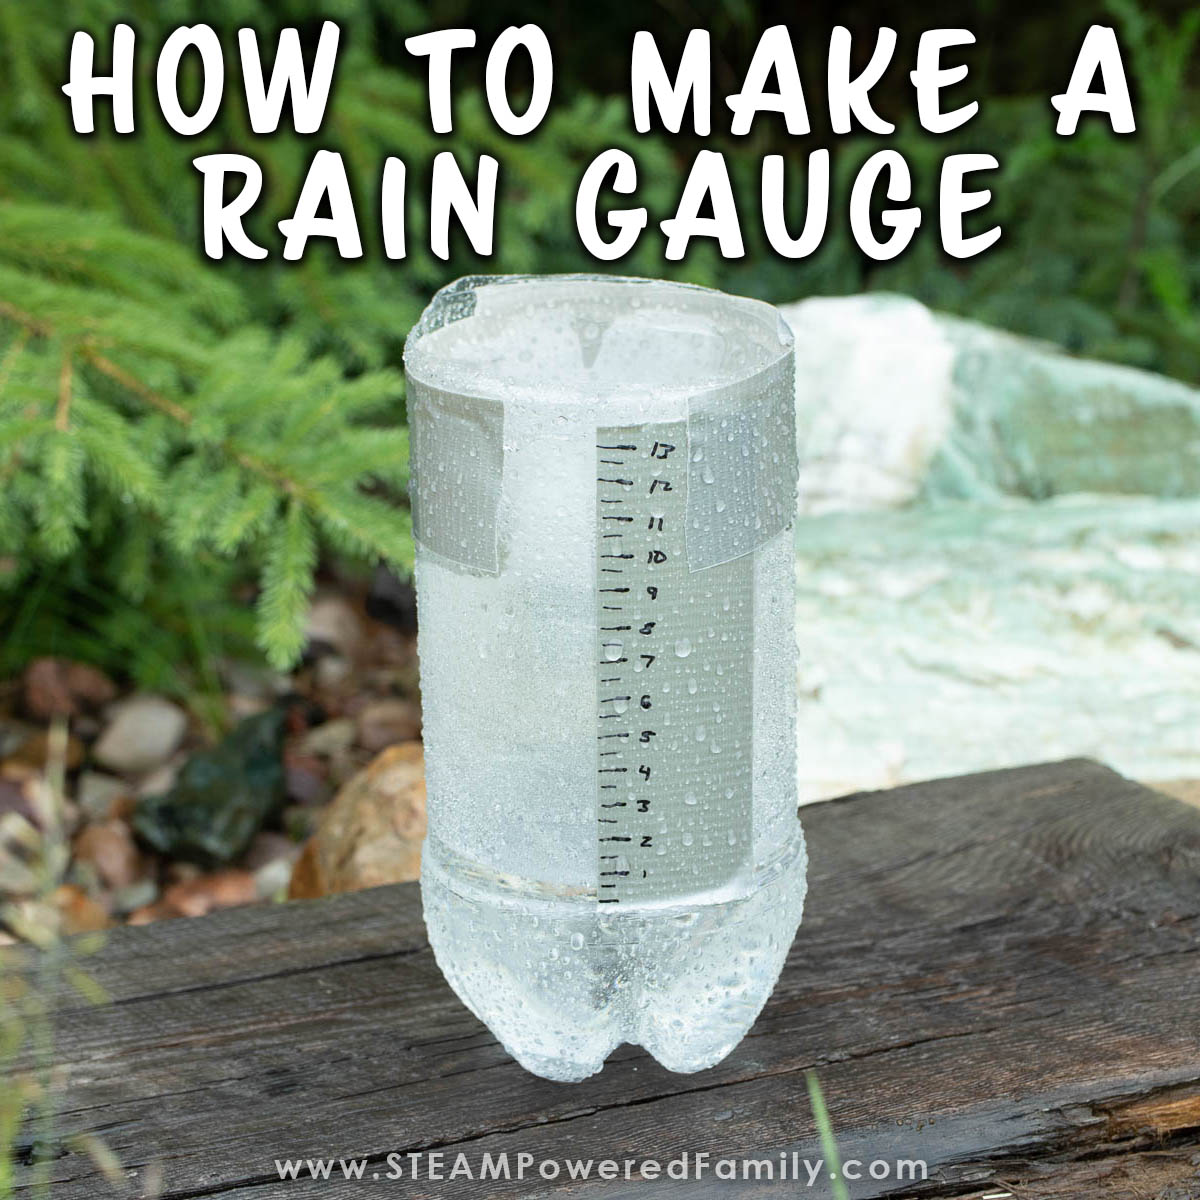
How To Make A Rain Gauge
Summer is a great time to get outside and embrace nature with some outdoor learning. Part of learning outdoors means embracing the weather, even rainy days. With this Earth Sciences activity kids will get excited for rain as they learn how to make a rain gauge. A wonderful STEM activity and chance to study and learn more about the weather and nature. Teach your children how to make a simple rain gauge to measure rainfall at home, at school or at camp.
Homemade Rain Gauge Summer STEM Project
Disclaimer: This article may contain commission or affiliate links. As an Amazon Influencer I earn from qualifying purchases.
Not seeing our videos? Turn off any adblockers to ensure our video feed can be seen. Or visit our YouTube channel to see if the video has been uploaded there. We are slowly uploading our archives. Thanks!
Did you know you can measure rainfall at home or at school with a simple device you make yourself? It’s called a rain gauge and it is a very important tool used by meteorologists in the study of weather science.
History of the Rain Gauge
Measuring the amount of rainfall is an ancient practice which was first practiced in the 4th century. The first records showing ancient people tracking rainfall come from 400-500 BC from both ancient Greece and India. Korea invented the first standardised rain gauge in 1441 called the Cheugugi. It was 32 cm high and had a diameter of 15 cm.
The rain gauge has been developed across the world in different ways, but its purpose is the same across cultures and locations.
What Does a Rain Gauge Measure?
A rain gauge is an instrument that we use to measure the amount of rainfall an area receives in a certain amount of time. If you look at a weather report for a rainy day it will include the amount of rainfall, usually over a 24 hours period. Here in Canada that rainfall is measured in millimeters or mm.
How Does a Rain Gauge Work?
A rain gauge is a simple device that collects rain through a funnel, into a container, which allows us to measure the amount of rainfall over a given period.
Want to learn more about the Water Cycle? Check out our Water Cycle Science Experiment.
How To Make a Rain Gauge
Watch a video of us making our rain gauge. If you can’t see the video, please turn off any adblockers as they also block our video feed. This video can also be found on the STEAM Powered Family YouTube Channel.
Materials
Empty 2L soda pop bottle (washed, dried, with labels removed)
Scissors
Utility Knife
Duct Tape
Permanent marker
Ruler
Directions
This is a simple rain gauge you can make easily at home, school or at camp.
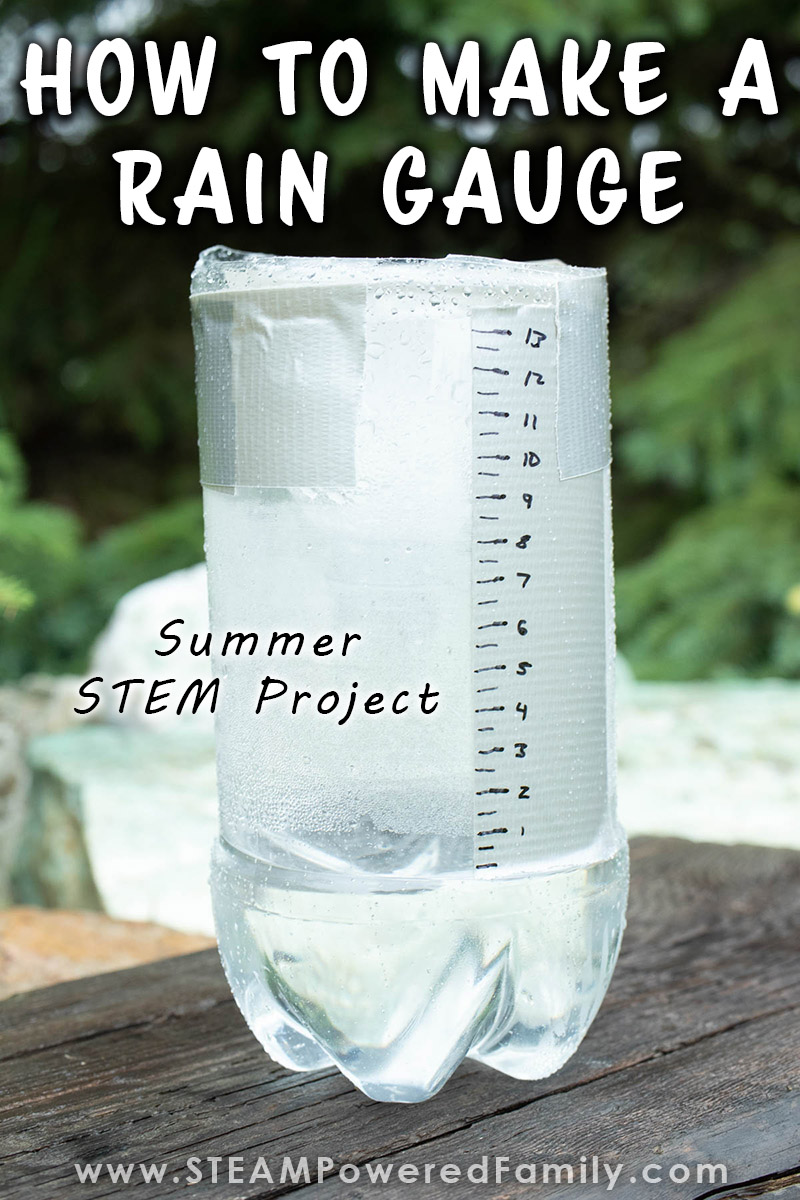
Take a 2L pop bottle and remove the cap and label, wash and dry it.
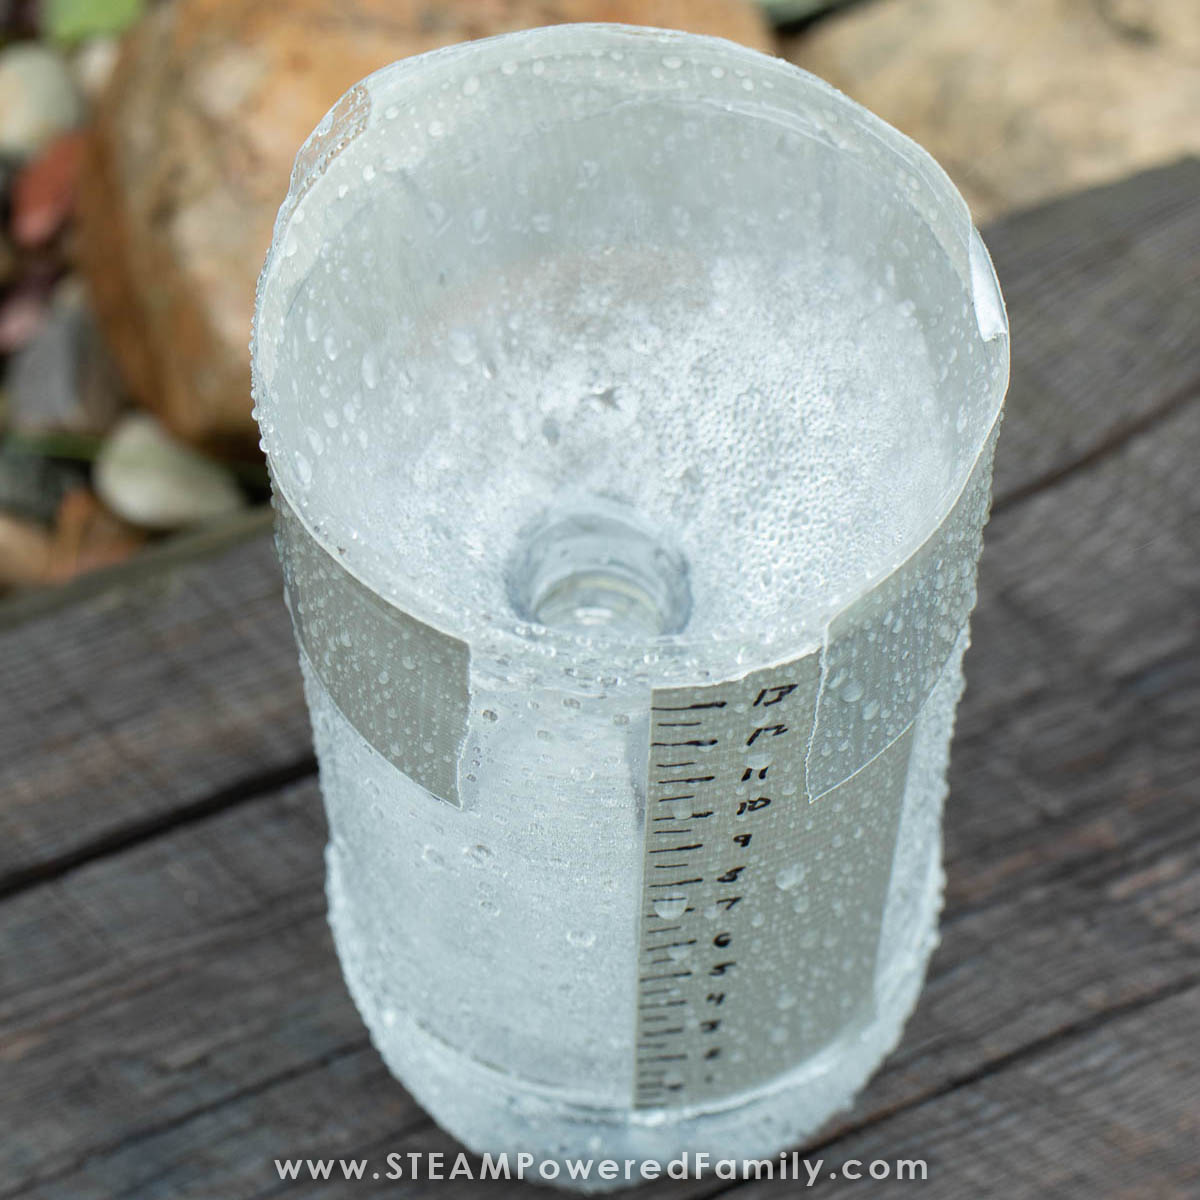
Notice how it has straight sides, but bulges out a bit at the top and the bottom part of the bottle. Those are very important parts to be aware of in this project.
For this first step, kids will need adult help. Using a utility knife, cut the top off just below the top bulge, where the sides start to go straight (at the top of where the label used to be). An adult can do this, or if a child wants to help, once it is started a child can use scissors to finish cutting it off.
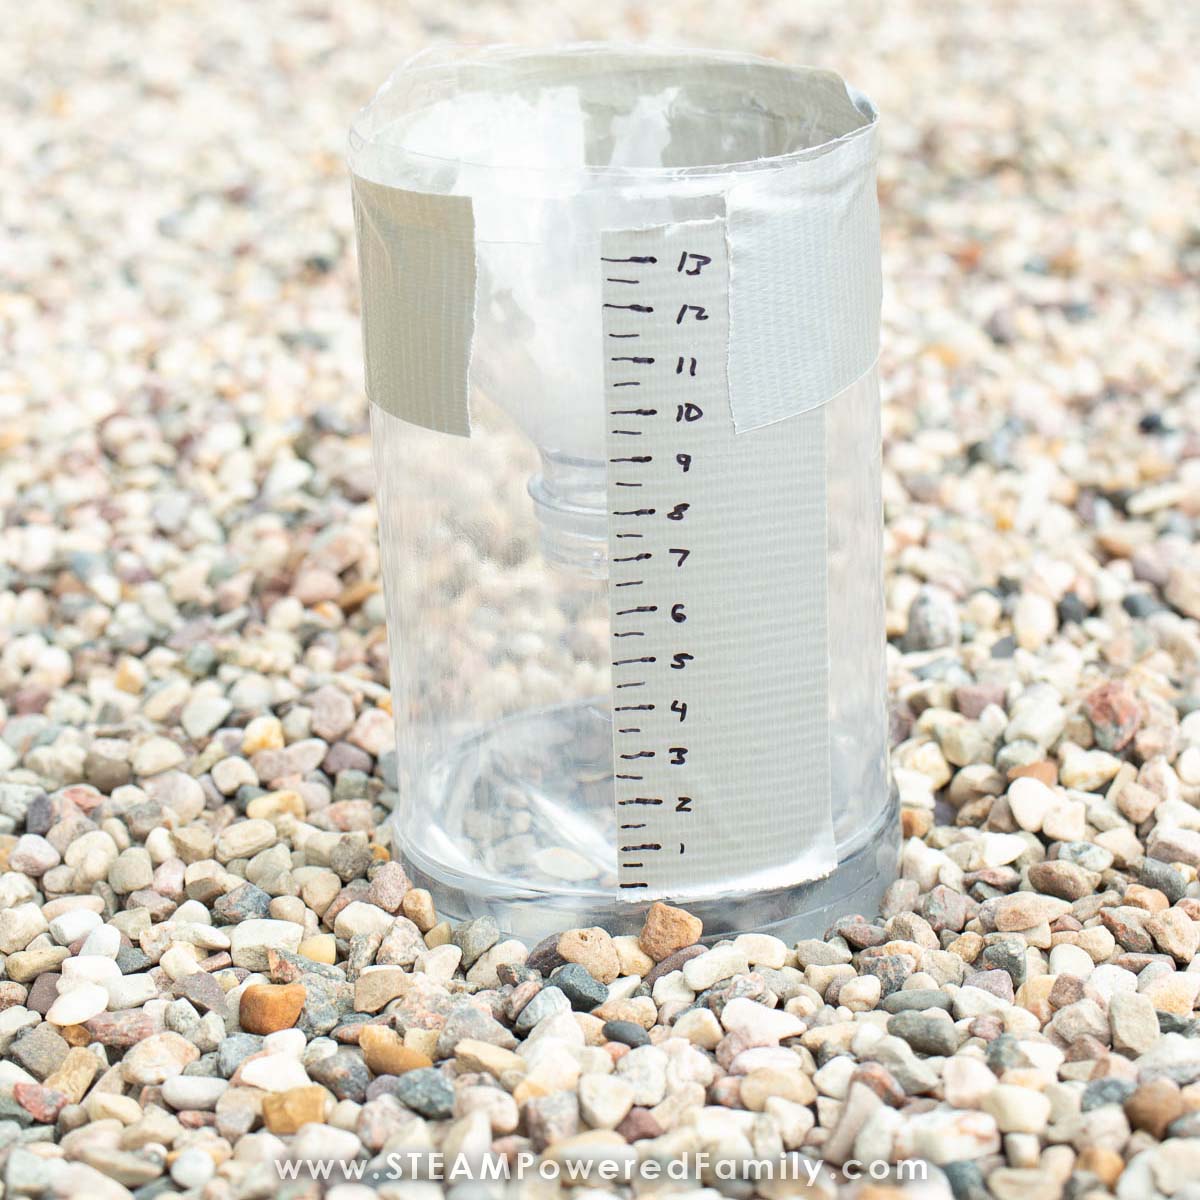
Take a piece of duct tape and cut off a piece the same length as the straight side of the pop bottle.
Using a ruler and a permanent marker, make a copy of the ruler indicating each mm.
Attach the tape to the straight side of the bottle so the zero line is right above the bottom bulge.

Now turn the bottle top that you cut off, upside-down and place it inside the top of the bottle so it is like a funnel. Tape it into place.
If you are adding anything to prevent tipping (see below), add that now.
Finally add some water until the water level just touches the zero line on your tape ruler.

Your rain gauge is ready to go outside and measure rainfall!
Using a Rain Gauge
Set your rain gauge outside where it can collect the rain. There should be no obstacles such as trees, buildings or anything else that could affect rain collection. An open area is perfect. If you are worried about it tipping over in the wind, see below for tips.
Want help predicting rainfall? Try making a DIY Barometer!
Ensure the water is at the zero line before it starts raining. If you end up waiting for it to rain for a while, some water may evaporate out of your bottle. Simply add a bit more to top it back up to the zero line.
Collect rainfall for a set period of time. It could be 24 hours. During a specific storm or cloud burst. Or any set amount of time.
To measure rainfall simply take a look at what level the water is at according to your tape measure. If it shows the water at 2mm, then 2mm of rainfall has accumulated.
When you are done measuring, ensure you bring your rain gauge back to the zero line so it is ready to take an accurate reading of the next rainfall.
Pro Tip! Using this method to create a rain gauge, all you need to do is tip the rain gauge on its’ side and any extra water will pour out. When you turn it back up right, the water level should be perfectly at zero, ready for the next rainfall measurement. So cool!
Prevent Tipping
One issue that may happen with your rain gauge if it is windy, is that it may tip over. There are a few things you can do to help prevent this.
To keep ours upright we set it in a bed of small rocks, so the rocks covered the bottom of the bottle, almost to our zero line. You could also set it between some larger rocks to help hold it stable.
Another idea is to add some heavy material to the inside of the bottle before you add your water to the zero line. You could use marbles, clean gravel or small pebbles, or even sand. These items will help your rain gauge be more bottom heavy and less likely to tip over in the wind. Just make sure you add these materials to your bottle, then add your water to get to the zero line.
Benefits of Making a Rain Gauge
Making a rain gauge is a fantastic way to help kids connect more with natural weather patterns where they live. It also gives them a chance to practice their measurement and math skills.
Meteorologists and many other professionals use rain gauges as very important tools in the work that they do. Meteorologists in particular use rainfall data to predict weather related natural disasters and climate change.
Tracking local weather patterns such as rainfall can be used to help predict the upcoming weather so people can plan their days appropriately. Make a weather station with your kids and track the weather.
If you love to garden or have a lawn, you know keeping the plants and grass watered is important. But nature often takes care of that for us. And if you overwater, you can damage your plants too. Gardeners track rainfall so they know when they need to water their gardens to protect their plants and keep them healthy.
Farmers need to know when to plant their crops. Each plant has its own ideal rainfall amount to stay healthy or for seed germination. Knowing the amount of precipitation will help farmers understand when to sow a particular crop or grow a particular plant.
There is one time when we hear a lot of talk about rainfall in the news, and that is when there is either too much rainfall (known as flooding) or too little (known as droughts). A rain gauge is an essential tool for measuring precipitation, and preparing for flooding or drought.
One of our favourite uses for a rain gauge is to help kids develop a better understanding and connection with the environment. Climate change is a major issue affecting our planet and the more we can educate children and help them understand the many issues affecting the Earth, the better prepared they will be to protect it.
More Summer STEM Projects