Popsicle Stick Catapult Design Challenge
How do you build a better catapult? This is a great subject for a science fair project or STEM challenge. Students will put their critical thinking, problem solving and creative skills to the test as they engineer popsicle stick catapults looking for the best design.
CATAPULT SCIENCE FAIR PROJECT
Disclaimer: This article may contain commission or affiliate links. As an Amazon Influencer I earn from qualifying purchases.
Not seeing our videos? Turn off any adblockers to ensure our video feed can be seen. Or visit our YouTube channel to see if the video has been uploaded there. We are slowly uploading our archives. Thanks!
Catapults are one of my all time favorite STEM projects, whether we are sending out a siege of marshmallow snowballs or launching Peeps into easter baskets, kids are always, always enthralled with a good catapult project. Catapults have been used as weapons since ancient times, their ability to launch heavy projectiles across long distances made them a key element in warfare, you could attack while keeping away at a safe distance.
Any catapult has three basic parts – the arm (including the bucket), an elastic force (elastic force most often uses tension – stretching force or torsion – a twisting force) and the base or fulcrum (the point where your force and arm meet). The physics behind a catapult are simple, pulling back on the arm creates stored or potential energy and when you release the arm it converts that energy to motion and flings your object through the air.
Catapult Challenge
If your goal with a catapult is to stay as far away as you can while still sending an object a great distance with force and accuracy, what makes a better catapult? How can changing your design or materials impact your force and distance?
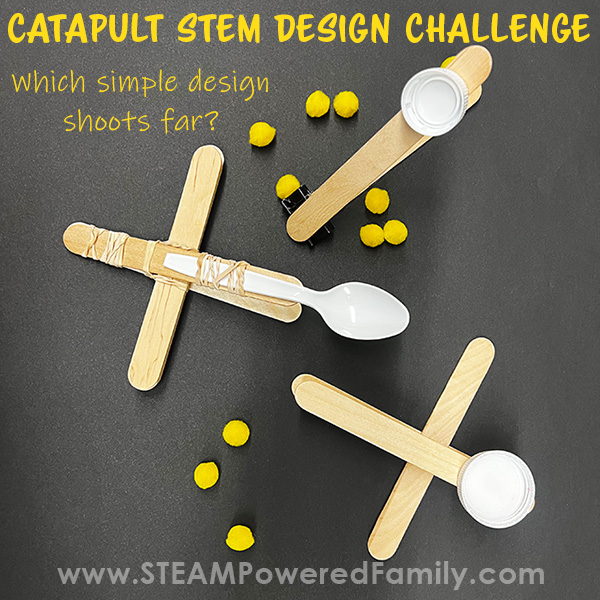
Let’s pit three basic popsicle stick catapults against each other to find the ultimate popsicle stick catapult design!
Supplies
For this project we are going to use:
Jumbo popsicle sticks
Plastic spoon
Rubber bands
Medium sized plastic binder clip
Wooden clothespins
Plastic bottle caps
Ultra low temperature glue gun
Projectiles (pom poms, ping pong balls, etc.)
Building the Catapults
CATAPULT 1: Spoon and Rubber Band Style
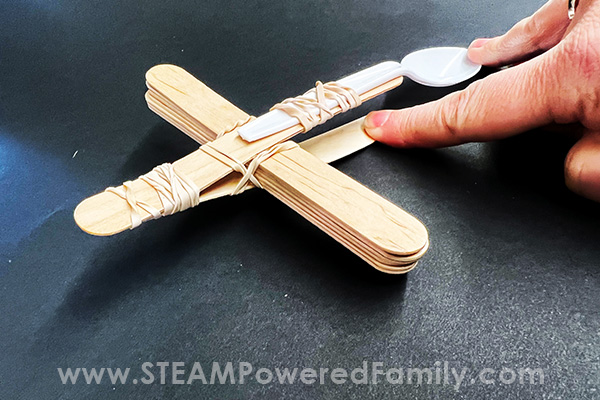
To construct this catapult, place a plastic spoon on one popsicle stick and secure it in place with a rubber band. The popsicle stick should meet the neck of the spoon right before the head.
Next, stack that popsicle stick on top of another and secure the ends without the spoon with another rubber band.
After that, stack 5-6 popsicle sticks on top of each other and wedge them between the two popsicle sticks you just joined. You can rubber band both ends of the stack of popsicle sticks if it makes it easier for you but it isn’t necessary for the construction.
Once they’re wedged in there nice and snug use a thick rubber band to hold the wedged sticks in place. We twisted the rubberband and looped it around each crossed stick until it was secure.
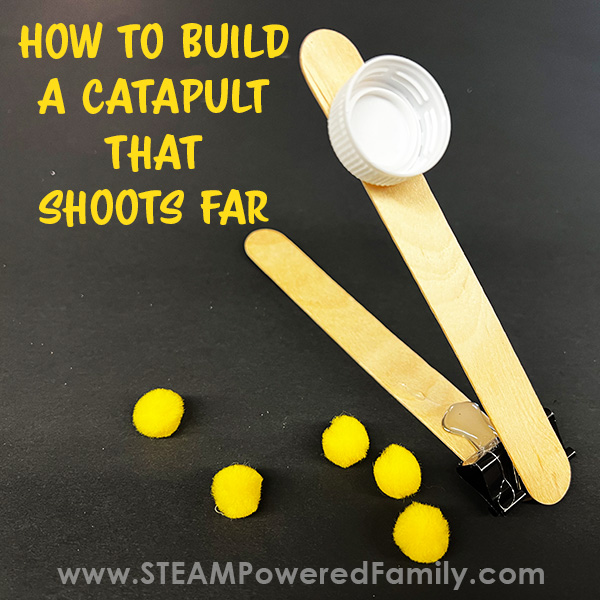
CATAPULT 2: Binder Clip Style
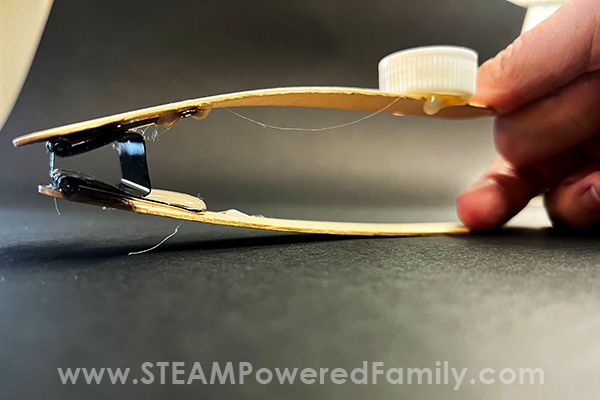
To construct this catapult, your binder clip should have it’s arms back, just like you would use it to clip papers together.
Position a popsicle stick on either side of the plastic binder clip and secure each in place with your ultra low temperature glue gun.
Use a bottle cap as your basket. We placed the bottle cap just a little lower than the end of the stick so we had a spot to pull back on our arm.
CATAPULT 3: Clothespin Style

To construct this catapult, stack two wooden clothespins together so both are facing the same direction and glue them together with your ultra low temperature glue gun.
After the glue has set, glue a popsicle stick on the top and the bottom, one will act as your arm and the other as your base.
Finally position a bottle cap leaving a little space at the top and glue that in place as well.
TESTING THE CATAPULTS
That’s it – all three have their arm and basket as well as their base and fulcrum but each is using a different type of elastic energy. Now for the fun part – the testing!
STEAM Powered Family mailing list members can access a printable worksheet by simply entering your email in this form. This will unlock the printable. Or you can use a piece of paper to record your answers.
Let’s test each catapult three times and get the average distance each throws a pom pom, but first – can you make a prediction? What catapult do you think will win?
Our prediction was #1 the spoon because the spoon is so flexible.
The Results
Our catapult tests provided some very clear results!
Catapult #1 launched the pom pom an average of 14.66 inches. (We decided to use pom poms for our projectile.)
Catapult #2 launched the pom pom an average of 5 feet 5 inches
Catapult #3 launched the pom pom an average of 19 inches
By far Catapult #2 was our winner – it traveled way beyond any of the other designs.
Our conclusion, the binder clip is the best tension source and catapult design.
Extension Activities
How else could you conduct this experiment? Questions you could ask your kids…
Does the size and weight of the projectile change the results of the test?
Try using a different projectile. Maybe a marble or a ping pong ball?
What do you think made the binder clip a better tension source?
What if you tried another design? Like our Original Popsicle Stick Catapult? Or even a Catapult Cannon?
Can you build a better catapult? Put those critical thinking and creative skills to work to solve this problem! Check out all of these fun Catapult Ideas to find your inspiration.
Have Fun!
More Fun STEM Activities