Pomander Activity for Kids
Last year we made pomanders at Christmas (Yule) time. It was a wonderful activity with the kids. So I wondered…. could we also do a pomander to celebrate Halloween (Samhain) as well? Turns out the answer was a resounding YES. Just wait until you try this orange and clove activity with your kids and students, they are going to love it! Whether you do it for Christmas, Thanksgiving, or Halloween, this is a must do activity in the fall and winter.
No Carve Halloween Pumpkin Decorating
Disclaimer: This article may contain commission or affiliate links. As an Amazon Influencer I earn from qualifying purchases.
Not seeing our videos? Turn off any adblockers to ensure our video feed can be seen. Or visit our YouTube channel to see if the video has been uploaded there. We are slowly uploading our archives. Thanks!
It is a magical moment when an activity really makes an impact on kids. As a child I remember making pomander balls with my grandmother. I admit, it wasn’t the most vivid memory, that was until I made pomanders with my kids last year. As soon as that incredible orange clove smell hit me, all those amazing childhood memories came flooding back.
So I was incredibly touched when the kids talked about “those orange clove candy thingies” we made last year and asked when we could make them again. I love these traditional activities that get passed down generation to generation.
What is a Pomander?
A pomander or pomander ball is simply orange and cloves. That’s it!
The term Pomander comes from the French “pomme d’ambre”, which roughly translated means “apple of perfume”. It referred to an aromatic ball made of ambergris, civet, musk, dried flowers, spices and scented oils.
The first recorded mention of pomanders was in the mid-thirteenth century in Europe. Their original purpose was essentially aromatherapy. People would carry them to help them cope with bad smells and also as a form of protection against disease and pestilence.
In more modern history, pomanders took the form of orange and clove. These were usually made during Yule (Christmas) by members of high society who then gifted them. Oranges and cloves were quite an extravagance, so it was a sign of someone’s wealth and prestige to be able to make and share pomander balls.
Today, pomanders have made a resurgence in popularity as people look for natural ways to brighten their homes and as a fantastic kids activity.
Benefits of Making Pomanders with Kids
Making clove pomander balls is an exceptional activity to do with the kids.
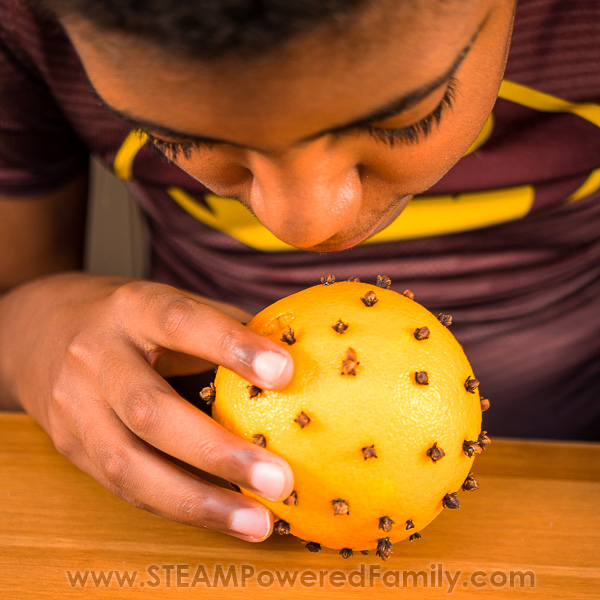
It is an incredible fine motor and strength building activity. Using toothpicks and cloves, kids poke and push to create their designs.
Pomanders, by their very definition are a sensory experience. But the best part is that kids LOVE the smell. My kids say it smells like candy, but better.
It is a very calming activity. Not only are the scent of oranges and cloves perfect for relaxation, but the process of creating the designs is very soothing and satisfying. I love watching the focus of my kids as they work on theirs.
It challenges their creative skills. When making a pomander kids can create incredible designs. For Halloween they can make little pumpkin faces or spooky designs, they can even use mini-pumpkins or traditional oranges. For Christmas they can make festive designs and patterns either as pomander balls or use slices to create ornaments. Not only can they use the cloves to make designs, but they can unleash their creativity by also using peelers or paint.
It is budget friendly. This is such a big benefit for many families and classrooms that are looking for meaningful and memorable activities to do with their kids that won’t break the bank.
It is screen free, creative time that employs the senses and creates incredibly memories that will stay with kids for many, many years.
And when making the pumpkins, we had so much full pulling out the hammer and drills! See my video below to see us in action!
Pomander Making Supplies
Oranges – You can use any size of orange that suits your purpose. This is traditionally what is used, and provides the most intense, amazing scent.
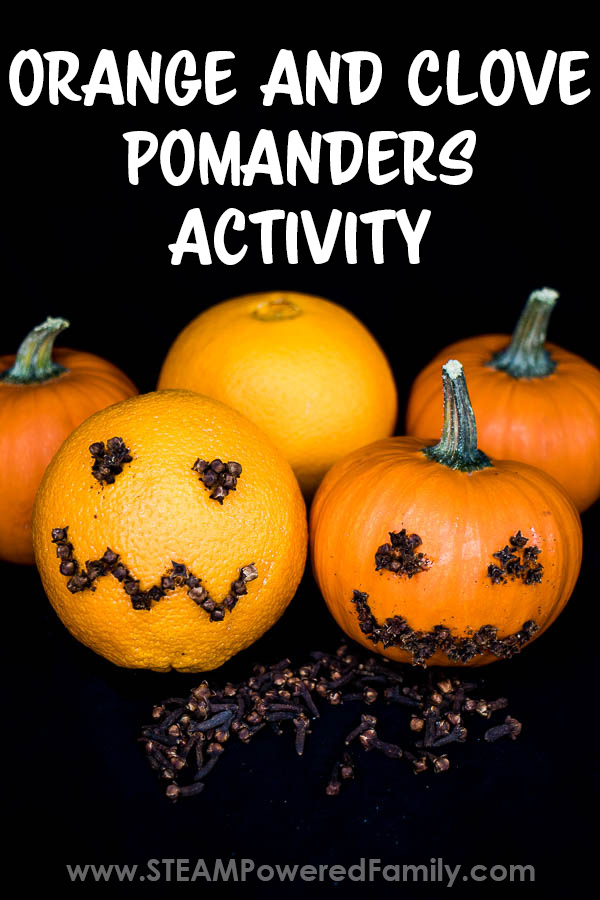
Pumpkins – For Halloween we used mini pumpkins instead of oranges. The skin is a bit tougher, but the results are so cute for Halloween or Thanksgiving!
Whole Cloves – Lots, because the more you use the better!
Toothpick or Skewer
Markers (optional)
Paints (optional)
Peeler (optional)
For curing (optional):
Screwdriver or knitting needle (or similar) & Twine or string
Orris Root Powder, spices & Paper bag
Halloween Pumpkin Pomander
When doing pumpkin pomanders you will want to use a nail, plus maybe a hammer or drill. Check out our video on YouTube of us making Pomander Pumpkins.
PRO TIP! Need a tip for making hammering nails safer with little fingers? Have the kids hold the nail with a clothespin!

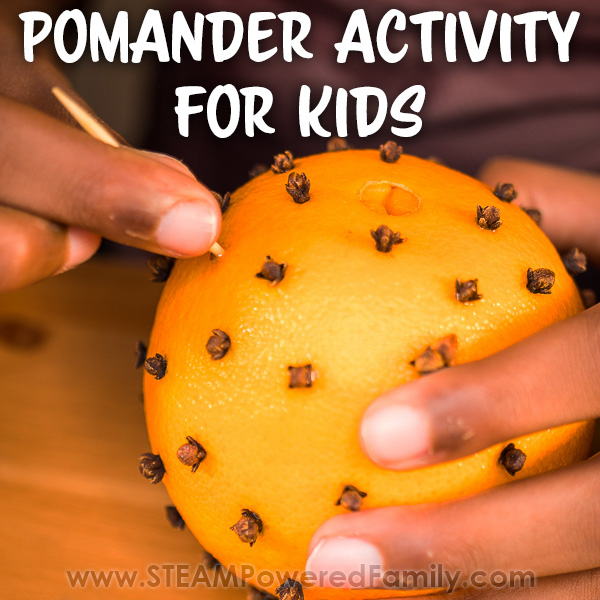
Directions with an Orange
For this activity we are making a version of the pomander that is the more modern approach. These simple pomanders, also known as Pomander Balls, involve using the whole fruit uncut.
First, have your kids plan their design. It may help to draw the design with a marker on the orange so they have something to follow. Older kids and teens may prefer to wing it.
You can do regular patterns like lines, swirls or dots. Or you can make faces, which is great fun for Halloween. Or you can spell words. It is totally up to your kids.
Once you have your design ready, use the toothpick to poke holes through the skin of the orange. Insert a clove into the hole.
Repeat, following the design until you have created a design using the cloves on your orange.
Depending on the thickness of the skin on your orange and the fine motor strength of your child, you can skip using the toothpick, but the heads of the cloves will likely get crushed more. With our Halloween designs there is a lot more crushing as my teens preferred to muscle their cloves through the skin. No matter how it is done, it will smell amazing!

Once you are done making the pomander, you can display it or cure it so it lasts longer.
Directions with a Mini Pumpkin
Making Pumpkin Pomanders is a little different because the pumpkin skin is thicker.
Start by using a marker or a thumbtack to map out the design. Leave about 1cm between each hole.
Then you have 3 options for making the holes. You can:
1 – Use a nail to make the holes. The nail should be about the same size as the clove stock. This is a bit of work, but if you insert and twist, it is a great way to build fine motor skills and is easy for a larger class.
2 – Use a hammer! This helps build coordination as kids use a hammer to insert the nail into the pumpkin skin to make the holes.
3 – Use a drill with a bit about the same size as the clove stock. Set the drill on low and slowly drill into the pumpkin to make the holes. This is honestly so much fun!
Once you have the holes, insert the cloves and smell that incredible pomander smell!
Curing a Pomander
If you want your Pomanders to last more than a few days without molding you will need to cure or dry the creations. The easiest way to do this is to poke a hole through the middle of the Pomander. This can be done with a long screwdriver or knitting needle. Anything long and pokey will do. Then thread twine or string through the hole. Hang it in a cool, dark place for up to two weeks.
Alternatively, you can place it in a bag with a few tablespoons of orris root powder. Leave it in the bag for 1 to 2 weeks giving it a shake every day to coat the pomander with the orris root. To make the smell even stronger, use a curing mix. One of our favourite recipes is 1 teaspoon ground cinnamon, 1 teaspoon ground cloves, 1 tablespoon ground nutmeg, 1 tablespoon allspice, 1/4 cup powdered orris root. This mixture of spices makes for an incredibly fragrant ornament.
Using either method, at the end of 2 weeks your pomander should be cured and dried, ensuring it lasts to be enjoyed throughout the season.
You can use your pomander as a beautiful fragrant centerpiece, or hang it using a ribbon on your Christmas Tree, or set it out as part of your decorations and to add wonderful holiday fragrance to your classroom or home.
More Pomander Ideas
These are so much fun to make, and with a little creativity you can make them all year round. Traditionally oranges are used and give you those delicious scents of winter. For Halloween we used mini pumpkins. In the summer you can use lemons. You can also use grapefruits or any other citrus fruit you have readily available.
Another thing you can do if you don’t want to use the entire orange is to slice the fruits to create discs that you insert the whole cloves into to create beautiful designs, then cure and hang with ribbon. The discs will be translucent and will not only smell amazing, but also look stunning hanging in a window.
Want more holiday sensory ideas? Try making a Snow Globe!
Enjoy this wonderful heritage activity with your kids.