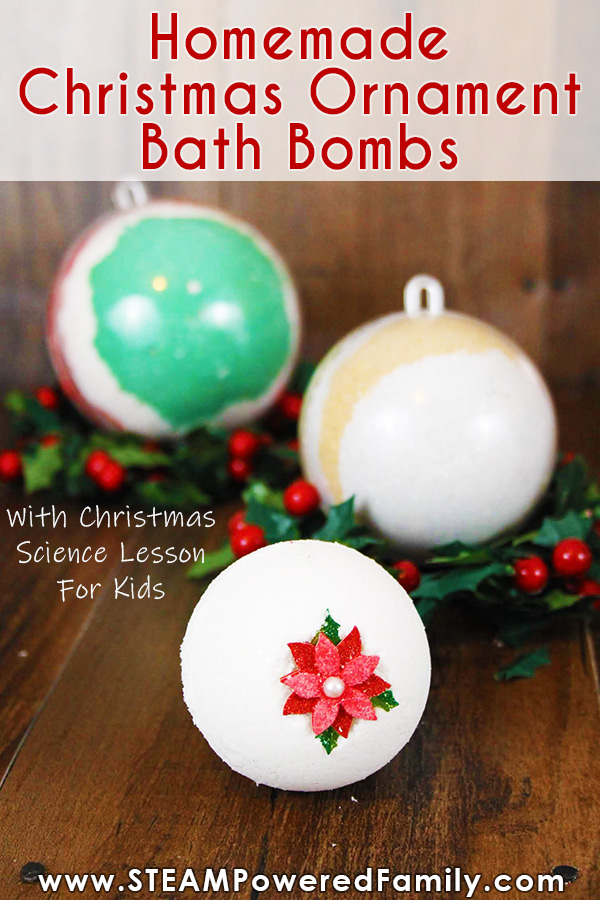
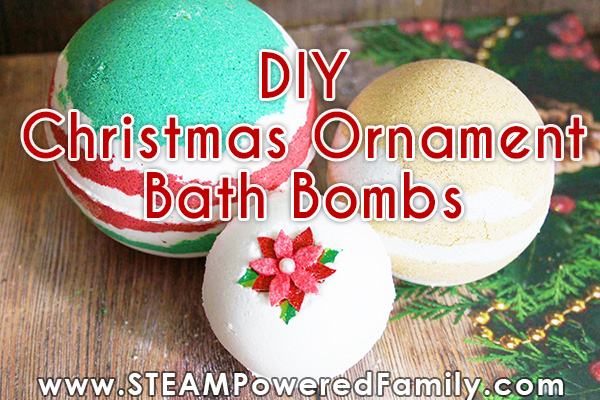
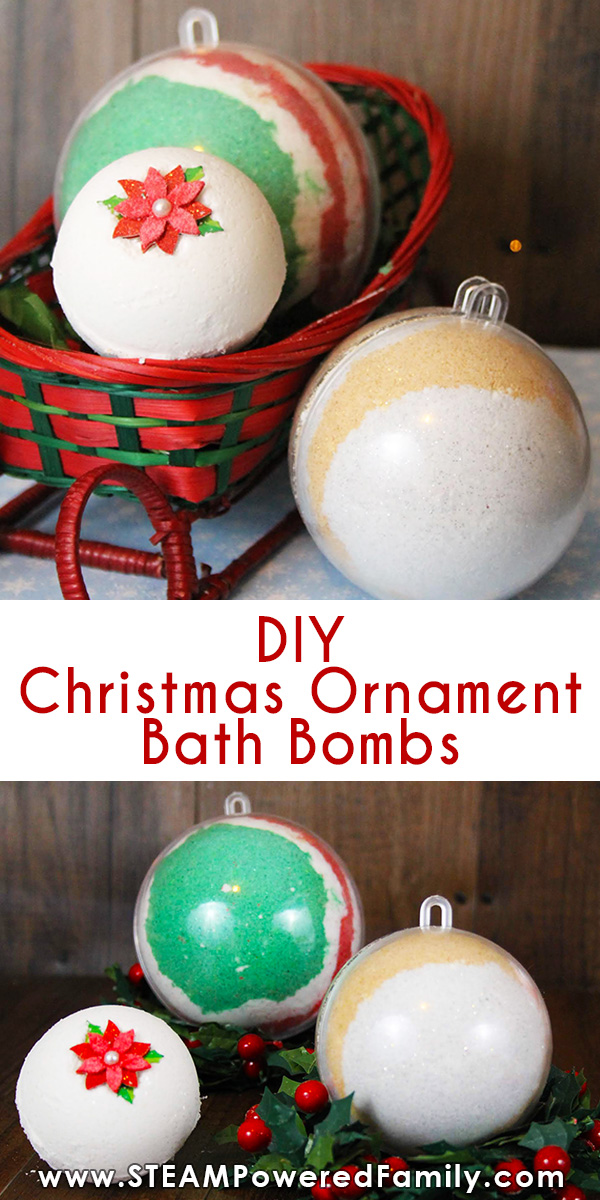
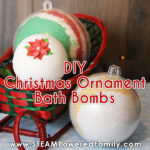
DIY Christmas Ornament Bath Bombs
Christmas is coming and every year we have a tradition of making ornaments for the tree. We’ve used recycled computer parts and milk plastic to make some of our ornaments in the past, but this year I needed something new for my tweens. The answer was simple, Ornament Bath Bombs! It’s no secret how much we have enjoyed embracing bath bombs as a STEAM project and these version is perfect for the holidays, especially gifting to those we love.
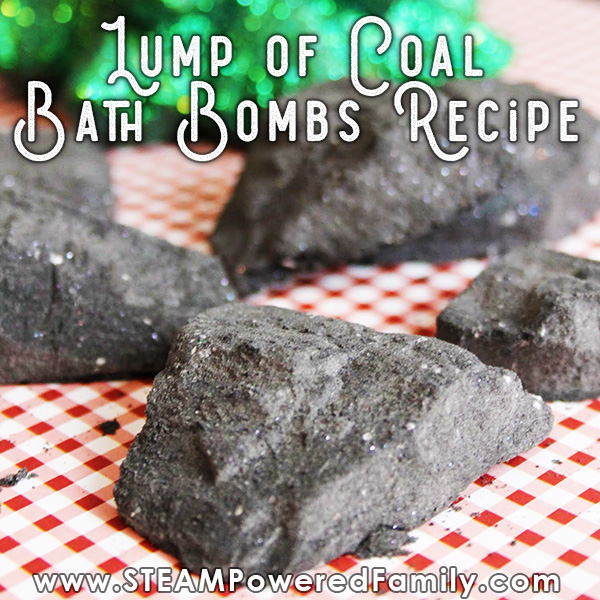
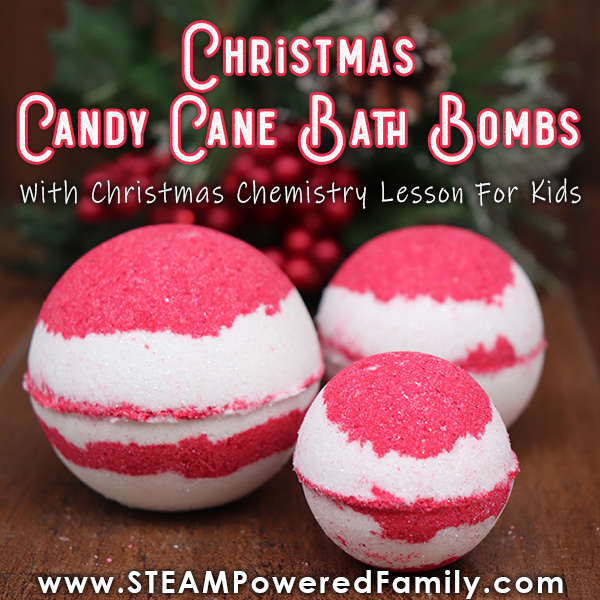
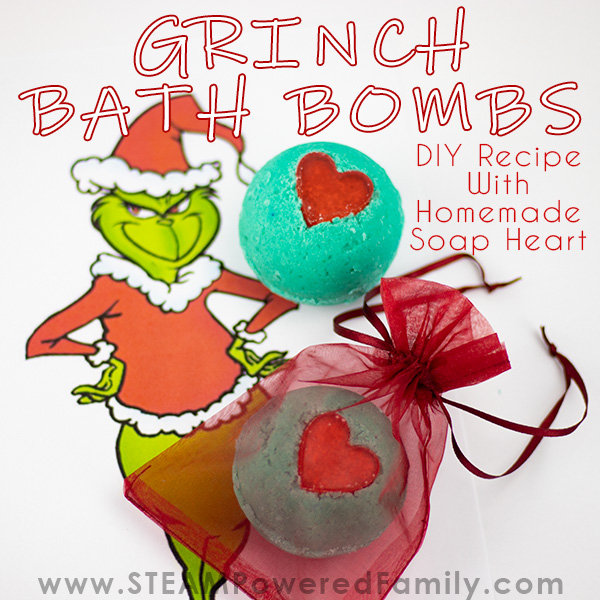
This is one of our top picks for Christmas Bath Bombs For kids, check out the whole list here.
KID MADE CHRISTMAS ORNAMENT BATH BOMBS

Disclaimer: This article contains affiliate links for which we may earn a small commission on qualifying purchases.
It’s no secret we love making bath bombs around here. So when I saw these ornament bath bomb casings I knew we had to make some for the holidays. The kids are so excited to gift bath bombs this season to their family members, and this seemed like the perfect way to do it!
One of the main reasons I love this project is that using traditional bath bomb molds is tricky, especially for kids. Since the bath bombs stay in these molds, it makes it easier for little kids. Depending on the skill level of your kids, you may want to tell your recipients to open their bath bomb ornament casings over the bath water. That way if the bath bomb is not packed quite right, and the bath bomb crumbles, they still get all the goodness in their bath.
Another idea for kids that struggle with bath bomb making is to try our super easy Christmas bath bombs made in silicone molds. Kids LOVE decorating and personalizing these bath bombs.
What Is A Bath Bomb?
For those new to bath bombs or bath fizzies, they are items you add to your bath that fizzy and bubble creating a fun bath experience. We also use a special ingredient that results in a fragrant and luxurious foam bubble bath afterwards. The best part about bath bombs is that you can make them yourself and they make a fantastic science/chemistry lesson. Once you understand the science behind the ingredients, making bath bombs is inexpensive, fun and inspires a ton of creativity!
What is the Science Behind Bath Bombs?
So what is the chemical reaction behind a bath bomb? Well it’s an acid-base reaction. It’s really that simple at the core. We have baking soda as our base and citric acid and cream of tartar as our acids. Since they are in dry form they don’t react when mixed. It is only once moisture is added that you will get the wonderful bath fizzy reaction. This is important to understand. If your mix is prematurely reacting it is because you are either adding moisture to your mix or it is very humid in your environment.
In our recipe we also have cornstarch which acts as a buffer to help keep moisture away from our acids and bases to prevent premature reactions.
If you want to really up your chemistry lesson, our bath bomb recipe also includes a surfactant (SLSA) and an emulsifier (Polysorbate 80). So what is the role of these two ingredients? SLSA is a surfactant that helps capture the carbon dioxide gas that is released during the acid-base reaction and turn it into a wonderful, bubbly, foam bubble bath. Polysorbate 80 is a very important ingredient in making bath bombs. Ask anyone and they will tell you oil and water don’t mix. We need Polysorbate 80 because it helps oil and water mix. This helps stop the bath bomb from forming a layer of scum on the top of your water and sides of your bath tub. An no one wants a scummy bath!
Ready to make your special ornament bath bombs? Then let’s do this!
Homemade Ornament Bath Bombs Recipe
3 cups baking soda
1 1/2 cup citric acid
3/4 cup cream of tartar
1 1/2 cup SLSA (Sodium Laurel Sulfoacetate)
3/4 cup cornstarch
3/4 cup coconut oil
3 tablespoons polysorbate 80
1-2 drops of essential oil of your choice
2-3 drops red and green soap colouring (mica powder will also work)
Mica powder
Biodegradable glitter *
Spray bottle of rubbing alcohol
1 large mixing bowl
6 smaller mixing bowls
Plastic bath bomb ornament casings
*A NOTE ON GLITTER – Glitter has become very controversial due to the negative impacts on the environment, but I know many of you still love a little sparkle in your projects! When it comes to glitter, I believe it is always optional. None of my projects require it. But if you decide you do want a little sparkle and shine in your creations, I highly recommend using a biodegradeable glitter. There are lots of fantastic options available.
How To Make Ornament Bath Bombs
Add all of the dry ingredients to a large bowl, baking soda, citric acid, cream of tartar, SLSA, and cornstarch. Mix the ingredients together.
In a smaller mixing bowl add your coconut oil and melt in the microwave for 10 to 20 seconds until it is liquid. Add polysorbate 80 and nutmeg scented oil. Mix.
Now add the oil mixture to the dry mixture. Blend the ingredients together. This is easiest to do with your hands. Use disposable gloves to protect your hands as needed. You will know when the mixture is perfect when it feels like wet sand and you can press the mixture together in your hands and it stays together.
Separate your mixture into 5 bowls. To one bowl, add 1-2 drops of your red coloring and mix (you are adding a liquid, so be cautious and careful so you don’t cause a big reaction). Continue to add 1 drop of the coloring and mixing well until you get the shade of red you want. Add your red glitter and mix everything together.
Repeat with green in another bowl, then silver, and finally gold in the final bowl. Leave one bowl white (you can add some glitter if you wish to your white mix).
Pro Tip! These colours are just what we did, but you can feel free to swap out colours and fragrance/essential oils to suit your needs.
Take one of your plastic ornaments and separate the sides. Fill each side in any pattern you like with your coloured mixtures. Once each side is filled, add a bit of extra mixture to each side and press them together. You will need to use a grinding motion until the sides fit together. Do this over a bowl so you can save the extras for a fun activity at the end!
If the mix gets too dry and stops sticking together, use rubbing alcohol to spritz your mixture. Give a few squirts and mix together until it has that wet sand feel again. Then continue packing your molds.
Once they are all packed, set your ornaments somewhere warm and dry to set. This can take anywhere from 24 to 48 hours. Once dry you can open your ornament casing and use your bath bomb. Of course if you are gifting or hanging your ornaments, they just stay in their casings as long as you need.
Pro Tip! You can add fun decorative features like the little poinsettia feature we added to one of our ornament bath bombs. You can make your own features like we did with our hearts in our Grinch Bath Bombs, or you can use decorative candy pieces from your bakery section. It is best to use something that will dissolve, like sugar pieces, to prevent any foreign objects going down the drain.
The Fun Bath Bomb Making Finale!
Our favourite part of any bath bomb making afternoon is when we take our bowl of leftover bits and add hot water so we can study the reaction!
Using Your Homemade Ornament Bath Bomb
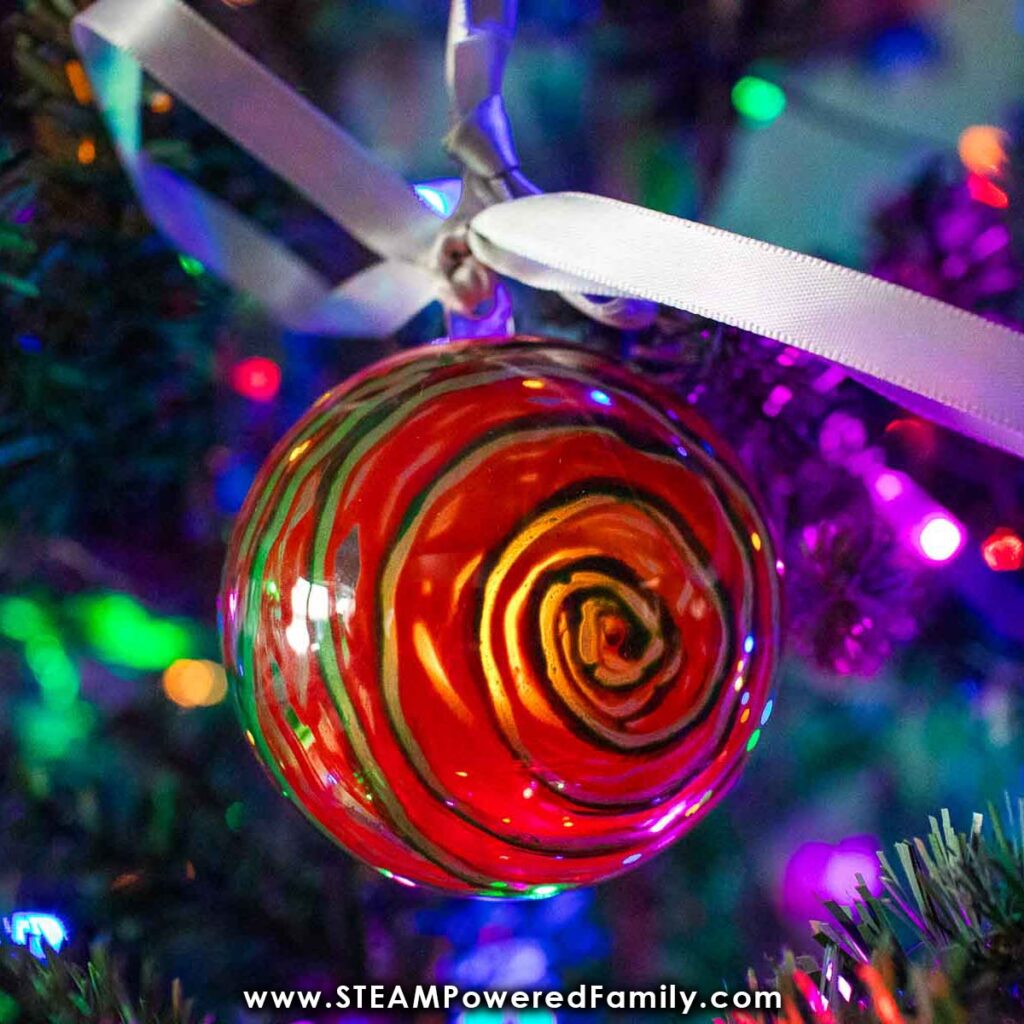
To hang your ornament on the tree simply add a colourful ribbon to the top. They are wonderful, colourful decorations that look amazing on the tree.
These make fantastic gifts! Make sure you tie a ribbon through the top and wrap the bath bomb so it doesn’t get knocked open during transportation. You can wrap them in plastic wrap to help make sure the two sides stay intact. Especially if you have exuberant kids who will be delivering your bath bomb ornaments to their recipients. The ribbon on the top is also a great place to add a little card or note.
The casings are reusable, so make sure you save them to make more bath bombs next year.
To use your ornament bath bomb, carefully open the ornament casing to release the bath bomb. Add the bath bomb to your warm bath water, and enjoy!
Gifting A Love of Bath Bomb Making
Want to add a little extra to your gifting this year? Why not make a few ornament bath bombs, but then put them in a box along with this recipe (printable recipe card is at the bottom of the article), along with all the ingredients so you can give the gift of bath bomb making! Since the casings are reusable, your gift recipient can use them to make future bath bombs. It’s the gift that keeps on giving! This is a fantastic gift idea for the tweens and teens on your list.
Reuse the Ornament Shells
Want another idea for those ornament shells after you have used them for bath bombs? Turn them into stunning crayon melt ornaments this holiday season.
MORE CHRISTMAS BATH BOMBS AND SCIENCE

Christmas Ornament Bath Bomb Recipe
A great kid made Christmas Ornament Bath Bomb that they will love gifting this season.
Supplies
- 3 cups baking soda
- 1.5 cups citric acid
- 3/4 cup cream of tartar
- 1.5 cups SLSA
- 3/4 cup cornstarch
- 3/4 cup coconut oil
- 3 tbsp polysorbate 80
- 2 drops nutmeg fragrance oil
- colouring or mica powders
Instructions
-
Add all of the dry ingredients to a large bowl, baking soda, citric acid, cream of tartar, SLSA, and cornstarch. Mix the ingredients together.
-
In a smaller mixing bowl add your coconut oil and melt in the microwave for 10 to 20 seconds until it is liquid. Add polysorbate 80 and nutmeg scented oil. Mix.
-
Now add the oil mixture to the dry mixture. Blend the ingredients together. This is easiest to do with your hands. Use disposable gloves to protect your hands as needed. You will know when the mixture is perfect when it feels like wet sand and you can press the mixture together in your hands and it stays together.
-
Separate your mixture into 5 bowls. To one bowl, add 1-2 drops of your red coloring and mix (you are adding a liquid, so be cautious and careful so you don’t cause a big reaction). Continue to add 1 drop of the coloring and mixing well until you get the shade of red you want. Add your red glitter and mix everything together.
-
Repeat with green in another bowl, then silver, and finally gold in the final bowl. Leave one bowl white (you can add some glitter if you wish to your white mix).
-
Take one of your plastic ornaments and separate the sides. Fill each side in any pattern you like with your coloured mixtures. Once each side is filled, add a bit of extra mixture to each side and press them together. You will need to use a grinding motion until the sides fit together.
-
Once they are all packed, set your ornaments somewhere warm and dry to set. This can take anywhere from 24 to 48 hours. Once dry you can open your ornament casing and use your bath bomb. Of course if you are gifting or hanging your ornaments, they just stay in their casings as long as you need.